by Joanne James2. November 2014 07:00It's Sunday and time for a new challenge over at The Paper Players, where this week LeAnne has an interesting challenge for us:
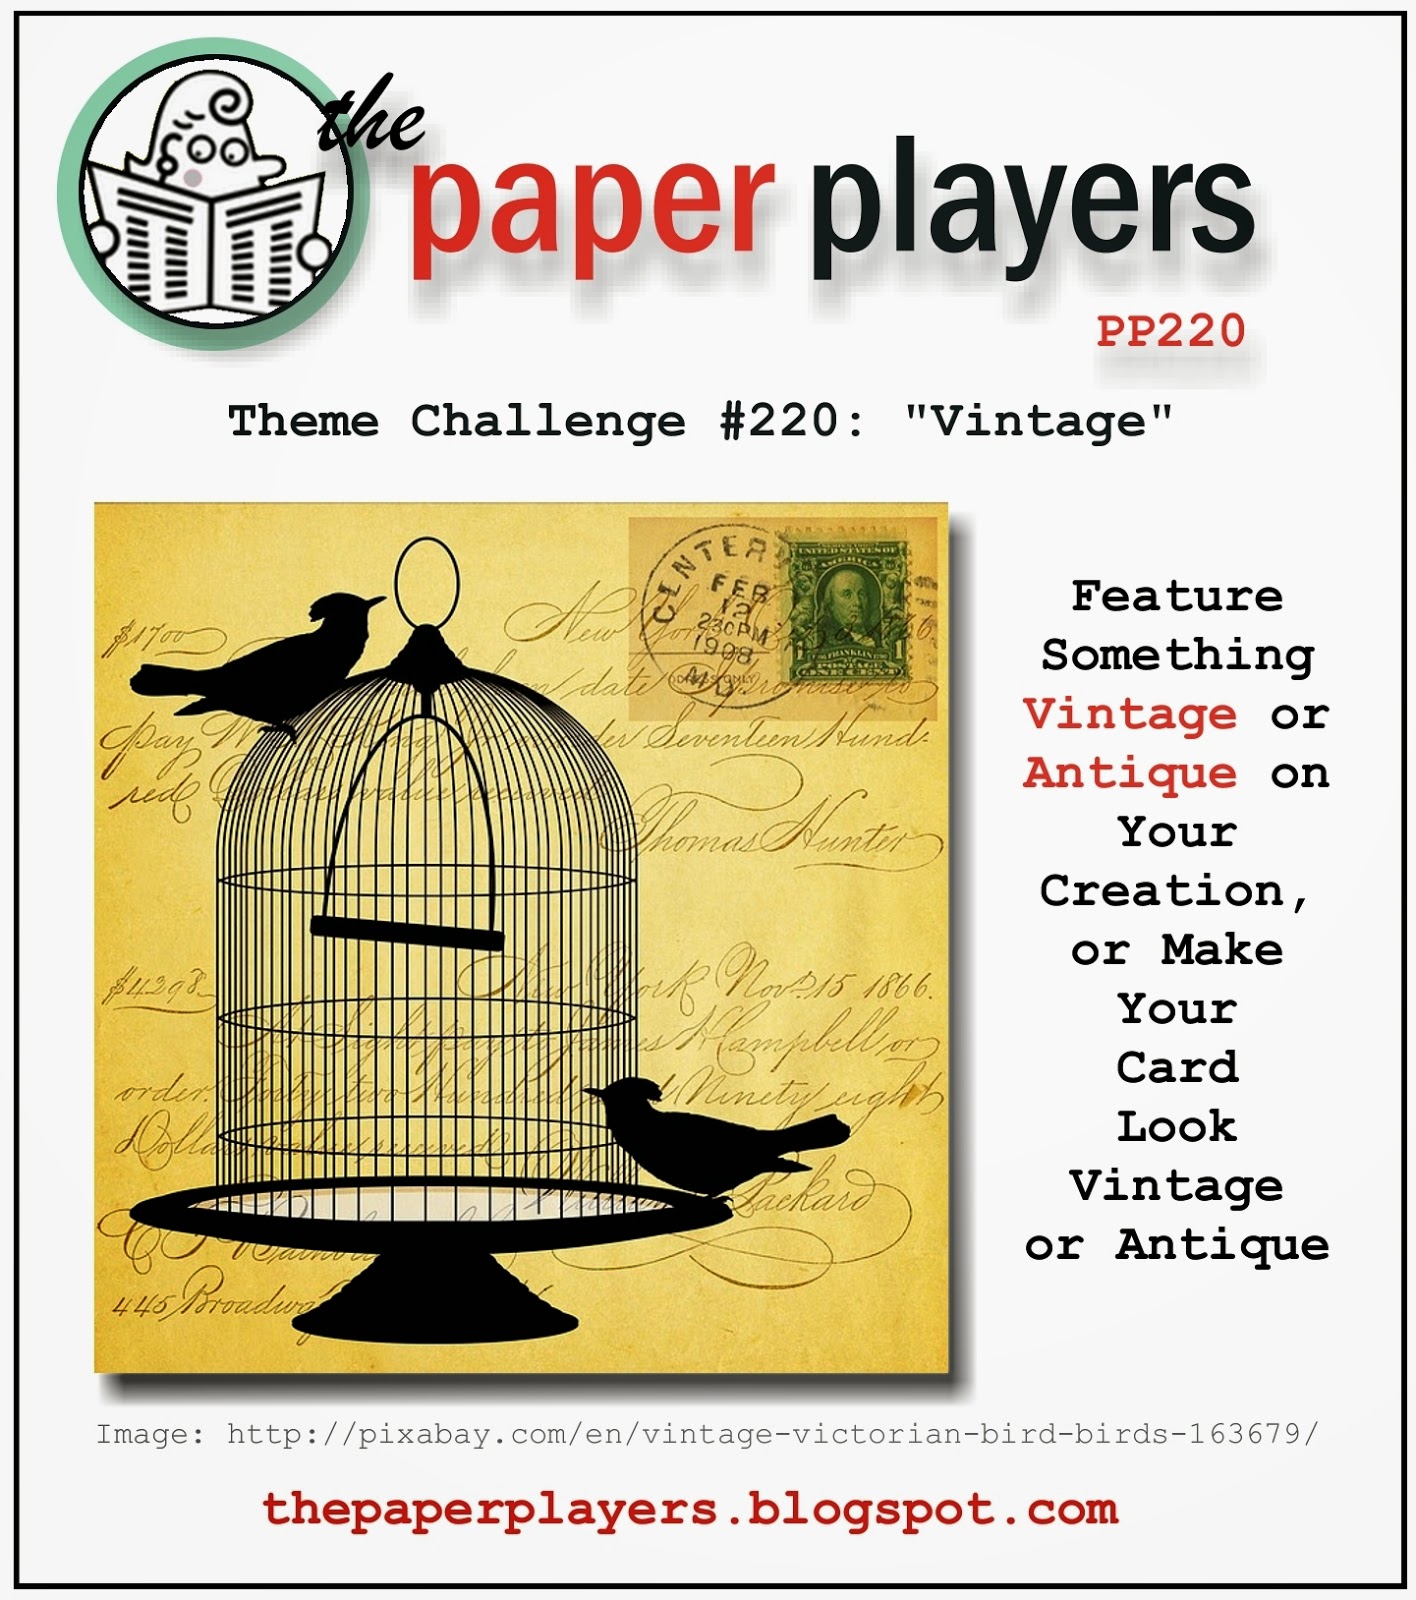
I had a minor panic when I saw this week's challenge, for two reasons: firstly, vintage as a style is not my forte, and secondly, when I looked through my (extensive!) stamp collection, it was obvious I didn't have much in the way of vintage stamps either!! In fact, I only have one set that looks even remotely 'vintage' and that's my Traveler set - at that moment though, I relaxed. I love this set and suddenly remembered an idea I'd had way back when it first came out in July. I wondered what the vintage steam train would look like converted into the Polar Express, the famous train in the Christmas movie starring Tom Hanks - well wonder no more, here's my card:
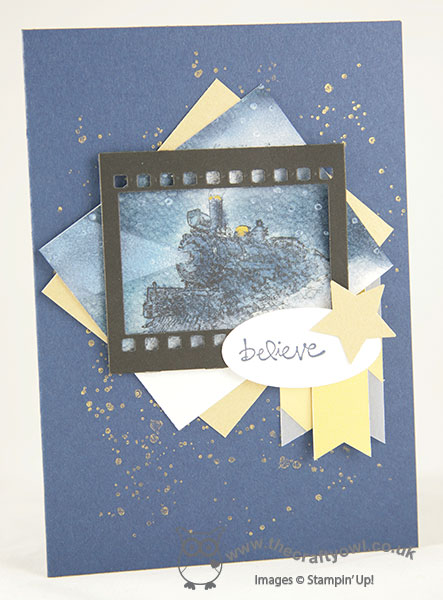
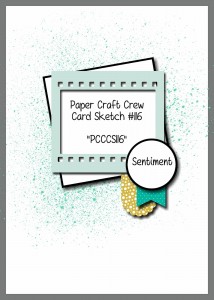
I used Night of Navy for my card base, stamped with some grunge spatters from Gorgeous Grunge in Gold Encore ink, and matted my focal image with an offset piece of Brushed Gold cardstock. I stamped my image in black Stazon on watercolour paper, then sponged in my sky using Night of Navy and a little Pacific Point. I added more colour to the train using my Aquapainter and a touch of gold, then I used Whisper White kraft ink for the snow on the ground, the smoke from the train's funnel and I masked off an area and sponged white for the beam of light coming from the front of the train. I also stamped some falling snow using the snow stamp in the 'White Christmas' set. I wanted to frame my image with the 'On Film' framelit as per the sketch from The Paper Craft Crew because I wanted the connection to the movie, but in truth it does crop the image a little small and you lose some of the detail. I will probably make another version of this without such a tight crop, but as I was racing towards my deadline I didn't have time to make another for today so had to go with this one. I do love the overall effect though. The flags are made from striped gold vellum and gold foil, and the sentiment from 'Good Greetings', in keeping with one of the famous straplines from the movie, 'The bell still rings for all who truly believe', which I punched out with a small oval punch and finished with a small brushed gold star.
I hope you like my vintage festive train today; do check out the other design team cards over at The Paper Players - there is, as always, some fantastic inspiration to be found there.
Back tomorrow with another project; until then, happy stampin'!
Stampin' Up! Supplies Used:
b76a2ac7-4489-4a34-a688-887463a380af|0|.0|96d5b379-7e1d-4dac-a6ba-1e50db561b04
Tags: Big Shot, Christmas, On Film Framelits, Good Greetings, Shop online, Stampin' Up Supplies, Stampin' Up Card ideas, Stampin' Up Card, Stampin' Up, Star Framelits, Watercolouring, Traveler, Gorgeous Grunge, The Paper Players
Cards | Stamping
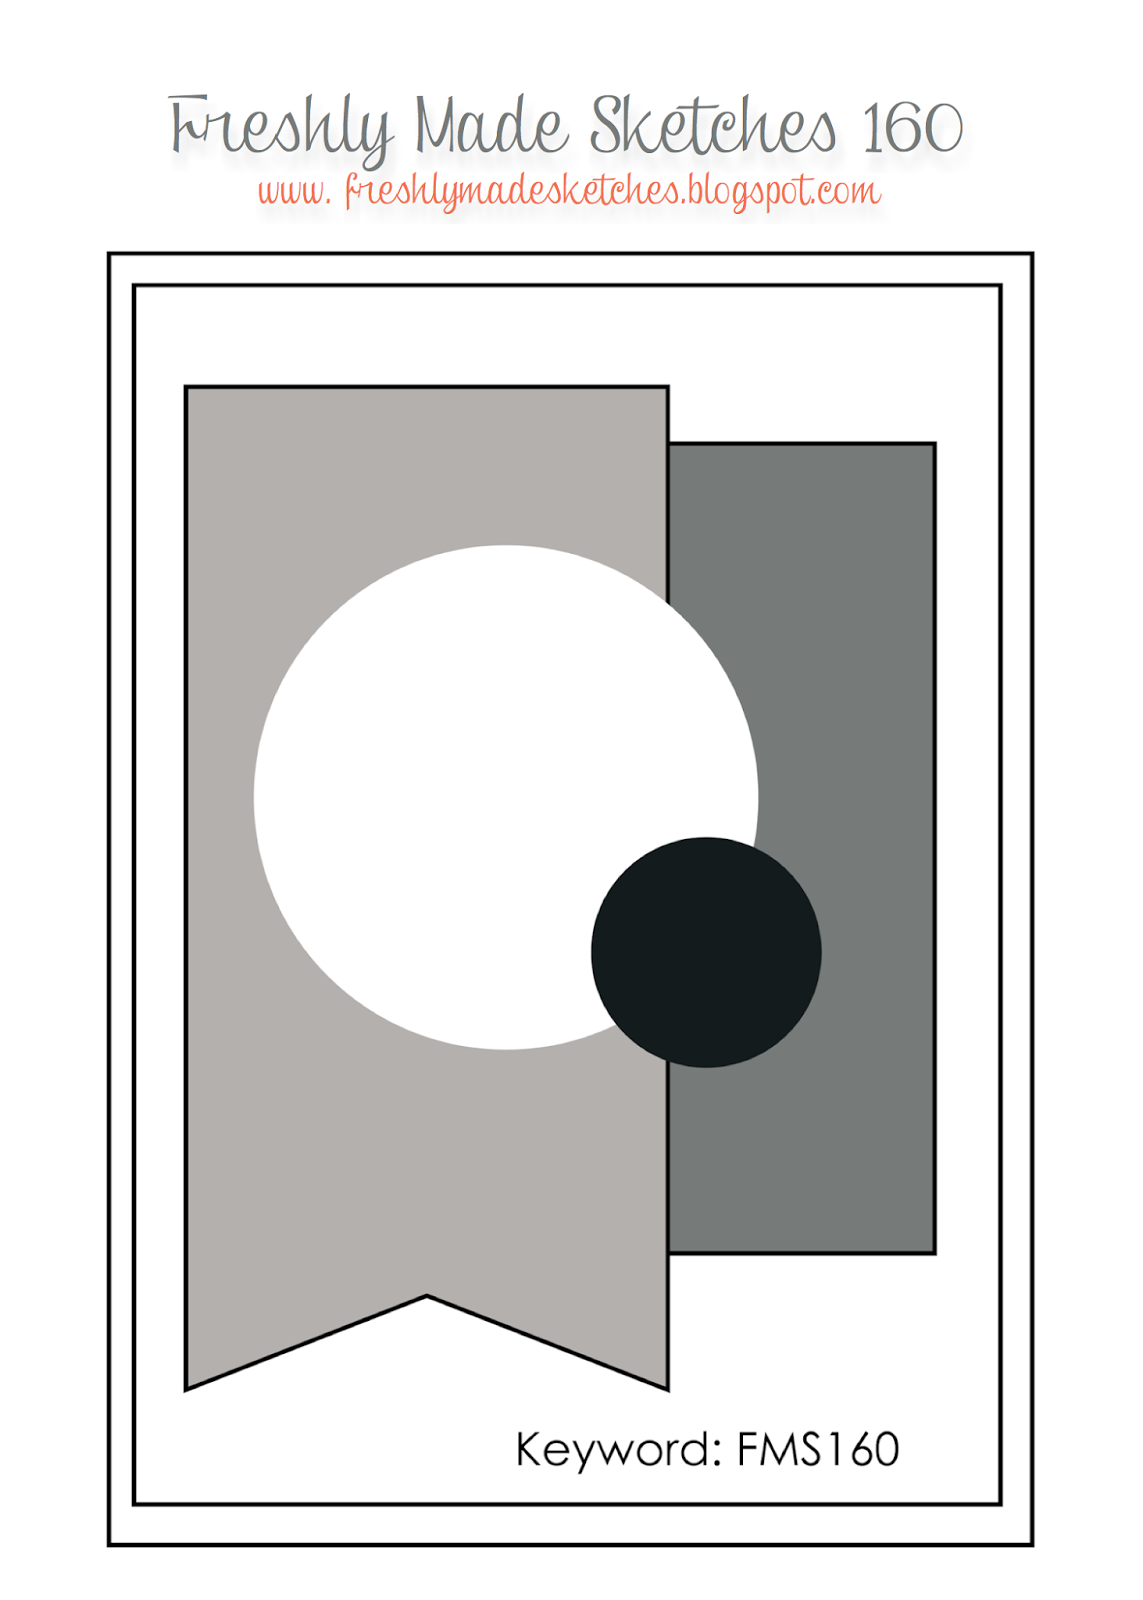
by Joanne James1. November 2014 22:26A quick post from me with today's card which is for this week's Merry Monday and Freshly Made Sketches challenges:
Snowflakes, naturals and dry embossing - and here is my card:
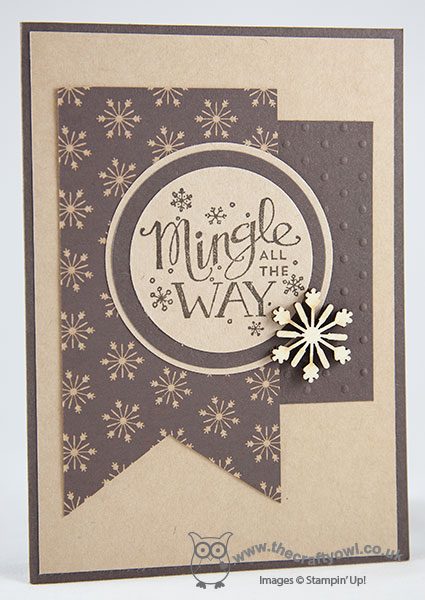
When I saw the challenge over at Merry Monday, I knew immediately that I was going to use the lovely Early Espresso/kraft paper in the DSP Under The Tree Speciality DSP pack; I teamed it with the Mingle All the Way stamp, stamped in Early Espresso on kraft, which also has little snowflakes on it and punched this out using a 2" circle punch and layered it using a couple of additional circles. I used the Perfect Polka Dots embossing folder for my embossed panel and had to finish with one of the little wooden snowflake embellishments from the Merry Many Stars kit - I love these and with I could buy them just one their own, I could find so many uses for them!!
I usually find monochromatic colour schemes so tricky, but this card came together so well and I love the natural look that this card has.
That's me for today; back tomorrow with my Design team card for The Paper Players; until then, happy stampin'!
Stampin' Up! Supplies Used:
7b63bae6-bc4d-48fd-9a05-a58e7877f422|0|.0|96d5b379-7e1d-4dac-a6ba-1e50db561b04
Tags: Christmas, Many Merry Stars, Under The Tree, Perfect Polka Dots Embossing Folder, Big Shot, circle punch, Circles Framelits, Magnetic Platform, Shop online, Stampin' Up Supplies, Stampin' Up Card ideas, Stampin' Up Card, Stampin' Up
Cards | Stamping
by Joanne James29. October 2014 10:00It's Wednesday and time for this week's challenge over at Colour Me...! where we have not one but two colour palettes for you to choose from this week:
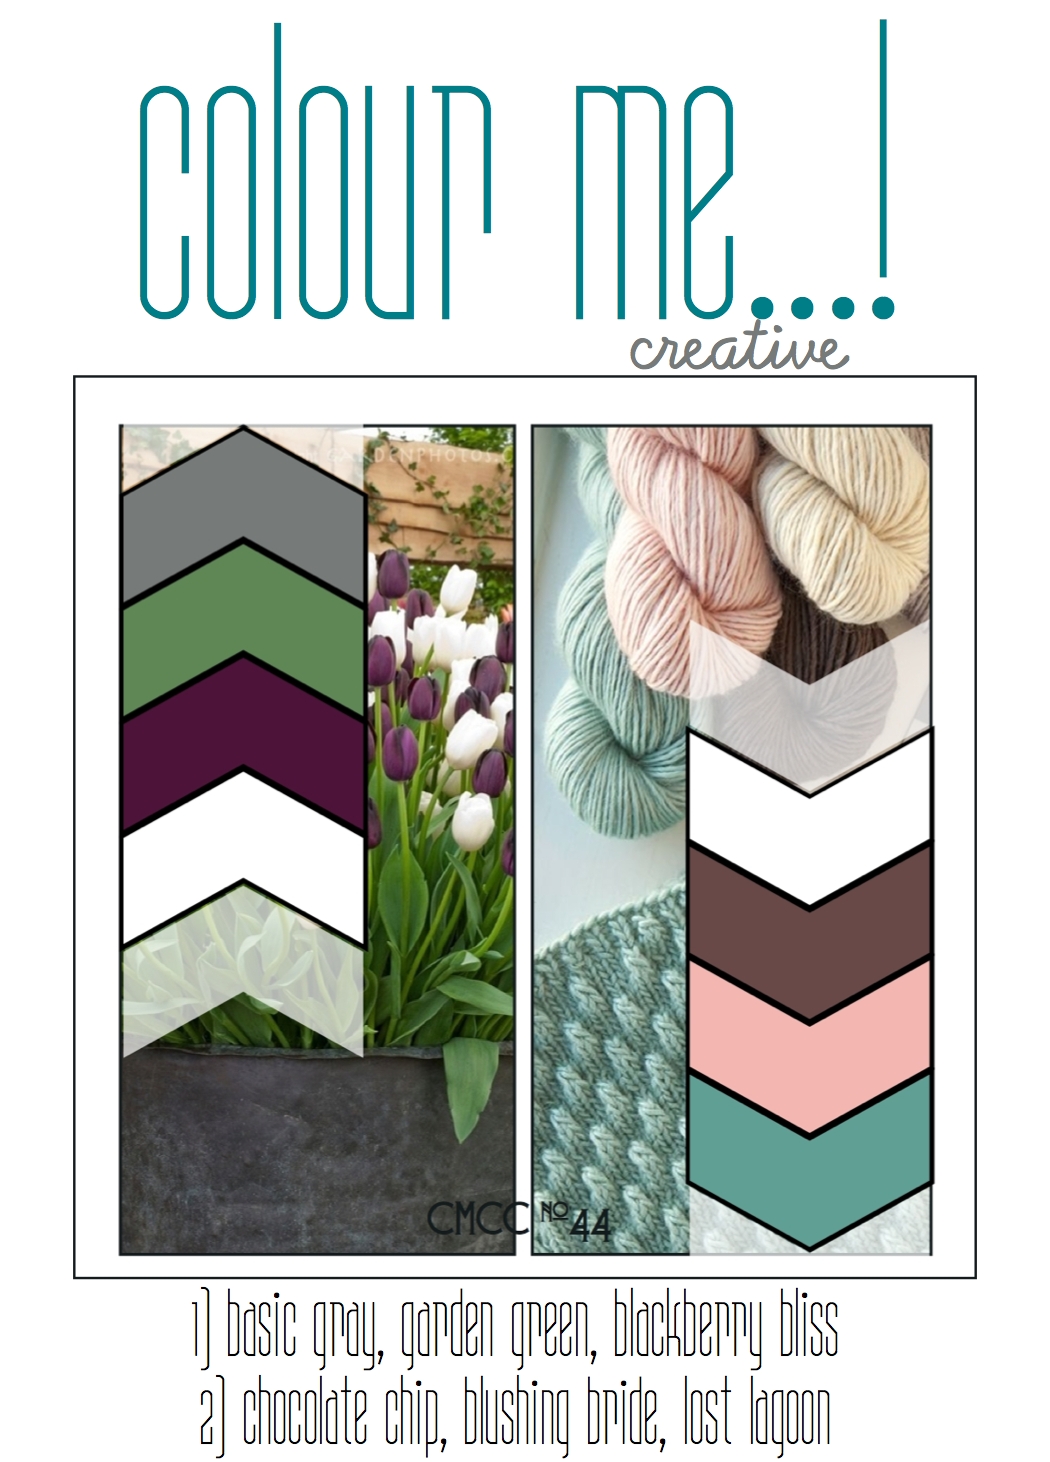
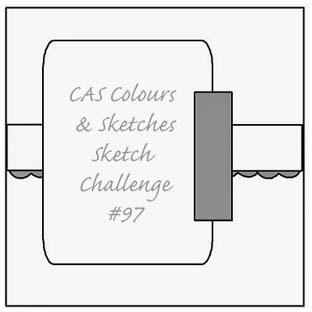
I'm playing along with option 2 this week, so I have the colour combination of Chocolate Chip, Lost Lagoon, Blushing Bride and a neutral (I chose Very Vanilla) to work with. Using the above sketch from CAS Colours & Sketches as the inspiration for my layout (I turned it through 90 degrees), I decided to make (another!) baby card using one of my favourite baby sets, Baby We've Grown. Here is my card:
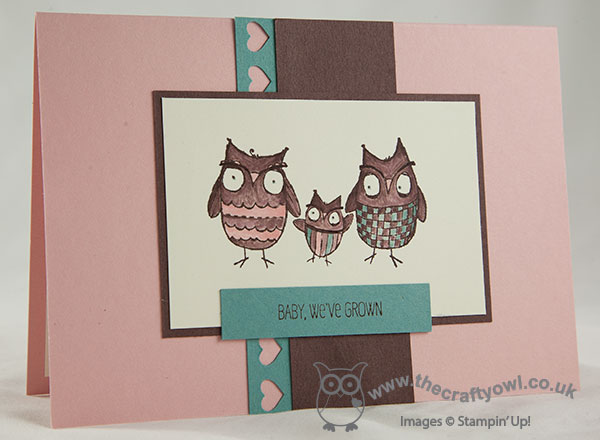
I stamped my focal image in Chocolate Chip and coloured in using ink and my blender pens, to give a slightly vintage look to my owls. I matted this panel onto a piece of Chocolate Chip Cardstock, which overlays a vertical strip that has been edged with a piece of Lost Lagoon punched with the hearts border punch. I added my sentiment, again stamped in Chocolate Chip on Lost Lagoon cardstock, to finish. Although the base is Blushing Bride, I think this could be a good unisex baby card; you could always alternate the pink and blue elements if you wanted something more masculine in appearance.
So what do you think? Feel free to leave a comment on today's card, before hopping over to check out the amazing cards by the rest of the Colour Me...! team:
We look forward to seeing your creative creations - which colour scheme will you choose?
I'm having a fun day with friends today, with all kinds of crafting the order of the day. Back tomorrow with another project; until then, happy stampin'!
Stampin' Up! Supplies Used:
by Joanne James27. October 2014 20:19Happy Monday everyone! I've had a fun day today: made today's blog card first thing, caught up with a friend who's been away for a while, then spent the afternoon with the lovely ladies that attend my monthly card class - there can't be a better way to start my week! I tell you, those ladies are an absolute hoot and there are some real artists amongst them for sure (yes Chris, the reindeer was inspired!!) Pictures to follow on my Facebook page!
We used the Endless Wishes stamp set in my class today, but today's blog card is back on the theme of Halloween - I need to get the use out of my Halloween sets before they get retired for another year! I took my inspiration from the photo over at Fusion, but didn't double up and use their sketch too (I might have another go at this later in the week) - instead I used the rather interesting layout over at Pals Paper Arts:

I knew I wanted to use orange with a touch of black and definitely needed to incorporate the pumpkin in the photo - this is what I came up with:
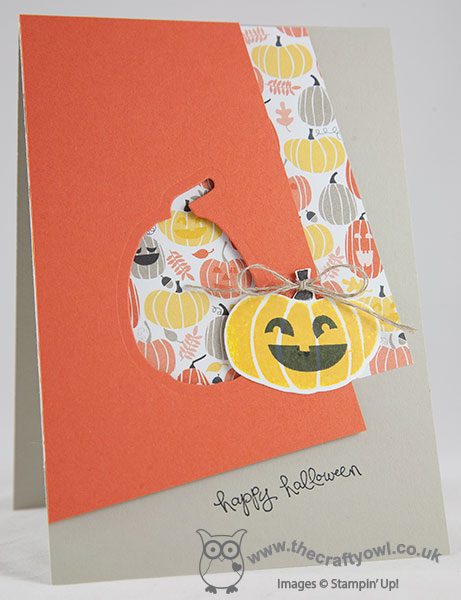
I used Sahara Sand for my card base, and used a piece of the Motely Monsters DSP that is covered with happy smiling pumpkins as my first angular layer. For my top piece, I used a piece of Tangerine Tango cardstock and cut out a pumpkin shape using my Fall Fest framelits, so that the DSP beneath would show through. I then stamped another smaller pumpkin is Crushed Curry onto Whisper White, stamped a face in Memento Black, cut this out with a framelit, tied it with a piece of linen thread and adhered to the edge of the open aperture. I popped this whole section onto dimensionals to give a little extra lift and depth. To finish, I stamped my sentiment from 'Good Greetings' in Memento Black onto the base of my card.
I hope you like today's card; back tomorrow with another project. Until then, happy stampin'!
Stampin' Up! Supplies Used:
c0351d83-e8e2-49f3-9dce-33cb991fade2|0|.0|96d5b379-7e1d-4dac-a6ba-1e50db561b04
Tags: Halloween, Fall Fest, Fun Fall Framelits, Magnetic Platform, Motley Monsters, Shop online, Stampin' Up, Stampin' Up Card, Stampin' Up Card ideas, Stampin' Up Supplies, Big Shot, Good Greetings
Cards | Stamping
by Joanne James26. October 2014 07:00Sunday means it's time for a new challenge over at The Paper Players where this week Nance has a great sketch for us to play along with:

I love a good sketch challenge so decided to use this one to make a Christmas card using The Newborn King, a set I haven't inked up in a while. Here's my card:
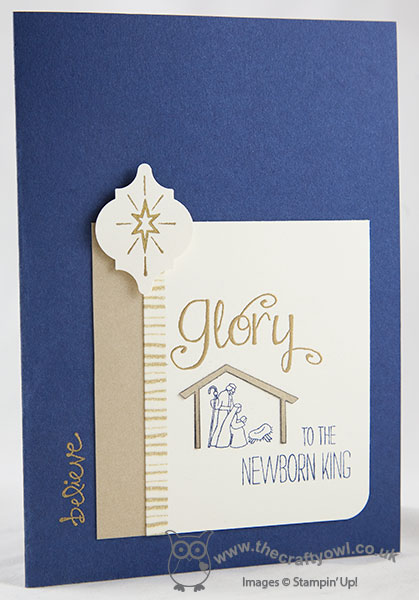
I stamped just the stable image on a piece of Very Vanilla cardstock in Night of Navy, and stamped it again on Brushed Gold cardstock and fussy cut out the stable itself and adhered this to my stamped image. I stamped my sentiment in two halves: the first half, the 'glory' in Versamark and heat embossed in gold, and the second part in Night of Navy, masking off the respective elements in turn. I toyed with whether or not I should stamp a sentiment on this section at all, given the sketch, then having decided that the sentiment here was as much a part of my image as the nativity, I then wondered whether I should dispense with the vertical sentiment element as per the sketch. In fact, I decided to use the word 'believe' from the Good Greetings set here, as it seemed to fit with my main focal panel. I edged my vanilla cardstock with a piece of gold washi tape and matted this section onto a piece of Brushed Gold, which overhangs the many section to show a border. Lastly, I stamped the star from the Newborn King stamp set in Versamark and heat embosses in gold, the filled in the outline with my gold marker for added definition and punched it out using my mosaic punch and attached it with a dimensional. I used Night of Navy for my cardbase, which I think is the perfect pairing for the gold and vanilla elements. I liked this card so much, I managed to make two (always good for my growing pile of cards!) - at this rate, I might just be ready for Christmas in time!!
Do check out the amazing cards produced by the rest of the design team for this week's challenge; as always, the standard is incredibly high and there's lots of inspiration to choose from.
Right - I'm off to hockey and then lunch with the extended James family, which will be nice for a change. Back tomorrow with another project; until then, happy stampin'!
Stampin' Up! Supplies Used:
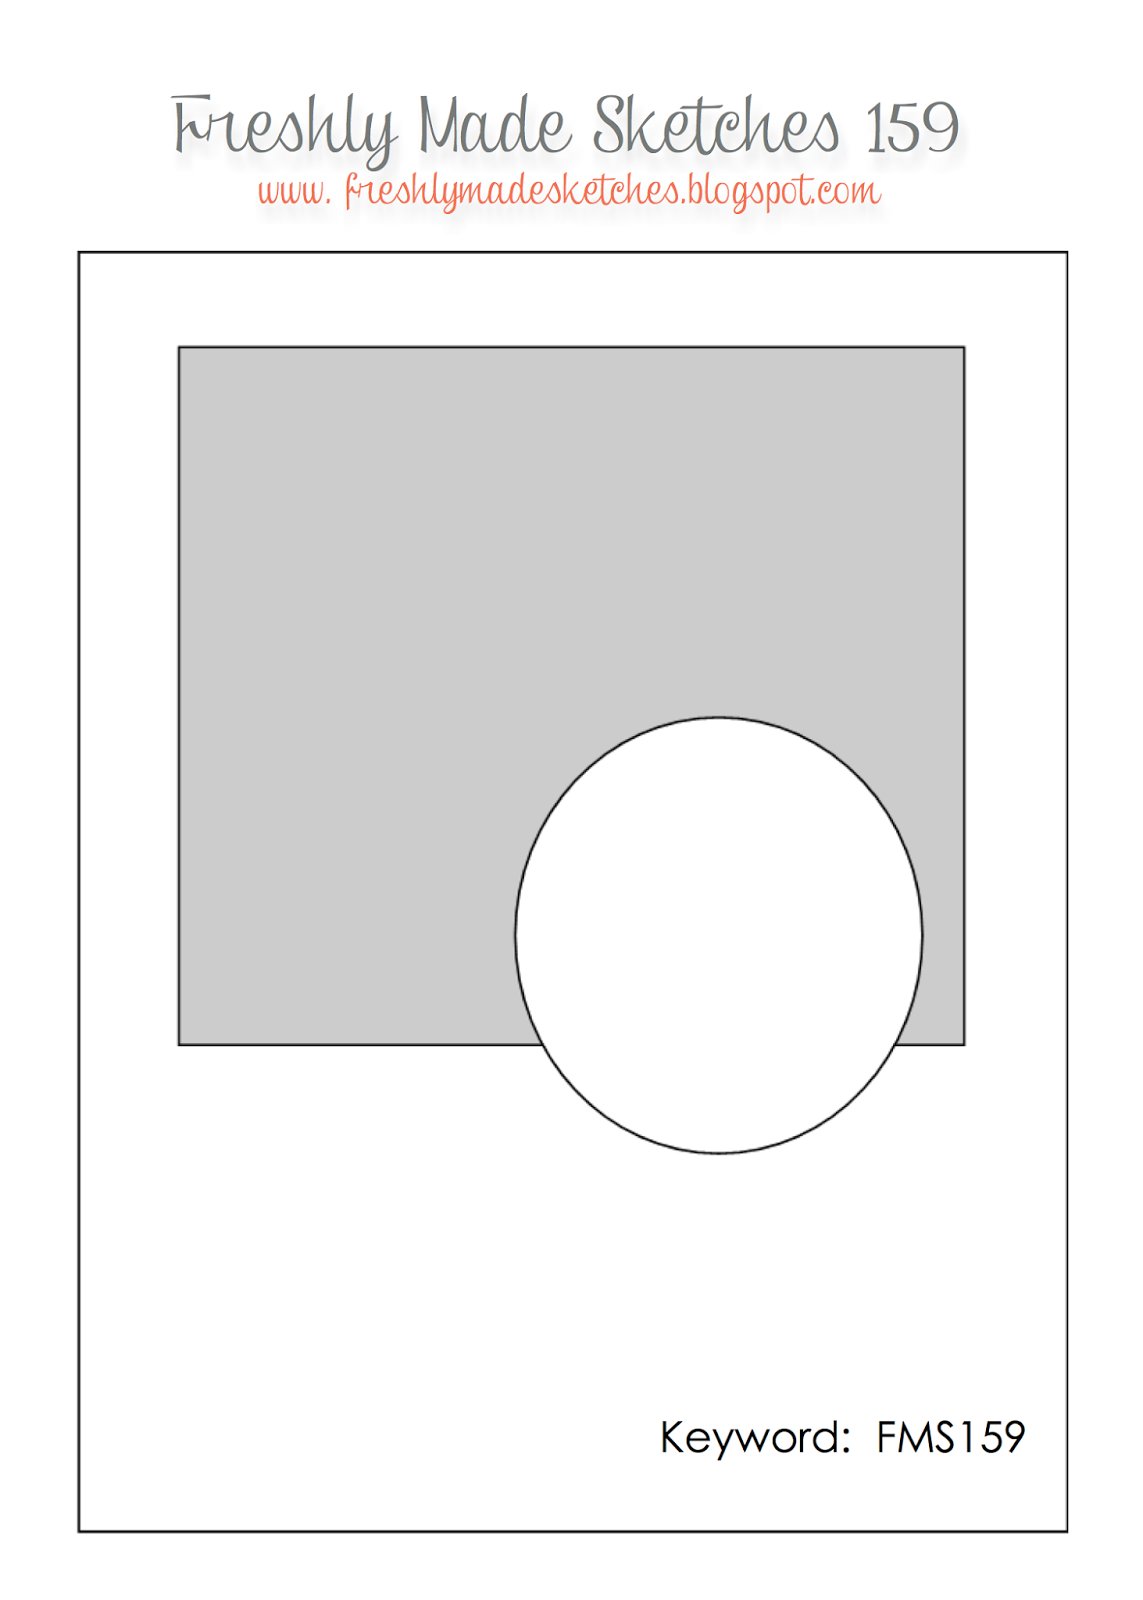
by Joanne James25. October 2014 12:15Happy Saturday everyone! I am back into the challenge swing of things and today I have a card for this week's Merry Monday challenge where the aim is to create a card using non-traditional colours and I also took a little inspiration from the sketch over at Freshly Made Sketches:
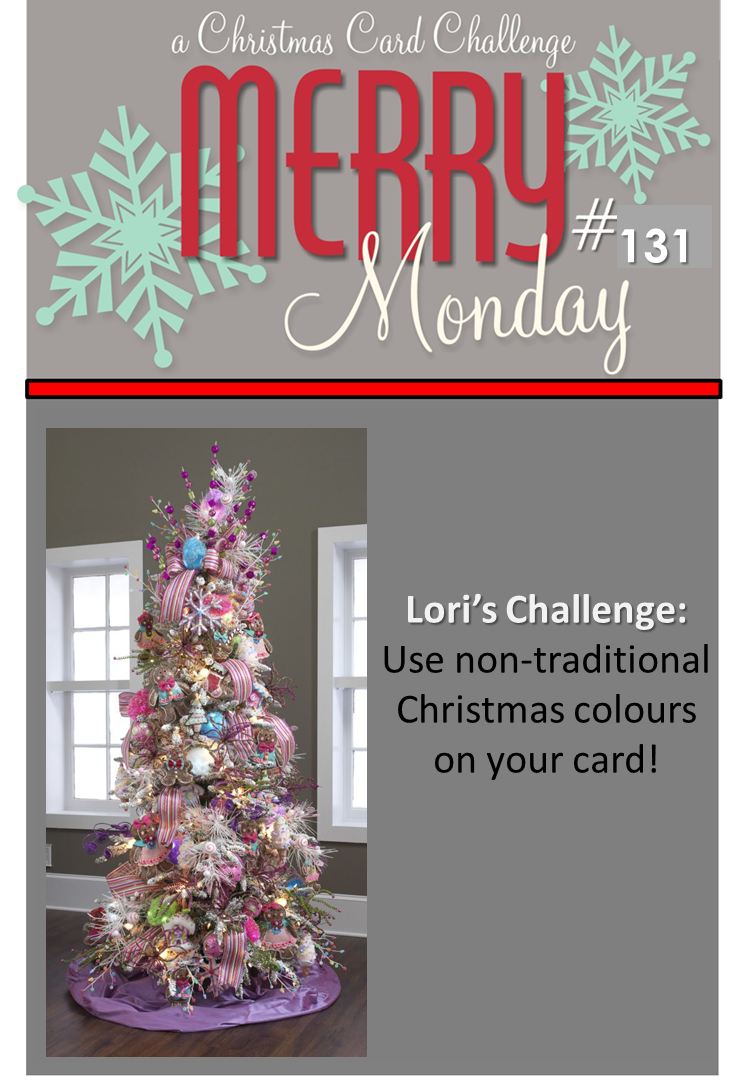
I decided to make a card using the Nutcracker stamp as it really lends itself to cards using non-traditional colours and I've been wanting to make a purple card with him for some time; here's my card:
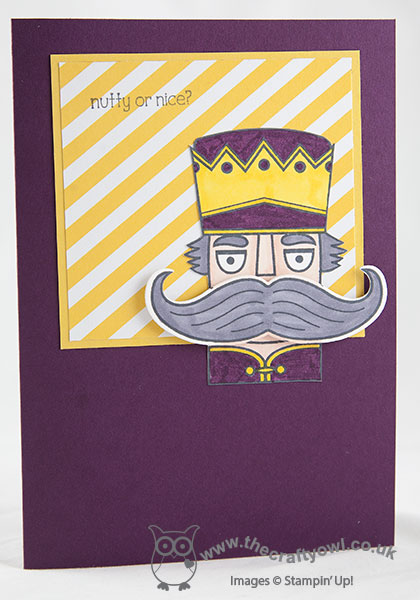
I used Blackberry Bliss for my base and Hello Honey for the mat and the striped DSP which is from the Midnight DSP stack. I coloured my nutcracker using a combination of Stampin' Write markers and the skin tone, Smoky Slate and Daffodil Delight Blendabilities (I sued the middle and darkest one only as these are closer to Hello Honey) and added a popped-up moustache cut out using my Big Shot and the moustache framelit. To finish, I stamped my sentiment directly onto the DSP layer. I love the Nutcracker in these colours - I think he looks very regal!
That's me done for today; I have some class prep later for next week's class and then we are meeting up with some friends later for dinner, which should be fun.
Back tomorrow with my Design Team card over at The Paper Players, where Nance has a fabulous sketch for us and there is lots more festive fun to be had!
Until then, happy stampin'!
Stampin' Up! Supplies Used:
by Joanne James24. October 2014 20:53Another busy day today but I managed to shop, clean the house and catch up on some work, so a nicely productive one. Today's card is my entry for this week's challenge over at 'Less Is More' where the theme this week is 'Little Creatures' - I'm squeezing this one in right under the wire this evening, but as this is one of my favourite challenge blogs and I haven't done any challenges this week, it was worth the effort.
I decided to make a Christmas card, although my 'little creatures' didn't come from a festive set - take a look:

I thought the little bird in the 'Hello Love' hostess set would make a cute robin, so I decided to stamp a pair under the little sprig of mistletoe that features in the Project Life Holiday Cheer stamp set and then coloured them with my Cherry Cobbler and skin tone Blendabilities, highlighting with my Colour Lifter, and adding a little red bow to the hair of one to make her into the 'Mrs'. I stamped the mistletoe in Garden Green and wiped away the bow and re-drew it in Real Red, and added a few tiny pearls to look like the mistletoe berries. For my sentiment, I chose 'I love us' from the 'Good Greetings' hostess set; this set is still available until the end of the month if you host a party and have qualifying sales of £200 or more. This sentiment just seemed to suit my robins perfectly!
A simple one layer card (even though one layer isn't part of the challenge criteria this week!) which shows a useful way to adapt the 'Hello Love' set for a Christmas card.
Back tomorrow with another Christmas card; until then, happy stampin'!
Stampin' Up! Supplies Used:
by Joanne James22. October 2014 09:00DON'T FORGET: 2 DAYS LEFT UNTIL THE FREE PACK OF PAPER FOR 6 MONTHS SIGN UP DEAL ENDS - CLICK HERE TO FIND OUT MORE AND JOIN MY STAMPIN' UP! TEAM TODAY!

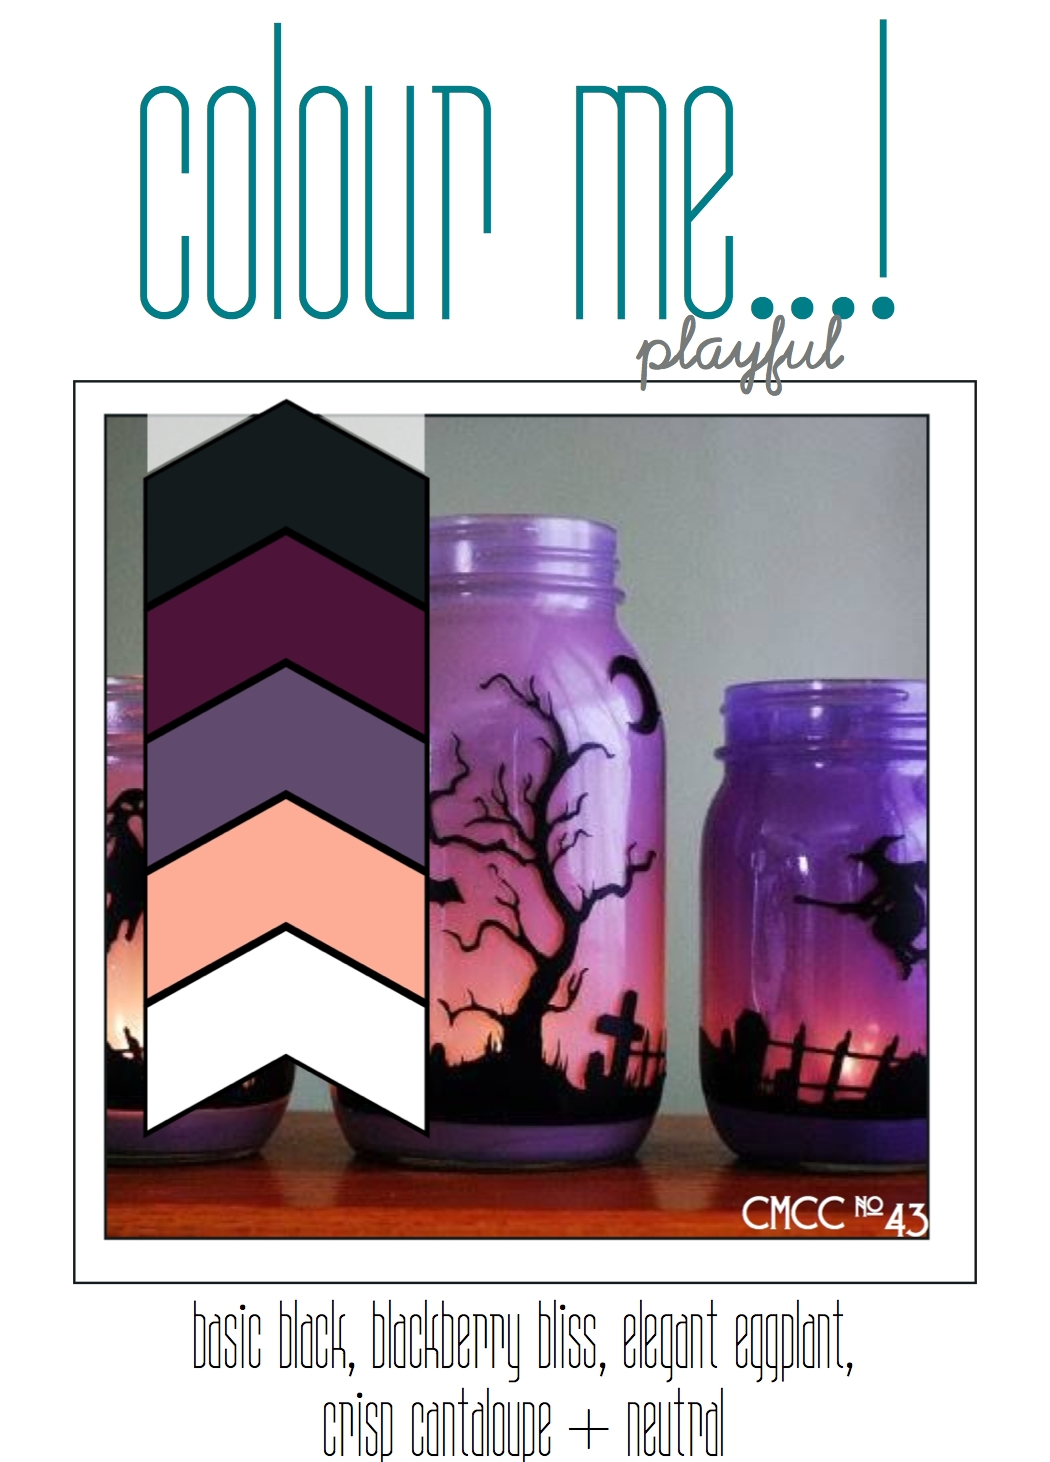
It's Wednesday and time for this week's challenge over at Colour Me...! where we have a playful colour palette for you to work with this week:
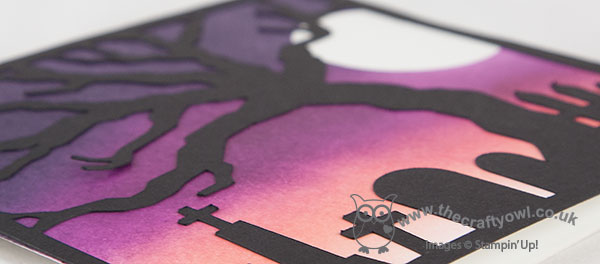
For my card, I took my inspiration straight from this week's challenge badge and those lovely spooky mason jars and decided to create a similar effect with the aid of my Silhouette Cameo - take a look:
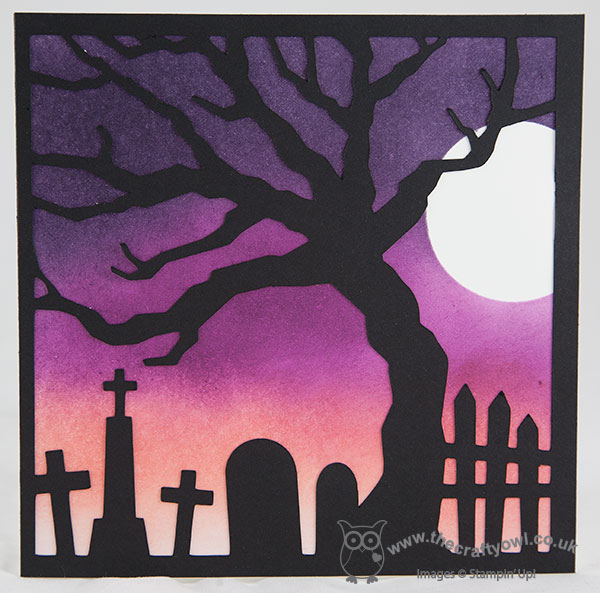
I couldn't find a suitable file in My Digital Studio to work with, so I downloaded this Halloween Graveyard scene from the Silhouette store and cut it out of Basic Black. For the background, I sponged a panel of Whisper White using each of the challenge colours, having first masked off a circle with a post-it note punched with a 1 3/4" circle punch for my moon. I'm surprised at just how well these three colours blend together to create the spooky scene - it's really quite atmospheric. I left the front of my card sentiment-free and added one to the inside, as I didn't want to interrupt my picture.
So what do you think? This card was surprisingly easy to create with my e-cutter. Feel free to leave a comment on today's card, before hopping over to check out the amazing cards by the rest of the Colour Me...! team:
We look forward to seeing your subtle creations.
Back tomorrow with another project; until then, happy stampin'!
Stampin' Up! Supplies Used:
by Joanne James19. October 2014 07:00DON'T FORGET: 5 DAYS LEFT UNTIL THE FREE PACK OF PAPER FOR 6 MONTHS SIGN UP DEAL ENDS - CLICK HERE TO FIND OUT MORE AND JOIN MY STAMPIN' UP! TEAM TODAY!
As you read this I'll be on my way home from Stampin' Up!'s European Convention and will undoubtedly have some pictures to share later this week, but meanwhile it's time for this week's challenge over at The Paper Players and Sandy has a clean and simple yet glitzy challenge for us this week:
We are using silver or gold on our cards this week - think Encore ink, embossing, sequins, glitter - so many possibilities! I decided to go with silver paired with white, and chose to use the lovely Bright and Beautiful stamp set and co-ordinating star framelits for my clean and simple card:
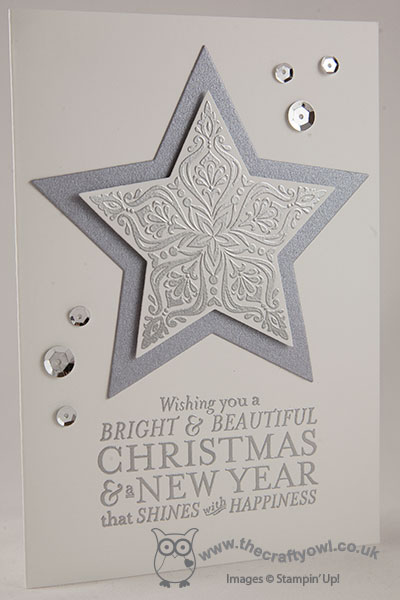
I used Whisper White as my card base and stamped the sentiment in Versamark and heat embossed it with silver embossing powder. I did the same with the middle-sized star in the set, but cut this out using a framelit and layered it on a second star cut out of Brushed Silver cardstock using dimensionals, having glued the silver star to my card base. I added a sprinkling of Frosted Sequins to finish my clean and simple card. This would be a great card to make a lot of if you wanted to make a dent in your Christmas cards - you could switch the base card colours and even make in gold too to ring the changes and it doesn't take a large volume of supplies.
Hope you like today's card - check out this week's challenge page over at The Paper Players to see what the rest of the Design Team have been up to - there are some amazing cards to see as always. We look forward to seeing what you come up with this week!
Back tomorrow with another project; until then, happy stampin'!
Stampin' Up! Supplies Used:
aa78c9f1-6df5-4ffb-a3c2-1601fdea5494|0|.0|96d5b379-7e1d-4dac-a6ba-1e50db561b04
Tags: Christmas, Bright and Beautiful, Stampin' Up, Stampin' Up Card, Stampin' Up Card ideas, Stampin' Up Supplies, Stampin' Up SuppliesCircles Framelits, Star Framelits, Magnetic Platform, Big Shot, The Paper Players
Cards | Stamping
by Joanne James15. October 2014 09:00DON'T FORGET: 9 DAYS LEFT UNTIL THE FREE PACK OF PAPER FOR 6 MONTHS SIGN UP DEAL ENDS - CLICK HERE TO FIND OUT MORE AND JOIN MY STAMPIN' UP! TEAM TODAY!

It's Wednesday and time for this week's challenge over at Colour Me...! where we have a subtle colour palette for you to work with this week:
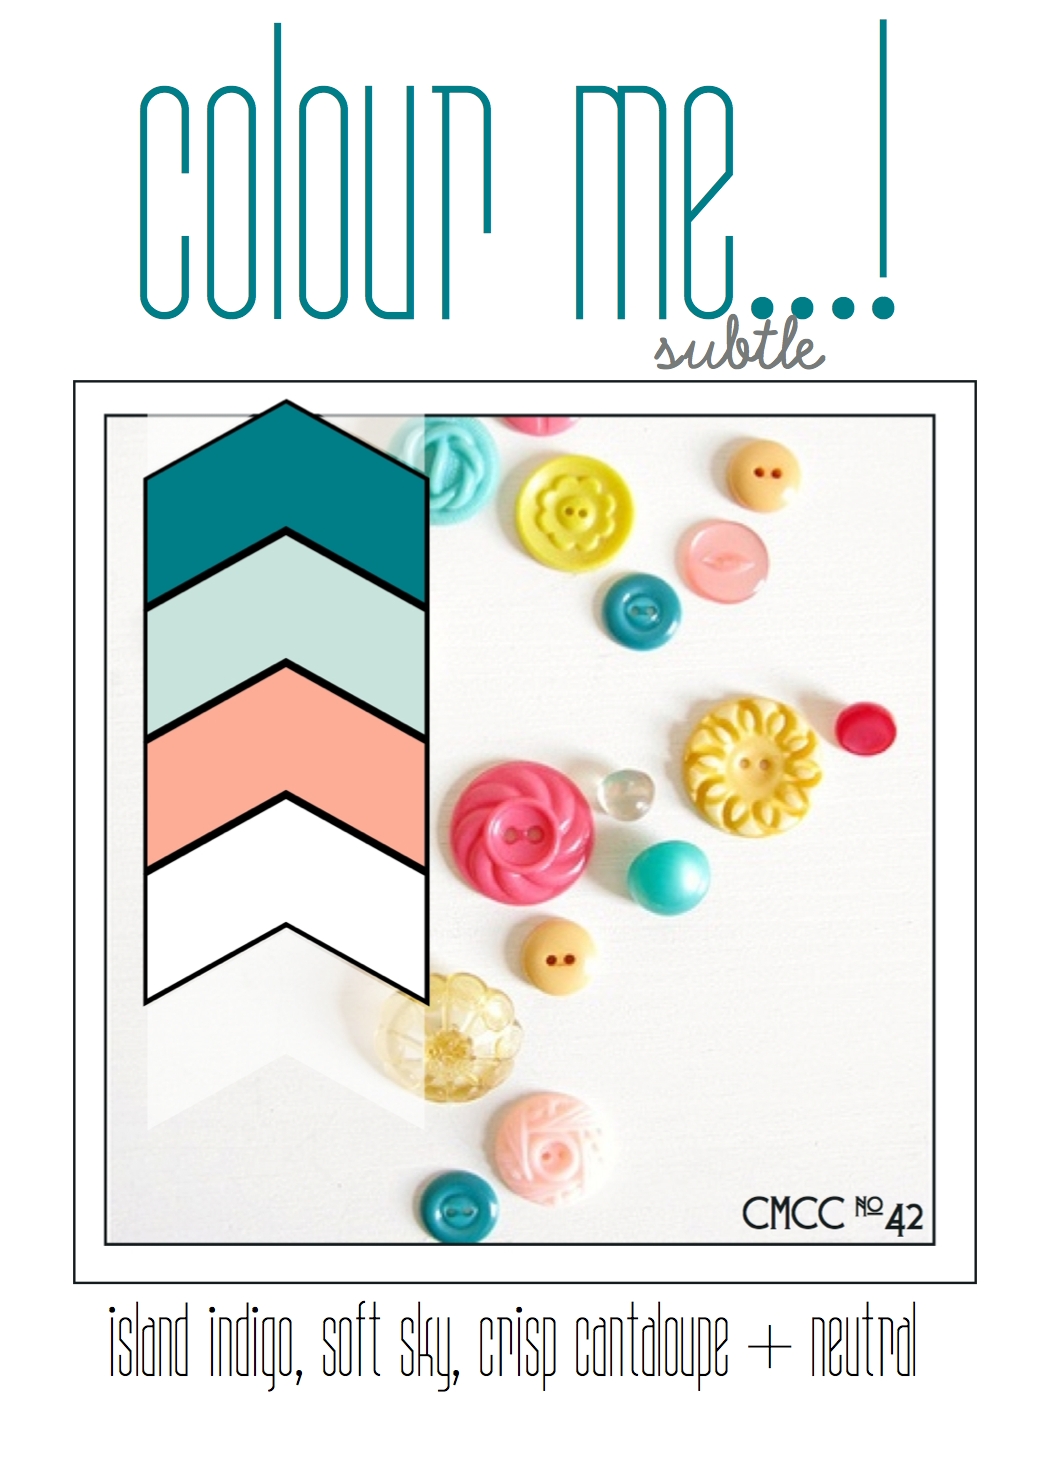
This colour palette presented me with the perfect opportunity for a card using the 'colour blocking' technique that I've had in my head for a while. Take a look at my card and then I'll explain:
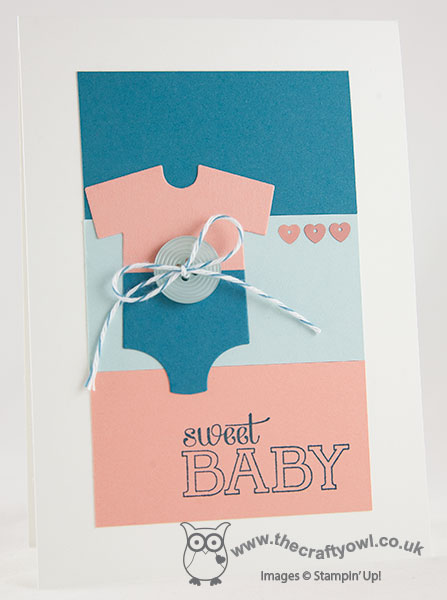
Colour blocking is the technique of using large blocks of colour to create a solid background and works really well as a background for silhouette shapes in black or white or where you have one large image that you can reverse-block on top, as I've done here with the babygro onesie. I created my colour block background out of three equal pieces of cardstock in the challenge colours running horizontally across my card. I stamped my sentiment in the darkest colour, Island Indigo, onto the lightest one, Crisp Cantaloupe, and then picked out each of the colours in the embellishments: a Soft Sky button, some Island indigo baker's twine and a trio of Crisp Cantaloupe hearts.
Deceptively easy but rather effective I think and a technique that could work with lots of different colour combinations. So what do you think? Feel free to leave a comment on today's card, before hopping over to check out the amazing cards by the rest of the Colour Me...! team:
We look forward to seeing your subtle creations.
Back tomorrow with another project; until then, happy stampin'!
Stampin' Up! Supplies Used: