Sending Smiles with the Zoo Babies Alligator!

by Joanne James6. April 2016 07:00

Today I have another clean and simple card for you, the second one this week using the sketch challenge over at CAS(E) This Sketch. As I mentioned yesterday, I love playing along with their sketches, which can sometimes leave me lost at first glance but then often take me in an unexpected direction. This week's sketch is definitely one of those! Here is the sketch:


I spent considerable time thinking about how I was going to interpret this sketch; the Design Team have some great takes on this sketch and I was fascinated by Michelle's Design Team card in particular and the way she created the channel for her airplane. In a similar vein I created my second card:

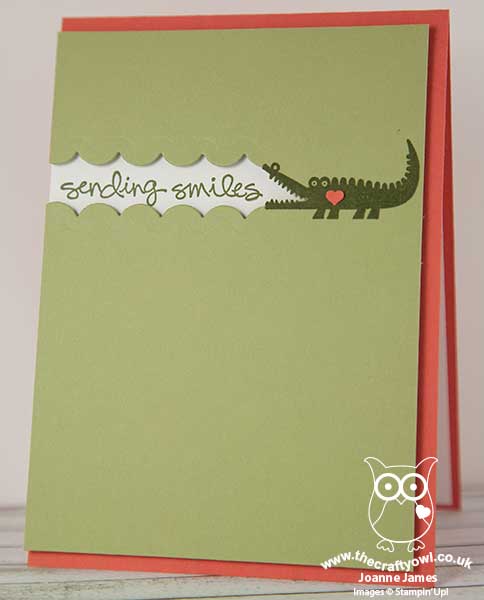
How cute is this?!! Here's the low-down on today's card:

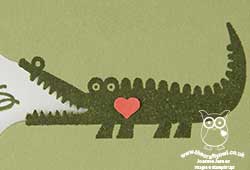
See Ya Later Alligator - My alligator is from the 'Zoo Babies' stamp set. Super cute on a baby card but also works for a fun 'hello' style card too. His open jaws were just crying out to be used with this sketch! I added a tiny punched heart from the Confetti Hearts Border Punch for a little pop of colour too.

Chomp Chomp - What to use to create the teeth marks I needed for my alligator's bite? I used the scalloped thinlit in the Cutie Pie Thinlit set; this enabled me to create a mirrored border to reveal my sentiment beneath, which is from the 'Greatest Greetings' set. Don't all alligators look like they are smiling - before they open their mouths at least?!

'White' Space - Like Monday's card, today's features plenty of true 'white space' - or in this case 'green' space! You can read all about white space and its function of clean and simple cards here. Today is another example that fits with this week's challenge over at Less is More, so I will be linking up for the second time this week.

This is one of those cards that makes me feel warm and fuzzy inside - I just love it!

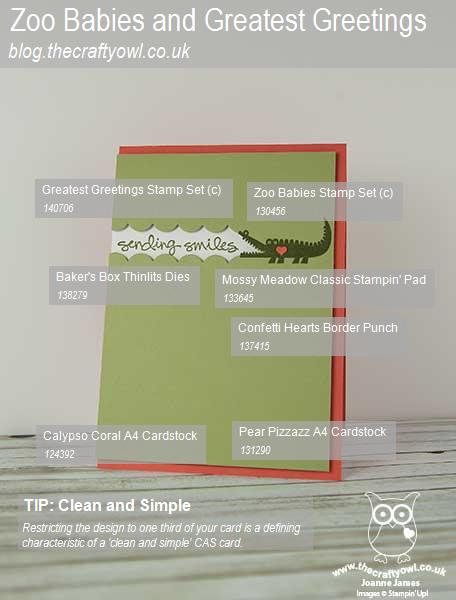
Here is the visual summary of the key products used on today's project for you to pin for easy reference:


You can see all of my 'How To' summaries on my 'How To - Tips and Techniques' Pinterest board in case you've missed any. 

What's more, two of the products I've used on today's card - The Confetti Hearts Border Punch and Greatest Greetings set - are available at a knock-down bargain price on Weekly Deals today - get the full details here

Back tomorrow with a card for this week's new challenge over at Create With Connie and Mary; until then, happy stampin'!


Stampin' Up! Supplies Used: 

Table built using Product Table Builder by The Crafty Owl - Independent Stampin' Up! Demonstrator.

Let's Paint The Town...Red!

by Joanne James11. February 2016 10:00

I've an extra card for you today; my spot of crafting yesterday gave me just enough time to squeeze in this fun card for this week's CAS(E) This Sketch:


I also used the colour palette over at Fab Friday, which seemed rather appropriate given the sentiment on today's card - after all, as the saying goes 'Let's paint the town red' right?


I used the hostess set 'Love You Sew' for my card today. The paint brushes and swish of paint stamp made the perfect backdrop for my sentiment; I stamped each paint swish twice on my mat of Very Vanilla and overlapped them beneath my sentiment oval in order to extend their length. I cut out my sentiment using my Big Shot and Oval Framelits and popped it up on a couple of dimensionals. A few punched hearts and an epoxy sticker on the largest heart finished my card. 

This hostess set is a great set for crafters and non-crafters alike - I just love the fun sentiments and creative possibilities. Whilst this sentiment isn't a particular 'love' themed one, I think my card could be used as a fun invitation to a loved one or group of friends perhaps. 'Love You Sew' is exclusively available to customers who host a Stampin' Up! party or place a single order that qualifies for Stampin' Rewards. Sale-A-Bration is a great time to host a party with extra hostess rewards available for qualifying party sales. If you would like to host a party, do get in touch; I have a few slots left before the end of March if you would like to take advantage of these great offers. in addition, for all of my customers who host a party between now and the end of Sale-A-Bration, I will provide them with a free 'to go' tutorial to make a set of fun cards using the 'Love You Sew' hostess stamp set. So what are you waiting for? Make the call!

That's all from me today; back tomorrow with another project. until then, happy stampin'!


Stampin' Up! Supplies Used:

Table built using Product Table Builder by The Crafty Owl - Independent Stampin' Up! Demonstrator.


Love You Hearts Border Card

by Joanne James3. February 2016 18:00

I had a great day of classes yesterday, with my second 'Love Blossoms' technique class of the month and my Project Life memory keeping class - lots of fun layouts of babies, toddlers, wartime Cairo and sightseeing in New York to name a few! I so enjoy my Project Life class and feel privileged to have my ladies share and document their precious memories with me. 

Today I'm sharing a Valentine's card that uses this week sketch over at As you See It that also fits the colour palette over at Can You Case It: black, reds and white or neutrals. I was also inspired by the photo of the ombre repeated heart biscuits over at The Card Concept to create my 'Clean and Layered' card today:

AYSIChallenge121  CYCI#105

I decided on some layered heart borders for the striped/border elements of my card using a trio of reds and a sentiment stamp I don't use very often - take a look:


A trio of Watermelon Wonder, Real Red and Cherry Cobbler panels, layered so that the alternating colours show through, and the hearts that I punched out using my Hearts border punch I randomly adhered, spilling from the sentiment, taken from the 'Friendly Wishes'  stamp set. A Basic Black mat for definition and a double bow of black and white baker's twine finish my card. Hearts and reds - what more do you need for the perfect Valentine?

That's all from me today; back tomorrow with a card for this week's new challenge over at Create With Connie and Mary. Until then, happy stampin'!


Stampin' Up! Supplies Used:

Table built using Product Table Builder by The Crafty Owl - Independent Stampin' Up! Demonstrator.


Chip And Mrs Potts Cups and Kettle Framelits Card

by Joanne James28. January 2016 08:05

Today it's time for a new challenge over at Create With Connie and Mary and this week we have a great sketch for you:


Now as my regular readers know I love a good sketch but it wasn't actually the sketch that inspired my card today; I was working on a couple of projects at the same time and had my Cups and Kettle Framelits Dies still out on my desk from my Paper Players card (if you missed it you can see that card here) and the minute I set eyes on that little cup (or it might even be a milk jug, I'm not sure) I just knew it would be perfect to make Chip, the little cup from Disney's movie 'The Beauty and The Beast' - you know the little guy I mean?

Image result for mrs potts and chip (Copyright Disney)

Paired with a customised teapot for Mrs Potts, Chip's Mum, this sketch gave me the perfect layout to showcase my fun characters - here's my finished card:

Now I know I'm biased since I made the card, but aren't that pair just the cutest?! So how did I make them? Here are the key component parts you need:

  • Basic teapot and cup cut from Shimmery White cardstock (I reversed my cup for the above card as I wanted the characters to be looking at each other)
  • Cupbase and teapot base made from the base of the other cup framelit cut from Wisteria Wonder
  • Cut an extra teapot and cup in Daffodil Delight and trim off the handles and some strips to edge the bases
  • Cut three of the looped framelit pieces, one each in Daffodil Delight, Tempting Turquoise and Pink Pirouette. Detach and use one whole yellow loop to line the cup. Snip the blue and pink ones in half across the middle and glue them in alternating colours to the Wisteria Wonder base.
  • Cut a teapot lid out of Wisteria Wonder and add a Pink Pirouette candy dot to the lid top. 
  • Cut two pieces of the wave shapes, one each from Daffodil Delight and Wisteria Wonder. Paper-piece them together and adhere to the teapot edge to create the frill.
  • Punch some eyes using the circle from the owl builder punch, adding eyelids and eye lashes to Mrs Potts and cut the eyebrows and mouths freehand with paper snips. 
  • Lastly, don't forget to snip to add Chip's chip!

I stamped a faint heart on the background, added a strip of 'Have a Cuppa' designer series paper and a heart boarder, along with my sentiment, to complete my card. Punch art-type cards like this are sometimes time-consuming to create, but so worth it I think for a special card!

Do visit the other Design Team members to see how they interpreted this week's sketch; there's lots of inspiration over on their blogs too!

Enjoy your day and I'll be back tomorrow with another project; until then, happy stampin'!


Stampin' Up! Supplies Used: 

Table built using Product Table Builder by The Crafty Owl - Independent Stampin' Up! Demonstrator.

New Wednesday Weekly Deals Are Here!

by Joanne James2. December 2015 09:00

It's Wednesday and you know what that means: a new collection of Wednesday Weekly Deals! These offers are valid for one week only. As always, a new collection of deals will be announced next Wednesday.

If you want to take advantage of any of the deals on offer, you can support my business by placing your order online by clicking here or using the link to my store on the right hand side of my blog page where it says 'Shop Online' or with me in person. Don't forget to add the new Hostess Code for December 99Y3W6CF if your order is under £150 and be sure to make sure that you don't check the 'no contact' box if you'd like to be kept updated with the progress of you order and receive a little thank you in the post from me. 

Here's a summary of this week's one-week only Wednesday deals - click on each item to go to the online store to purchase:

Table built using Product Table Builder by The Crafty Owl - Independent Stampin' Up! Demonstrator.

I will be placing an order this evening, so if you live in or around Northampton and would like to save on postage, please get in touch and I will add your items on. I'll also be using this washi tape on my card tomorrow so pop back if you'd like to see how I use it.

Back later with today's creative project; until then, happy shopping!

Hello Life Wedding Hearts

by Joanne James1. November 2015 17:48

Another quick post from me today! I managed to get a little time yesterday to create a clean and simple wedding card for a couple of challenges today:


I was fortunate enough to be a winner over at The Challenge last week (you can see that card here -thank you ladies!) and I didn't want to miss the opportunity to join in again this week. The Challenge have a theme of weddings this week and CASology have a cue card of 'heart'; I thought I would make a card in warm Winter reds with a touch of gold using my 'Hello Life' stamp set and hearts border punch:


I used a card base of Cherry Cobbler with a split top panel of Very Vanilla, stamped with two overlaying hearts and heat embossed in gold with my 'love' sentiment and joined with a piece of gold foil cardstock punched with the hearts border punch to allow the red to show through the negative space. 

Super simple but rather pretty and perfect for a winter wedding when regal colours often feature.

That's all from me; back tomorrow with a festive project once more. Until then, happy stampin'!


Stampin' Up! Supplies Used:

Table built using Product Table Builder by The Crafty Owl - Independent Stampin' Up! Demonstrator.


New Wednesday Weekly Deals Are Here!

by Joanne James5. August 2015 21:06

It's Wednesday and you know what that means: a new collection of Wednesday Weekly Deals! The same as last week there are more offers than usual, with increased reductions of up to 30% on Weekly Deals this month, although there are specific allocated quantities at the increased offer price; once they're gone, the price will revert to RRP, so don't delay in ordering if there is something on your wish list. Each week items are proving very popular and some are sold out within a couple of days of the offers being published. As always, a new collection of deals will be announced next Wednesday.

If you want to take advantage of any of the deals on offer, you can support my business by placing your order online by clicking here or using the link to my store on the right hand side of my blog page where it says 'Shop Online' or with me in person. Don't forget to add the new Hostess Code for August SCFAMEG2 if your order is under £150 and be sure to make sure that you don't check the 'no contact' box if you'd like to be kept updated with the progress of you order and receive a little thank you in the post from me. 

Here's a summary of this week's one-week only Wednesday deals - click on each item to go to the online store to purchase:

Table built using Product Table Builder by The Crafty Owl - Independent Stampin' Up! Demonstrator.

Not quite as many deals to be had this week, but those that are there are all good! The must-have has to be the Envelope Punch Board; I know they have been featured several times, but at £13.50 this truly is a bargain! The Metric Scoring Plate is a great deal too; it makes light work of scoring card blanks and is a great deal at only £8.25.

So what are you waiting for? Get clicking over to my online store!

I'll be back later with a quick creative post. Until then, happy shopping!

Bold Butterfly Framelit Shaped Edge Card and Rainbow Hearts Card Celebrating Gay Pride

by Joanne James29. June 2015 09:49

Happy Monday everyone! Well, we didn't manage to barbeque yesterday as it was the worst weather day of the week here in the UK, but no matter - this week is supposed to be a scorcher, despite the fact that it's the start of Wimbledon Tennis Fortnight (a sure recipe for rain!) so I'm sure there will be lots of opportunity. My week is shaping up to be a busy one - with only three weeks until the end of the school term, there is something on pretty much every other day between now and the end of term so forgive me if my blogging becomes brief! Anyway, a good start to the week as I've two cards to share today! This first is my card for this week's challenge over at Colour Q:

Don't you just love those flip flops?! The colours along with the butterflies prompted me to create a fun 'cutting edge' card that I am also linking up with the current challenge over at SUO Challenges where they are asking us to create a card that features a cut edge that is something other than a straight line. This is what I came up with:

I used Soft Sky for my card base, then diecut four butterflies in Night of Navy using the smallest butterfly in the new Bold Butterfly framelits and adhered them to the edge of my card, carefully cutting around them by hand to remove the edge of the card base and expose the back panel. I then cut another two butterflies each in Daffodil Delight and Marina Mist and paper-pieced the small pieces into the navy butterflies. I stamped the sentiment from Watercolour Wonder onto the front of my card in Night of Navy and stamped the spotty strip repeatedly along the back inside edge of the card in Soft Sky for some added detail behind the butterflies, although you can't see this in the above photo as it's not flat and only visible when closed (I need to take another picture which I will add to this post later - these type of cards are so tricky to photograph!). This card looks so pretty in real life - the fussy cut edge really lifts this card and makes it something special.

My second card today is using this week's sketch over at Freshly Made Sketches where the lovely Jen Mitchell has a great sketch that would work so well for so many layouts:

I flipped the sketch through 180 degrees (it's allowed!) to create a rather topical card that was inspired by a cupcake of all things that appeared in my Facebook feed over the weekend, commemorating the decision by the US Supreme Court over the weekend to legalise same sex marriage across all US states:


I used a rainbow of strips of cardstock, punching each with my Hearts Border punch before adhering to my base of extra-thick Whisper White cardstock (love this for card bases!) I then took the punched out hearts and adhered these individually in a row beneath the negative punched space on the strip above. My focal point is a couple of 2" circles, the first in Whisper White and stamped with one of the sentiments in the 'Groovy Love' stamp set, inked up with Pacific Point and Real Red Stampin' Write markers. The second circle was punched from Real Red cardstock, with a heart punched out of the centre using the Sweetheart punch so that the sentiment could show through the negative space and popped up over the first on Dimensionals for added depth. Very 'gay pride' with the hearts and rainbows, don't you agree? I am also entering this card into a demonstrator-only challenge that Stampin' Up! are currently running with the tagline #punchitup where we have to use a combination of two of four specific punches and as you can see, I went with hearts!

That's my creative post for today; I will be back tomorrow with another project and may be back in the meantime with other news, depending on how far I get through today's 'to do' list so do pop back later! Until then, happy stampin'!


Stampin' Up! Supplies Used:

Card One:

Table built using Product Table Builder by The Crafty Owl - Independent Stampin' Up! Demonstrator.
 
 
Card Two:
 
Table built using Product Table Builder by The Crafty Owl - Independent Stampin' Up! Demonstrator.


'I Do Love You' Valentine's Card

by Joanne James8. February 2015 08:00

Good morning lovely blog readers! Today it's Sunday and time for a new challenge over at The Paper Players, where this week the lovely Nance has this great colour combination for us:


I also used this week's sketch over at Mojo Monday for the layout of today's card. I was tempted to use the florals in the inspiration photo as the starting point for my card - isn't the badge great? Nance creates all our blog challenge badges and does such a fantastic job, thank you Nance! - but in the end the lure of my 'Stacked with Love' DSP paper stack was too strong and I decided to make another Valentine's card! Come and take a look:


I used one of the large sentiments from the 'Big on You' stamp set as the focal point for my card and stamped it in Versamark on blackboard paper and heat embossed in white. I rubbed a little white kraft ink around the edges to add to the chalkboard look and feel of this panel. The large sentiment allowed me to use a number of the other DSP patterns for the background layers to my card. Red and black are clearly taking centre stage on my card, but there are a couple of pops of Calypso Coral - both the flag banner behind the strip of punched hearts and in the popped-up heart, finished with a Real Red bow cut with one of the Mini Treat Bag Thinlit accessory dies and a rhinestone. I haven't made a card using these papers for over a week and I was clearly getting withdrawal symptoms; having got them back out on the desk I've been creating with them again and I have a few more cards to share that feature them this week, so stay tuned!

Before you reach for your ink pads, do visit the other design team members to see what interesting ideas they've had this week:

The Paper Players Design Team
 
Here's a quick recap of our challenge rules:
 
1.  Create a new paper project
2.  Upload your creation to your blog with a link back to us and provide a direct link to the post featuring your challenge submission.
3.  Please link your card to no more than three challenges, TOTAL.
4.  Have FUN! 

I look forward to seeing your projects in the gallery this week. I'm off to hockey this morning and looking forward to an afternoon with a spot of crafting and some fun with the rest of the family before the new week starts again in earnest.

Back tomorrow with another project; until then, happy stampin'!


Stampin' Up! Supplies Used:

Table built using Product Table Builder by The Crafty Owl - Independent Stampin' Up! Demonstrator.


There Is Always Something to be Thankful For

by Joanne James14. January 2015 12:01

I haven't managed to blog the last couple of days as there's just been too much going on. Whilst I was intending to blog later today, I thought I would just share with you a card that I made with the ladies in my Technique Card Class this week, as it features two if the punches that are available on Wednesday Weekly Deals this week. My card was heavily inspired by this one by Inge Groot that a saw a couple of weeks ago. Here is my altered version, in the colourway that we made in our class:


The technique class featured the new Chalkboard paper and all the different ways in which you can use the lovely new chalk inks that are now available in the Spring-Summer catalogue. These inks have a fabulous soft chalk effect on the new Chalkboard paper; here we used it to stamp the tag from the 'You Brighten My Day' stamp set, yours free with a £45 spend during Sale-A-Bration, and behind this added some black and white baker's twine, some of the Best Year Ever ribbon and buttons (another Sale-A-Bration freebie) and a strip of cardstock punched with the Hearts Border Punch. All of this was mounted on a feature mat in Pink Pirouette that we embossed with the new Happy Heart embossing folder. I also made two more cards to the same design, but in two alternative colourways. This one is Aquamarine chalk in on Coastal Cabana, with Crushed Curry accessories:

Lastly, Yellow Citrus chalk ink and So Saffron, with Calypso Coral accessories:

I like that these cards are quite subtle, despite the bright appearance of the chalk ink in the pad itself - it's quite deceiving. Both the Note Tag punch and the Hearts Border Punch are on offer this week as part of the Wednesday Weekly Deals, as is the What's Up punch that also co-ordinates with the house stamp in the 'You Brighten My Day' stamp set. If this stamp set appeals to you and you would like to be able to create today's card, the following product bundle costs £47.87, includes both punches and would enable you to acquire the key supplies and get the stamp set for free:

Table built using Product Table Builder by The Crafty Owl - Independent Stampin' Up! Demonstrator.

All you need to add is the cardstock in the colours of your choice, a button and some ribbon from your stash. For everyone that buys this bundle from my online store this week and uses the hostess code 44JKUBHY, I will send you a separate little thank you gift from me in the post. 

Back soon with another creative post; until then, happy stampin'!

Mini Catalogue

BROWSE THE CATALOGUE

The mini catalogue is now live! Read and download your copy here.

Shop Online

Access my online shop 24 x 7, 365 days of the year:

Current April hostess code:

VDKNV7BH

Shop Online

Join My Team

It's always a great time to join Stampin’ Up! New team members can get £130 worth of products for only £99 + free business supplies + free shipping + all the fun being a part of Stampin’ Up! Stampin' Up! has something for everyone: join my growing team and benefit from my support to enjoy Stampin' Up! however you choose.

If you're interested, call me for a chat to understand how I can help you realise your goals. Alternatively, if you have already decided to sign up and you just can't wait, please click here for the link to the online form where you can sign up and order your starter kit right away! 

Latest Kit!

Stampin Cut and Emboss

The Rock Legend Kit has all you need to make 8 cards with coordinating envelopes. Along with the new Panda Friends Kit, both are available from January 4th for just £14 each - get yours here!

2023-24 Annual Catalogue

BROWSE THE CATALOGUE

Click on the catalogue for a full list of current SU! supplies - if you would like to order any of the items featured, please drop me a line at [email protected] or give me a call on 07773 421446 - I'd be happy to help.

New Online Exclusives

There are new products available exclusively in the online store from 5 March - check them out here.

About Me

Hi I'm Joanne and live in Northampton and when I'm not looking after my husband and two beautiful children, am an avid crafter with a passion for all things Stampin' Up!

I must confess that I have never been a big rubber stamper - until I discovered Stampin' Up! that is. I love the fact that I can get such great results with co-ordinating stamps, inks, papers and punches - the possibilities are endless! Join me on my stamping journey as I share the things I love and be inspired to create amazing things yourself!

Follow Me

Monthly Newsletter

Box Builder

Click the button above to use Box Buster to create your custom box design using the Envelope Punch Board!

Kits Collection Now Available!

Stampin Cut and Emboss

The new Kits Collection from Stampin' Up! is now available!

Click here to see the current kits available and order yours online today.

I Design For


Stampin' Up Stuff

This is my personal blog and is not endorsed by Stampin’ Up! I hope you find it a plentiful source of ideas and personal inspiration but please don't copy my designs for contest submission or use for classes, publication or sale without express permission.