Baby We've Grown New Parent Congratulations Card

by Joanne James20. July 2019 22:00

Today I'm sharing a card that I made because it is perfect for the current challenge over at Festive Friday and uses the current Color Throwdown colours:

#festivefridaychallenge, #FF0038, Parent's Day, Watercolor cards   

Using both watercolouring and with Parent's Day in mind (or at least two new parents in particular) and this soft and sweet colour palette, I created this card for some new parents:

Not much to say about my card today! I stamped my image on watercolour paper and then heat embossed it in silver, watercoloured it and added a stitched frame to finish. No product table for this card because it uses a whole bunch of retired bits and pieces: one of my favourite baby-themed retired stamp sets, Baby We've Grown, a retired colour in Pink Pirouette (a perfect baby pink) and some retired co-ordinating ribbon and foil doily. All of these were chosen deliberately though, as they are just perfect for the recipients: a Stampin' Up! demonstrator friend of mine and her husband have finally this week received their much longed-for adopted child, a baby girl, so their family of two has (almost overnight) grown to become three. This stamped image of three owls seemed just so appropriate to celebrate the arrival of Little Miss Wilson as she is affectionately known, and the oh-so girly pink complimented with the pale grey seemed like the perfect palette.

Enjoy your evening; I am typing this having spent the evening at the swimming pool watching the youngest of the James Juniors race with some great race times and a couple of wins, so it's nice to be sat in the cool again. I'll be back tomorrow with another project and this week's post over at The Paper Players. Until then, happy stampin'!


Tags: , , , , , ,

Cards | Shop Online | Shop Stampin' Up! Online | Stamping

Some Bunny Loves You Valentine's Card

by Joanne James1. February 2015 07:30

It's Sunday and time for a new challenge over at The Paper Players, where this week Claire has the following challenge for us:
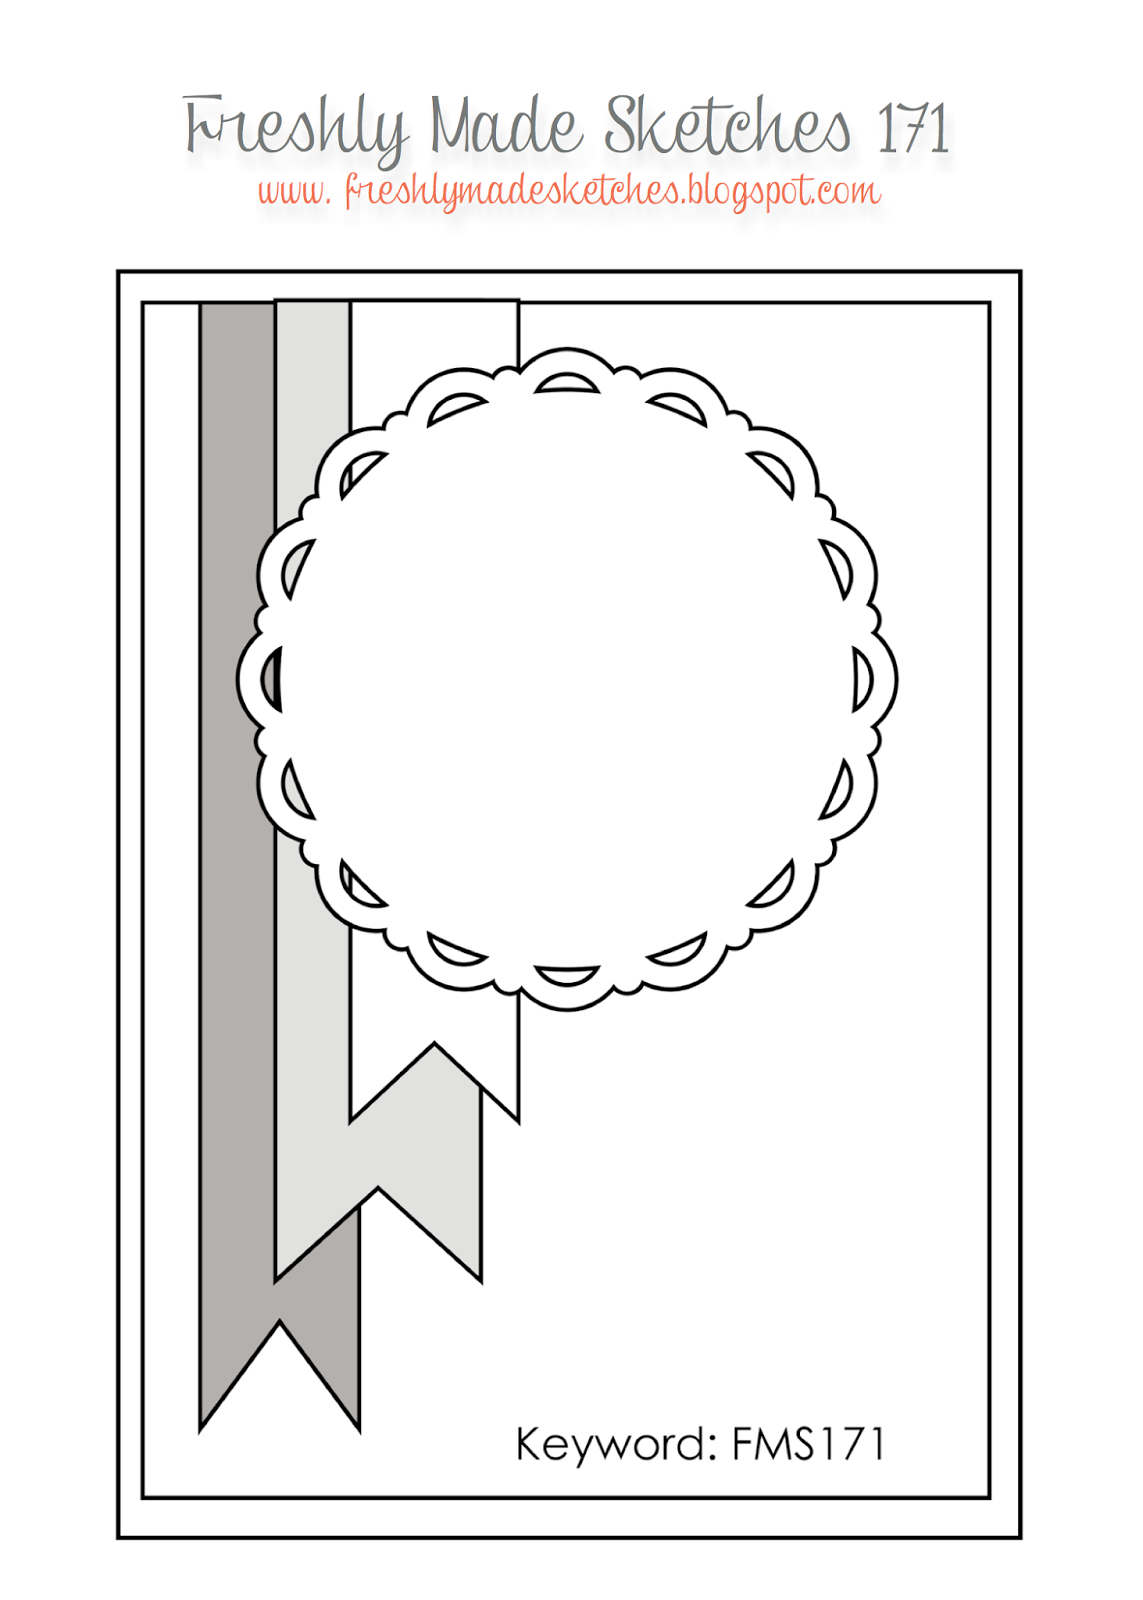
    

I also used Rita's sketch layout over at Freshly Made Sketches for my card this week. Now this week's card caused me some mild consternation, as anyone who knows me knows that I've never really had a pet and so I have been known to get myself into all kinds of trouble with friends for under-estimating the depth of their feelings towards their two-and four-legged friends. I am not intentionally insensitive, it's just that I don't 'get it' - so the idea of creating a Valentine's card for or from a pet sent me into quite a spin! Both James Juniors have had goldfish as pets previously, but since I used fish on my card last week I thought today's card needed an alternative, altogether more fluffy friend - so this is what I came up with:
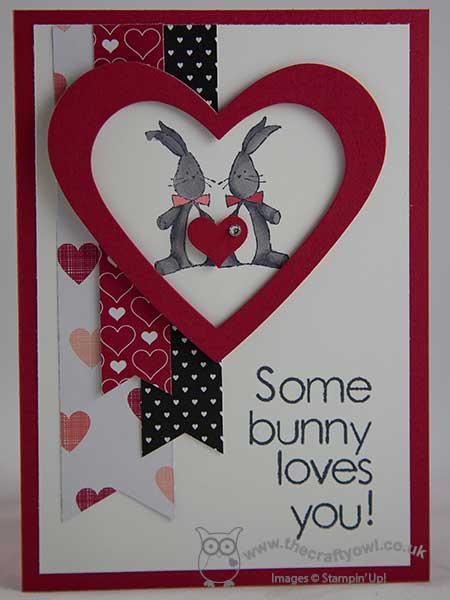
I created a custom sentiment using my 'Back to Basics' alphabet stamps and added a selection of banners using patterns from the 'Stacked with Love' DSP stack. For the heart-shaped centrepiece, I stamped a pair of adorable bunnies and coloured them in with my Smoky Slate Blendabilities. Do you recognise the bunnies, or should I say, bunny? The bunny on the right is from the 'Baby We've Grown' stamp set. I stamped him once, then having masked him off with a post-it note, I then stamped him again onto a piece of window sheet and using the reflection technique transferred this image onto my cardstock, overlapping the legs slightly. The tiniest drag line on the ear resulted in a cute fold-over look, so I left it, as it made the bunnies a little less symmetrical. Don't they make such a cute pair? I finished this centre piece by framing the bunnies in a Real Red heart-shaped frame cut using my Big Shot and Hearts Framelits and added a tiny punched heart with a rhinestone to the centre. If I had a bunny rabbit, I would be happy to send him this Valentine - job done! I'm also linking up with SUO Challenges today too, where the theme is 'Valentine's Wishes' - very appropriate.

Before you reach for your ink pads, do visit the other design team members to see what interesting ideas they've had this week:

The Paper Players Design Team
 
Here's a quick recap of our challenge rules:
 
1.  Create a new paper project
2.  Upload your creation to your blog with a link back to us and provide a direct link to the post featuring your challenge submission.
3.  Please link your card to no more than three challenges, TOTAL.
4.  Have FUN! 

I look forward to seeing your projects in the gallery this week.

I'm looking forward to a quiet day today: the hockey pitch is frozen as a result of the sub-zero temperatures we've been having this past week and poor Ben is struggling to shake his cough and cold that he's had for weeks now, so he is going to have a rugby-free week too, as running around a freezing pitch for a couple of hours is certainly not going to improve things. Rebecca and I will be completing the masterpiece that is her ancient Greek theatrical mask, the result of two weeks of paper mache and modelling clay - all being well it should be dry enough to paint. We may even manage to squeeze in another family movie afternoon; last week we watched Malificent for the first time, which was hugely enjoyable and an interesting alternative take on a classic.

Back tomorrow with another project; until then, happy stampin'!

Stampin' Up! Supplies Used: 

Table built using Product Table Builder by The Crafty Owl - Independent Stampin' Up! Demonstrator.

Retro Fresh Sweet Baby Card

by Joanne James26. January 2015 09:00

Today its Monday and I have a card for this week's Freshly Made Sketches challenge; I am also linking up with the Friday Mashup, where the challenge is to create a baby card, a card in brown aqua and tangerine - or as in my case, a mashup of both:


I decided that the 'any shape' allowed in the sketch was a great opportunity for me to use probably the only stamp that has never been inked up in my 'Something for Baby' stamp set - the pram. Here is my card:


I chose to use some retired 'Retro Fresh' DSP for my card, as it featured the mashup colours. Once I'd decided on my layers, this card came together surprisingly quickly, even leaving time to stamp the inside and decorate the envelope. I've not used this pram stamp previously as it's quite large - this type of sketch layout is just perfect for it though. I finished my pram wheels with a couple of candy dots for added interest and done! 

Back tomorrow with another project; until then, happy stampin'!


Stampin' Up! Supplies Used:

Table built using Product Table Builder by The Crafty Owl - Independent Stampin' Up! Demonstrator.

Baby We've Grown Baby Card for a Colour Me...! Double Bill

by Joanne James29. October 2014 10:00

It's Wednesday and time for this week's challenge over at Colour Me...! where we have not one but two colour palettes for you to choose from this week:


I'm playing along with option 2 this week, so I have the colour combination of Chocolate Chip, Lost Lagoon, Blushing Bride and a neutral (I chose Very Vanilla) to work with. Using the above sketch from CAS Colours & Sketches as the inspiration for my layout (I turned it through 90 degrees), I decided to make (another!) baby card using one of my favourite baby sets, Baby We've Grown. Here is my card:

I stamped my focal image in Chocolate Chip and coloured in using ink and my blender pens, to give a slightly vintage look to my owls. I matted this panel onto a piece of Chocolate Chip Cardstock, which overlays a vertical strip that has been edged with a piece of Lost Lagoon punched with the hearts border punch. I added my sentiment, again stamped in Chocolate Chip on Lost Lagoon cardstock, to finish. Although the base is Blushing Bride, I think this could be a good unisex baby card; you could always alternate the pink and blue elements if you wanted something more masculine in appearance.

So what do you think? Feel free to leave a comment on today's card, before hopping over to check out the amazing cards by the rest of the Colour Me...! team:

And our talented guest designer for October - Jen Mitchell
 
We look forward to seeing your creative creations - which colour scheme will you choose? 
 
I'm having a fun day with friends today, with all kinds of crafting the order of the day. Back tomorrow with another project; until then, happy stampin'!


Stampin' Up! Supplies Used:

Table built using Product Table Builder by The Crafty Owl - Independent Stampin' Up! Demonstrator.


Tags: , , , , , ,

Cards | Stamping

Colour Block Sweet Baby Card for Colour Me...!

by Joanne James15. October 2014 09:00

DON'T FORGET: 9 DAYS LEFT UNTIL THE FREE PACK OF PAPER FOR 6 MONTHS SIGN UP DEAL ENDS - CLICK HERE TO FIND OUT MORE AND JOIN MY STAMPIN' UP! TEAM TODAY!


It's Wednesday and time for this week's challenge over at Colour Me...! where we have a subtle colour palette for you to work with this week:

This colour palette presented me with the perfect opportunity for a card using the 'colour blocking' technique that I've had in my head for a while. Take a look at my card and then I'll explain:

Colour blocking is the technique of using large blocks of colour to create a solid background and works really well as a background for silhouette shapes in black or white or where you have one large image that you can reverse-block on top, as I've done here with the babygro onesie. I created my colour block background out of three equal pieces of cardstock in the challenge colours running horizontally across my card. I stamped my sentiment in the darkest colour, Island Indigo, onto the lightest one, Crisp Cantaloupe, and then picked out each of the colours in the embellishments: a Soft Sky button, some Island indigo baker's twine and a trio of Crisp Cantaloupe hearts.

Deceptively easy but rather effective I think and a technique that could work with lots of different colour combinations. So what do you think? Feel free to leave a comment on today's card, before hopping over to check out the amazing cards by the rest of the Colour Me...! team:

And our talented guest designer for October - Jen Mitchell
 
We look forward to seeing your subtle creations. 
 
Back tomorrow with another project; until then, happy stampin'!
 
 
Stampin' Up! Supplies Used:
Table built using Product Table Builder by The Crafty Owl - Independent Stampin' Up! Demonstrator.
 

Another Sweet Baby Boy!

by Joanne James27. May 2014 19:56

Well, it's still raining here in the UK and I've even had to resort to turning up the central heating - in May!!! We've had a lovely day catching up with friends today, which hasn't dampened our half-term spirits. On to today's card, which I used this week's colours over at Create with Connie and Mary and LeAnne's sketch at The Paper Players:


I started out with the colours and must say the ladies over at Create with Connie and Mary almost had me stumped this week! I played around with these colours wanting to use white as my neutral - some of the CCMC design team used white to great effect with this colour combination on their cards - but in the end I went with a baby boy card and didn't use any white at all (go figure!). Here's my card:

I decided to go with a Soft Sky base and added a strip of DSP down the centre - do you recognise it? This pattern is actually one of the patterns in the Kaleidescope pack, although you could be forgiven for overlooking it as it is quite muted given the other bright and bold patterns in the set. I then used lots of layers to create interest on the main design; I stamped the 'Sweet Baby' stamp from the Baby We've Grown stamp set in Basic Grey onto Sahara Sand, and matted this onto both Soft Sky and Basic Grey. I then stamped the 'Brand New' stamp from the same set in Basic Grey, twice onto Soft Sky cardstock and once onto Sahara Sand. I cut these out with the smallest Starburst Collection framelit and then did a little fussy cutting to create a layered badge: I cut the banner in Sahara Sand and adhered this to one of the Soft Sky pieces, then took the other image stamped on Soft Sky and cut out the individual letters of the word 'NEW' and adhered them to the banner section. This button badge was then adhered to a circle punched from Basic Grey cardstock with a 1 1/4" circle punch and mounted onto my card as per the sketch.

So quite a graphic clean and layered card today and not overly 'baby cute' but still unmistakably a baby boy card I think. I'm just pleased I managed to eventually create something with this colour combination! When I went back to grab the Paper Players sketch image to insert into my blog I realised Ann Schach also used a couple of stamps from the same set to create her baby girl card - you should go check it out on the above link if you want to see an alternative take using the same sketch.

Back tomorrow with another card; until then, happy stampin'!

Stampin' Up! Supplies Used:

Table built using Product Table Builder by The Crafty Owl - Independent Stampin' Up! Demonstrator.


Tags: , , , , , , ,

Cards | Stamping

Monochrome Baby Boy Card - Baby We've Grown

by Joanne James16. May 2014 17:55

I have had the busiest day today - last minute preparations for the Stampin' Up! UK Regional Training Event in Telford tomorrow coupled with lots of little jobs. Best part of my day though was getting to spend an hour in the sunshine watching Rebecca's team win their second rounders match of the week (go girls!) and I'm even managing to squeeze in a quick blog post, which I thought might be touch and go today!

I have had a few baby cards to make lately, all of them girls, but I know someone who is due a baby boy anytime soon so thought I would get ahead for once and make my card ready. I decided to make a monochrome boy card to pair with the monochrome girl card I designed a couple of weeks ago for the Pals Paper Arts 200th anniversary challenge (you can see my original baby girl card here). Here is today's card:

Using a Soft Sky base, I matted both of my cardstock layers on Whisper White and used a piece of Polka Dot DSP from the Subtles DSP stack for panel 2, whilst for panel 3 I stamped the 'sweet baby' stamp repeatedly in Whisper White onto Soft Sky cardstock - a stamp-a-ma-jig is essential for this - and coloured the word 'baby' with my chalk marker to give it a powdery look. Lastly, my focal point is the cute little boy shoes that I fussy cut and decorated with my chalk marker; to finish I layered this circle on a blue starburst mat and a further white circle.

Another pastel monochrome creation - not quite as fussy as the little girl one, but then in my experience boys never are!

Back tomorrow with another card and news of what's been happening at the regional event; until then, happy stampin'!

Stampin' Up! Supplies Used:

Table built using Product Table Builder by The Crafty Owl - Independent Stampin' Up! Demonstrator.


Monochrome Baby Girl Card for The Pals Paper Arts 200th Anniversary

by Joanne James22. April 2014 08:00

This week the Pals Paper Arts Card Challenge is celebrating its 200th anniversary - a whole 200 challenges! To celebrate this milestone, they have a sketch along with a twist - to complete your card in a monochromatic colour scheme. Here is the sketch:


Both design teams have designed cards to inspire this week; initially I was really tempted to use the Starburst Sayings stamps and framelits which lend themselves totally to this sketch and worl with my favourite Brights colour palette, but as lots of the designers had the same idea and I couldn't see how I was going to create something suitably unique, I decided to go with something completely different - a baby card using the 'Baby We've Grown' stamp set in Blushing Bride pastel pink:

Using a pink base, I matted both of my cardstock layers on Whisper White and used a piece of Polka Dot DSP from the Subtles DSP stack for panel 2, whilst for panel 3 I stamped the 'sweet baby' stamp repeatedly in Whisper White onto Blushing Bride cardstock - a stamp-a-ma-jig is essential for this - and coloured the word 'baby' with my chalk marker to give it a powdery look. Lastly, my focal point panel 4 is a triumph of layers and fussy cutting: I stamped the shoe stamp 3 times, twice on Whisper White and once on Blushing Bride, then I fussy cut the shoes from the pink and glued them to the white base; with the other image stamped on white, I fussy cut the bows from the shoes and adhered them on top. I finished the shoes with two tiny seed pearls for fastenings, and layered this circle on a pink starburst mat and a further white circle. My card has 10 separate layers in total - this must be something of a record!

This card took a little while to create, but I love it - and only Blushing Bride and Whisper White used throughout. Do check out the other monochromatic cards at the Pals paper Arts this week - there is a mass of inspiration.

Back tomorrow with another card; until then, happy stampin'!

Stampin' Up! Supplies Used:

Table built using Product Table Builder by The Crafty Owl - Independent Stampin' Up! Demonstrator.


Baby Girl We've Grown!

by Joanne James27. March 2014 22:55

Today I’m sharing my entry for this week’s Less is More challenge where you have to create a card with three of something. I decided to indulge in a spot of watercolouring and use a new stamp of mine from the ‘Baby We’ve Grown’ stamp set:


What can I say – I love this trio of owls! I’ve never purchased a dedicated baby-themed stamp set before, but I saw this set and it really appealed to me: a cute bunny, some of the sweetest baby shoes, some sentiments and well – those owls!


I simply stamped the image onto watercolour paper and coloured using my Aquapainter and a range of browns and pinks – this card is heading for my ‘baby girl’ pile – and mounted on a mat of Baked Brown Sugar and a card base of Blushing Bride.  Well, this is ‘Less is More’ after all! I'm still a novice at this compared to some, yet I love the blending I get with an Aquapainter - here's a close up:

Back tomorrow with another project; until then, happy stampin’!

Stampin’ Up! Supplies Used:

Table built using Product Table Builder by The Crafty Owl - Independent Stampin' Up! Demonstrator.

Tags: , , , , , , ,

Cards | Stamping

Mini Catalogue

BROWSE THE CATALOGUE

The mini catalogue is now live! Read and download your copy here.

Shop Online

Access my online shop 24 x 7, 365 days of the year:

Current April hostess code:

VDKNV7BH

Shop Online

Join My Team

It's always a great time to join Stampin’ Up! New team members can get £130 worth of products for only £99 + free business supplies + free shipping + all the fun being a part of Stampin’ Up! Stampin' Up! has something for everyone: join my growing team and benefit from my support to enjoy Stampin' Up! however you choose.

If you're interested, call me for a chat to understand how I can help you realise your goals. Alternatively, if you have already decided to sign up and you just can't wait, please click here for the link to the online form where you can sign up and order your starter kit right away! 

Latest Kit!

Stampin Cut and Emboss

The Rock Legend Kit has all you need to make 8 cards with coordinating envelopes. Along with the new Panda Friends Kit, both are available from January 4th for just £14 each - get yours here!

2023-24 Annual Catalogue

BROWSE THE CATALOGUE

Click on the catalogue for a full list of current SU! supplies - if you would like to order any of the items featured, please drop me a line at [email protected] or give me a call on 07773 421446 - I'd be happy to help.

New Online Exclusives

There are new products available exclusively in the online store from 5 March - check them out here.

About Me

Hi I'm Joanne and live in Northampton and when I'm not looking after my husband and two beautiful children, am an avid crafter with a passion for all things Stampin' Up!

I must confess that I have never been a big rubber stamper - until I discovered Stampin' Up! that is. I love the fact that I can get such great results with co-ordinating stamps, inks, papers and punches - the possibilities are endless! Join me on my stamping journey as I share the things I love and be inspired to create amazing things yourself!

Follow Me

Monthly Newsletter

Box Builder

Click the button above to use Box Buster to create your custom box design using the Envelope Punch Board!

Kits Collection Now Available!

Stampin Cut and Emboss

The new Kits Collection from Stampin' Up! is now available!

Click here to see the current kits available and order yours online today.

I Design For


Stampin' Up Stuff

This is my personal blog and is not endorsed by Stampin’ Up! I hope you find it a plentiful source of ideas and personal inspiration but please don't copy my designs for contest submission or use for classes, publication or sale without express permission.