Hip Hip Hooray - Sea Street Shaker Birthday Card

by Joanne James11. August 2014 08:00

It's Monday and today I have a special card for a special day - today my youngest James Junior turns 7! I can't quite believe it - some days I'm not sure where the last 7 years have gone. So today I'm sharing a birthday card I made for Ben to celebrate his special day. I used this week's sketch over at the Paper Craft Crew as my inspiration: 

My card is slightly larger than usual - A5, 21cm x 14.9cm - and features a fun shaker element along with my favourite Sea Street stamp set:

The shaker is made using the surround from the On Film framelit set and filled with fussy cut starfish, crabs, lobsters, gold sequins and some fish and anchors cut with my now retired Oh Whale! clearlit. I stamped the 'Hip Hip Hooray' onto the background before putting the shaker together and carried the sentiment on to the inside of the card:

We have a fun day planned today, including a visit to the cinema and maybe even a cycle ride on his new bicycle if the weather holds! Back tomorrow with another project; until then, happy stampin!


Stampin' Up! Supplies Used:

Table built using Product Table Builder by The Crafty Owl - Independent Stampin' Up! Demonstrator.

Simply Created Thank You Collage Card

by Joanne James10. August 2014 08:00

Yay - it's Sunday and time for a new challenge over at The Paper Players! Today Nance has an interesting colour challenge for us:


Today I have an unusual card to share with you, in more ways than one! When I saw Nance's colour palette, I immediately thought of the Simply Created Banner Kit that I used for the decorations for Rebecca's recent birthday party; I knew I had a few offcuts and leftover pieces of DSP from the kit and that Calypso Coral, Blushing Bride and Basic Grey were 3 of the feature colours of the add-on kit, so using this week's sketch over at Create with Connie and Mary as my starting point (perfect for using up scraps!) I set to work. Here is my finished card:

Using Calypso Coral as my base, I layered a number of strips of DSP in varying widths/lengths across the front of my card, alternating between the Calypso Coral/Blushing Bride chevron pattern and the Basic Grey/Smoky Slate chevron pattern. I then embossed a strip of Blushing Bride cardstock with the Arrows Embossing Folder and cut one end to a point. I layered some Calypso Coral chevrons that I had cut out with one of the framelits from the Circle Thinlit card, then created a tag, again using a pre-printed leftover tag from the kit. I added some black chevron ribbon (a little bit of a liberty as far as the colour scheme is concerned, but the closest match I could get from my stash!) and tied it with some retired Calypso Coral baker's twine in a double bow. I finished my tag with a die cut 'thank' in Hello Honey, part of the 'thankful' framelit from the now retired Expressions Thinlits set (still available on the European Clearance Rack if you fancy snapping up a bargain!) and the YOU cut out of Basic Grey with my Big Shot and the new Perfect Print Alphabet Bigz die. lastly, I added an Essentials Hardware Clip to my tag before adhering it to my card with dimensionals.

I love the idea of collage cards but find them really difficult to create, so am quite pleased with the way this arrow-filled card turned out. Also, on completion I realised that I hadn't done any stamping at all on this card - how unusual is that??! For more inspiration from the Design Team and to see the fabulous cards they've made using this colour palette, pop on over to The Paper Players blog to see what they've created and to link up your own card.

Back tomorrow with a fun birthday card; until then, happy stampin'!


Stampin' Up! Supplies Used:

Table built using Product Table Builder by The Crafty Owl - Independent Stampin' Up! Demonstrator.


My First Flower Flower Patch Card!

by Joanne James7. August 2014 20:56

Today I'm excited to share with you my first Flower Patch card! Now, this may not seem like a big event, but for someone who has had the stamp set for over a month whilst having to wait (not so) patiently for the matching framelit set, it is a big deal! I decided to make a card for the challenges over at 'Less is More' and Retrosketches, where the colour palette and sketch were perfect for what I had in mind:


Since the lovely Sarah over at 'Less Is More' is celebrating her birthday this week, I decided a birthday card should be the order of the day. Here's what I came up with: 

My card base is Coastal Cabana, which I matted with Whisper White and stamped my sentiment in Momento Black, then surrounded it with a trio of flowers in Coastal Cabana, Daffodil Delight and Bermuda Bay, cutting out one of these with my framelits and layering it to add depth and dimension. I finished with a few candy dots for the flower centres and a random one (just because!). The stamp set is photopolymer, which makes aligning everything so easy no need even for a stamp-a-ma-jig!

I liked my card so much, I decided to create another one with one of the other framelits in the set - I need a few extra birthday cards in my 'emergency' box - here is my slight variation on the card above:

These cards use surprisingly few supplies, yet I think they have real interest. This set has so much potential I am so glad that I can finally get creating with it - it my well replace Simple Stems from the Spring-Summer seasonal catalogue in my 'bold flower' affections! I'm also linking my card up over at SUO Challenges, where the theme this week is 'new toys' - well, I've certainly had fun playing with mine!

Back tomorrow with another project; until then, happy stampin'!

Stampin' Up! Supplies Used:

Table built using Product Table Builder by The Crafty Owl - Independent Stampin' Up! Demonstrator.


Tags: , , , , , , , ,

Cards | Stamping

Monochromatic Pistachio Pudding for this week's Colour Me...! Challenge

by Joanne James6. August 2014 11:00

Happy Wednesday everybody! Today is a good day - the sun is shining again, my Autumn-Winter pre-order has arrived so I have lots of Halloween and Christmas goodies to play with, there's a new bunch of weekly deals (see earlier post here) and it's time for this week's Colour Me...! Challenge, where we have a monochromatic colour challenge this week using Pistachio Pudding and a neutral:


I thought this challenge would be trickier than it actually was. I used the latest sketch from the Deconstructed Sketch for my layout and inked up my new Kinda Eclectic stamp set which I have been keen to get working with - here's my card: 

For my card I used a base of Pistachio Pudding, then layered one of the die-cut pieces from the now retired Simply Sent card kit in last year's annual catalogue. I added some Pistachio Pudding polka dot paper from the All Abloom DSP stack, then stamped the sunburst from Kinda Eclectic in Pistachio Pudding onto Whisper White and cut out using my Big Shot and Circles Framelits and cut the bottom third off the circle. For the central banner, I stamped the spots in Pistachio Pudding on the cardstock of the same colour, then stamped my sentiment in Versamark and heat embossed in White embossing powder over the top to add additional dimension. Lastly, I replaced the flags in the sketch with the butterflies from Kinda Eclectic, stamped in Pistachio Pudding onto Whisper White cardstock and punched out using the co-ordinating punches. I think the key to a single colour card where you are using one single colour plus a neutral, and don't have then benefit of tonal shades of the same colour, is to add layers, patterns and shapes for extra interest. If you're based in the UK and Europe, the Pistachio Pudding ink pad is on this week's Wednesday Weekly Deals List too and can be yours for just £3.71 instead of the usual £4.95 this week, so if you needed an incentive to have a go at this week's challenge, this is it!

I look forward to seeing what you come up with in the gallery this week - meanwhile, check out what the other designers have in store for you over at Colour Me and our new featured guest designer for the month of August.

Back tomorrow with another project for you; until then, happy stampin'!

Stampin' Up! Supplies Used:

Table built using Product Table Builder by The Crafty Owl - Independent Stampin' Up! Demonstrator.


New Big Shot Bundle Promotion - The Best Reason Ever To Own One!

by Joanne James1. August 2014 11:51

Good morning lovely blog readers - so much to be excited about today: it's Friday (always cause for celebration!), I placed my pre-order for Autumn-Winter seasonal catalogue products in the early hours of this morning (woohoo!) and today Stampin' Up! has announced a fantastic Big Shot bundle offer available for the month of August only!!

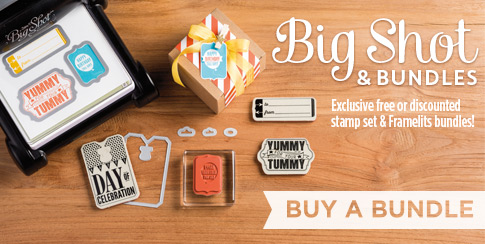
That's right - from 1st-31st August inclusive, if you purchase a Big Shot, you can receive one of five exclusive stamp set and framelit bundles ABSOLUTELY FREE - that's up to £55 worth of free products!! With the new seasonal catalogue just around the corner, which includes lots of Big Shot accessories, there's never been a better time to get your hands on one.

If you already own a Big Shot, don't worry there's a great offer for you too - you can purchase any of the exclusive bundles at a discount of 15% off. So now for the detail - these are the amazing one-time only bundles on offer:

BundleStamp SetFramelitsDiscounted Price
Sumthin' Sumthin'Word Bubbles£28.50
Sumthin' Sumthin'Word Bubbles£26.95
Oh My GoodiesDeco Labels£36.25
Oh My GoodiesDeco Labels£31.25
Day Of CelebrationChalk Talk£37.25
Day of CelebrationChalk Talk£31.95
Daydream MedallionsFloral Collection£47.50
Daydream MedallionsFloral Collection£41.50
Bright and BeautifulStar£44.95
Bright and BeautifulStar£37.25
Table built using Product Table Builder by The Crafty Owl - Independent Stampin' Up! Demonstrator.

You will even notice that one of the stamp sets in the above bundles - Bright & Beautiful - is a 'sneak peek' set that will be appearing in the new Autumn-Winter Seasonal Catalogue due to go live on 28th August.

The Big Shot is an amazing multi-tasking tool that has so many uses: it can be used to dry emboss, cut cardstock using framelits, edgelits or Sizzlits and allows you to cut a range of additional materials - wood, metal, fabric - using our extensive range of dies. If you don't own a Big Shot and need convincing, you might find this short video from Stampin' Up! a useful introduction:

For everyone that purchases a Big Shot from me, I will follow up with a one-to-one session that ensures you understand exactly how your Big Shot works with the various accessories in order that you can get the most from your purchase. This is one tool you will wonder how you ever managed without!

There is no limit to the number of Big Shots or stamp/framelit bundles that you can purchase from the above list during the month of August; the only restriction is where a Big Shot is purchased using Hostess Credits or using a 50% item discount - for these purchases the above offer does not apply.

So what are you waiting for? If you have any additional questions, do give me a call - otherwise, get ready to make the most of this amazing offer!

Back tomorrow with a creative post; until then, happy shopping!

149 Days Until Christmas - Snowflakes for Freshly Made Sketches

by Joanne James28. July 2014 18:51

I know, I know - we re experiencing some of the hottest weather we've had in the UK for ages and I'm making Christmas cards with snowflakes on!!! My new seasonal catalogue arrived with the postman on Saturday (it doesn't go live until the beginning of September, but as a demonstrator we receive them early so that we can pre-order items to plan classes and make samples to share with you (one of the many perks of being a demonstrator) and so for the last couple of days I have well and truly had Christmas on the brain! When I saw this week's sketch over at Freshly Made Sketches I decided festive was the order of the day - here's the sketch:

And here's my card:

I changed the orientation of my card as I wanted to use two of the embossed layered snowflakes stamped with the Festive Flurry stamp set and cut out with the coordinating framelits and needed it to be wider rather than taller. I cut my banners out of silver foil sheet and a scrap of last year's Winter Frost DSP that I found in my box, along with a retired snowflake embellishment. I added a few of the current in-colour sequins in Coastal Cabana to add a little more sparkle and finished with a vintage sentiment (from the 'Sweet Essentials' set).

You still have another month and a bit to wait until the launch of the new seasonal catalogue, however if you're the kind of person who likes to get organised and wants to start making Christmas cards now, the Festive Flurry stamps and Framelits are on the Holiday Carryover List and, along with a number of other seasonal items, are still available to purchase until 27th August. You can find the full list of items in the 'Holiday Carryover' section on the right hand side of my blog page, or by clicking here.

That's all from me today - no more Christmas cards I promise - well, at least not this week. Once my pre-order arrives next week, I might not be able to stop myself from sharing a few 'sneak peeks' of festive loveliness!

Back tomorrow with another card; until then, happy stampin'!


Stampin' Up! Supplies Used:

Table built using Product Table Builder by The Crafty Owl - Independent Stampin' Up! Demonstrator.


Giggle Greetings Birthday - My First Blendabilities Coloured Card!

by Joanne James26. July 2014 23:24

A late post from me today - I returned late yesterday evening from a family mini break and seem to have spent all day today washing and ironing, isn't that always the way?! That's not strictly true - I did manage to get some long overdue gardening done this afternoon and fit in a grocery shop; all in all a very productive day! I made this card earlier in the week for my brother-in-law's  birthday; it's not until next week, but as he doesn't read my blog I know I'm safe to share! I used this week's Mojo Monday sketch challenge as the inspiration for my layout:


I've spent some time practising with my Blendabilities this week and thought today's card would be a great opportunity to show you just how great these fabulous markers are for achieiving a blended coloured image. Here is my card:


Since my Bro' is officially 'post 40' this year, this image and sentiment from the 'Giggle Greetings' set seemed rather appropriate. I coloured the candle and cheese with my Daffodil Delight and Coastal Cabana sets of markers and echoed these colours elsewhere in my card. I am loving these new pens - they allow for beautiful shading with seamless colour blending and are so easy to use - no previous expertise necessary, although if you're the type of person who liked to colour as a child, you may find them rather addictive! I also embossed the top layer of my card with the Large Polka Dot embossing folder - it kind of reminded me of the holes in the cheese, albeit a little too regular in design. Lastly, I went with thick baker's twine for my bow detail - as a true 'man's man', I'm not sure my brother-in-law would appreciate anything more fancy!

Back tomorrow with my design team card for the Paper Players this week when we have a great sketch challenge for you - and another card using my Blendabilities markers!

Until then, happy stampin'!


Stampin' Up! Supplies Used:

Table built using Product Table Builder by The Crafty Owl - Independent Stampin' Up! Demonstrator.

Be The Star You Are Card

by Joanne James24. July 2014 08:00

Today I'm sharing a card I made for this week's challenge over at CAS(E) This Sketch:

The minute I saw this sketch, I knew exactly what I wanted to do with it - I love it when that happens! I definitely had stars in my eyes with this one - have a look at my card and you'll see what I mean:

I decided to use one of my favourite products from the new annual catalogue, the star framelits, along with some of the images from the co-ordinating 'Be The Star' stamp set for this card. I simply stamped one of the stars in Pumpkin Pie onto Whisper White, then cut it out with the framelit of the same size. Using the framelit the next size up, I cut out another star from Crushed Curry cardstock and paper pierced this around the edge using my Eclectic piercing template. I finished the star with the 'be the star you are' sentiment stamped in Bermuda Bay and punched out with a 1" circle punch. Lastly, I used the small bundle of stars stamp in Coastal Cabana directly onto the base layer of cardstock.

All being well I'll be spending a family day at the beach today - buckets and spades at the ready! Hope you have a fun day however you choose to spend it.

Back tomorrow with another project; until then, happy stampin'!


Stampin' Up! Supplies Used:

Table built using Product Table Builder by The Crafty Owl - Independent Stampin' Up! Demonstrator.


Tags: , , , , , , ,

Cards | Stamping

Around the World Have Fun on Your Travels Card

by Joanne James22. July 2014 10:00

I haven't participated in the Pals Paper Arts challenge for a little while, but when I saw Margaret's sketch this week I knew it would be perfect for a special card that I wanted to make:

A friend of mine is moving to Australia - she is a native Australian, so for her it's just 'going home', but for her British husband and young children, it's emigrating to the other side of the world. So the move is a big deal and comes with mixed emotions on all sides. The great thing is though that they are taking the opportunity to spend a few months travelling the world on leaving Britain and before arriving in Australia, so rather than focus on the move I thought it would be fun to make a card to wish them all the very best for their travels. I knew I wanted to make a card using the 'Around the World' stamp set - here's what I came up with:

I used a Pool Party base and a mat of Real Red, along with a piece of the now retired 'I am Me' designer series paper (I am still awaiting the arrival of my new papers and besides, this one was perfect for my theme!) I added the cross-panel in Pool Party, then stamped three of the images from the Around the World stamp set in Real Red on Whisper White. I did take advantage of the 'any shape' instruction on the sketch and did a little 'mix and match', with two circles and a hexagon. The circles I cut out using my Circle Framelits and then mounted them onto some Real Red circles cut with my 1 1/4" circle punch; the hexagon I cut by hand so that I could mount it on a Real Red hexagon punched with my hexagon punch. I tied them all together by stamping the trail from the aeroplane stamp onto the Pool Party card behind them.

So a bright, fun card to wish my dear friend and her family the best of luck on their forthcoming travels.

Back tomorrow with this week's Wednesday Weekly Deals and my Colour Me...! card for this week. Until then, happy stampin'!


Stampin' Up! Supplies Used:

* I Am Me Designer Series Paper - retired

Table built using Product Table Builder by The Crafty Owl - Independent Stampin' Up! Demonstrator.


Colour Me...! Zoo Babies

by Joanne James16. July 2014 08:00

Good morning blog readers - it's Wednesday so today I am definitely prepared and 'on the ball'! Today I'm sharing my Design Team card for this week's challenge over at Colour Me...!, where this week's colour palette is Subtles, featuring Lost Lagoon, Smoky Slate and Island Indigo:


I decided these colours would make a nice baby card, as they are quite masculine and a change from traditional powder blue and got to work with my Zoo Babies stamp set and the above sketch layout from Seize the Sketch:

I used Smoky Slate for my card base and having stamped my animals on Whisper White in each of the challenge colours (I love how you can build little towers with them!) I mounted my animal panel on Island Indigo and for my offset layer I used a piece of Lost Lagoon cardstock which I embossed with the Alphabet Press embossing folder. Lastly, I stamped 'congratulations' from the Zoo Babies stamp set in island Indigo onto Whisper White and created a layered banner flag, finished off with a Basic Metal Buttton tied with retired Island Indigo baker's twine.

So that's what I chose to do with the colours. Why not pop over to the Colour Me...! blog for more colour inspiration and see what Hayley, Tara, Sherrie, Claire, Julia and Anja have done with these colours.

Back later with this week's Wednesday Weekly Deals; until then, happy stampin'!


Stampin' Up! Supplies Used:

Table built using Product Table Builder by The Crafty Owl - Independent Stampin' Up! Demonstrator.


Tags: , , , , , , ,

Cards | Stamping

Mini Catalogue

BROWSE THE CATALOGUE

The mini catalogue is now live! Read and download your copy here.

Shop Online

Access my online shop 24 x 7, 365 days of the year:

Current April hostess code:

VDKNV7BH

Shop Online

Join My Team

It's always a great time to join Stampin’ Up! New team members can get £130 worth of products for only £99 + free business supplies + free shipping + all the fun being a part of Stampin’ Up! Stampin' Up! has something for everyone: join my growing team and benefit from my support to enjoy Stampin' Up! however you choose.

If you're interested, call me for a chat to understand how I can help you realise your goals. Alternatively, if you have already decided to sign up and you just can't wait, please click here for the link to the online form where you can sign up and order your starter kit right away! 

Latest Kit!

Stampin Cut and Emboss

The Rock Legend Kit has all you need to make 8 cards with coordinating envelopes. Along with the new Panda Friends Kit, both are available from January 4th for just £14 each - get yours here!

2023-24 Annual Catalogue

BROWSE THE CATALOGUE

Click on the catalogue for a full list of current SU! supplies - if you would like to order any of the items featured, please drop me a line at [email protected] or give me a call on 07773 421446 - I'd be happy to help.

New Online Exclusives

There are new products available exclusively in the online store from 5 March - check them out here.

About Me

Hi I'm Joanne and live in Northampton and when I'm not looking after my husband and two beautiful children, am an avid crafter with a passion for all things Stampin' Up!

I must confess that I have never been a big rubber stamper - until I discovered Stampin' Up! that is. I love the fact that I can get such great results with co-ordinating stamps, inks, papers and punches - the possibilities are endless! Join me on my stamping journey as I share the things I love and be inspired to create amazing things yourself!

Follow Me

Monthly Newsletter

Box Builder

Click the button above to use Box Buster to create your custom box design using the Envelope Punch Board!

Kits Collection Now Available!

Stampin Cut and Emboss

The new Kits Collection from Stampin' Up! is now available!

Click here to see the current kits available and order yours online today.

I Design For


Stampin' Up Stuff

This is my personal blog and is not endorsed by Stampin’ Up! I hope you find it a plentiful source of ideas and personal inspiration but please don't copy my designs for contest submission or use for classes, publication or sale without express permission.