Snowflake Paper Christmas Wreath

by Joanne James21. December 2014 20:33

Sunday already?! Where are the days going??! I have been busy with my Christmas preparations and my focus has been on gift packaging these last few days, along with a few special Christmas cards. Most are going out of the door before they are even photographed though! Today I wanted to do a quick post to share a snowflake paper wreath that I made recently for a friend of mine:

It uses a whole bunch of retired product - the paper is from a couple of years ago (I can't even remember what it was called) and is decorated with snowflakes made from stamping Cherry Cobbler and Gumball Green on Very Vanilla carstock using the Festive Flurry stamp set, that I then cut out using the Big Shot and co-ordinating framelits and finished with a paper bow made using my Gift Bow Bigz Die. 

My friend specifically wanted this paper pattern as she wanted her wreath to co-ordinate with other festive pieces she had - as such I had to include a few pieces of solid colour cardstock just to enable me to get all the way around the wreath base; I am now officially out of this DSP pattern! I am going to make another of these wreath types at some point as I think it's really effective, although will probably choose a more traditional blue/silver colour scheme with my snowflakes. It was also quite easy to achieve: about 22 strips of DSP measuring 12" x 1 1/4", adhered to a styrofoam wreath and then the ends flagged.

That's all from me today - back soon with another project when time allows. Until then, happy stampin!

Tags: , , , , , , , , ,

3D Projects | Stamping

149 Days Until Christmas - Snowflakes for Freshly Made Sketches

by Joanne James28. July 2014 18:51

I know, I know - we re experiencing some of the hottest weather we've had in the UK for ages and I'm making Christmas cards with snowflakes on!!! My new seasonal catalogue arrived with the postman on Saturday (it doesn't go live until the beginning of September, but as a demonstrator we receive them early so that we can pre-order items to plan classes and make samples to share with you (one of the many perks of being a demonstrator) and so for the last couple of days I have well and truly had Christmas on the brain! When I saw this week's sketch over at Freshly Made Sketches I decided festive was the order of the day - here's the sketch:

And here's my card:

I changed the orientation of my card as I wanted to use two of the embossed layered snowflakes stamped with the Festive Flurry stamp set and cut out with the coordinating framelits and needed it to be wider rather than taller. I cut my banners out of silver foil sheet and a scrap of last year's Winter Frost DSP that I found in my box, along with a retired snowflake embellishment. I added a few of the current in-colour sequins in Coastal Cabana to add a little more sparkle and finished with a vintage sentiment (from the 'Sweet Essentials' set).

You still have another month and a bit to wait until the launch of the new seasonal catalogue, however if you're the kind of person who likes to get organised and wants to start making Christmas cards now, the Festive Flurry stamps and Framelits are on the Holiday Carryover List and, along with a number of other seasonal items, are still available to purchase until 27th August. You can find the full list of items in the 'Holiday Carryover' section on the right hand side of my blog page, or by clicking here.

That's all from me today - no more Christmas cards I promise - well, at least not this week. Once my pre-order arrives next week, I might not be able to stop myself from sharing a few 'sneak peeks' of festive loveliness!

Back tomorrow with another card; until then, happy stampin'!


Stampin' Up! Supplies Used:

Table built using Product Table Builder by The Crafty Owl - Independent Stampin' Up! Demonstrator.


Festive Flurry Tag a Bag Gift Box

by Joanne James28. December 2013 20:33

Another quick post from me today in between continuing festivities. We had one of our two annual trips to the pantomime today: this one our family visit to one of the smaller theatres in town, which is always guaranteed to put on a good show. This year was no exception - the performance of 'Wind In The Willows' was one of the best I've seen in some time and we all had a lovely time. If you're local to Northampton you really should visit the Royal before the run finishes - you won't regret it.

Now for today's project! As my regular blog readers will know, one of my other hobbies is biscuit baking and decorating. I've made lots of them in the last few weeks, mostly as gifts for teachers, friends and neighbours. I've packaged them in lots of different ways and often use jars tied with ribbon for my bite-size cookies, but one of my favourite methods of presentation for standard size biscuits has to be the Tag a Bag Gift Boxes - you can decorate and embellish, but I love the 'sneak peek' you get of the contents inside through the acetate sleeve. These boxes are also super sturdy, which is great for transporting their reasonably fragile contents. Many of my boxes were made and gifted before I got the chance to photograph them, but I managed to get a shot of my very last box before its departure: 

I finished the box with a belly band of Pool Party layered with a strip of Winter Frost DSP through the centre and finished with a pretty triple-layered snowflake, just right for my festive snowflake iced gingerbread biscuits in a co-ordinating colourway. This particular box of biscuits was destined for Aaron, the UPS man who delivers my Stampin' Up! parcels all year round; just one of the many people I like to show my appreciation for, especially at this time of year.

Tomorrow I have a special project to share: not a Christmas themed project, but rather something I made for a dear friend of mine as a Christmas gift. Here's a little glimpse just to whet your appetite: 

Hopefully you're intrigued - pop back tomorrow to see the whole thing. Until then, happy stampin'!


Stampin' Up! Supplies Used:

Table built using Stampin' Up! Product Table Builder from The Crafty Owl.


Tags: , , , , , , , ,

3D Projects | Boxes | Stamping

Warmth and Wonder Chocolate Spoon Stirrers

by Joanne James28. November 2013 20:36

Today I have another festive project to share - this was also one of my convention swaps for some of the members of my wider team. I made a whole bunch of chocolate spoon stirrers - here's a close-up photo of the unwrapped spoon:

These really are so easy to make. All you need are some disposable wooden spoons and some small cello bags. To make the spoon, first I stamped it; I stamped the tiny snowflake in white kraft ink and heat embossed it for shine and texture, then stamped the word 'Christmas' in Real Red along the length of the spoon. This is a partial stamp from the 'Christmas Greetings' in the 'Warmth and Wonder' stamp set. This is a lovely hostess exclusive set, available when you host a Stampin' Up! party. Once the spoon has been stamped, I melted some milk chocolate in a small silicone cake mould and inserted both the spoon and some festive shaped marshmallows into it and left it to set before removing the mould. Here is a picture of the finished packaged spoons:

All you need to do is package in a small cello bag and tie with red grosgrain ribbon and attach a Festive Flurry snowflake stamped gift tag, stamped in white kraft on Crumb Cake cardstock and overstamped in Real Red with one of the other greetings from the 'Warmth and Wonder' set. So simple, yet a lovely gift for hostesses, customers, neighbours or friends during the festive season.

Back tomorrow with another project; until then, happy stampin'!


Stampin' Up! Supplies used:


Tags: , , , , , , ,

3D Projects | Stamping

Festive Flurry 3D Snowflake Bottle Tag and Video Tutorial

by Joanne James26. November 2013 13:20

Well, I'm back from Stampin' Up! 2013 European Convention and what can I say - my team and I had a blast! We came home exhausted, but having had the best time swapping, learning, meeting old friends, making new ones, 'sneak peeking' at some fabulous new products. Normal blogging is now resumed and I have lots of lovely things to show you, starting with the general swap that one of my downlines, Barbara, and I made for everyone we met at convention. It was something of a 'case' on the tag that features in this year's autumn-winter seasonal catalogue, but with a few changes to make it our own. Here is a picture of one of our finished swaps:

We also made some in a Pool Party/Island Indigo/Embossed Silver colourway - I will have to edit this post to include a photograph of one of these as I can't find one at the moment (might have to retake!) The snowflakes in the Festive Flurry set are great for making ornaments or 3-D tags or box-toppers with and you can layer just three snowflakes or all four to get a really large one. I shot a short video tutorial to show you how to put these layered snowflakes together to create this added dimension; grab your glue gun and click on the link below if you would like to see how to achieve it yourself - the video also shows the snowflake in the alternative colourway:

 I hope you find the video useful and have fun creating your own snowflakes in lots of different colour combinations. Just before I leave you the supplies list for this project, I thought you might like to see a fun Convention picture of me with 2 of my downline team members - I'm the one in the middle with the stripey hat:

If you would like to join us for some fun - and chocolate! - at next year's European Convention in Brussels next October, get in touch for more information about the benefits of joining my team.

Back tomorrow with more swaps and gifts made for friends; until then, happy stampin'!


Stampin' Up! Supplies Used:


Easiest Ever Crackers with the Stampin' Up! Envelope Punch Board - Video Tutorial

by Joanne James16. November 2013 21:42

Yay - it's the weekend! I've been busy doing homework and more convention swaps today, along with other lovely items for my convention friends, all of which I will share with you another time ... because today I'm going to show you the easiest ever way to make Christmas Crackers using the new Stampin' Up! Envelope Punch Board! Not just pictures, but a video too. The new envelope punch board from Stampin' Up! has been hugely popular as lots of my customers will testify and it really is a versatile piece of kit. As I mentioned in a previous post, the board can be used not only to make envelopes, but also boxes in a variety of shapes and sizes and other 3D items such as crackers.

As we are fast approaching the start of the festive season, what better than to make some lovely Christmas crackers to decorate your Christmas tree, as table favours for the festive table or even to house a couple of chocolates as a little gift for someone special? Here are the ones I make in my video, along with a picture of some other ones that I've made:
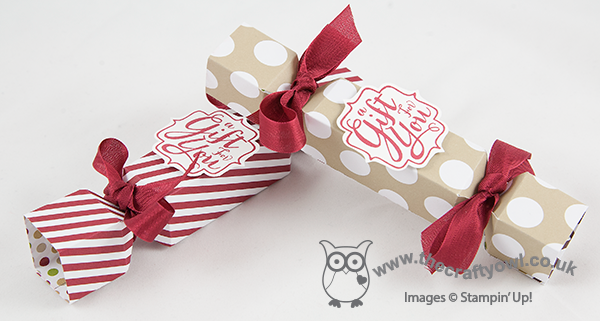
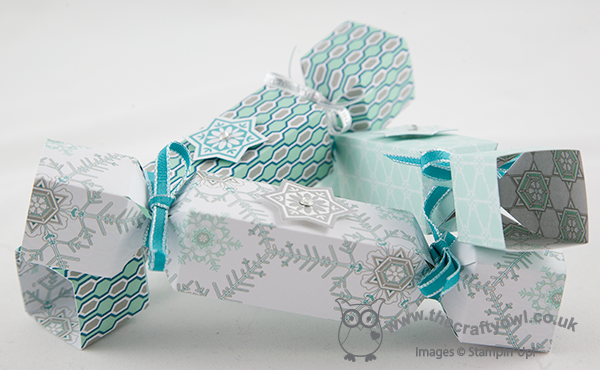
I've seen lots of videos and tutorials on how to make them in a variety of sizes and styles, but if you want to make lots I think by far the easiest way is to use the current Designer Series Paper Stacks in the seasonal catalogue as your starting point: each sheet measures 4.5"x6.5" so it makes the score measurements really easy: 1", 2", 3" and 4" on the short side, and 1", 1.5", 2", 4.5", 5" and 5"5 on the long side. Simply score, punch stick and done - you can make a cracker in just a couple of minutes. Add a minute or two more to add some decoration and you could be mass producing these in no time. If you don't use the paper stacks, any designer paper cut to the basic measurement will do; I would avoid using solid colour standard cardstock as this is much thicker and whilst your envelope punch board will punch through a double thickness of cardstock, it is quite hard work and you risk damaging your punch and board as it isn't really designed with this in mind.

In my video, I also show a boxed set of crackers that I made using the Winter Frost Designer Series Paper Stack - here is the photo again:
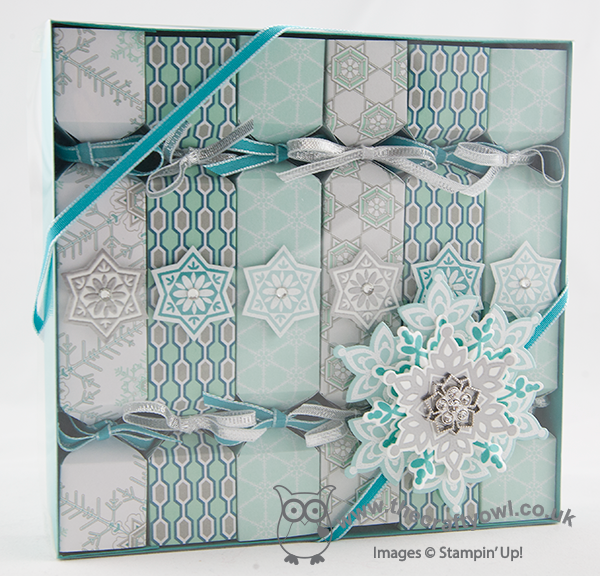
This box set would make a lovely gift for someone - if you would like to make a box for your crackers, the dimensions you will need are as follows:

Box Base: Sheet of cardstock (I used Bermuda Bay) 8 1/4" x 8 1/2". Score at 1 1/8" and 7 1/8" across the short side, then rotate through 90 degrees and score at 1 1/8" and 7 3/8" on the long side.

Box lid: Acetate window sheet size 8 1/4" x 8 1/2". Create a shim for your score board using an offcut of window sheet, then with your shim in place, score the lid to the same dimensions as the base above (1 1/8" and 7 1/8" across the short side, 1 1/8" and 7 3/8" on the long side). This will ensure your box lid fits snugly.

I then decorated my box with some embossed die cut snowflakes using the Festive Flurry Stamp Set and Framelits, Bermuda Bay ribbon and a Frosted Finishes embellishment.

So without further ado, grab your paper stack and watch my video tutorial and start making your Christmas crackers today!


Stampin' Up Supplies Used:


Festive Flurry Merry Monday Challenge

by Joanne James18. October 2013 21:06

I know, you're probably thinking 'Merry Monday? It's only Friday!' I'm not wishing away my weekend, far from it. Rather today's card is another Christmas card made with the challenge over at Always Playing with Paper in mind. The challenge was to use blues, grey/silver and white and snowflakes:

I've been wanting to use a sketch layout I saw over at the Paper Pal Arts site a little while ago; here's the card I made:

I used Pool Party for the base of my card and layered with Island Indigo and Smoky Slate and some of the Winter Frost DSP for the top layer. My design is anchored with a lovely Festive Flurry layered snowflake , which is stamped Whisper White on Pool Party cardstock for the first layer, Island Indigo on Whisper White for the second layer and then Metallic Silver on Whisper White for the top layer, finished with a single Island Indigo candy dot - I love these! Here's a close up of the snowflake, with the shimmery metallic silver finish (that is very difficult to photograph!):

This photo shows the build of layers of the snowflake - this set is so good for this and the framelits make cutting out so easy:

I finished the inside by stamping this verse from the Christmas Messages set:

As of today the James Juniors are on half term for two weeks. We have lots of homework to do, but I am relieved to be having a break from some of the challenges and routine of school life and looking forward to having fun with some pre-Christmas activities of our own. I'm also looking forward to another of my special project classes this weekend; I have a group of lovely ladies coming to make Christmas banners using the Build a Banner kit. Check out my Facebook page tomorrow if you would like a 'sneak peak'; otherwise I will be sharing the completed banners next week.

Back tomorrow with another project; until then, happy stampin'!


Stampin' Up Supplies Used:

 Big Shot Die-Cut Machine - by Stampin' Up!Festive Flurry Clear-Mount BundleMagnetic PlatformChristmas Messages Clear-mount Stamp SetWinter Frost Designer Series Paper Stack

Island Indigo Classic Stampin' PadWhisper White Craft Stampin' Pad - by Stampin' Up!Silver Metallic Encore PadRegals Candy Dots


Bermuda Bay Festive Flurry Card

by Joanne James11. October 2013 19:53

Today I'm sharing another of this week's class cards using the Festive Flurry stamp set and framelits bundle. Another simple layout featuring the Winter Frost paper stack. Here's the card we made:

This time we layered the snowflakes and overstamped on the top one (the snowflake was stamped in Smoky Slate, having been stamped off once first onto scrap paper to give a softer background). Bermuda Bay cardstock adds a real striking background and gives this colourway quite a modern feel. Some silver Dazzling Details on the tips of the snowflake adds a little finishing sparkle.

We used both of the seasonal colourways in our class, and I'm really undecided as to which one I prefer most. Which one do you like the most?

Back with another card tomorrow; until then, happy stampin'!


Stampin' Up Supplies Used:

Festive Flurry Clear-Mount BundleWinter Frost Designer Series Paper StackBermuda Bay Classic Stampin' PadMagnetic PlatformBig Shot Die-Cut Machine - by Stampin' Up!Christmas Messages Clear-mount Stamp Set

Smoky Slate Classic Stampin' PadSilver Sparkle Dazzling Details


Festive Flurry Card and New MDS Downloads

by Joanne James8. October 2013 15:40

A quick post from me today as I'm out again this evening preparing for our school annual bonfire and fireworks display. I promised to share a card with you today, so thought I'd share this lovely festive flurry card that we made in my card class yesterday:

This is a case of a Mary Fish card (you can see her original card here) minus the frosted finish embellishment. Whilst I love the embellishment and you will see them on future blog cards, our class cards are all intended to be post-friendly, so the frosted embellishment on this card had to go! We replaced with a large rhinestone instead to give a little sparkle but not add too much bulk. I love the Winter Frost colours of this card - they have a real fresh and modern feel.

Lastly, it's Tuesday, also known as Digital Download Day. Click on the link below to see all of the new digital downloads available in the online store this week:

October 8, 2013 - Digital Downloads

There are some great new downloads this week, including calendar and photobook templates that would make lovely Christmas presents. Why not have a click and take a look?

Back tomorrow with another card; until then, happy stampin'!


Stampin' Up Supplies Used:

Festive Flurry Clear-Mount BundleWinter Frost Designer Series Paper StackSilver 1/8 RibbonStylish Stripes Textured Impressions Embossing Folder

Bermuda Bay Classic Stampin' PadBasic Rhinestones Jewel Accents - by Stampin' Up!Magnetic PlatformBig Shot Die-Cut Machine - by Stampin' Up!

Scrapbooking

Stampin' Up! has introduced a new range of 12x12" scrapbooking product and kit - the full range is now available to purchase online. To download a copy of the new digital Scrapbooking Catalogue click here.

Mini Catalogue

BROWSE THE CATALOGUE

'Tis The Season - the new Stampin' Up! Mini Catalogue is here! For more details and to download your copy click here

Shop Online

Access my online shop 24 x 7, 365 days of the year:

Current September hostess code:

JQEHTZGK

Shop Online

2024-25 Annual Catalogue

BROWSE THE CATALOGUE

Click on the image to download your copy of the 2024-25 annual catalogue. For a full list of current SU! supplies, go to my online store. If you would like any help or advice, please drop me a line at joanne@thecraftyowl.co.uk or give me a call on 07773 421446 - I'd be happy to help.

Join My Team

It's always a great time to join Stampin’ Up! New team members can get £130 worth of products for only £99 + free business supplies + free shipping + all the fun being a part of Stampin’ Up! Stampin' Up! has something for everyone: join my growing team and benefit from my support to enjoy Stampin' Up! however you choose.

If you're interested, call me for a chat to understand how I can help you realise your goals. Alternatively, if you have already decided to sign up and you just can't wait, please click here for the link to the online form where you can sign up and order your starter kit right away! 

Latest Kits!

Stampin Cut and Emboss

The Christmas Ornaments Kit and Card Keeper Kit are the latest kits that will be arriving in the online store later this month - get yours here!

New Online Exclusives

There are new products available exclusively in the online store from 3 July - check them out here.

About Me

Hi I'm Joanne and live in Northampton and when I'm not looking after my husband and two beautiful children, am an avid crafter with a passion for all things Stampin' Up!

I must confess that I have never been a big rubber stamper - until I discovered Stampin' Up! that is. I love the fact that I can get such great results with co-ordinating stamps, inks, papers and punches - the possibilities are endless! Join me on my stamping journey as I share the things I love and be inspired to create amazing things yourself!

Follow Me

Monthly Newsletter

Box Builder

Click the button above to use Box Buster to create your custom box design using the Envelope Punch Board!

Kits Collection Now Available!

Stampin Cut and Emboss

The new Kits Collection from Stampin' Up! is now available!

Click here to see the current kits available and order yours online today.

I Design For


Stampin' Up Stuff

This is my personal blog and is not endorsed by Stampin’ Up! I hope you find it a plentiful source of ideas and personal inspiration but please don't copy my designs for contest submission or use for classes, publication or sale without express permission.