Freaky Friends Halloween Joke Card

by Joanne James6. October 2014 10:41

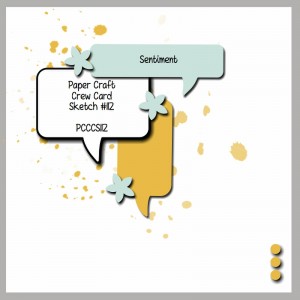
Happy Monday everyone! It might be raining outside but I guarantee today's card will cheer you up! It's a Halloween card with a difference using this week's sketch over at The Paper Craft Crew:

This sketch is quite similar to the sketch from a couple of weeks ago (you can see my card for that sketch here - and this card earned me a Featured Artisan spot too, so thank you Paper Craft Crew!) and whilst I did choose to use the word bubbles literally, the layout of this sketch was perfect for something that I've been wanting to create for a while - a Halloween joke card! Take a look: 

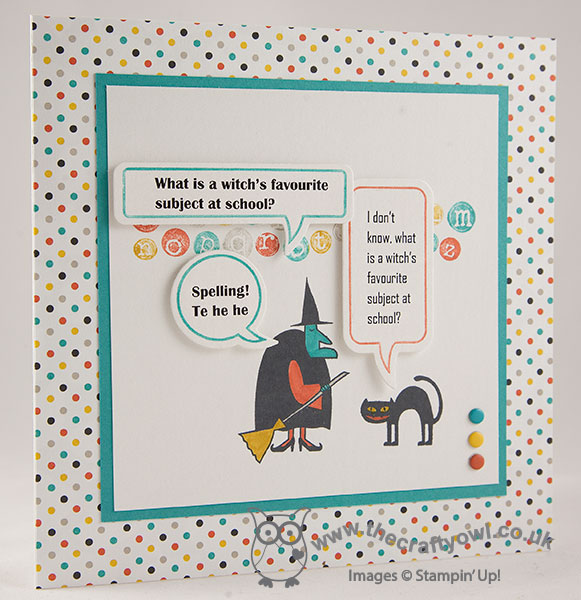
Fun, eh?! Every time I've looked at using the witch and cat from 'Freaky Friends' together, the witch just looks to me like she is saying something to the cat - so I decided a suitably-themed joke was in order! I made my card 6" square and used a Whisper White card base, covering the entire front section with a piece of Motley Monsters DSP and matting my central Whisper White panel with a mat of Bermuda Bay.

I stamped the witch and cat in Memento Black ink and coloured in the open spaces with my Bermuda Bay, Crushed Curry, Sahara Sand and Tangerine Tango Stampin' Write marker pens. My joke is computer-generated, which I printed out on Whisper White then inked the borders of the Just Sayin' stamps that co-ordinate with the Word Bubble framelits with my markers and stamped these over the top using my stamp-a-ma-jig for placement before rolling out with my Big Shot. I stamped the alphabet letters from the 'Tap Tap Tap' stamp in the background, colouring the individual letters with my markers, before positioning my word bubbles on top and adhering with dimensionals. To finish, I added a trio of candy dots in the corner.

I think this card is really fun; I made it to give to my 7 year old son, who is and always has been joke-mad. When he saw it he proclaimed it 'definitely funny', so I guess it passed the test. His first and favourite joke of all time is still this one:

Why did the banana go to the doctors?

Because he wasn't peeling very well!

This still sends him into fits of giggles every time he tells it!

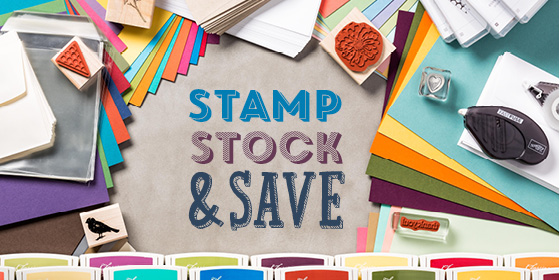
Ok enough jokes from me today - before I go, just a reminder that today is the last day to take advantage of 'stamp, stock and save' - selected ink pads, paper, envelopes, and adhesive are available at a 15% discount! There are also a number of select stamps that are 20%! Full details of the products included in this offer can be found in the offer flyer here or you can go straight to my online store here to place your order - don't forget to include October's hostess code SFEXF44E.

That's all from me today - back tomorrow with another project. Until then, happy stampin'!


Stampin' Up! Supplies Used:

Table built using Product Table Builder by The Crafty Owl - Independent Stampin' Up! Demonstrator.


My First Halloween Pumpkin!

by Joanne James5. October 2014 07:00

It's Sunday and time for this week's challenge over at The Paper Players, where Jaydee has a fun Halloween theme challenge for us this week:


I used the layout over at Freshly Made Sketches again this week for my card (although I'm not sure my card is as 'clean' as is required; the layout was too good to pass up) as I thought it would be perfect to highlight my first Halloween pumpkin - here's my card:

I used a piece of Motley Monsters DSP on a base of Tangerine Tango for the front of my card; I love this paper and the little eyes that peek through between the trees, although I must confess this looks so much better on a sheet of 12 x 12" and it was difficult to take my scissors to it! I used the Halloween sentiment from 'Mingle All The Way', colouring the letters with a Tangerine Tango Stampin' Write marker and mounted this on a circle of Basic Black. This circle was mounted on top of a piece of chevron-embossed Crushed Curry and black chevron ribbon and the card finished with a cute little pumpkin from the Fall Fest stamp set and cut out with the matching framelit. It's tricky to see from the photo, but the pumpkin was then covered in Crystal Effects and allowed to dry, so it has a lovely dimension and shine.

That's my simple Halloween card for today; why not pop over to The Paper Players challenge blog and check out this week's inspiration from the other designers? As always, there are some great cards on show.

Back tomorrow with another project; until then, happy stampin'!


Stampin' Up! Supplies Used:

Table built using Product Table Builder by The Crafty Owl - Independent Stampin' Up! Demonstrator.


Autumn Leaves and Happy Hauntings For The Paper Players

by Joanne James28. September 2014 07:00

It's Sunday which means one thing - it's time for our weekly challenge over at The Paper Players! This week Sandy has a great sketch for us:

Sketches are my absolute favourite challenges - so many possibilities, and this sketch is no exception! So much so, I actually made two cards using this sketch already which I thought I would share with you today. If you've come from The Paper Players blog, this is the card that you will have seen there:

My first take on the sketch was this fall-inspired card, where I layered a combination of 1" punched circles and little leaves cut out using the Big Shot and the Fall Fest framelits, in Hello Honey, Mossy Meadow and Tangelo Twist on a base of Baked Brown Sugar, and finished with a simple knotted bow of Hello Honey satin ribbon and a sentiment from the 'Good Greetings' hostess set. I haven't used this colour combination before but thought it would make a nice fall colour scheme; I prefer these colours in cardstock rather than stamped on Whisper White, as I find the inks too intense somehow. I am linking this card up with the challenge over at SUO Challenges this week as they are looking for cards using autumnal colours, so this totally fits the bill.

I liked this sketch so much, I couldn't stop at one card though; the card below is the very first thing that came to me when I looked at the sketch and it was so simple I just had to make it and share it with you:

I stamped the 3 pairs of eyes from 'Freaky Friends' twice each in Versamark onto Basic Black cardstock and heat embossed in Crushed Curry, then did the same with the sentiment and heat embossed that in white. I then matted this panel onto a panel of Crushed Curry and a Basic Black card base. Simple, but so effective in real life - the eyes have a real shine as if they are looking out of the card at you!

I had to stop there for today, but I know I will use this sketch again - it is a keeper! Do pop by The Paper Players site and check out the blogs of the rest of the design team - there are some awesome cards this week, as always!

Right, we have a morning of sport in the James household today - Rebecca and I are going to explore a new hockey club and the boys are off to check out a rugby club, before reconvening for lunch and hopefully a restful afternoon.

Back tomorrow with another project; until then, happy stampin'!


Stampin' Up! Supplies Used:

Table built using Product Table Builder by The Crafty Owl - Independent Stampin' Up! Demonstrator.


Boo To You! Ghosts Galore Halloween Card

by Joanne James23. September 2014 20:00

As promised, here's my second post today as I wanted to share with you the card I made for this week's sketch challenge over at Create With Connie and Mary:

I love a sketch challenge and was intrigued by this unusual layout, which was crying out for the use of some washi tape with those bold stripes, something that is quite under-utilised within my craft stash at times. Anyways this was one of those cards that the minute I saw the sketch I knew what I wanted to do with it, so it took me next to no time to pull this card together. Here's my card:

I used a base of Sahara Sand for my card as this is the colour of the ghost DSP from the Motley Monster set, but as it's quite neutral used lots of splashes of Tangerine Tango to really bring this card together and prevent it from looking washed out. By the way, check out the faces on the ghosts on the paper - how cute are they?! In addition to the mat, I added a strip of Tangerine Tango Retro Fresh washi tape for the vertical band (I love how you can see the ghosts through it - adds to the spooky I think!) and then used a piece of Tangerine Tango cardstock for the horizontal band, onto which I stamped my 'boo to you!' greeting. I bordered this with a piece of thick orange and white two-tone trim (I frayed the ends before adhering to the back of my panel so that it wouldn't have too much bulk). Lastly, I finished with a lovely Dazzling Diamonds sparkly ghost (thank you Mary Brown for the inspiration on a previous card of yours - love it!) I wanted my ghost to look towards the sentiment so cut the paper on the reverse using my framelit so that I could turn him over (hope that makes sense). I used one of the eyelits from the 'Chalk Talk' framelits to create the eyes and punched his mouth using my Crop-a-dile and adhered a piece of Basic Black cardstock to the reverse for definition, before adhering with dimensionsals.

The greeting I used on this card is from the 'Good Greetings' set that is currently available free with qualifying party sales of £200 or more for parties held between now and 31st October. This is such a versatile set - whilst this card has a definite Halloween feel to it, I think the 'boo to you' greeting means it would work as a nice 'Hello' card for this time of year. If you would like to earn this greetings set for free, I do still have a couple of slots available for parties in October so if you'd like one, do get in touch as soon as possible!

If you like this sketch, you should check out the other cards over at Create with Connie and Mary - there are some great interpretations and ideas of how to use it.

Back tomorrow with this week's Design Team sketch for the new challenge over at Colour Me...! and this week's Weekly Wednesday Deals!

Until then, happy stampin'!


Stampin' Up! Supplies Used:

Table built using Product Table Builder by The Crafty Owl - Independent Stampin' Up! Demonstrator.


Thankful For ... You! Thank You Card

by Joanne James23. September 2014 13:30

Hello everyone! Today I'm sharing my card for this week's challenge over at The Paper Craft Crew, for which I also used the current colour palette over at The Card Concept:


I thought the sketch layout with the word bubbles and the leafy inspiration photo would combine to create the perfect opportunity to showcase the sentiments in the 'Gratitude For Days' stamp set - a rather unsung hero from the current seasonal catalogue I think, but a set that I have used lots and lots. Here is my card:

I used a combination of Real Red, Crushed Curry and Wild Wasabi for my card and inked the outlines of the Just Sayin' stamped word bubbles using my markers then stamped the insides with various 'gratitude' stamps in contrasting colours. I used some little leaves cut with my Fall Fest framelits as the embellishment for the word bubbles, and gradually layered them over a Gorgeous Grunge background to achieve my finished design. I think this still qualifies as 'clean and layered' as far as The Card Concept is concerned (if you've ever wondered about the definitions of the various cardmaking styles, you should check out their site - it gives some great guidelines), maybe bordering on 'freestyle collage', although probably not random enough to truly be a collage!

Hope you like my card; I'll pop back later with another quick make today for this week's challenge over at Create With Connie and Mary, so stay posted. until then, happy stampin'!


Stampin' Up! Supplies Used:

Table built using Product Table Builder by The Crafty Owl - Independent Stampin' Up! Demonstrator.


Autumn Fall Wreath for The Paper Players

by Joanne James14. September 2014 08:00

Today I'm sharing my Design Team card for The Paper Players, where this week Anne Marie has chosen this beautiful Autumnal colour palette for us to work with:


I also used the sketch over at Freshly Made Sketches this week for my layout. As soon as I saw this week's colours, I knew it was time to make an Autumn wreath card using my 'Wondrous Wreath' stamp set, as I've been wanting to do one of these for ages. Here's my card:

I used Baked Brown Sugar and Cajun Craze for the leaves on my wreath and stamped the berries in Blackberry Bliss. I cut it out using my Big Shot and the co-ordinating framelits and looped some linen thread behind it before adhering it with dimensionals to my Hardwood background, stamped in Always Artichoke (this panel reminds my of a mossy whitewashed shed!). I finished my wreath with a bow in the gorgeous Blackberry Bliss satin ribbon and a sentiment panel stamped with a simple 'thanks' and decorated with a few leaves from my 'Gratitude For Days' stamp set and a couple of candy dots. I love the rustic feel of this card - so fitting for this time of year.

Do pop by the challenge blog and see how the other Paper Players designers have used this week's colour combination - there are some fabulous cards from this talented bunch of designers.

I'm still playing catch up so am looking forward to a reasonably restful day today before the onslaught of another new and action-packed week. Back tomorrow with another project; until then, happy stampin'!


Stampin' Up! Supplies Used:

Table built using Product Table Builder by The Crafty Owl - Independent Stampin' Up! Demonstrator.


Sweet Baby Duck New Baby Card for Colour Me...!

by Joanne James3. September 2014 09:30

Wednesday already? This week is zipping by! Today I'm sharing my card for this week's challenge over at Colour Me...! where we have a monochromatic colour palette to work with:

Daffodil Delight yellow - a favourite of mine! - and white. I used this week's sketch over at CAS(E) This Sketch for my layout and this is what I came up with:

A simple card where the feature is this lovely piece of Daffodil Yellow DSP from the All Abloom DSP paper stack (the little white spots remind me of bubbles!). I overlaid this with my angled panel of Whisper White, having used my Big Shot and Baby's First framelits to cut out the duck shape to allow the DSP to peek through. I finished the duck with a simple white baker's twine bow before adding my Bitty Banner 'Sweet Baby' sentiment on dimensionals for added height.

A great 'welcome baby' card that is the perfect store cupboard standby as it would be suitable for a boy or a girl - I'm also linking up with SUO Challenges as it fits nicely with their 'clean and simple' theme. Why not visit the other Colour Me...! designers and check out their takes on this week's colour combination:

And our talented guest designer for September - Holly Endress
 
We look forward to seeing your bright monochromatic creations. Back tomorrow with another project; until then, happy stampin'!
 
Stampin' Up! Supplies Used:
 
Table built using Product Table Builder by The Crafty Owl - Independent Stampin' Up! Demonstrator.
 

Plaid Partridge & Pears Christmas Card

by Joanne James2. September 2014 21:12

Another busy day today - getting ready for the return to school tomorrow of my beloved James Juniors, including an early visit to meet Ben's new teacher, as it has changed over the vacation to the one he was expecting prior to the end of last term. I love having them at home during holiday time and we have had lots of fun, but I think we will all benefit from a little more routine in our lives (although this time next week I might disagree!)

So today a quick share of another card I made with the 'Partridge & Pears' stamp, this time in reds and browns and stamping onto Sahara Sand as my base, rather than Whisper White. It give a totally different look and feel - take a look and see what you think:

I used Early Espresso as my card base, with a layer of the lovely Cherry Cobbler plaid patterned paper from the Trim The Tree DSP paper stack, the stamped my main image in Early Espresso on Sahara Sand. I coloured the image with my standard Stampin' Write markers and only used my Blendabilities on the pears (Old Olive) and the partridge's breast (skin tones). You have to be really careful when using Blendabilties on coloured cardstock, as they bleed into the paper much more quickly than with Whisper White. I added some colour to the leaves with my chalk marker. I finished my card with a sentiment from the 'Watercolor Winter Too' set stamped in Cherry Cobbler on Sahara Sand and cut it out with my Big Shot and Project Life framelits, then matted it onto a piece of Early Espresso which I just snipped the corners away from with a circle punch to echo the shape of the framelit.

I really like the more muted colours of this card - it's just a little bit different. Back tomorrow with my Design team post for the Colour Me...! challenge, so do pop by to see what our theme is this week, along with a new set of Wednesday Weekly Deals.

Until then, happy stampin'!


Stampin' Up! Supplies Used:

Table built using Product Table Builder by The Crafty Owl - Independent Stampin' Up! Demonstrator.


Tags: , , , , , , , ,

Cards | Stamping

Have a Spooky Halloweeny with The Paper Players

by Joanne James24. August 2014 08:00

Today I'm sharing my Design team card for this week's challenge over at The Paper Players. This week Jaydee is hosting and she has the following sketch layout for us:

I love a good sketch layout and this one is no exception - I'd designed 3 cards with it within minutes of looking at it, so don't be surprised if you see this layout inspiring more of my creations in the coming weeks. For today though, I have another seasonal catalogue 'sneak peek' for you (I know, I'm such a tease!) - this time, with a Halloween theme: 

I don't normally purchase any Halloween items as I usually plough straight into Christmas, but this year I couldn't resist - there are some fantastic items to choose from! Today's card features the 'Motley Monsters' DSP and stamps from both the 'Freaky Friends' stamp set (the cat) and the 'Mingle All the Way' stamp set (sentiment). I heat embossed the cat in black so that he would be nice and shiny and coloured in the open letters of the sentiment with marker colours that co-ordinated with the DSP. The banner flag is made from a piece of Tangerine Tango cardstock covered with Retro Fresh washi tape in the same colour.

I hope this gets you in the mood for a spooky spooky halloweeny! Do pop over to The Paper Players to see what the other designers have come up with - there are some amazing takes on today's sketch.

Back tomorrow with a post for Bank Holiday Monday; until then, happy stampin'!


Stampin' Up! Supplies Used:

* Motley Monsters Designer Series Paper, Freaky Friends and Mingle All The Way - available 28th August

Table built using Product Table Builder by The Crafty Owl - Independent Stampin' Up! Demonstrator.


Flowerfull Heart Wedding Card

by Joanne James16. August 2014 21:54

I've spent a pleasant afternoon today with the ladies at my local hair and beauty salon celebrating their 3rd anniversary since opening (Pamper Me Hair & Beauty in Northampton - if you're local look them up, they're a lovely bunch). So another quick share today - I'm linking up with The Card Concept where the theme is to make a wedding card:

As much as I loved the photo inspiration for this challenge, I wanted to use Shimmery White and silver for my card - I had a clear idea in mind of what I wanted to create. Here's my card: 

This card uses some of my favourite 'vintage' stamps and tools of all time - Expressions Thinlits and that beautiful Flowerfull Heart stamp. The card is still my usual clean and layered style, but I do think the silver elements and the bow give a real 'classy and elegant' feel. This is one of those cards that looks so much better in real life - so very opulent, even with a relatively simple design.

That's all from me today - back tomorrow with my Design Team post this week for The Paper Players - and it's a fun one!

Until then, happy stampin'!

Stampin' Up! Supplies Used:

Table built using Product Table Builder by The Crafty Owl - Independent Stampin' Up! Demonstrator.


Mini Catalogue

BROWSE THE CATALOGUE

The mini catalogue is now live! Read and download your copy here.

Shop Online

Access my online shop 24 x 7, 365 days of the year:

Current April hostess code:

VDKNV7BH

Shop Online

Join My Team

It's always a great time to join Stampin’ Up! New team members can get £130 worth of products for only £99 + free business supplies + free shipping + all the fun being a part of Stampin’ Up! Stampin' Up! has something for everyone: join my growing team and benefit from my support to enjoy Stampin' Up! however you choose.

If you're interested, call me for a chat to understand how I can help you realise your goals. Alternatively, if you have already decided to sign up and you just can't wait, please click here for the link to the online form where you can sign up and order your starter kit right away! 

Latest Kit!

Stampin Cut and Emboss

The Rock Legend Kit has all you need to make 8 cards with coordinating envelopes. Along with the new Panda Friends Kit, both are available from January 4th for just £14 each - get yours here!

2023-24 Annual Catalogue

BROWSE THE CATALOGUE

Click on the catalogue for a full list of current SU! supplies - if you would like to order any of the items featured, please drop me a line at [email protected] or give me a call on 07773 421446 - I'd be happy to help.

New Online Exclusives

There are new products available exclusively in the online store from 5 March - check them out here.

About Me

Hi I'm Joanne and live in Northampton and when I'm not looking after my husband and two beautiful children, am an avid crafter with a passion for all things Stampin' Up!

I must confess that I have never been a big rubber stamper - until I discovered Stampin' Up! that is. I love the fact that I can get such great results with co-ordinating stamps, inks, papers and punches - the possibilities are endless! Join me on my stamping journey as I share the things I love and be inspired to create amazing things yourself!

Follow Me

Monthly Newsletter

Box Builder

Click the button above to use Box Buster to create your custom box design using the Envelope Punch Board!

Kits Collection Now Available!

Stampin Cut and Emboss

The new Kits Collection from Stampin' Up! is now available!

Click here to see the current kits available and order yours online today.

I Design For


Stampin' Up Stuff

This is my personal blog and is not endorsed by Stampin’ Up! I hope you find it a plentiful source of ideas and personal inspiration but please don't copy my designs for contest submission or use for classes, publication or sale without express permission.