2015 Stampin' Up! Catalogue Sneak Peak - Endless Birthday Wishes

by Joanne James16. May 2015 18:00

Today I've been at a Stampin' Up! UK regional training event in Telford. These events are both exhilarating and exhausting at the same time! It's a great opportunity to get together with team members, other SU! demos and the Stampin' Up! UK and European Home Office teams, to see lots of new and exciting product and swap work with others as a means of creative inspiration. I love creating swaps for this type of event although they can be time-consuming and always seem to create something rather too elaborate for mass production, hence no post yesterday and a late one today. I made a card for this week's challenges over at The Paper Craft Crew and Colour Me! and then based my swap on this as it features a stamp that is new to us here in the UK so is an annual catalogue 'sneak peek', although if you are a USA reader this set will be familiar to you as it has been available as a photopolymer set for some time: Endless Birthday Wishes.


So here is my original challenge card:  

I stamped the sprinkles stamp on my base of Melon Mambo and used the challenge colours to create my own custom happy birthday DSP which I used for the right hand panel - thank heavens for photopolymer stamps, they made lining up a doddle! I then stamped the cake in Memento Black on Whisper White and coloured with my retired Blendabilities, before mounting on a starburst cut with the retiring Starburst framelits - still available and a bargain at only £11.48 for the set! I added a few sequins for sparkle and to tie in my gold button, and then added a strip with a few DSP banners and the second part of my sentiment (the stamp has these words side by side, so I stamped it in two separate goes, so that the words sat on top of each other and fitted my banner better). 

I liked this card so much I created a (only slightly!) simpler version as my swap for the Stampin' Up! regional event. Here it is in the same colours:

The background and DSP panel was the same, however to save on colouring I stamped the cake in a single colour and mounted on a combination of a 2" circle, 2 3/8" scallped circle and 2 1/2" circle instead and I left off the button and twine. I also created it in three other colour combinations, but totally forgot to take photos of the whole pile when finished! I do however have this 'work in progress' shot of the chaos on my office desk last week:

Well, organised chaos! Here are the other colour combinations: Tangerine Tango and Tempting Turquoise (top left), Calypso Coral and Bermuda Bay (bottom left) and Wisteria Wonder and Elegant Eggplant (bottom right).

Thanks to everyone who swapped with me - I have some lovely samples that I'm looking forward to sharing with my customers. Also, before I go here's another quick photo of some of my downline and team members who I was lucky enough to spend the day with:

Even the camera-shy Samantha doesn't look to cross to have been snapped in this one :-) Love you ladies!

I'm looking forward to sharing lots more of the new and fun things that we got to see and create with at our training in the coming weeks; only a couple more weeks until the new 2015 Stampin' Up! annual catalogue launches!

Back tomorrow with another project; until then, happy stampin'!


Stampin' Up! Supplies Used (challenge card):

Table built using Product Table Builder by The Crafty Owl - Independent Stampin' Up! Demonstrator.


Stampin' Up! Supplies Used (swap card):

Table built using Product Table Builder by The Crafty Owl - Independent Stampin' Up! Demonstrator.


All About Trees Christmas Card - I'm a Color Throwdown Guest Designer Today!

by Joanne James3. December 2014 07:00


Welcome to my first creative post of the day! Following my selection as Featured Stamper for this card using the above challenge colours over at Color Throwdown a couple of weeks ago, the lovely ladies over there have invited me to be a guest designer for this week's challenge - yay! As if that wasn't enough, just look at the lovely colours and inspiration photo we had to work with:

I had to go with something Christmassy and I found the mix of textures in the inspiration photo provided me with the starting point for my card. So this is what I came up with:

I used Whisper White for my base and layered this with a mat of Early Espresso, then another piece of Whisper White, having first embossed this piece with my On Point embossing folder. I then created a little 'corner collage', comprising some gold striped vellum, a piece of tree-patterned DSP from the 'Trim The Tree' stack, a gold and snaller silver foil starburst circle, and then two Christmas trees - one stamped in Versamark and heat embossed in gold on Early Espresso cardstock and the other stamped in Early Espresso on Whisper White, with the baubles heat embossed in gold and a few silver rhinestones added for extra sparkle. A couple of silver glimmer paper stars top the trees and I looped some silver thread removed from some silver baker's twine behind them. To finish, I stamped my sentiment in between the embossed area in Early Espresso and Versamark heat embossed in gold. Collage-style cards are not my usual thing, but I must confess I enjoyed getting slightly carried away with this card and am really pleased with the result.

Do pop over to the Color Throwdown blog to see what the other designers have created using this colour palette; these ladies do a great job each week and would I'm sure appreciate your visit. I for one will be stalking the gallery with interest!

Back shortly with today's third post! Until the, happy stampin'!


Stampin' Up! Supplies Used:

Table built using Product Table Builder by The Crafty Owl - Independent Stampin' Up! Demonstrator.


Hip Hip Hooray - Sea Street Shaker Birthday Card

by Joanne James11. August 2014 08:00

It's Monday and today I have a special card for a special day - today my youngest James Junior turns 7! I can't quite believe it - some days I'm not sure where the last 7 years have gone. So today I'm sharing a birthday card I made for Ben to celebrate his special day. I used this week's sketch over at the Paper Craft Crew as my inspiration: 

My card is slightly larger than usual - A5, 21cm x 14.9cm - and features a fun shaker element along with my favourite Sea Street stamp set:

The shaker is made using the surround from the On Film framelit set and filled with fussy cut starfish, crabs, lobsters, gold sequins and some fish and anchors cut with my now retired Oh Whale! clearlit. I stamped the 'Hip Hip Hooray' onto the background before putting the shaker together and carried the sentiment on to the inside of the card:

We have a fun day planned today, including a visit to the cinema and maybe even a cycle ride on his new bicycle if the weather holds! Back tomorrow with another project; until then, happy stampin!


Stampin' Up! Supplies Used:

Table built using Product Table Builder by The Crafty Owl - Independent Stampin' Up! Demonstrator.

Paper Players Guest Designer Announcement - And A Happy Day Card!

by Joanne James25. June 2014 13:00

Today I was all set to share the card I made for this week’s challenge over at The Paper Players, where Nance has this great sketch for us to work with:


But before I get to my card, there is an exciting news announcement over on the Paper Players blog today involving yours truly: I have been asked to feature as one of their guest designers, starting July 6th - how great is that?!

I am excited and truly honoured that this wonderful bunch of papercrafters have asked me to join them for a three month period through to September. You can check out the details and the other guest designers that will be featuring at the same time by clicking on the link here and you will of course be able to see my weekly submissions right here on my blog in weeks to come.

Anyway - back to today's card! I love a good sketch challenge and Nance's sketch can be used in so many ways. Given that we are transitioning between catalogues, my choices for my card today were driven by the (relatively!) fewer stamps that I currently have in my collection and also a desire to use another piece of Designer Series Paper that hasn’t yet made the cut – here’s my card:

I decided to use the ‘Oh Happy Day’ stamp from the Starburst Sayings stamp set and wanted to use the bold black and white zebra-like pattern from the Kaleidescope DSP set; this layout allows for the use of a bold patterned paper without it overwhelming the rest of the card. Black and white alone was a little stark for me though – but I had the perfect antidote with a burst of Melon Mambo, a great hot pink to liven things up a bit! I used the black and white DSP for my central panel, matting this on a piece of Basic Black and then a strip of Melon Mambo, before adhering to my Basic Black card base. I stamped my sentiment focal point in Versamark on Basic Black and then heat embossed in Melon Mambo, which adds great texture and sheen, and cut out using the co-ordinating framelit. I then popped the starburst onto a Melon Mambo circle cut with my Circle Framelits using dimensionals to give added depth. I also decided this card was worthy of some serious ‘bling’ and adhered small rhinestones to each of the circles on the word ‘happy’ – this made this card so sparkly! To finish, I added two small banners cut with framelits as per the sketch, finished with a Melon Mambo button and a few extra rhinestones for good measure.

I think this card has a real ‘rock chick’ feel to it and would be great for an uber-cool teenager; I have a very discerning teenage niece that this card will be perfect for and as her birthday isn’t until October, I guess that makes me look super organised too – win, win! Or I could just send it to myself since today is indeed a happy day, given the announcement that I am going to be a Paper Players Guest Designer - yay! Decisions, decisions....

Back tomorrow with another project; until then, happy stampin’!

Stampin' Up! Supplies Used:

Table built using Product Table Builder by The Crafty Owl - Independent Stampin' Up! Demonstrator.


Dad You Make The World A Better Place

by Joanne James8. June 2014 21:36

This has been the busiest of weekends, with so much going on: we bought Ben a new bike as an early birthday present yesterday - it has become quite apparent as we've been cycling since this year that he had outgrown his previous one and the middle of August was such a long time to wait - and he doesn't seem to have been off it since, along with the usual homework, swimming and a special golden wedding anniversary party today. Not much time for crafting although I did make a quick card using this week's Mojo Monday sketch layout and Pals Paper Arts colours, so a really quick post from me to share it with you:


I haven't played along with Mojo Monday for a while and saw this sketch and had a few ideas of what to do with it and thought that this week's PPA colours would work well for a brighter masculine card. I must confess that things didn't come together quite how I planned though and with limited time I eventually settled on this card:

Some simple layers and patterns in So Saffron and Baked Brown Sugar and a pop of Pacific Point in the stamp from Starburst Sayings, echoed in the mat for the So Saffron panel with 'Dad' in a double-layer of sketched and outline alphabets. I made this card with Father's Day in mind and the thing I like most about the card is the sentiment - there are two James children in this house who absolutely would agree with this statement.

Back tomorrow with another project; until then, happy stampin'!


Stampin' Up! Supplies Used:

Table built using Product Table Builder by The Crafty Owl - Independent Stampin' Up! Demonstrator.


Specs Appeal?

by Joanne James3. June 2014 21:42

Today's card started out as my entry for this week's challenge over at Create with Connie and Mary; once I'd decided on my design, I also remembered the inspiration photo over at The Card Concept so used this as my colour scheme:


Here is my finished card:

I decided to use the sunglasses (minus the sentiment) from the Spring catalogue hostess set 'To the Point' as the focal point for my card and stamped them onto a circle of Whisper White as I wanted to be able to create the cut out image on the layer behind. I created a patterned layer using punched 3/4" circles on a black square to echo the spot pattern on the sunglasses, and cut out the starburst shape and mat for the circle using my Starburst Framelits. I stamped the retired single stamp 'Spectacular' and my marker pens to create my own DSP background panel, using my stamp-a-ma-jig to enable easy alignment and pattern repeat, and rounded the corners with my Envelope Punch Board. Lastly, I stamped my sentiment onto a flag of Smoky Slate; the sentiment on the original stamp was too small to work here, so I substituted with 'Awesome' from the Cool kid stamp set in the current Spring catalogue (only available until the end of the month).

I had already made a card for the challenge over at The Card Concept, which is scheduled to post later in the week and couldn't be more different to this one, however having chosen my design I couldn't help but think that sunglasses were the only thing missing from the inspiration photo, so I decided to roll with it! My card definitely fits the 'clean and layered' style; the question is, does it really have specs appeal? I'd love to know what you think - feel free to leave me a comment below! I am also linking this card up over at SUO Challenges, where the theme is to create your own background DSP, as I've done here with my 'Spectacular' stamp.

That's all from me today; back tomorrow with another card and news of this week's Wednesday Weekly Deals; until then, happy stampin'!


Stampin' Up! Supplies Used:

Table built using Product Table Builder by The Crafty Owl - Independent Stampin' Up! Demonstrator.


Tags: , , , , , , , , ,

Cards | Stamping

Monochrome Baby Boy Card - Baby We've Grown

by Joanne James16. May 2014 17:55

I have had the busiest day today - last minute preparations for the Stampin' Up! UK Regional Training Event in Telford tomorrow coupled with lots of little jobs. Best part of my day though was getting to spend an hour in the sunshine watching Rebecca's team win their second rounders match of the week (go girls!) and I'm even managing to squeeze in a quick blog post, which I thought might be touch and go today!

I have had a few baby cards to make lately, all of them girls, but I know someone who is due a baby boy anytime soon so thought I would get ahead for once and make my card ready. I decided to make a monochrome boy card to pair with the monochrome girl card I designed a couple of weeks ago for the Pals Paper Arts 200th anniversary challenge (you can see my original baby girl card here). Here is today's card:

Using a Soft Sky base, I matted both of my cardstock layers on Whisper White and used a piece of Polka Dot DSP from the Subtles DSP stack for panel 2, whilst for panel 3 I stamped the 'sweet baby' stamp repeatedly in Whisper White onto Soft Sky cardstock - a stamp-a-ma-jig is essential for this - and coloured the word 'baby' with my chalk marker to give it a powdery look. Lastly, my focal point is the cute little boy shoes that I fussy cut and decorated with my chalk marker; to finish I layered this circle on a blue starburst mat and a further white circle.

Another pastel monochrome creation - not quite as fussy as the little girl one, but then in my experience boys never are!

Back tomorrow with another card and news of what's been happening at the regional event; until then, happy stampin'!

Stampin' Up! Supplies Used:

Table built using Product Table Builder by The Crafty Owl - Independent Stampin' Up! Demonstrator.


Stampin' Up! Coram Cards For Keeps Charity Auction

by Joanne James26. April 2014 21:06

I've been busy preparing for next week's classes today; I'll share those cards with you later next week, however today thought I would share something a little different. If any of you are followers of Stampin' Up! UK's Facebook page, you will probably already be aware of Stampin' Up!'s 'Cards For Keeps' charitable auction that is due to take place on Ebay in May. For those of you that aren't, Stampin' Up! have joined forces with Coram, the oldest UK children's charity, to celebrate its 275 year anniversary by inviting a wide range of stars from sport, stage, screen, music and art to create a unique card using Stampin' Up! supplies.

Stampin' Up! demonstrators have also been invited to submit a card for a pre-auction competition; the winning card will also be entered into the 'Cards for Keeps' auction, alongside those of the participating celebrities. In trying to decide on a design for my contest submission, I did a little research about Coram. Through services such as adoption and creative therapies, Coram helps some of the UK’s most vulnerable children to feel safe and loved and have access to the education and opportunities in life all children need. I read several inspirational stories about the work they do and the difference they make to the lives of so many young people, they really are a charity worthy of our support.

So without further ado, let me share the card I designed;for me, this card sums up everything that Coram stands for:
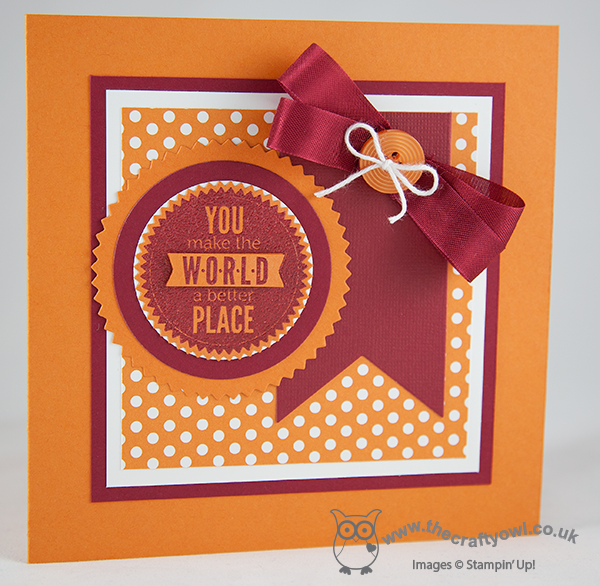
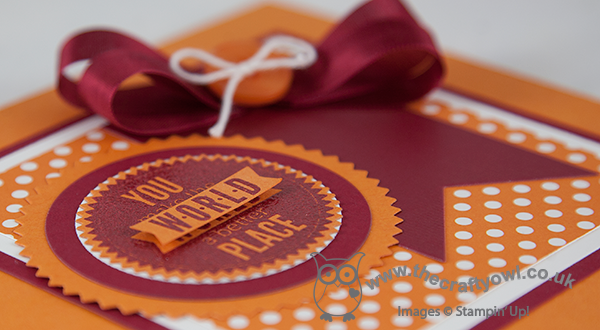
My colour scheme of Pumpkin Pie, Cherry Cobbler and Whisper White was inspired by Coram's logo and corporate colours. I decided to make a square card with a strong focal point - the 'you make the world a better place' stamp from the Starburst Sayings set. For me, this stamp sums up the work of Coram so well - they make the world a better place for thousands of children each and every year. l brought in lots of detail to my card with layers and textures: I stamped the image in Versamark and heat embossed in Cherry Cobbler embossing powder, cutting out the 'World' banner and popping it up on a couple of dimensionals for extra emphasis. I then matted my starburst on white and Cherry Cobbler circles, followed by a final starburst of Pumpkin Pie. I cut my banner using the Banner Framelits and a piece of Cherry Cobbler Cored'inations cardstock. The base of the card is Pumpkin Pie, with Cherry Cobbler and Whisper White mats and a central panel of Polka Dots DSP in Pumpkin Pie. A Cherry Cobbler seam binding double bow tied with white baker's twine and a Pumpkin pie button finish my card.

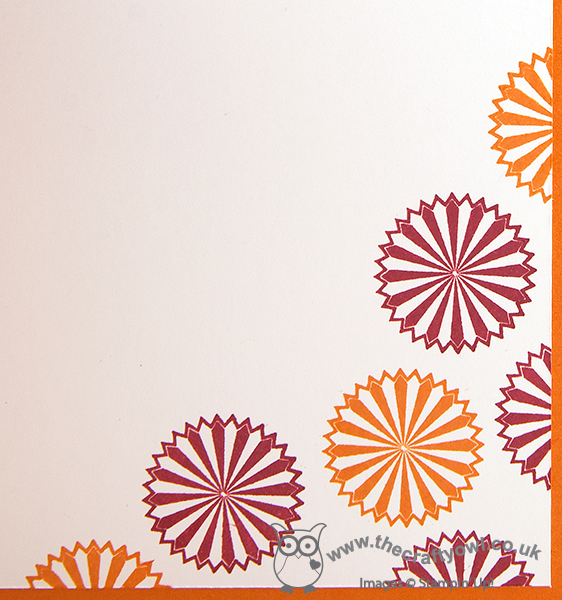
The inside had a little treatment too, before I added my personalised message:
If you would like to see some of the celebrity cards that have been created for the 'Cards For Keeps' online auction, check them out here on the Cards For Keeps Pinterest board. There are sure to be some sought-after auction lots, with celebrities from Benedict Cumberbatch to Liza Tarbuck, and Axel Scheffler to Twiggy.

I'll let you know if my autographed version is lucky enough to join them, but for now I'm off to work out which ones I'm going to bid on - so far my favourite is Jo Brand and the Jelly Babies (yes, for real!)

Back tomorrow with another project; until then, happy stampin'!
 

Stampin' Up! Supplies Used:

Table built using Product Table Builder by The Crafty Owl - Independent Stampin' Up! Demonstrator.


Monochrome Baby Girl Card for The Pals Paper Arts 200th Anniversary

by Joanne James22. April 2014 08:00

This week the Pals Paper Arts Card Challenge is celebrating its 200th anniversary - a whole 200 challenges! To celebrate this milestone, they have a sketch along with a twist - to complete your card in a monochromatic colour scheme. Here is the sketch:


Both design teams have designed cards to inspire this week; initially I was really tempted to use the Starburst Sayings stamps and framelits which lend themselves totally to this sketch and worl with my favourite Brights colour palette, but as lots of the designers had the same idea and I couldn't see how I was going to create something suitably unique, I decided to go with something completely different - a baby card using the 'Baby We've Grown' stamp set in Blushing Bride pastel pink:

Using a pink base, I matted both of my cardstock layers on Whisper White and used a piece of Polka Dot DSP from the Subtles DSP stack for panel 2, whilst for panel 3 I stamped the 'sweet baby' stamp repeatedly in Whisper White onto Blushing Bride cardstock - a stamp-a-ma-jig is essential for this - and coloured the word 'baby' with my chalk marker to give it a powdery look. Lastly, my focal point panel 4 is a triumph of layers and fussy cutting: I stamped the shoe stamp 3 times, twice on Whisper White and once on Blushing Bride, then I fussy cut the shoes from the pink and glued them to the white base; with the other image stamped on white, I fussy cut the bows from the shoes and adhered them on top. I finished the shoes with two tiny seed pearls for fastenings, and layered this circle on a pink starburst mat and a further white circle. My card has 10 separate layers in total - this must be something of a record!

This card took a little while to create, but I love it - and only Blushing Bride and Whisper White used throughout. Do check out the other monochromatic cards at the Pals paper Arts this week - there is a mass of inspiration.

Back tomorrow with another card; until then, happy stampin'!

Stampin' Up! Supplies Used:

Table built using Product Table Builder by The Crafty Owl - Independent Stampin' Up! Demonstrator.


New Online Exclusives

There are new products available exclusively in the online store from 5 November - check them out here.

Latest Kits!

Stampin Cut and Emboss

The Perpetual Beauty Calendar Kit and Cherry Blossoms Treat Boxes Kit are the latest kits in the online store - get yours here!

Shop Online

Access my online shop 24 x 7, 365 days of the year:

Current December hostess code:

9NKXDTTR

Shop Online

Mini Catalogue

BROWSE THE CATALOGUE

'Tis The Season - the new Stampin' Up! Mini Catalogue is here! For more details and to download your copy click here

Scrapbooking

Stampin' Up! has introduced a new range of 12x12" scrapbooking product and kit - the full range is now available to purchase online. To download a copy of the new digital Scrapbooking Catalogue click here.

2024-25 Annual Catalogue

BROWSE THE CATALOGUE

Click on the image to download your copy of the 2024-25 annual catalogue. For a full list of current SU! supplies, go to my online store. If you would like any help or advice, please drop me a line at joanne@thecraftyowl.co.uk or give me a call on 07773 421446 - I'd be happy to help.

Join My Team

It's always a great time to join Stampin’ Up! New team members can get £130 worth of products for only £99 + free business supplies + free shipping + all the fun being a part of Stampin’ Up! Stampin' Up! has something for everyone: join my growing team and benefit from my support to enjoy Stampin' Up! however you choose.

If you're interested, call me for a chat to understand how I can help you realise your goals. Alternatively, if you have already decided to sign up and you just can't wait, please click here for the link to the online form where you can sign up and order your starter kit right away! 

About Me

Hi I'm Joanne and live in Northampton and when I'm not looking after my husband and two beautiful children, am an avid crafter with a passion for all things Stampin' Up!

I must confess that I have never been a big rubber stamper - until I discovered Stampin' Up! that is. I love the fact that I can get such great results with co-ordinating stamps, inks, papers and punches - the possibilities are endless! Join me on my stamping journey as I share the things I love and be inspired to create amazing things yourself!

Follow Me

Monthly Newsletter

Box Builder

Click the button above to use Box Buster to create your custom box design using the Envelope Punch Board!

Kits Collection Now Available!

Stampin Cut and Emboss

The new Kits Collection from Stampin' Up! is now available!

Click here to see the current kits available and order yours online today.

I Design For


Stampin' Up Stuff

This is my personal blog and is not endorsed by Stampin’ Up! I hope you find it a plentiful source of ideas and personal inspiration but please don't copy my designs for contest submission or use for classes, publication or sale without express permission.

DSP Special Release

Check out 3 popular designer series paper designs in fresh new colourways! Available exclusively in the online store from 3 December - check them out here

Last Chance Products

Last Chance Products will now be updated every other month - check them out here.