A Little Bit Festive Poinsettia Card

by Joanne James1. November 2024 09:00

Happy Friday everyone! Today I'm sharing a card that uses the layout over at Try A Sketch on Tuesday as my starting point:


I'm still making Christmas cards and when I saw that large open oval I thought the double poinsettia in the A Little Bit Festive Mix & Match designer series paper pack would make the perfect centrepiece for my card - take a look:


Here's the low-down on today's card:

Isn't that double flower great? I paired it with some (retired) striped paper from Around The World, and overlaid my flowers with a diecut 'Joy' from the Joyful Sayings pack and added in some gold twine and enamel dots as accents:

This card is big on impact with those larger-than-life elements, yet was relatively quick and easy to put together; the combination of A Little Bit Festive Mix & match papers and the Joyful Sayings diecut sentiments are great for speedy Christmas cards.

Here is the visual summary of the key products used on today's project for you to pin for easy reference:


You can see all of my 'How To' summaries on my 'How To - Tips and Techniques' Pinterest board in case you've missed any. 

Enjoy your day: I'm out for dinner this evening since the young James Junior is staying at a friends for fireworks and a sleepover - what a treat. and I'll be back tomorrow with another project. Until then, happy stampin'!


Stampin' Up! Supplies Used:

Table built using Product Table Builder by The Crafty Owl - Independent Stampin' Up! Demonstrator.

Around The World Christmas Card

by Joanne James30. October 2017 05:00

Today I'm sharing a card for this week's challenge over at Freshly Made Sketches:

I decided to do something different with the Around The World designer series papers again - take a look:


Here's the low-down on today's card:

A Trio Of Papers - I've used designer series paper from two packs on today's cardboth of which are available in the 'Buy 3, Get 1 Free' designer series paper promotion. There are two more days for you to stock up on the papers on offer, so don't delay! There are three different patterns of designer series paper on today's card: the first is the red and white diagonal stripe from the Be Merry collection, and the second is one of two from the Around The World pack. The first of the Around the World papers is the Pool Party snowfall background; can you spot the second one? 

Look Who's Talking - The second of the Around The World papers on my card is the speech bubble - this is fussy cut directly from one of the sheets in the pack. The sheet in question features 29 sayings in a variety of languages - what fun! Perfect for a no-stamping card too. I backed my speech bubble with a piece of Basic Grey cardstock for additional stability and snipped it allowing a thin border all the way around to add more definition and help it standout on my card.

A Seasonal Colour Combo - I took the colours for my card today directly from the speech bubble - a festive combination of cool Pool Party Blue with warm Cherry Cobbler red, along with Whisper White and Basic Grey as neutrals. Here is my colour combination should you wish to save it for your creative inspiration:


Here is the visual summary of the key products used on today's project for you to pin for easy reference:


You can see all of my 'How To' summaries on my 'How To - Tips and Techniques' Pinterest board in case you've missed any. 

Enjoy your day and I'll be back tomorrow with another project. Until then, happy stampin'!


Stampin' Up! Supplies Used:

Table built using Product Table Builder by The Crafty Owl - Independent Stampin' Up! Demonstrator.

Leaf Punch Christmas Wreath PP368

by Joanne James29. October 2017 09:00

It's Sunday and time for this week's new challenge over at The Paper Players! The clocks went back last night here in the UK so whilst this heralds the official arrival of winter, it also means an extra hour in bed - bliss! It's the fifth week of the month and the turn of the lovely Jaydee to host this week. She has a tic-tac-toe board to challenge our creative juices:
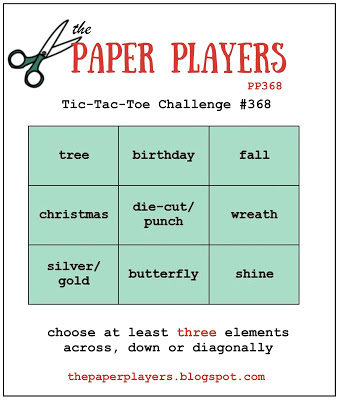
 

Tic-tac-toe week is always fun as the gallery is full of so many different creations as each of us work with a different combination of squares. For once I knew exactly where I was going with this one: straight across the middle. I took the opportunity to make another Christmas card, this time a larger 6" x 6" square card - take a look:
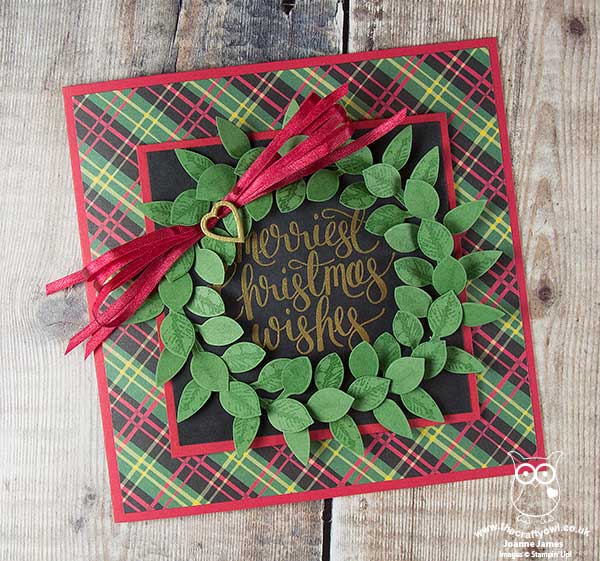
 

Here's the low-down on today's card:

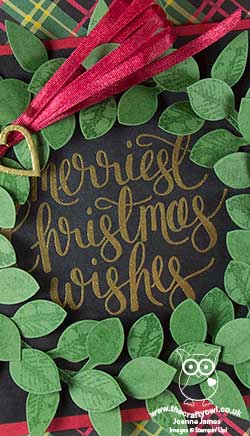
Leaf Punch Wreath - I used my leaf punch to create the oversize Christmas wreath on my card today. I stamped a whole bunch of leaves using each of the stamps in the 'Painted Harvest' stamp set in Garden Green onto Garden Green cardstock, then punched them out and layered them around my heat-embossed sentiment. Whilst this punch is part of the Painted Autumn Suite in the seasonal catalogue, today's card proves it will stretch beyond autumn into spring, summer and winter seasons too. 

Watercolor Christmas - The sentiment on my card is from the 'Watercolor Christmas' stamp set, that co-ordinates with the Christmas card kit of the same name. I love the big, bold scripted sentiments in this set! I know this set will be a 'keeper' for me, long after this catalogue is gone. I decided to heat emboss my sentiment in gold onto Basic Black cardstock, to tone in with the rich colours of my designer series paper border.

Grab Some Tartan -  The tartan border on my card uses one of my favourite patterns in the Around the World Designer Series Paper pack. This is one of the packs of paper that is included in the 'Buy 3, Get 1 Free' designer series paper promotional offer. This offer runs until the end of October so you have three more days to take advantage of this offer - why not stock up today? Just click on the links in the table below to go straight to my online store.

Here is the visual summary of the key products used on today's project for you to pin for easy reference:
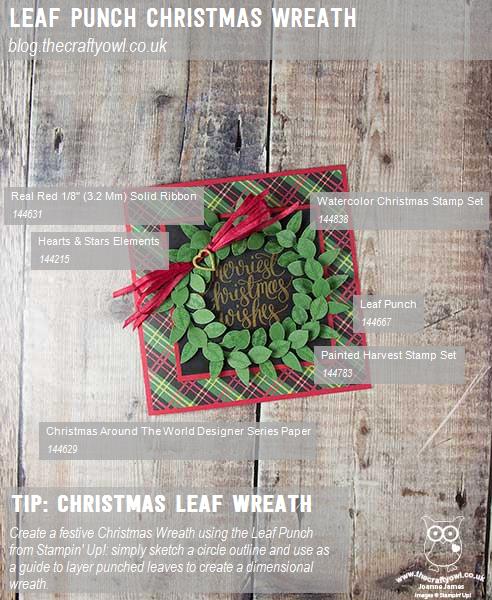
 

You can see all of my Product and 'How To' summaries on my 'How To - Tips and Techniques' Pinterest board in case you've missed any. 

This card really isn't post-friendly because of the depth and fragile nature of the wreath and bow, however will be perfect to hand-deliver to someone special - it really is very pretty in real life and makes a great statement card.

Before you reach for your ink and papers, check out what our amazing team has created to inspire you this week:

The Paper Players Design Team
 
 
Here's a quick recap of our challenge rules:
 
1.  Create a new paper project
2.  Upload your creation to your blog with a link back to us and provide a direct link to the post featuring your challenge submission.
3.  Please link your card to no more than four challenges, TOTAL.
4.  Have FUN! 


I look forward to seeing what you create with our board this week. Enjoy the rest of your weekend as it will be over all too quickly; I'll be back tomorrow with another project; until then, happy stampin'!


Stampin' Up! Supplies Used:

Table built using Product Table Builder by The Crafty Owl - Independent Stampin' Up! Demonstrator.

Around the World Have Fun on Your Travels Card

by Joanne James22. July 2014 10:00

I haven't participated in the Pals Paper Arts challenge for a little while, but when I saw Margaret's sketch this week I knew it would be perfect for a special card that I wanted to make:

A friend of mine is moving to Australia - she is a native Australian, so for her it's just 'going home', but for her British husband and young children, it's emigrating to the other side of the world. So the move is a big deal and comes with mixed emotions on all sides. The great thing is though that they are taking the opportunity to spend a few months travelling the world on leaving Britain and before arriving in Australia, so rather than focus on the move I thought it would be fun to make a card to wish them all the very best for their travels. I knew I wanted to make a card using the 'Around the World' stamp set - here's what I came up with:

I used a Pool Party base and a mat of Real Red, along with a piece of the now retired 'I am Me' designer series paper (I am still awaiting the arrival of my new papers and besides, this one was perfect for my theme!) I added the cross-panel in Pool Party, then stamped three of the images from the Around the World stamp set in Real Red on Whisper White. I did take advantage of the 'any shape' instruction on the sketch and did a little 'mix and match', with two circles and a hexagon. The circles I cut out using my Circle Framelits and then mounted them onto some Real Red circles cut with my 1 1/4" circle punch; the hexagon I cut by hand so that I could mount it on a Real Red hexagon punched with my hexagon punch. I tied them all together by stamping the trail from the aeroplane stamp onto the Pool Party card behind them.

So a bright, fun card to wish my dear friend and her family the best of luck on their forthcoming travels.

Back tomorrow with this week's Wednesday Weekly Deals and my Colour Me...! card for this week. Until then, happy stampin'!


Stampin' Up! Supplies Used:

* I Am Me Designer Series Paper - retired

Table built using Product Table Builder by The Crafty Owl - Independent Stampin' Up! Demonstrator.


Project Life-Style Scrapbook Layout

by Joanne James19. April 2014 21:56

Good evening everyone! I hope you are all making the most of the long Easter weekend. I've been busy decorating and making new wall art for Ben's Lego-themed bedroom today. I also got to spend a couple of hours in my craft room, but unfortunately tidying and re-organising rather than creating today. So a quick post from me this evening to share a scrapbook page I made at our team training event last week.

The page was designed by the lovely Bekka Prideaux and is in the style of a Project Life page - i.e. divided into regular sized sections with space for journaling and photos, just like those designed by Becky Higgins, the creator of the hugely successful modern day scrapbooking phenomenon that is Project Life. Here is my page, finished with photos from the Dads, Lads & Lasses camping trip that was held at school last September:

This style of scrapbooking appeals to busy mums like me; I take lots of photographs and need a quick and easy method of presenting them and recording my memories, so I'm thrilled that Stampin' Up! has joined forces with Becky Higgins to produce our very own line of Project Life-themed accessories in the new Annual Catalogue, out in July - read all about it in my earlier post here. As a demonstrator, one of my perks is that I'll be able to get my hands on this and other new and exciting offerings ahead of customers and I can assure you I'll be first in line for this one!

If you'd like to be one of the first to get your hands on Stampin' Up's new range of Project Life accessories, now is a great time to join my team of Stampin' Up! demonstrators. If you're interested, please do get in touch - I would love to share with you the benefits that being a part of my Stampin' Up! team of demonstrators brings.

Back tomorrow with another project; until then, happy stampin'!


Stampin' Up! Supplies Used:

Table built using Product Table Builder by The Crafty Owl - Independent Stampin' Up! Demonstrator.


New Online Exclusives

There are new products available exclusively in the online store from 5 November - check them out here.

Latest Kits!

Stampin Cut and Emboss

The Layered Landscapes Kit and Nature's Paintings Kit are the latest kits in the online store - get yours here!

Shop Online

Access my online shop 24 x 7, 365 days of the year:

Current November hostess code:

9NKXDTTR

Shop Online

Mini Catalogue

BROWSE THE CATALOGUE

'Tis The Season - the new Stampin' Up! Mini Catalogue is here! For more details and to download your copy click here

Scrapbooking

Stampin' Up! has introduced a new range of 12x12" scrapbooking product and kit - the full range is now available to purchase online. To download a copy of the new digital Scrapbooking Catalogue click here.

2024-25 Annual Catalogue

BROWSE THE CATALOGUE

Click on the image to download your copy of the 2024-25 annual catalogue. For a full list of current SU! supplies, go to my online store. If you would like any help or advice, please drop me a line at joanne@thecraftyowl.co.uk or give me a call on 07773 421446 - I'd be happy to help.

Join My Team

It's always a great time to join Stampin’ Up! During October you can get even more in your starter kit! New team members can get £160 worth of products for only £99 + free business supplies + free shipping + all the fun being a part of Stampin’ Up! Stampin' Up! has something for everyone: join my growing team and benefit from my support to enjoy Stampin' Up! however you choose.

If you're interested, call me for a chat to understand how I can help you realise your goals. Alternatively, if you have already decided to sign up and you just can't wait, please click here for the link to the online form where you can sign up and order your starter kit right away! 

About Me

Hi I'm Joanne and live in Northampton and when I'm not looking after my husband and two beautiful children, am an avid crafter with a passion for all things Stampin' Up!

I must confess that I have never been a big rubber stamper - until I discovered Stampin' Up! that is. I love the fact that I can get such great results with co-ordinating stamps, inks, papers and punches - the possibilities are endless! Join me on my stamping journey as I share the things I love and be inspired to create amazing things yourself!

Follow Me

Monthly Newsletter

Box Builder

Click the button above to use Box Buster to create your custom box design using the Envelope Punch Board!

Kits Collection Now Available!

Stampin Cut and Emboss

The new Kits Collection from Stampin' Up! is now available!

Click here to see the current kits available and order yours online today.

I Design For


Stampin' Up Stuff

This is my personal blog and is not endorsed by Stampin’ Up! I hope you find it a plentiful source of ideas and personal inspiration but please don't copy my designs for contest submission or use for classes, publication or sale without express permission.