One for the Girls and one for the Boys!

by Joanne James6. September 2015 10:00

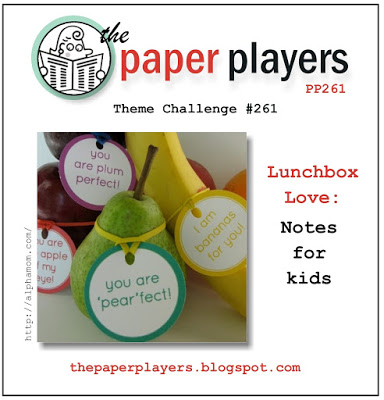
It's Sunday and you know what that means: time for a new challenge over at The Paper Players! This week it is the turn of the incredibly talented Sandy and she has a great theme challenge for you:


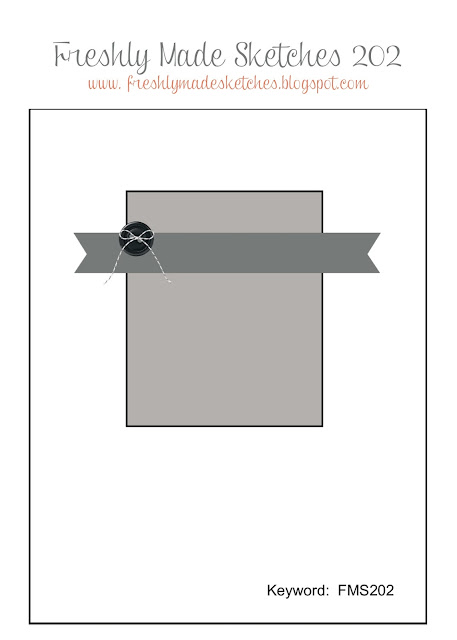
This is rather timely for me, as both of my Juniors are returning to school to begin a new academic year tomorrow following the long summer break, so it was a great opportunity for me to make a couple of cards to tuck into their schoolbags to wish them a good day. Here's my first card, using this week's Freshly Made Sketches layout:


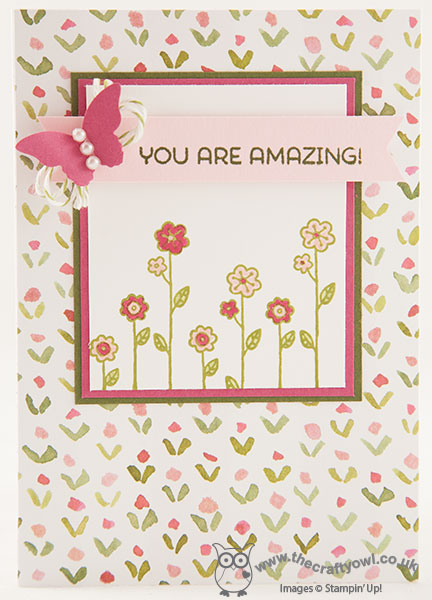
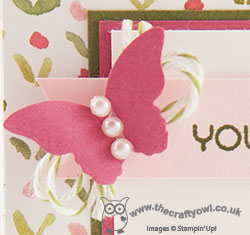
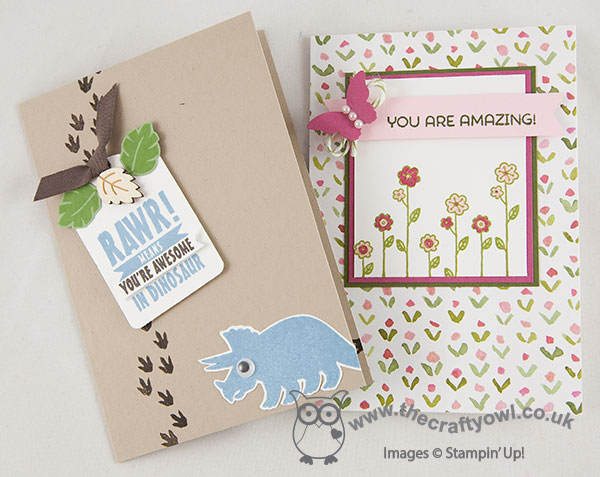
I made this card for Rebecca - very pink and girly, but hopefully sufficiently grown up for a 10 year old about to embark on her last year of Junior School. This is a big year for her as she will be Head Girl too and whilst she was voted into this role by her peers and I know she will do a great job, she sometimes lacks confidence in herself so a card to remind her that she's amazing (to me at least!) will be just what she needs for day one.

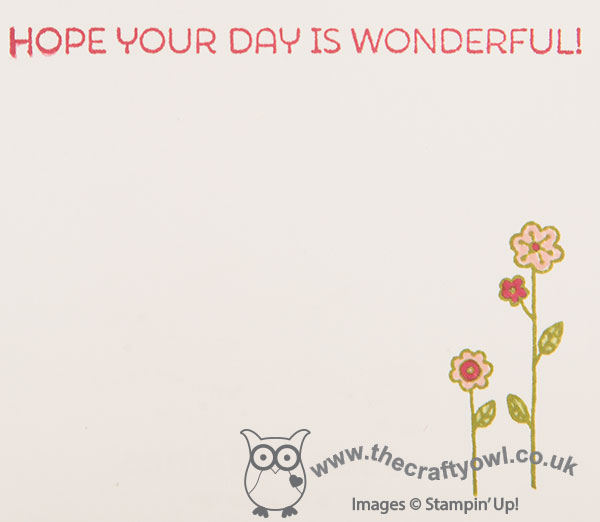
I used a Whisper White notecard and covered the front with a piece of English Garden DSP, then stamped a little panel of flowers with some Old Olive ink and the Cottage Greetings stamp set and coloured them with my Stampin' Write markers. I stamped my sentiment banner in Mossy Meadow onto Pink Pirouette and finished with a baker's twine bow and punched Bitty Butterfly and a few pearls. I also stamped the inside (and remembered to take a photograph of it!):

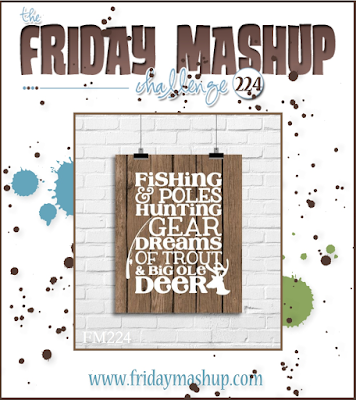
I couldn't possibly make Rebecca a card without making one for Ben too, so here's my second card which uses the colours over at the Friday Mashup and the sketch over at As You See It:


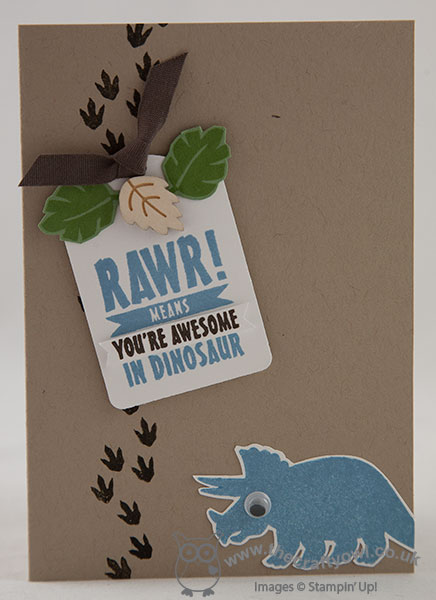
For this card I used a Crumb Cake notecard base, and stamped the dino footprints from'No Bones About It' in Early Espresso, before adding my sentiment tag complete with an Into The Woods wooden leaf embellishment and a fussy cut Marina Mist triceratops, complete with googly eye. Wondering where the dinosaur's tail went? Well, it continues over the page - look:


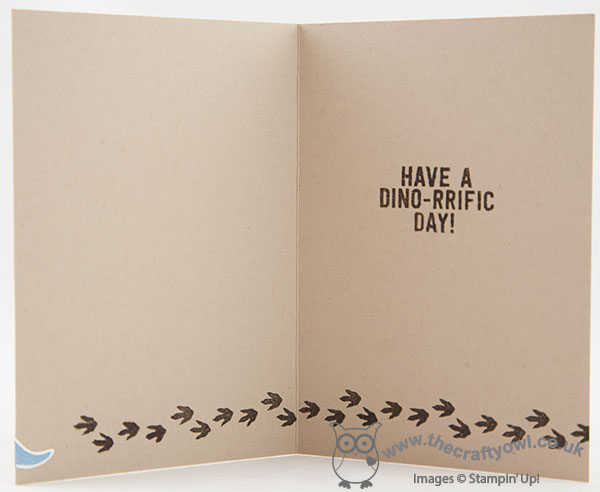
Isn't that fun?! The sentiment is from the same set, although I selectively masked it to say 'day' instead of 'birthday' which is more appropriate for my card. The 'No Bones About It' set is just great for boys cards, with so many design possibilities. I love the idea of little surprise notes in the children's school bags and it's definitely something I don't do enough of, so this year I will defintitely be making more of an effort.

Before you reach for your ink and papers, check out what our amazing team has created to inspire you this week:

The Paper Players Design Team
Anne Marie Hile - on leave
 
 
Here's a quick recap of our challenge rules:
 
1.  Create a new paper project
2.  Upload your creation to your blog with a link back to us and provide a direct link to the post featuring your challenge submission.
3.  Please link your card to no more than three challenges, TOTAL.
4.  Have FUN! 

I look forward to seeing what you create for Sandy's theme challenge in the gallery this week.  

Back tomorrow with another project; until then, happy stampin'!

    11709626_10155855871105085_3384290960448386223_n    


Stampin' Up! Supplies Used:

Card One: 

Table built using Product Table Builder by The Crafty Owl - Independent Stampin' Up! Demonstrator.


Card two: 

Table built using Product Table Builder by The Crafty Owl - Independent Stampin' Up! Demonstrator.

Football Circle Thinlit Birthday Card

by Joanne James14. August 2015 09:00

Today I'm sharing the birthday card I made for Ben to celebrate his 8th birthday. Basketball and football are his two sporting passions and lately he has been football mad. He also has a belief that pop-up cards are the best; whilst this isn't quite a pop-up, it does have a fun flip element with the Circle Thinlit card base - here's my card:

I used Soft Sky for my base and built my football out of a 2 1/2" circle punch and black and white hexagons and decorated my card with some grass cut with my fringe scissors and a bunting banner and greeting from Celebrate today, complete with personalisation using the Epic Alphabet set.

This card actually came together surprisingly quickly and Ben loved it - I'd forgotten quite how much fun a circle thinlit card could be! Here is a picture of the birthday boy blowing out the candles on his amazing birthday cake, made by one of my extended family, the super-talented Helen Vowles:


Ben declared his basketball cake the best ever and was mighty impressed. If you live in Northampton I would urge you to check out Helen's Facebook page here - she really does make the most amazing cakes! Here's another photograph of him in the garden trying out his new goalie gloves (don't look too closely at my lawn, it really doesn't appreciate being used as a football pitch!):


8 years old - my, where did those years go??!

That's all from me today; back tomorrow with another project - a Christmas card, no less! Until then, happy stampin'!


Stampin' Up! Supplies Used:

Table built using Product Table Builder by The Crafty Owl - Independent Stampin' Up! Demonstrator.


Around the World Have Fun on Your Travels Card

by Joanne James22. July 2014 10:00

I haven't participated in the Pals Paper Arts challenge for a little while, but when I saw Margaret's sketch this week I knew it would be perfect for a special card that I wanted to make:

A friend of mine is moving to Australia - she is a native Australian, so for her it's just 'going home', but for her British husband and young children, it's emigrating to the other side of the world. So the move is a big deal and comes with mixed emotions on all sides. The great thing is though that they are taking the opportunity to spend a few months travelling the world on leaving Britain and before arriving in Australia, so rather than focus on the move I thought it would be fun to make a card to wish them all the very best for their travels. I knew I wanted to make a card using the 'Around the World' stamp set - here's what I came up with:

I used a Pool Party base and a mat of Real Red, along with a piece of the now retired 'I am Me' designer series paper (I am still awaiting the arrival of my new papers and besides, this one was perfect for my theme!) I added the cross-panel in Pool Party, then stamped three of the images from the Around the World stamp set in Real Red on Whisper White. I did take advantage of the 'any shape' instruction on the sketch and did a little 'mix and match', with two circles and a hexagon. The circles I cut out using my Circle Framelits and then mounted them onto some Real Red circles cut with my 1 1/4" circle punch; the hexagon I cut by hand so that I could mount it on a Real Red hexagon punched with my hexagon punch. I tied them all together by stamping the trail from the aeroplane stamp onto the Pool Party card behind them.

So a bright, fun card to wish my dear friend and her family the best of luck on their forthcoming travels.

Back tomorrow with this week's Wednesday Weekly Deals and my Colour Me...! card for this week. Until then, happy stampin'!


Stampin' Up! Supplies Used:

* I Am Me Designer Series Paper - retired

Table built using Product Table Builder by The Crafty Owl - Independent Stampin' Up! Demonstrator.


Springtime Hello Friend

by Joanne James7. June 2014 20:55

Today I'm sharing the original card I designed for this week's challenge over at The Card Concept, which I also adapted for my Springtime Hello card class this week. Here is this week's challenge colour palette:

This card is quite different to my previous entry (you can see that card here); much more 'Classy and Elegant' this time around I think - here's my card:

I used Daffodil Delight for my card base and layered up from there. I dry embossed a piece of Basic Black cardstock with the Honeycomb embossing folder, then layered my main stamped panel onto this. I repeat-stamped the daisy stamp from the 'Springtime Hello' onto a piece of Watercolour Wonder DSP so that the panel would have a lovely washed background, and also stamped the text stamp from the retired 'French Foliage' set in Smoky Slate behind this, having stamped off twice first to give a very faint image. You could substitute this stamp with one from the 'Background Borders' set, which is currently reduced and still available on the retired list. I then stamped the bee and using my aquapainter, I washed white kraft ink over the bee's wings and the daisy flower petals to give a subtle hint of natural colour, whilst allowing the yellow of the DSP to show through. I finished with a piece of Basic Black 3/4" Chevron ribbon and heat embossed my sentiment fro the Six Sided Sampler set in black embossing powder onto a punched hexagon and popped it onto a dimensional.

I hope you like today's card; back tomorrow with another project. Until then, happy stampin'!


Stampin' Up! Supplies Used:

Table built using Product Table Builder by The Crafty Owl - Independent Stampin' Up! Demonstrator.


Project Life-Style Scrapbook Layout

by Joanne James19. April 2014 21:56

Good evening everyone! I hope you are all making the most of the long Easter weekend. I've been busy decorating and making new wall art for Ben's Lego-themed bedroom today. I also got to spend a couple of hours in my craft room, but unfortunately tidying and re-organising rather than creating today. So a quick post from me this evening to share a scrapbook page I made at our team training event last week.

The page was designed by the lovely Bekka Prideaux and is in the style of a Project Life page - i.e. divided into regular sized sections with space for journaling and photos, just like those designed by Becky Higgins, the creator of the hugely successful modern day scrapbooking phenomenon that is Project Life. Here is my page, finished with photos from the Dads, Lads & Lasses camping trip that was held at school last September:

This style of scrapbooking appeals to busy mums like me; I take lots of photographs and need a quick and easy method of presenting them and recording my memories, so I'm thrilled that Stampin' Up! has joined forces with Becky Higgins to produce our very own line of Project Life-themed accessories in the new Annual Catalogue, out in July - read all about it in my earlier post here. As a demonstrator, one of my perks is that I'll be able to get my hands on this and other new and exciting offerings ahead of customers and I can assure you I'll be first in line for this one!

If you'd like to be one of the first to get your hands on Stampin' Up's new range of Project Life accessories, now is a great time to join my team of Stampin' Up! demonstrators. If you're interested, please do get in touch - I would love to share with you the benefits that being a part of my Stampin' Up! team of demonstrators brings.

Back tomorrow with another project; until then, happy stampin'!


Stampin' Up! Supplies Used:

Table built using Product Table Builder by The Crafty Owl - Independent Stampin' Up! Demonstrator.


Happenings Simply Created Cards

by Joanne James2. March 2014 20:59

Today I'm sharing some of the cards I made using the Happenings Simply Created Card Kit that features in the Spring-Summer catalogue. The kit contains everything you need to make 15 cards, including envelopes and costs just £13.50 - that equates to 90p per card, which is great value for a hand-finished card. It doesn't include inks or stamps - you can use the 'Says it All' set suggested in the catalogue, or you can use whatever sentiment sets you already own. I used a selection of stamps on my cards, and added in a few additional items on a few of them too. So here's my first card, which is made up following the basic design that is included with the kit:

I then added in some co-ordinating accessories just to change things up a little on some of my cards - I created some embossed sections using the new Arrows embossing folder and the Hexagon embossing folder:

I also used some punches to create shapes that mirrored the patterns of the die-cut accents to add some interest:

These kits would be great for a beginner or someone who hasn't stamped before, as a gift for someone or even just when time is short and you want to create a whole bunch of cards in one go, but that can be varied such that each is unique. If you would like to buy the Happenings Simply Created Kit or any of the other items I've used on my cards, just click on the links in the table below to go straight to my online store or give me a call if you're local to me and I can place the order for you. We are using these kits in my classes this week and I can't wait to see what my ladies will come up with. I managed to decorate all of cards and still have some embellishments left over to decorate a gift box to hold some of the cards I made - come back tomorrow to see a video tutorial showing how I made it using a new tool that I'm sure you will find useful!

Until then, happy stampin'!


Stampin' Up! Supplies Used:

Table built using Product Table Builder by The Crafty Owl - Independent Stampin' Up! Demonstrator.


Round Hexagon Football Punch Art Card

by Joanne James17. November 2013 19:43

Another lovely day today, despite the miserable grey weather. I spent the morning at the swimming pool watching Rebecca train, followed by piano practice for both James Juniors, then lunch, more swaps for convention, a trip to the garden centre and then an hour or so in the garden planting some late winter baskets and pots and refilling our bird feeders - we are even more keen to look after our feathered friends this winter, as we have a new blue tit who seems to have made his home in our bird box and uses it every night to sleep in.

So, on to today's card! Yesterday was my nephew's birthday. He is now 11 years old (where did that time go?!) and another football-mad boy. Having just recently acquired a hexagon punch, I was keen to have a go at making a football as I've seen lots of cards like this on Pinterest. I was so pleased with the result I decided to make it into a shaped card using the largest of the circle framelits:

I simply punched the black and white hexagons and stuck them in a pattern onto Gumball Green card, then cut this out with a circle framelit and mounted it on the largest circle framelit, having cut this one by folding the card and cutting out just above the edge of the circle to create a hinge. A simply sentiment from the hostess set 'Express Yourself', some linen thread and done. Another simple yet effective card, with a definite masculine feel.

Back tomorrow with another project; until then, happy stampin'!


Stampin' Up! Supplies Used:


Tags: , , , , , , ,

Cards | Punch Art

Mini Catalogue

BROWSE THE CATALOGUE

The mini catalogue is now live! Read and download your copy here.

Shop Online

Access my online shop 24 x 7, 365 days of the year:

Current April hostess code:

VDKNV7BH

Shop Online

Join My Team

It's always a great time to join Stampin’ Up! New team members can get £130 worth of products for only £99 + free business supplies + free shipping + all the fun being a part of Stampin’ Up! Stampin' Up! has something for everyone: join my growing team and benefit from my support to enjoy Stampin' Up! however you choose.

If you're interested, call me for a chat to understand how I can help you realise your goals. Alternatively, if you have already decided to sign up and you just can't wait, please click here for the link to the online form where you can sign up and order your starter kit right away! 

Latest Kit!

Stampin Cut and Emboss

The Rock Legend Kit has all you need to make 8 cards with coordinating envelopes. Along with the new Panda Friends Kit, both are available from January 4th for just £14 each - get yours here!

2023-24 Annual Catalogue

BROWSE THE CATALOGUE

Click on the catalogue for a full list of current SU! supplies - if you would like to order any of the items featured, please drop me a line at [email protected] or give me a call on 07773 421446 - I'd be happy to help.

New Online Exclusives

There are new products available exclusively in the online store from 5 March - check them out here.

About Me

Hi I'm Joanne and live in Northampton and when I'm not looking after my husband and two beautiful children, am an avid crafter with a passion for all things Stampin' Up!

I must confess that I have never been a big rubber stamper - until I discovered Stampin' Up! that is. I love the fact that I can get such great results with co-ordinating stamps, inks, papers and punches - the possibilities are endless! Join me on my stamping journey as I share the things I love and be inspired to create amazing things yourself!

Follow Me

Monthly Newsletter

Box Builder

Click the button above to use Box Buster to create your custom box design using the Envelope Punch Board!

Kits Collection Now Available!

Stampin Cut and Emboss

The new Kits Collection from Stampin' Up! is now available!

Click here to see the current kits available and order yours online today.

I Design For


Stampin' Up Stuff

This is my personal blog and is not endorsed by Stampin’ Up! I hope you find it a plentiful source of ideas and personal inspiration but please don't copy my designs for contest submission or use for classes, publication or sale without express permission.