Painted Petals Meets Adventure Bound

by Joanne James17. April 2015 20:22

It's Friday and I almost don't know how I got here!! This week has been a busy one: the children are back to school following their Easter break, although Ben was only in for a day before departing for a three-day residential trip. He came home today, tired and a little grubby, but having had the best time! I've also had a couple of technique classes and my Project Life memory keeping group this week, and a couple of late nights, so it would be fair to say that I am happy that Friday is here and I'm looking forward to a lie-in in the morning, even if only a short one!

I haven't managed as much creative time this week as I would have liked, so today I thought I would share one of the cards I made at team training on Sunday. We made lots of projects using the Adventure Bound DSP stack; this is such a great stack for masculine cards and has some fabulous natural photographic prints. My card today though shows that these papers can equally be used for beautifully feminine cards - take a look:

A piece of hardwood print was randomly stamped with the flowers and stems from the Painted Petals set in Strawberry Slush and Mossy Meadow and adhered to a base of Strawberry Slush. The same colour was used to stamp the sentiment on a piece of Whisper White and then this was edged with a piece of Soft Sky, with a scalloped edge, tied with some Painted Blooms cotton twine, then attached to the card with an antique brad. To finish, I stamped a couple of extra flowers and leaves and fussy cut them out and popped them up on a couple of dimensionals. 

So what do you think of today's card? I rather like the hardwood background and it certainly shows how versatile this paper stack can be. 

That's all from me today. Don't forget to check The Paper Players blog tomorrow if you would like to see who won headliner for my challenge this week. Back tomorrow with another project; until then, happy stampin'!


Stampin' Up! Supplies Used:

Table built using Product Table Builder by The Crafty Owl - Independent Stampin' Up! Demonstrator.


Tags: , , , , , , ,

Cards | Stamping

So Sweet of You Card

by Joanne James15. December 2014 19:46

I know I've been MIA for a few days - last week was one of the busiest in the James household, with music recitals, discos, school productions and carol concerts galore with the end of the school term, so blogging did go somewhat by the wayside. I spent the morning at the pantomime watching 'The Wizard of Oz' and this afternoon managed to squeeze in a little creative time to craft the following card for this week's sketch over at Freshly Made Sketches, although I'm too late to link up this week:


I wanted to create a card using a piece of the All Abloom DSP stack - there are some great bold floral patterns in there that suit such a large background. Here is my card: 

I used a sentiment from the 'Hello There' hostess set on the main panel and overlaid a single flower from the same set, along with some retired Island Indigo baker's twine and a single pearl to finish.

So a quick post from me today with a card for all you lovely readers who pop by and comment and bear with me when the odd blog post goes awry - so sweet of you! We are officially on school holidays now - I'm not sure whether that means more or less time to craft though (I know really - definitely less!!) Back soon with another project; until then, happy stampin'!


Stampin' Up! Supplies Used:

Table built using Product Table Builder by The Crafty Owl - Independent Stampin' Up! Demonstrator.


Tags: , , , , , , , ,

Cards | Stamping

Nordic Noel Christmas Card for The Paper Players

by Joanne James23. November 2014 07:00

It's Sunday and time for another challenge over at The Paper Players where this week LeAnne has a great sketch for us: 

Sketch challenges are my absolute favourite and I had tons of ideas for this one; you may see some of the others later this week, but for today I'm sharing this Christmas card featuring some of my favourite Nordic Noel designer series paper:

I kept my layout really simple as the paper is quite busy, but used lots of layers to incorprate the colours in the DSP. I added a piece of white seam binding ribbon tied with some baker's twine and a Nordic Noel button and to the bottom opposing corner a co-ordinating ornament in Garden Green that I stamped in Versamark and heat embossed in white, with a trio of pearls coloured with my Cherry Cobbler Blendabilities for effect. A sentiment from 'Good Greetings' finishes off my card.

I'm off to hockey and then have a date with an overflowing basket of ironing this afternoon. If you have something altogether more fun lined up and have time for a spot of crafting, then check out the cards by the other Paper Players designers this week for some great inspiration and then see what you can come up with? We would love to see you in the gallery this week.

Back tomorrow with another project; until then, happy stampin'!


Stampin' Up! Supplies Used:

Table built using Product Table Builder by The Crafty Owl - Independent Stampin' Up! Demonstrator.


There's No Happy Like Holiday Happy Christmas Card

by Joanne James8. November 2014 21:14

Today has been a busy day full of highs and lows: a poorly boy at home and a central heating boiler that has packed up and won't be fixed until early next week, but also a pleasant Ladies Afternoon at a local salon and a fun-filled evening at our annual Bonfire and Fireworks Display at school. All in all a busy one and a late blog, so I'd best get on with today's card! Today's creation uses this week's sketch over at Mojo Monday combined with the colour challenge over at Create With Connie and Mary:


I really liked this sketch and thought the colour combination was an interesting one, as I wouldn't normally choose to combine blue with red on a Christmas card, so I wanted to have a play and see if I could make it work. Here is my card:

I used Cherry Cobbler for my base and added a strip of Lost Lagoon followed by a piece of Whisper White trimmed on one side with the Scallop Border Punch and overlaid with a piece of white and Cherry Cobbler patterned paper from the Trim the Tree DSP paper stack. To create the pennant banner, I stamped the 'Holiday Happy' stamp from the Mingle All The Way stamp set and coloured it with my Lost Lagoon marker and Cherry Cobbler and Smoky Slate Blendabilities. I added a strip of All is Calm washi tape the the top of the pennant and added a few rhinestones coloured with my Stampin' Up! Cherry Cobbler Blendabilities markers and stamped the 'Happy' banner a second time on a scrap of Whisper white cardstock, which I then cut out with my paper snips and popped on a couple of dimensionals for a little extra interest. To finish, I added a piece of Lost Lagoon Silky Taffeta Ribbon tied in a bow.

I rather like the finished look of today's card and this colour combo is certainly one I would consider using again.

Back tomorrow with my design card for this week's new challenge over at The Paper Players.

Until then, happy stampin'!


Stampin' Up! Supplies Used:

Table built using Product Table Builder by The Crafty Owl - Independent Stampin' Up! Demonstrator.


Hello There Calypso Coral!

by Joanne James1. October 2014 09:00

It's Wednesday and time for another challenge over at Colour Me...! where this week we have a monochromatic colour scheme for you:


I also used this week's sketch over at Retrosketches for my layout. Now I have to confess, Calypso Coral is a colour I don't use often (I don't know why) but this is particularly unfortunate, given that the last time I ordered a pack I ordered two by mistake and now I have Calypso Coral cardstock coming out of my ears! So today's challenge was the perfect excuse to make a dent in the pile. After much deliberation, this is what I came up with:

I used a piece of the Gold Soiree Speciality DSP as the main feature of my card. This paper has a very luxurious feel and definitely needed to be used where it could be seen! I matted this on a piece of gold foil and a Calypso Coral base. For my sentiment, I stamped 'Hello There' from the hostess stamp set of the same name in Calypso Coral on Whisper White, along with a flower from the same set stamped in Gold Encore ink finished with a candy dot and matted this onto a piece of Calypso Coral edged with the scallop edge punch.

I added a couple of flags of Calypso Coral chevron ribbon and some strings of gold sequins and a gold button threaded with baker's twine as per the sketch and finished the corner with three flowers: two in gold foil punched with the retired flower Itty Bitty Punch and one stamped in Coral on Whisper White where I added detail with my gold pen and this was punched with the Petite Petals punch.

That's my Colour Me...! card for this week - why not visit the other Colour Me...! designers and check out their takes on this week's colour combination:

And our talented guest designer for October - Jen Mitchell
 
We look forward to seeing your monochromatic creations.
 
I have a busy and exciting day planned today which I will tell you all about in due course. I'll be back later with the details of this week's Wednesday weekly deals and news of a great sign up offer and some great discounted offers to help you celebrate World Card Making Day on the 6th October.

Back tomorrow with another project; until then, happy stampin'!


Stampin' Up! Supplies Used:

Table built using Product Table Builder by The Crafty Owl - Independent Stampin' Up! Demonstrator.


Tags: , , , , , , , ,

Cards | Stamping

Giggle Greetings Birthday - My First Blendabilities Coloured Card!

by Joanne James26. July 2014 23:24

A late post from me today - I returned late yesterday evening from a family mini break and seem to have spent all day today washing and ironing, isn't that always the way?! That's not strictly true - I did manage to get some long overdue gardening done this afternoon and fit in a grocery shop; all in all a very productive day! I made this card earlier in the week for my brother-in-law's  birthday; it's not until next week, but as he doesn't read my blog I know I'm safe to share! I used this week's Mojo Monday sketch challenge as the inspiration for my layout:


I've spent some time practising with my Blendabilities this week and thought today's card would be a great opportunity to show you just how great these fabulous markers are for achieiving a blended coloured image. Here is my card:


Since my Bro' is officially 'post 40' this year, this image and sentiment from the 'Giggle Greetings' set seemed rather appropriate. I coloured the candle and cheese with my Daffodil Delight and Coastal Cabana sets of markers and echoed these colours elsewhere in my card. I am loving these new pens - they allow for beautiful shading with seamless colour blending and are so easy to use - no previous expertise necessary, although if you're the type of person who liked to colour as a child, you may find them rather addictive! I also embossed the top layer of my card with the Large Polka Dot embossing folder - it kind of reminded me of the holes in the cheese, albeit a little too regular in design. Lastly, I went with thick baker's twine for my bow detail - as a true 'man's man', I'm not sure my brother-in-law would appreciate anything more fancy!

Back tomorrow with my design team card for the Paper Players this week when we have a great sketch challenge for you - and another card using my Blendabilities markers!

Until then, happy stampin'!


Stampin' Up! Supplies Used:

Table built using Product Table Builder by The Crafty Owl - Independent Stampin' Up! Demonstrator.

And The Fox says "Thanks a Million!"

by Joanne James11. May 2014 20:42

Today I have a special blog post for you - a guest blogger, none other than my 8 year old daughter! As I was eating my breakfast and minding my own business one day, she was reading over my shoulder and fell in love with the card featured - this fabulous card featuring the fox from the Life in The Forest set, by the talented Erica Cerwin.  She promptly announced she just HAD to copy the card and as Rebecca has always fancied the idea of writing her own blog, I asked if she would like to write the blog post for it and she jumped at the chance! So here is her CASE of Erica's card and a few words about how and why she made it:

"I really liked this card when I saw it and decided it would make a perfect card for my singing teacher, to say thank you for her help in enabling me to get a distinction in my recent grade one singing exam. I stamped lots of foxes on the card base, and coloured in the white bits with a chalk marker. I love how you can see them through the vellum. I then stamped another fox and cut him out and stuck him on the front behind the grass, which I cut with fringe scissors. I made the banner with 'You're one in a million' but added a row of gold sequins to mine too, for extra sparkle. I also stamped a fox on the card envelope and coloured him in with a Cajun Craze marker pen. my singing teacher loved her card!"

I hope you like Rebecca's card - normal blog service resumes tomorrow! until then, happy stampin'!


Stampin' Up! Supplies Used:

Table built using Product Table Builder by The Crafty Owl - Independent Stampin' Up! Demonstrator.


Happy Watercolour Thank You

by Joanne James22. March 2014 21:25

I've had a busy day today preparing for tomorrow's Spring Banner class - photos to follow - and working on some other projects, so just time for a quick post today. I'm sharing a thank you card designed by Monica Gale that we made at our January team training session:

This is a lovely pastel card featuring the orchid stamp from the 'Happy Watercolour' set'. It is stamped onto a scallop topped tag and coloured with Stampin' Write markers and a blender pen and layered on a few layers of Sale-A-Bration Sweet Sorbet DSP in co-ordinating colours. along with an offcut from one of the laser-cut cards from the 'Simply Fabulous Simply Sent' kit sets. Some background stamping and a banner are stamped with two of the other stamps in the 'Happy Watercolour' set and the tag is finished with some ribbon and rhinestones to complete the look.

Come back tomorrow to see the outputs from tomorrow's Spring Banner class; until then, happy stampin'!


Stampin' Up! Supplies Used:

Table built using Product Table Builder by The Crafty Owl - Independent Stampin' Up! Demonstrator.


Fabulous Friend Boxed Keyring and Pen

by Joanne James27. November 2013 21:02

Today I'm sharing a gift I made for some of my most supportive stamping friends who I met up with at Convention. One of the great things about being a Stampin' Up! demonstrator is the friendships you make along the way - I have friends that I would never have met if it wasn't for Stampin' Up! and they are some of the most supportive when it comes to sharing successes, failures and ideas. Here is one of the gifts I made:

I found these cute little keyring notebooks in a local stationery store and customised them with stamps, punches and ribbon. I added a keyring Sharpie pen to each one, then made a little box with my Envelope Punch Board and closed with a co-ordinating belly band.

These are perfect for keeping in your handbag to always ensure you have a pen and paper to hand for quick notes.

Back tomorrow with another project. until then, happy stampin'!


Stampin' Up! Supplies Used:


Mosaic Madness Christmas Card

by Joanne James1. August 2013 21:00

I know, I know - 145 days until Christmas, but as a crafter it pays to be prepared! I have been busy this week preparing for an all day Christmas workshop this weekend when we will be making a headstart on our 3D projects and gifts for the festive season.

As such, today seems like a good day to share another of our quarterly team training projects designed by Monica Gale: this time a Christmas card using the Mosaic Madness stamp set. I love this set and still have so many more projects to make with it. It is great for all kinds of cards, and the main mosaic shape does have something ornamental about it, so it works really well for a Christmas card. So here is the finished card:

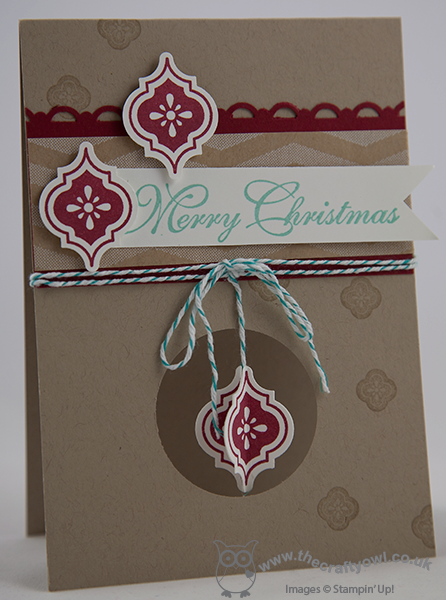
 The hanging ornament is made by scoring four punched pieces vertically then adhering together around the bakers twine and is then suspended in the negative space of a punched circle. The nice thing about this card is that although it's very multi-dimensional, it still folds flat for posting. Also, if you're wondering where that piece of crumb cake DSP with the chevrons came from, you might be looking for some time as it's actually a strip cut from a Tag a Bag - these just have so many uses!

So the first of many Christmas cards and projects to come; I will share our weekend workshop projects next week, guaranteed to really get you in the festive spirit! This is also a good time to mention that Mosaic Madness is the stamp set that I'll be featuring in my September card classes. If you would like more information about my classes or to book a place, please get in touch to find out more.

Back tomorrow with another project; until then, happy stampin'!


Stampin' Up Supplies:

Stamps: Mosaic Madness, Greetings of the Season

Cardstock: Crumb Cake, Whisper White, Cherry Cobbler

Ink/Stampin' Write Markers: Coastal Cabana, Crumb Cake, Cherry Cobbler

Tools: Mosaic Punch, 1 3/4" Circle Punch, Scallop Trim Border Punch

Finishing Touches: Baker's Twine (Tag A Bag Accessory Kit), Tag A Bag

Mini Catalogue

BROWSE THE CATALOGUE

The mini catalogue is now live! Read and download your copy here.

Shop Online

Access my online shop 24 x 7, 365 days of the year:

Current March hostess code:

S9F2XJJW

Shop Online

Join My Team

It's always a great time to join Stampin’ Up! New team members can get £130 worth of products for only £99 + free business supplies + free shipping + all the fun being a part of Stampin’ Up! Stampin' Up! has something for everyone: join my growing team and benefit from my support to enjoy Stampin' Up! however you choose.

If you're interested, call me for a chat to understand how I can help you realise your goals. Alternatively, if you have already decided to sign up and you just can't wait, please click here for the link to the online form where you can sign up and order your starter kit right away! 

Latest Kit!

Stampin Cut and Emboss

The Rock Legend Kit has all you need to make 8 cards with coordinating envelopes. Along with the new Panda Friends Kit, both are available from January 4th for just £14 each - get yours here!

2023-24 Annual Catalogue

BROWSE THE CATALOGUE

Click on the catalogue for a full list of current SU! supplies - if you would like to order any of the items featured, please drop me a line at [email protected] or give me a call on 07773 421446 - I'd be happy to help.

New Online Exclusives

There will be new products available exclusively in the online store from 5 March - check them out here.

About Me

Hi I'm Joanne and live in Northampton and when I'm not looking after my husband and two beautiful children, am an avid crafter with a passion for all things Stampin' Up!

I must confess that I have never been a big rubber stamper - until I discovered Stampin' Up! that is. I love the fact that I can get such great results with co-ordinating stamps, inks, papers and punches - the possibilities are endless! Join me on my stamping journey as I share the things I love and be inspired to create amazing things yourself!

Follow Me

Monthly Newsletter

Box Builder

Click the button above to use Box Buster to create your custom box design using the Envelope Punch Board!

Kits Collection Now Available!

Stampin Cut and Emboss

The new Kits Collection from Stampin' Up! is now available!

Click here to see the current kits available and order yours online today.

I Design For


Stampin' Up Stuff

This is my personal blog and is not endorsed by Stampin’ Up! I hope you find it a plentiful source of ideas and personal inspiration but please don't copy my designs for contest submission or use for classes, publication or sale without express permission.