Holiday Pines Hug In A Mug For PP369

by Joanne James5. November 2017 09:00

It's Sunday and time for this week's new challenge over at The Paper Players! My good friend LeAnne is the hostess this week and she has a seasonal theme for us to work with:


I was rather pressed for time this week and had been wanting to play along with the team over at Merry Monday with that fun inspiration photo so took the opportunity to use some of my hoarded retired Adventure Bound DSP along with my new 'Hug In A Mug' Stamp Set and combined the two to come up with this card - take a look:


My pines were in-situ and ready to go so I simply heat-embossed my sentiment in white, having already created a shadow in Early Espresso, to enable it to stand out against the wood effect DSP, fussing cut my little mug and added some puffy frosting to my hot chocolate having added white embossing powder to Tombo glue and heated it to create the puffy effect - I made a video tutorial on this technique previously that you can see here. I added a stamped striped candy cane and that was my card done - so easy to recreate.

Here is the visual summary of the key products used on today's project for you to pin for easy reference:


You can see all of my Product and 'How To' summaries on my 'How To - Tips and Techniques' Pinterest board in case you've missed any. 

This card is destined for a good friend of mine who recently emigrated to the USA; I miss our chats over coffee so I know this is one piece of happy mail that will surely brighten her day. 

Before you reach for your ink and papers, check out what our amazing team has created to inspire you this week:

The Paper Players Design Team
 
 
Here's a quick recap of our challenge rules:
 
1.  Create a new paper project
2.  Upload your creation to your blog with a link back to us and provide a direct link to the post featuring your challenge submission.
3.  Please link your card to no more than four challenges, TOTAL.
4.  Have FUN! 


I look forward to seeing what you create with this week's theme. Enjoy the rest of your weekend as it will be over all too quickly; I'll be back tomorrow with another project; until then, happy stampin'!


Stampin' Up! Supplies Used: 

Table built using Product Table Builder by The Crafty Owl - Independent Stampin' Up! Demonstrator.

Masculine Mini Treat Bag Thinlit Card and Self-Closing Gift Bag Punch Board Bag

by Joanne James7. June 2015 10:00

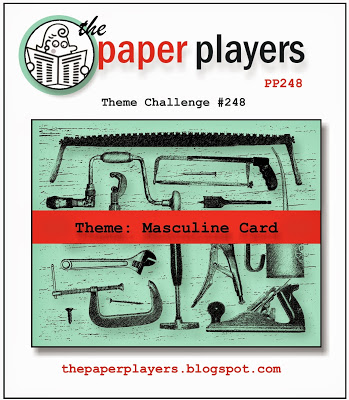
Yay it's Sunday and time for a new challenge over at The Paper Players - and this week I'm the hostess! With Father's Day approaching, I thought that masculine cards would make a great theme this week and it would at least encourage me to be organised!
I have lots of photos to share with you today, as I made not just one but two projects: a fun card using the mini treat bag thinlits and a matching gift bag using my new Gift Bag Punch Board - oh how I love this!

So first to my card: I've seen a few of these fun cards on Pinterest using the Mini Treat Bag Thinlits Die to create a fancy shirt with a sliding insert (one of my favourites is this one by Julie Kettlewell) and have been wanting to have a go at creating my own version for a while. Here it is: 
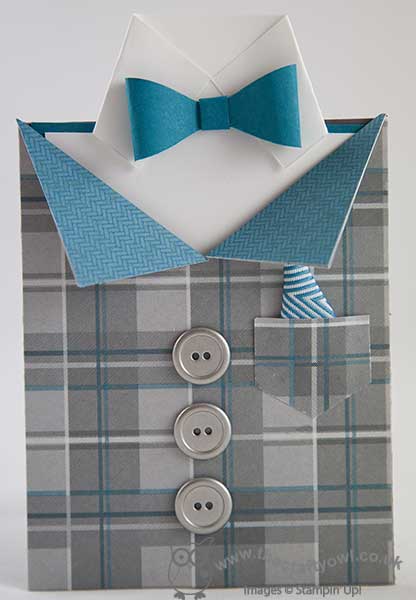
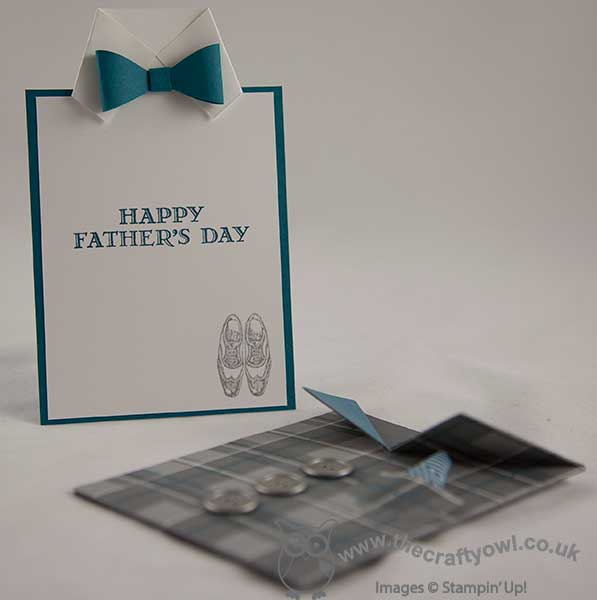
I have used the now retired Adventure Bound DSP for my card - this paper is just so fabulous for masculine cards and I hope you all stocked up before it retired! The Mini Treat Bag Thinlits are great for making simple slider cards as well as treat bags; I added silver buttons, a pocket punched with my hexagon punch and with a snippet of Island Indigo chevron ribbon in for a handkerchief. For my insert, I cut it taller than my pocket, then snipped in a third of the way each side to create my turned down collar and added my bow tie. The picture below shows the insert with my stamped sentiment from the 'Guy Greetings' stamp set and a pair of shoes to finish off this dapper outfit:
Pleased as I was with this cute little card, I couldn't stop there; I had to create a matching gift bag using my new Gift Bag Punch Board. I think this is going to be one of my new favourite tools - it is so easy to use and offers so many creative possibilities that go beyond the constraints of the board. Here is my bag:
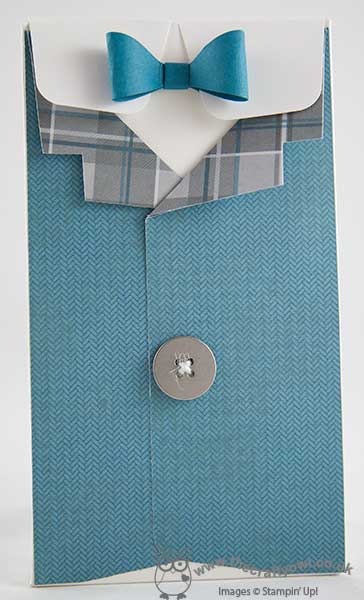
I made my bag using the 'L' measurements on the board and used a sheet of Whisper White cardstock measuring 9 1/2" x 12". Once I'd punched the bottom according to the board instructions, I flipped it around and did the same on the other end, cutting away all except the long flap on the back of the bag, which I then also punched in the middle to create my collar. I then used the collar as the close mechanism for my bag, by tucking it underneath the bow tie - the photo below of the open bag illustrates that more clearly:
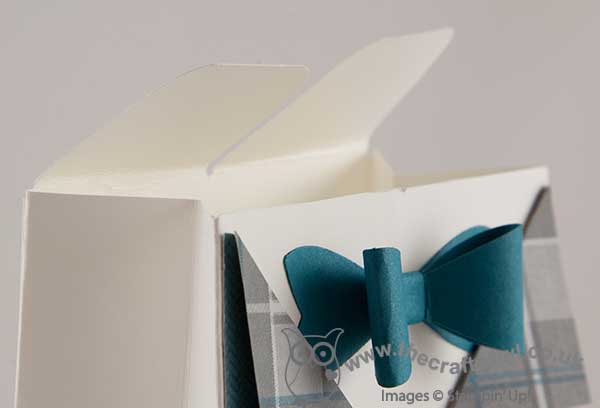
I then added two pieces of DSP with co-ordinating lapels and a large silver button threaded with a piece of white jute ribbon trim to finish my bag. Here are both items together:
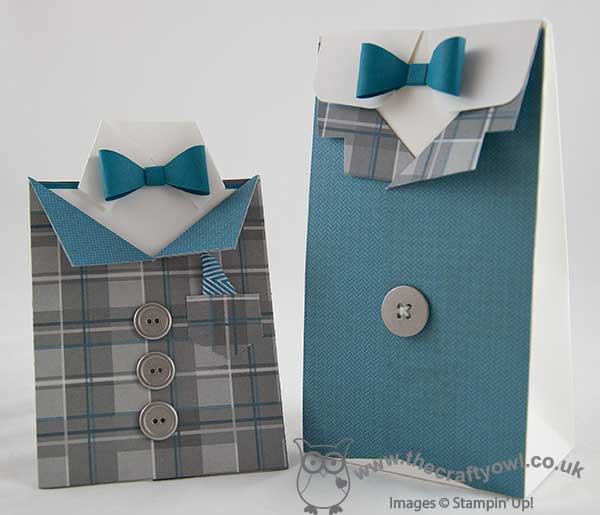
I'm really pleased with this project duo; the gift bag is large enough for a couple of pairs of socks, some toiletries, a sweet treat (or two!) - pretty much anything that might be on a Dad's wish list. I hope you like them too and they inspire you to create some fun masculine projects this week! Before you reach for your ink and papers, check out what our amazing team has created to inspire you this week, including our three new guest designers:

The Paper Players Design Team
 
 
Here's a quick recap of our challenge rules:
 
1.  Create a new paper project
2.  Upload your creation to your blog with a link back to us and provide a direct link to the post featuring your challenge submission.
3.  Please link your card to no more than three challenges, TOTAL.
4.  Have FUN! 

I look forward to seeing your masculine creations in the gallery this week. I'm off to finish preparations for this week's technique classes and tackle my mountain of ironing. How does the saying go - no rest for the wicked?!

Back tomorrow with another project; until then, happy stampin'!


Stampin' Up! Supplies Used:

Table built using Product Table Builder by The Crafty Owl - Independent Stampin' Up! Demonstrator.


To A Classic Masculine Card

by Joanne James3. May 2015 10:00

It's Sunday and time for a new challenge over at The Paper Players. There were some great takes on Anne's sketch last week and today we are kicking off with a challenge from the talented Sandy, who has chosen a great theme for you to play along with this week:


I used this week's layout over at Mojo Monday as the basis for my card (although I didn't go tall and skinny!). As soon as I knew Sandy's theme this week, I knew immediately that I wanted to do something using the vintage car in the 'Guy Greetings' stamp set. Here's what I came up with:

I decided the layout was perfect for showcasing some of the fabulous masculine patterned papers in the 'Adventure Bound' DSP stack too and used the plaid paper as the inspiration for my colour scheme. The base and mat layers are Smoky Slate, with a layer of Island indigo in between along with a band in the same colour across the front of the card, which I tied with a piece of thread split from the white jute ribbon in the current Occasions catalogue. I then used my piece of DSP for the vertical panel and stamped my car in Island Indigo onto a 2" punched circle of Whisper White, with the sentiment stamped in the same colour onto a banner of Smoky Slate, which I then laid over the top.

A great masculine card that could be paired with any of the other sentiments in the same stamp set for a special husband, dad or grandad, and would be suitable for a birthday or Father's Day alike. 

So before you reach for your paper and inks, check out what our amazing team has created to inspire you this week:

The Paper Players Design Team
 
Here's a quick recap of our challenge rules:
 
1.  Create a new paper project
2.  Upload your creation to your blog with a link back to us and provide a direct link to the post featuring your challenge submission.
3.  Please link your card to no more than three challenges, TOTAL.
4.  Have FUN! 

I look forward to seeing how many different modes of transport get into the gallery this week. I'm off to enjoy a nice long Bank Holiday weekend here in the UK - let's hope the sun shines!

Back tomorrow with another project; until then, happy stampin'!


Stampin' Up! Supplies Used:

Table built using Product Table Builder by The Crafty Owl - Independent Stampin' Up! Demonstrator.


Painted Petals Meets Adventure Bound

by Joanne James17. April 2015 20:22

It's Friday and I almost don't know how I got here!! This week has been a busy one: the children are back to school following their Easter break, although Ben was only in for a day before departing for a three-day residential trip. He came home today, tired and a little grubby, but having had the best time! I've also had a couple of technique classes and my Project Life memory keeping group this week, and a couple of late nights, so it would be fair to say that I am happy that Friday is here and I'm looking forward to a lie-in in the morning, even if only a short one!

I haven't managed as much creative time this week as I would have liked, so today I thought I would share one of the cards I made at team training on Sunday. We made lots of projects using the Adventure Bound DSP stack; this is such a great stack for masculine cards and has some fabulous natural photographic prints. My card today though shows that these papers can equally be used for beautifully feminine cards - take a look:

A piece of hardwood print was randomly stamped with the flowers and stems from the Painted Petals set in Strawberry Slush and Mossy Meadow and adhered to a base of Strawberry Slush. The same colour was used to stamp the sentiment on a piece of Whisper White and then this was edged with a piece of Soft Sky, with a scalloped edge, tied with some Painted Blooms cotton twine, then attached to the card with an antique brad. To finish, I stamped a couple of extra flowers and leaves and fussy cut them out and popped them up on a couple of dimensionals. 

So what do you think of today's card? I rather like the hardwood background and it certainly shows how versatile this paper stack can be. 

That's all from me today. Don't forget to check The Paper Players blog tomorrow if you would like to see who won headliner for my challenge this week. Back tomorrow with another project; until then, happy stampin'!


Stampin' Up! Supplies Used:

Table built using Product Table Builder by The Crafty Owl - Independent Stampin' Up! Demonstrator.


Tags: , , , , , , ,

Cards | Stamping

#Birthdaysrock Masculine Birthday Card

by Joanne James1. April 2015 14:07

Time for today's creative post and I have a fun masculine card, using this week's layout over at CAS(E) This Sketch and the current challenge over at Less Is More, where the task is to combine any 3 previous challenges:

I haven't managed to play along with the lovely ladies over at Less is More for a few weeks, so today's card was a great opportunity to combine some of their previous challenges for my card - I chose:

  • Week 7 - theme - masculine
  • Week 121 - recipe - humour
  • Week 127 - colour - 50 shades of grey

Here's the card I came up with:


I decided the sketch was perfect to use a small piece of DSP, something I don't often use on my LIM cards, but this card has sufficient 'white space' that I can get away with it. I love the natural patterned papers in the 'Adventure Bound' DSP stack and having seen so many with a fun 'play on words' with those pebbles, I thought it was about time I shared my version. My card really is quite simple: a base of Smoky Slate and an aperture cut using my Big Shot and the Squares Framelits - on offer as one of this week's Wednesday Weekly Deals for just £17.21, bargain! - and backed with a piece of the pebble-patterned paper (there must be at least 50 shades of grey in there!) and a simple sentiment consisting of an '@' stamped in Versamark and heat embossed in Pewter embossing powder, punched out with a 2" circle punch and popped up on some dimensionals and paired with the '#birthdaysrock' sentiment from the same #Hello stamp set, also heat embossed in pewter. 

A simple yet fun card, perfect for a man with a sense of humour!

Back tomorrow with this week's card for the new Thursday Challenge over at Create With Connie and Mary. until then, happy stampin'!


Stampin' Up! Supplies Used:

Table built using Product Table Builder by The Crafty Owl - Independent Stampin' Up! Demonstrator.


Tags: , , , , , , , , ,

Cards | Stamping

Mini Catalogue

BROWSE THE CATALOGUE

The mini catalogue is now live! Read and download your copy here.

Shop Online

Access my online shop 24 x 7, 365 days of the year:

Current March hostess code:

S9F2XJJW

Shop Online

Join My Team

It's always a great time to join Stampin’ Up! New team members can get £130 worth of products for only £99 + free business supplies + free shipping + all the fun being a part of Stampin’ Up! Stampin' Up! has something for everyone: join my growing team and benefit from my support to enjoy Stampin' Up! however you choose.

If you're interested, call me for a chat to understand how I can help you realise your goals. Alternatively, if you have already decided to sign up and you just can't wait, please click here for the link to the online form where you can sign up and order your starter kit right away! 

Latest Kit!

Stampin Cut and Emboss

The Rock Legend Kit has all you need to make 8 cards with coordinating envelopes. Along with the new Panda Friends Kit, both are available from January 4th for just £14 each - get yours here!

2023-24 Annual Catalogue

BROWSE THE CATALOGUE

Click on the catalogue for a full list of current SU! supplies - if you would like to order any of the items featured, please drop me a line at [email protected] or give me a call on 07773 421446 - I'd be happy to help.

New Online Exclusives

There will be new products available exclusively in the online store from 5 March - check them out here.

About Me

Hi I'm Joanne and live in Northampton and when I'm not looking after my husband and two beautiful children, am an avid crafter with a passion for all things Stampin' Up!

I must confess that I have never been a big rubber stamper - until I discovered Stampin' Up! that is. I love the fact that I can get such great results with co-ordinating stamps, inks, papers and punches - the possibilities are endless! Join me on my stamping journey as I share the things I love and be inspired to create amazing things yourself!

Follow Me

Monthly Newsletter

Box Builder

Click the button above to use Box Buster to create your custom box design using the Envelope Punch Board!

Kits Collection Now Available!

Stampin Cut and Emboss

The new Kits Collection from Stampin' Up! is now available!

Click here to see the current kits available and order yours online today.

I Design For


Stampin' Up Stuff

This is my personal blog and is not endorsed by Stampin’ Up! I hope you find it a plentiful source of ideas and personal inspiration but please don't copy my designs for contest submission or use for classes, publication or sale without express permission.