by Joanne James10. June 2015 19:52Having had a busy start to my week with two technique classes and my monthly Project Life Class, I am finally back with my blog today to share with you one of the cards we made in my technique class. The class featured the now retired set 'Painted Petals' from the Spring-Summer Seasonal catalogue; the ladies that attend my classes were so keen to have a class using this set that we decided we would carry it over into June. Here is one of the cards we made:
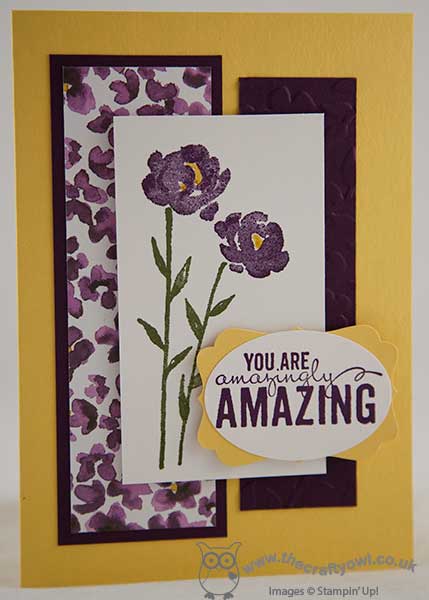
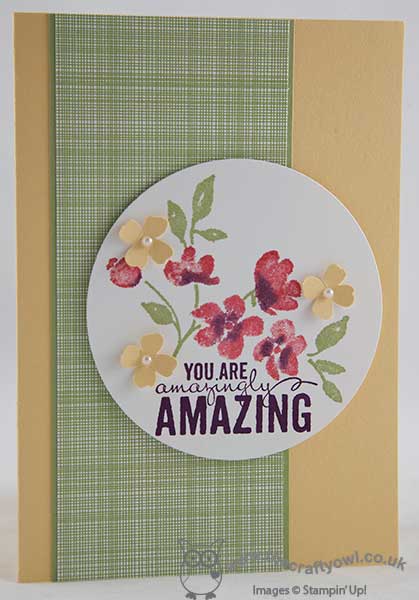
A beautifully bright and cheery card in Daffodil Delight and Blackberry Bliss. We used some retired All Abloom DSP matted on Blackberry Bliss, alongside a panel of Blackberry Bliss that we embossed with the Spring Flowers embossing folder (also retired), then mounted our panel of Whisper White stamped with the double flower image in Blackberry Bliss and Mossy Meadow (the yellow flower centres were added with a Crushed Curry Stampin' Write marker). To finish we added the sentiment, punched out with a large oval punch and mounted on a piece of yellow cut with the Decorative Label punch. This was our 'finishing up' card, having made a rather more complicated box card beforehand (one to share another day!).
Next month's technique class is featuring the gorgeous new stamp set 'You've Got This'. If you would like to join with me and two groups of the nicest people you could wish to know, do get in touch for more details and to book your place.
That's all from me today; back tomorrow with a card for our new challenge over at Create With Connie And Mary. Until then, happy stampin'!
Stampin' Up! Supplies Used:
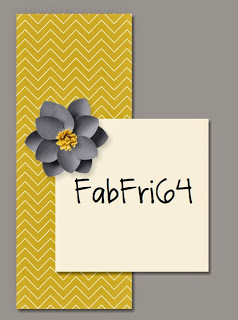
by Joanne James25. May 2015 19:20Well the Bank Holiday didn't bring the sunshine I was hoping for, but it did stay nice and dry and we managed a bracing long bike ride this afternoon, so it's all good! Today I have not one but two cards for you! The first one is my card for the current Fab Friday Challenge where they have a sketch challenge this week:
Before I share my card, a big thank you to the team over at Fab Friday for choosing my In-Colour thank you card as their Fab Fave - I'm honoured! You can see that card here. Now onto today's card:
I'm still on my quest to use up more of my Designer Series Paper (I am such a DSP hoarder!) and this sketch was the perfect opportunity to showcase some. So no 'sneak peeks' today; instead a Daffodil Delight base with some mats in Soft Suede, and two of the patterns in the Park Lane pack. I used one of my favourite retiring thank you stamps, 'One in a Million', for my sentiment, stamped in Soft Suede onto Very Vanilla, and I chose to fussy cut one of the flowers for my accent. I liked the clean lines of this card so much, I made two identical ones - if you are one of my contactable online customers, you may find one winging its way to you to you this month!
My next card is for this week's TGIF challenge:
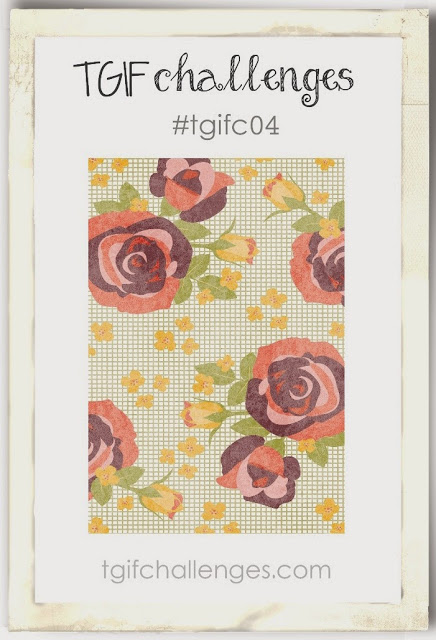
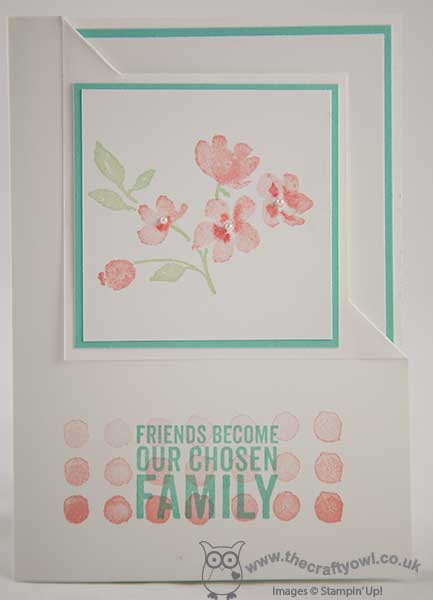
I saw the inspiration photo and I had my Painted Petals set out on my desk preparing for my technique class next month (this is the set we are going to be using) and I just knew the two would work together. Here's my card:
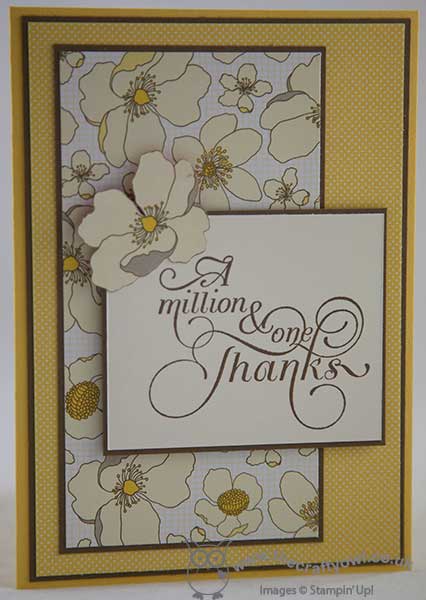
I used So Saffron for my card base and matted a strip of the already retired Gingham Garden DSP (I told you I was a DSP hoarder!) onto a strip of Pear Pizzazz and adhered this to the front of my card. I stamped the flowers on a large circle of Whisper White cut out using my Big Shot and Circles framelits, inking them with one of the new in-colours, Watermelon Wonder, and adding some Blackberry Bliss using my Stampin' Write marker to the flower centres before stamping. I stamped the sentiment in Blackberry Bliss too and to finish added a few So Saffron flowers, punched using one of the Itty Bitty Accent punches and centred with pearls. I popped this circle up on dimensionals to stand away from the card.
Please do check out the design team inspiration for both of the above challenges; they are some amazing cards on both blogs this week. I'll be back tomorrow with another card; until then, happy stampin'!
Stampin' Up! Supplies Used (Card 1):
Stampin' Up! Supplies Used (Card 2):
0084fcea-f009-4701-8df0-72f46e1d3ed5|0|.0|96d5b379-7e1d-4dac-a6ba-1e50db561b04
Tags: Million & One, Park Lane, Shop online, Shop Stampin' Up online, Stampin' Up, Stampin' Up Card, Stampin' Up Card ideas, Stampin' Up Supplies, Big Shot, Gingham Garden, Itty Bitty Accents Punch Pack, Painted Petals, Circles Framelits
Cards | Stamping
by Joanne James17. April 2015 20:22It's Friday and I almost don't know how I got here!! This week has been a busy one: the children are back to school following their Easter break, although Ben was only in for a day before departing for a three-day residential trip. He came home today, tired and a little grubby, but having had the best time! I've also had a couple of technique classes and my Project Life memory keeping group this week, and a couple of late nights, so it would be fair to say that I am happy that Friday is here and I'm looking forward to a lie-in in the morning, even if only a short one!
I haven't managed as much creative time this week as I would have liked, so today I thought I would share one of the cards I made at team training on Sunday. We made lots of projects using the Adventure Bound DSP stack; this is such a great stack for masculine cards and has some fabulous natural photographic prints. My card today though shows that these papers can equally be used for beautifully feminine cards - take a look:
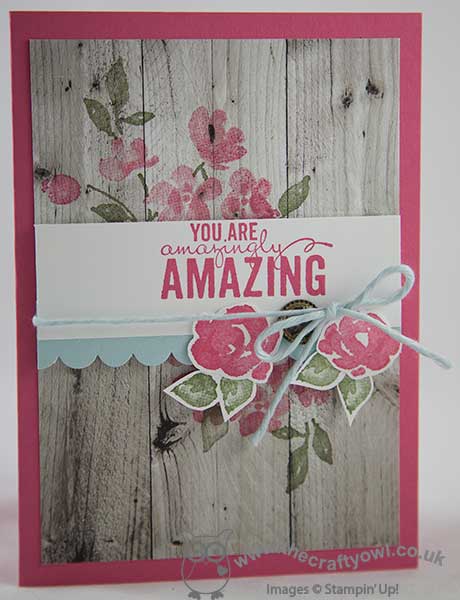
A piece of hardwood print was randomly stamped with the flowers and stems from the Painted Petals set in Strawberry Slush and Mossy Meadow and adhered to a base of Strawberry Slush. The same colour was used to stamp the sentiment on a piece of Whisper White and then this was edged with a piece of Soft Sky, with a scalloped edge, tied with some Painted Blooms cotton twine, then attached to the card with an antique brad. To finish, I stamped a couple of extra flowers and leaves and fussy cut them out and popped them up on a couple of dimensionals.
So what do you think of today's card? I rather like the hardwood background and it certainly shows how versatile this paper stack can be.
That's all from me today. Don't forget to check The Paper Players blog tomorrow if you would like to see who won headliner for my challenge this week. Back tomorrow with another project; until then, happy stampin'!
Stampin' Up! Supplies Used:
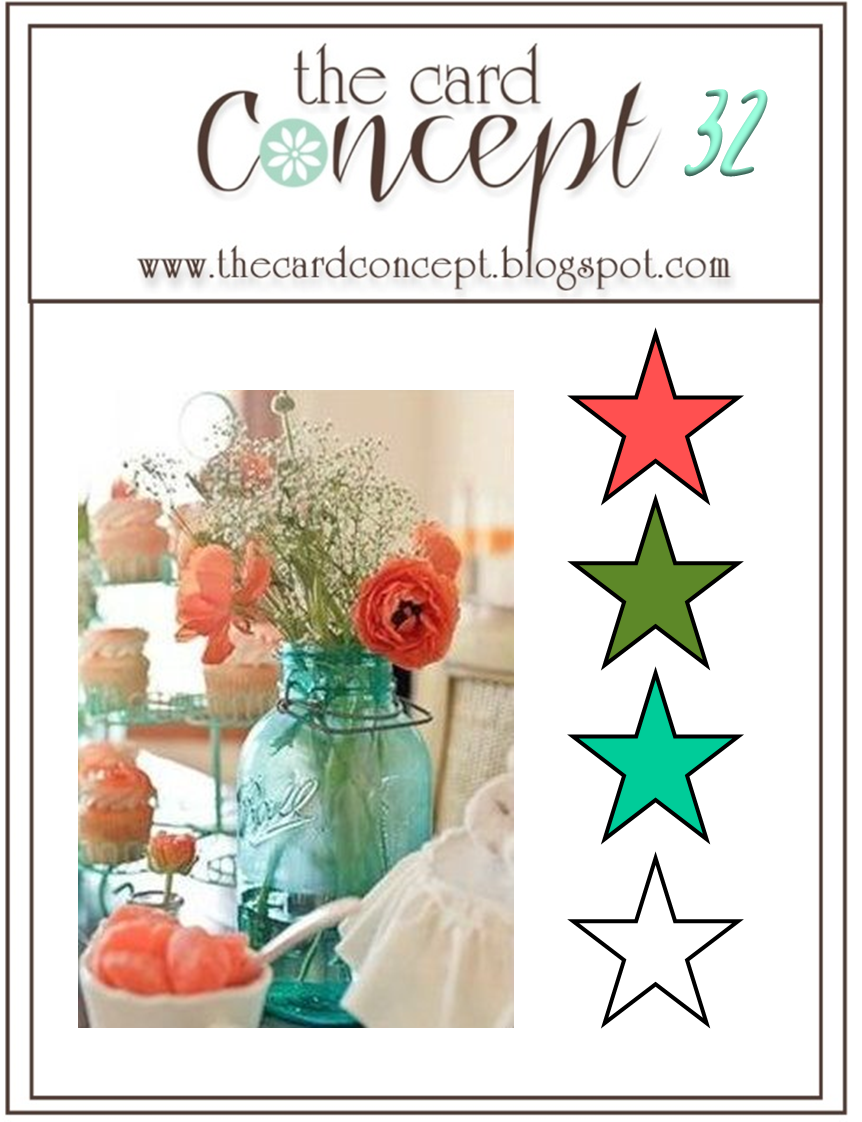
by Joanne James4. April 2015 10:00I have a couple of posts for you today - the first one is for this week's challenge over at SUO Challenges, where they have a 'fun fold' challenge going on. I was also inspired to use the colours over at The Card Concept - don't you just love that inspiration photo?
Now I don't often make fun fold cards, although I saw a really 'simple but effective' one over on LeeAnn Greff's blog here a couple of weeks ago (inspired by an original card by Darlene McCallum) that I really wanted to try. When I went to LeeAnn's blog to link up, she has today added a video tutorial here, although I had already made my card and used slightly different measurements to this as I was working in metric. Here is my version:
It wasn't too tricky to work out where to make the cuts using my Stampin' Trimmer to make the folded corner and once they were in place I could adhere the front panel, which featured my Painted Petals blooms, stamped in Pistachio Pudding and Crisp Cantaloupe, with a little detail added using a Calypso Coral Stampin' Write marker and some tiny pearls and matted onto a piece of Coastal Cabana. I created an ombre border using the dot stamp in Crisp Cantaloupe along the bottom, starting with the bottom row and working upwards, stamping each time without reinking. I then overstamped my sentiment in Coastal Cabana.
I need to add a couple more photos showing this card from the inside and so that you can better see it with the front face closed against the back panel. I love this fun fold - it enables me to maintain my 'clean and layered' look whilst adding an unexpected twist.
Back later with another fun Easter project; until then, happy stampin'!
Stampin' Up! Supplies Used:
by Joanne James14. March 2015 21:10It's the weekend but no signs of my week slowing down yet! I had a great Stampin' Up! party hosted by the lovely Lucy yesterday and today we visited a science fair and Ben played basketball on his school team at the county quarter finals this evening. So just time for a quick post with a card I made for this week's Mojo Monday challenge:
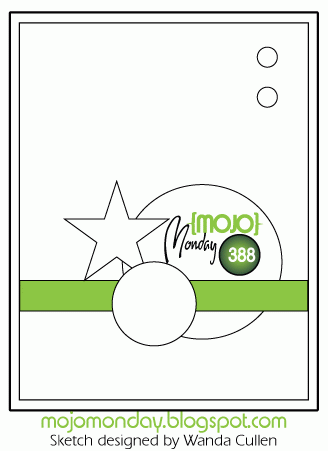
This is the first sketch designed by Wanda Cullen and I think it's great (go Wanda!) I decided it was the perfect layout for me to cut into one of my favourite pieces of paper in my Painted Blooms DSP pack - here is my card:
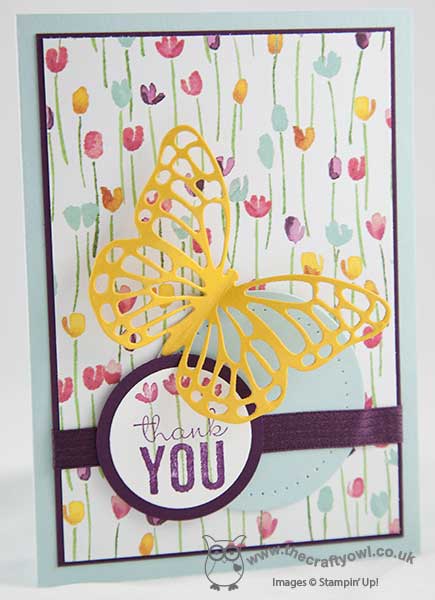
I used Soft Sky for my base and matted my paper on a piece of Blackberry Bliss to give a thin border, then layered a paper pierced circle, a piece of Blackberry Bliss satin ribbon and my layered sentiment circle, where I over-stamped the tulips with my thank you, before finally adding my Crushed Curry thinlit butterfly. I just love the detail of the sentiment and the dramatic bright yellow butterfly on this card - here's a close up:
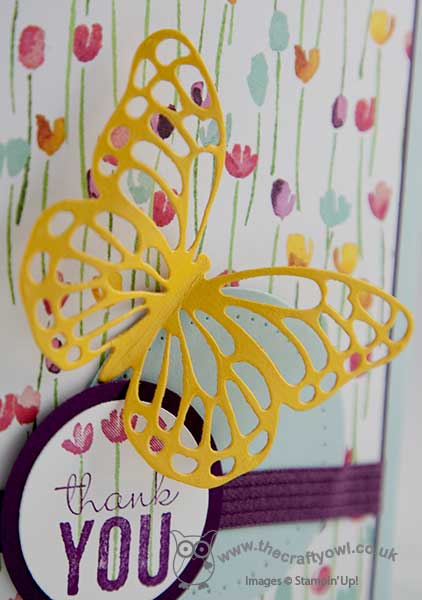
Love it! That's all from me today; back tomorrow with this week's card for our new challenge over at The Paper Players. Until then, happy stampin'!
Stampin' Up! Supplies Used:
421f25bd-a649-4dc9-a3f6-f3f8488735e3|0|.0|96d5b379-7e1d-4dac-a6ba-1e50db561b04
Tags: Painted Blooms, Painted Petals, Big Shot, Butterfly Thinlits Dies, circle punch, Circles Framelits, Paper Piercing, Shop online, Stampin' Up, Stampin' Up Card, Stampin' Up Card ideas, Stampin' Up Supplies
Cards | Stamping
by Joanne James17. January 2015 20:44Today's card is for this week's challenge over at Mojo Monday where this week's sketch has encouraged me to cut into my Painted Blooms DSP for the first time! Here's the sketch:
I thought this sketch was perfect to showcase some DSP and what better than 'Painted Blooms'; I've spent long enough stroking it and it's time to start cutting it! Here is my card:
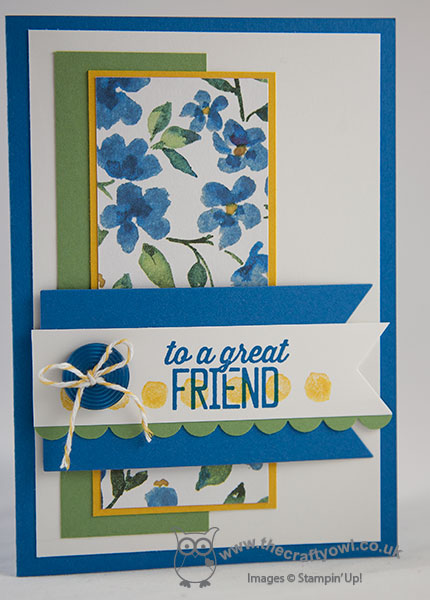
I decided to go with the blue flowers, so used Pacific Point for my card base and matted with Whisper White. I used the floral panel for the main vertical section and backed this with Crushed Curry and an offset panel of Wild Wasabi. For the sentiment banner, I stamped off the row of dots in Crushed Curry once, then stamped my sentiment on top. A scallop edge trim, button and twine finish my card.
The papers in the 'Painted Blooms' DSP pack are some of the most beautiful I've ever seen and are works of art in their own right. Having started cutting now, I'll be sure to use more of them and share with you in the coming weeks.
Back tomorrow with my post for this week's challenge over at The Paper Players. Until then, happy stampin'!
Stampin' Up! Supplies Used:
b4fd7060-d5ee-49b7-9538-4998b3d5d28f|0|.0|96d5b379-7e1d-4dac-a6ba-1e50db561b04
Tags: Painted Petals, Painted Blooms, Sale-A-Bration 2015, Shop online, Simply Wonderful, Stampin' Up, Stampin' Up Card, Stampin' Up Card ideas, Stampin' Up Supplies, Banners Framelits, Big Shot
Cards | Stamping
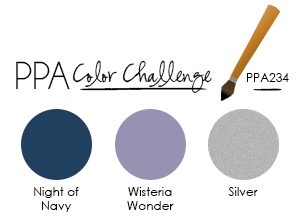
by Joanne James5. January 2015 22:06I'm back today with a card for this week's challenge over at Pals Paper Arts, where they have this striking colour combination to play with this week:
My card today features another 'sneak peek' (only one more day to go!) - this time of a fabulous new stamp set from the new Spring-Summer seasonal catalogue called 'Painted Petals'. It's a lovely two-step stamp set that has some fabulous sentiments and was perfect for the card I had in mind today:
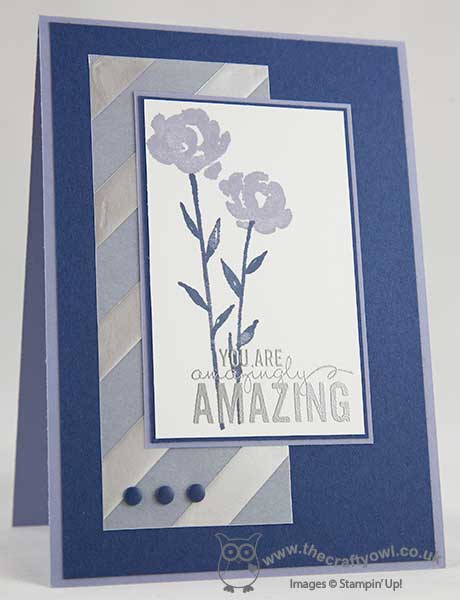
I used a base of Wisteria Wonder matted with Night of Navy and added a piece of silver striped vellum to this base. I stamped the flowers in Wisteria Wonder and Night of Navy on Whisper White, then stamped the sentiment in Versamark and heat-embossed in silver. I matted this stamped piece in Night of Navy and Wisteria Wonder then adhered this to my base. I added three navy candy dots to the bottom of the vellum panel to add balance to my image. I just love this stamp set and know it's one that is going to get lots more use this season.
That's all from me today - I hope you've all placed your final orders from the current Autumn-Winter catalogue and year-end closeouts, because we are all-change from tomorrow: Sale-A-Bration will be here and Spring-Summer is most definitely on its way!
Back tomorrow with another project; until then, happy stampin'!
Stampin' Up! Supplies Used: