by Joanne James30. June 2020 12:06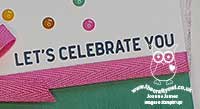
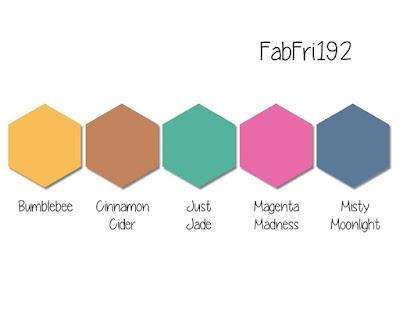
Today I'm sharing another card for the current challenge over at Fab Friday to use some/all of Stampin' Up!'s new in-colors, as I finally got over my 'use all 5 colours' mental block when I saw the current inspiration over at Time Out:
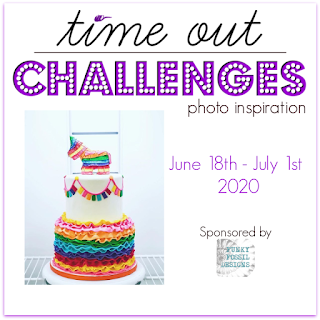
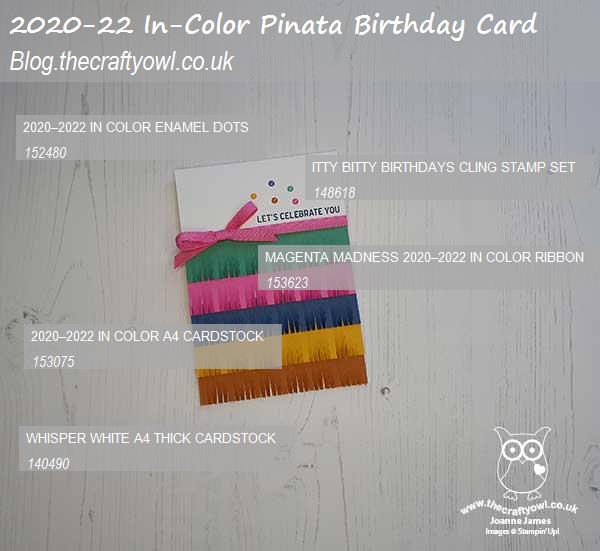
I saw that frilly cake and cute pinata cake topper and realised that frills would be a great way to use all five colours so I grabbed my fringe scissors and set about creating a rainbow of in-colors just like the frills on that fabulous cake - take a look:
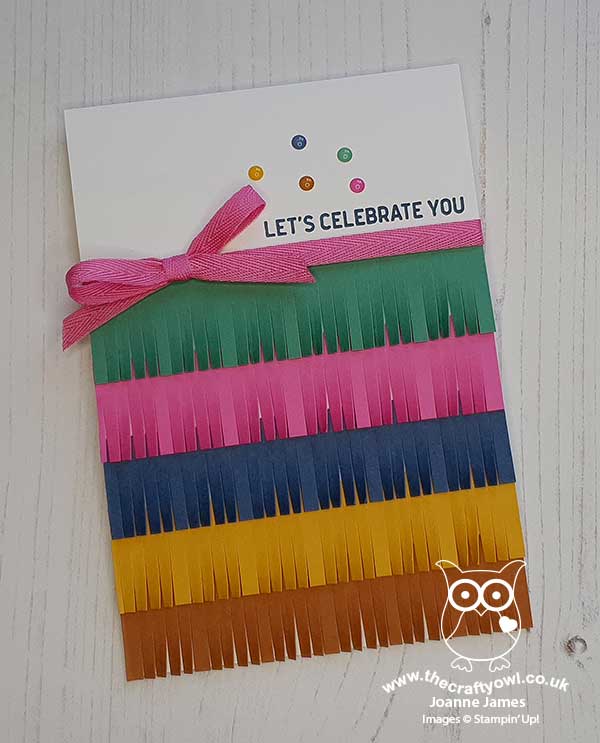
I paired my frills with a simple birthday sentiment, a sprinkling of in-color enamel dots and a co-ordinating Magenta Madness ribbon and bow to complete my quick and colourful birthday card.
Here is the visual summary of the key products used on today's project for you to pin for easy reference:
You can see all of my 'How To' summaries on my 'How To - Tips and Techniques' Pinterest board in case you've missed any.
One final reminder that today is the last day you can take advantage of additional hostess rewards on orders over £200 or this month's great joining offer - if you need a reminder you can find the full details here.
That's all from me today - lots to do! Enjoy your day and I'll be back tomorrow with another project. Until then, happy stampin'!
Stampin' Up! Supplies Used:
by Joanne James23. October 2015 21:24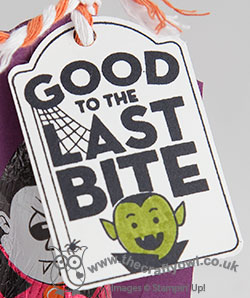
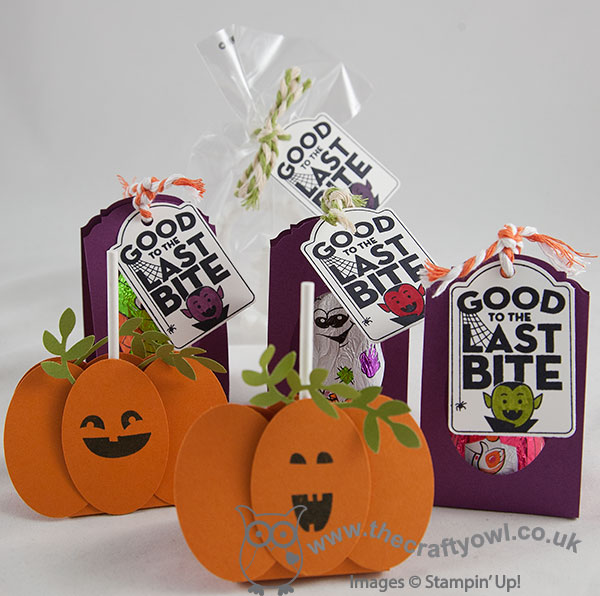
A quick post today to share some fun little Halloween treats that I've been preparing for a fundraiser that I'm attending next week. A friend of mine is raising funds for the Outspan School in Uganda where she sponsors a student and she invited me along to do a little crafting with the children and raise a few pennies.
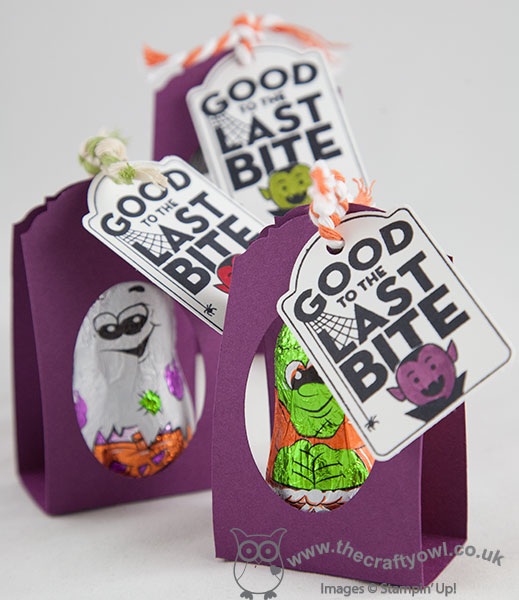
We will be making a selection of sweet treats and fun Halloween favours, some of which I've shared with you before, such as these fun Halloween chocolate characters, with their Merry Everything Note Tag punched tags:
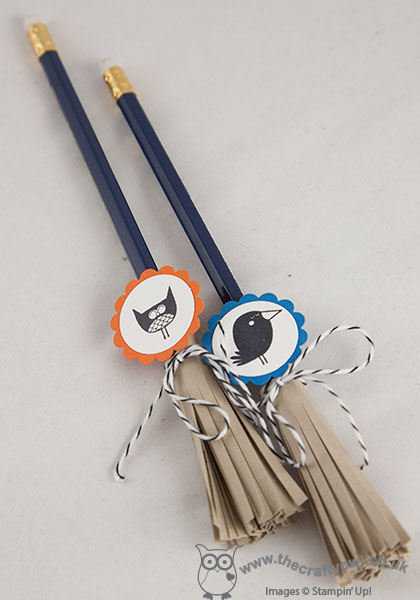
Some broomstick pencils, made with fringe scissor toppers:
Along with some pumpkin lollipops, made with the oval punch and some bird punch leaves:

A fun selection of treats that I'm sure we will have lots of fun making.
Back tomorrow with another project; until then, happy stampin'!
Stampin' Up! Supplies Used:
bc400e84-9d12-4654-a86b-91f284361968|0|.0|96d5b379-7e1d-4dac-a6ba-1e50db561b04
Tags: Halloween, On Point TIEF, Ornate Tag Topper Punch, Merry Everything, Note Tag Punch, bird builder punch, Fringe Scissors, Shop online, Shop Stampin' Up online, Stampin' Up, Stampin' Up Card, Stampin' Up Card ideas, Stampin' Up Supplies
Cards | Shop Online | Stamping
by Joanne James16. September 2015 09:00It's Wednesday and you know what that means: a new collection of Wednesday Weekly Deals! These offers are valid for one week only. As always, a new collection of deals will be announced next Wednesday.
If you want to take advantage of any of the deals on offer, you can support my business by placing your order online by clicking here or using the link to my store on the right hand side of my blog page where it says 'Shop Online' or with me in person. Don't forget to add the new Hostess Code for September HJQSKSW6 if your order is under £150 and be sure to make sure that you don't check the 'no contact' box if you'd like to be kept updated with the progress of you order and receive a little thank you in the post from me.
Here's a summary of this week's one-week only Wednesday deals - click on each item to go to the online store to purchase:
More great deals again this week. my favourite has to be the oh so versatile hexagon punch - great for little banners and so many more uses besides. At only £10.88 a bargain too!
Back tomorrow with this week's challenge over at Create with Connie and Mary; until then, happy shopping!
by Joanne James14. August 2015 09:00Today I'm sharing the birthday card I made for Ben to celebrate his 8th birthday. Basketball and football are his two sporting passions and lately he has been football mad. He also has a belief that pop-up cards are the best; whilst this isn't quite a pop-up, it does have a fun flip element with the Circle Thinlit card base - here's my card:
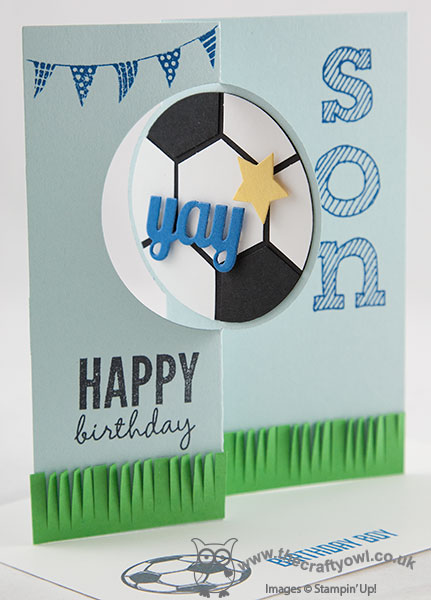
I used Soft Sky for my base and built my football out of a 2 1/2" circle punch and black and white hexagons and decorated my card with some grass cut with my fringe scissors and a bunting banner and greeting from Celebrate today, complete with personalisation using the Epic Alphabet set.
This card actually came together surprisingly quickly and Ben loved it - I'd forgotten quite how much fun a circle thinlit card could be! Here is a picture of the birthday boy blowing out the candles on his amazing birthday cake, made by one of my extended family, the super-talented Helen Vowles:
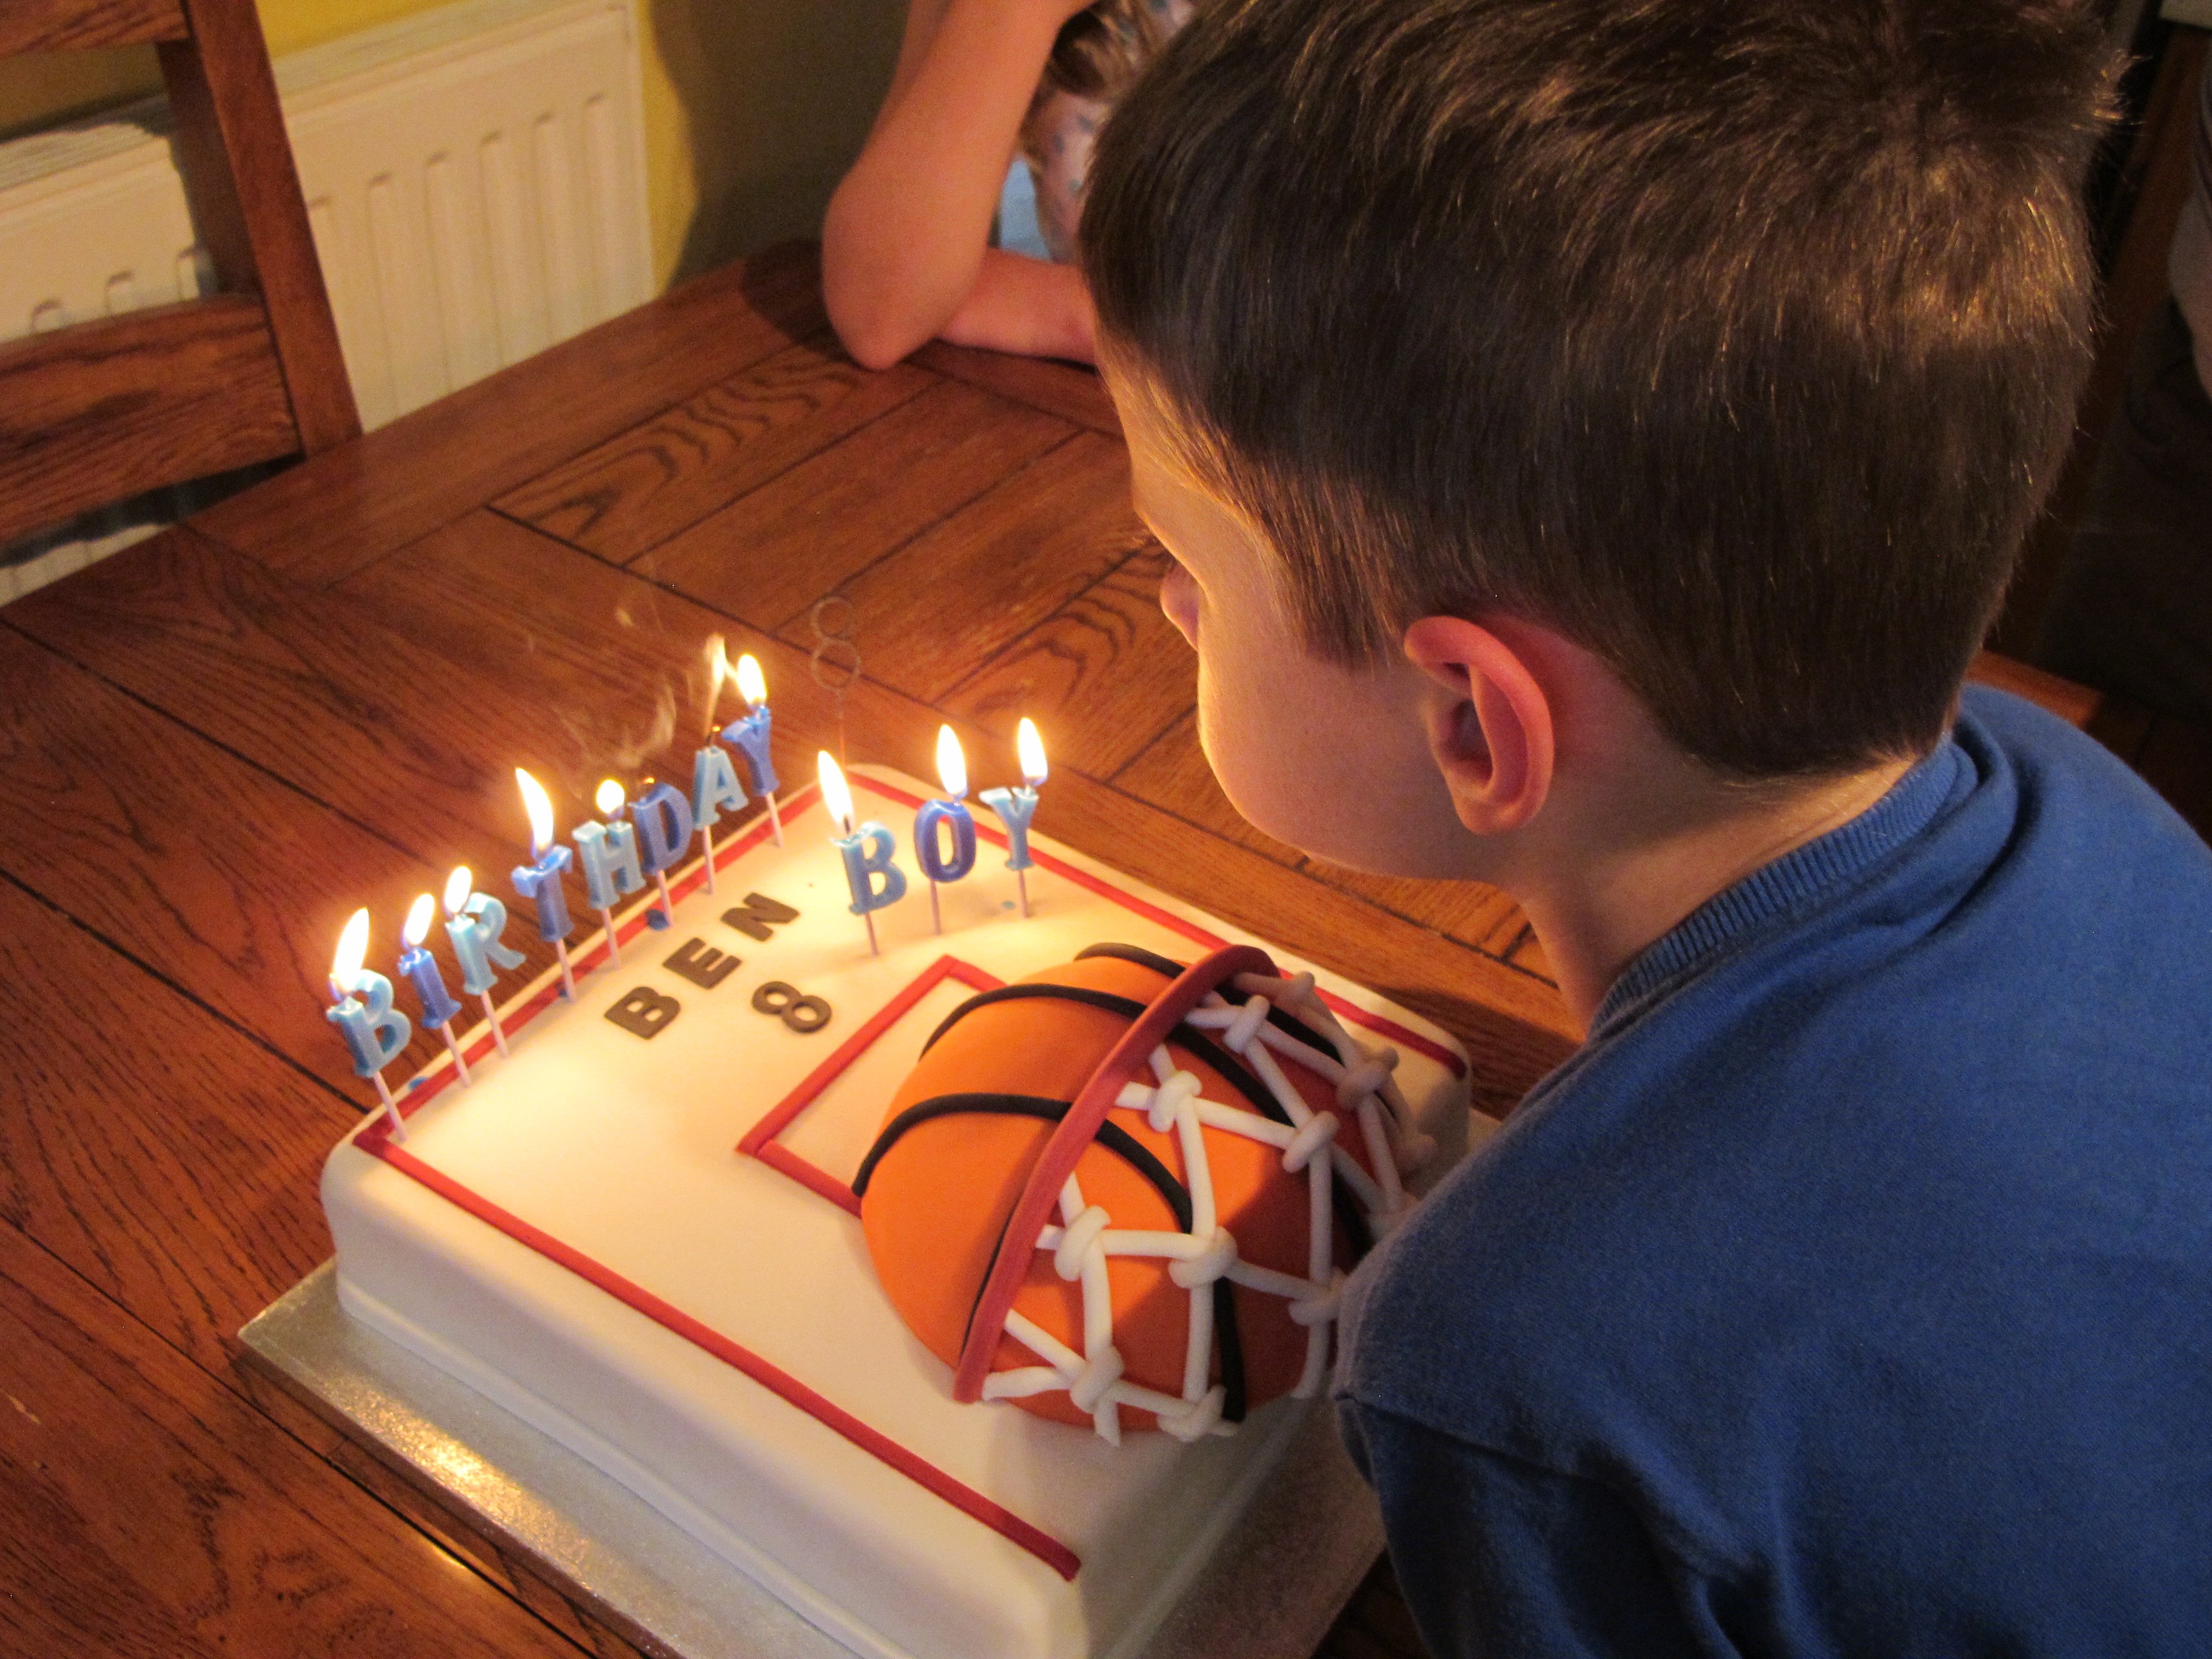
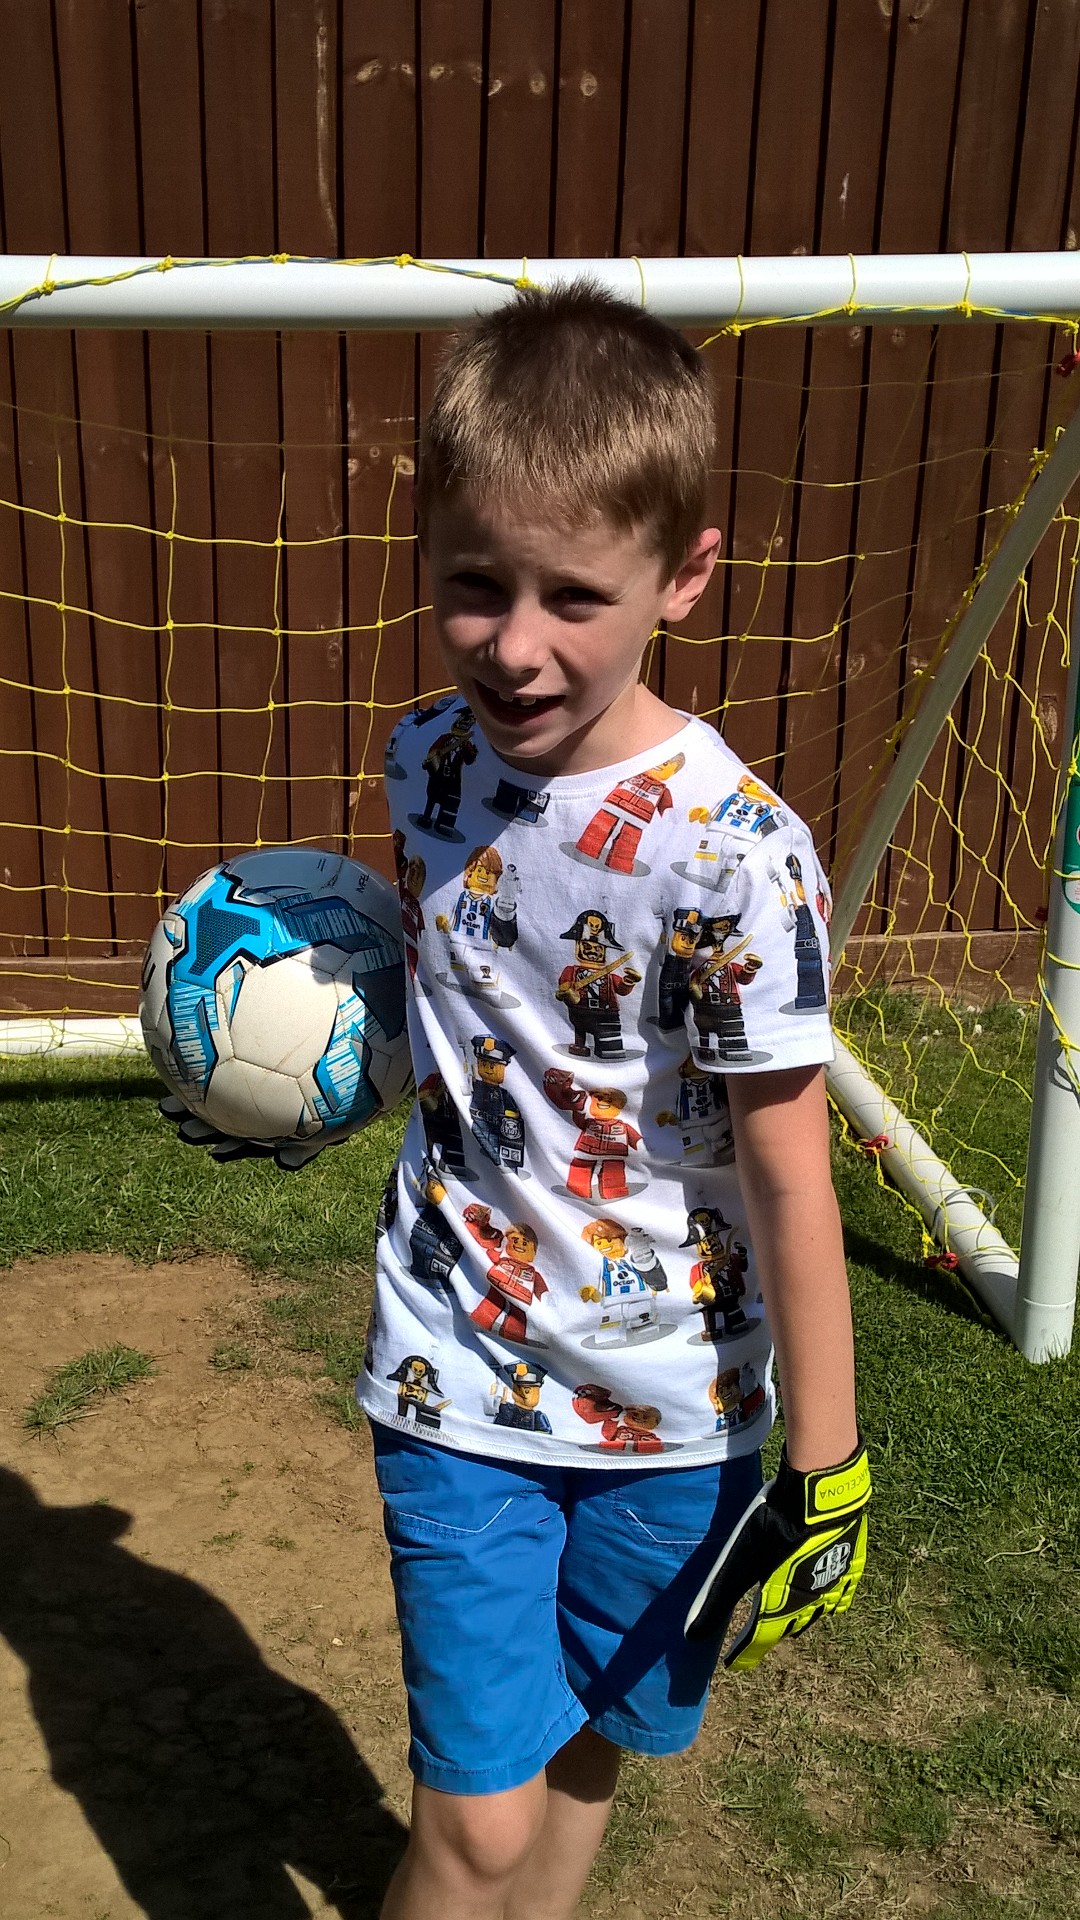
Ben declared his basketball cake the best ever and was mighty impressed. If you live in Northampton I would urge you to check out Helen's Facebook page here - she really does make the most amazing cakes! Here's another photograph of him in the garden trying out his new goalie gloves (don't look too closely at my lawn, it really doesn't appreciate being used as a football pitch!):
8 years old - my, where did those years go??!
That's all from me today; back tomorrow with another project - a Christmas card, no less! Until then, happy stampin'!
Stampin' Up! Supplies Used:
ea2df5b3-4cc4-4ac2-9302-712baa21967b|0|.0|96d5b379-7e1d-4dac-a6ba-1e50db561b04
Tags: Circle Thinlit Card, Epic Alphabet, Big Shot, Celebrate Today, Fringe Scissors, Hexagon Punch, circle punch, Shop online, Shop Stampin' Up online, Stampin' Up, Stampin' Up Card, Stampin' Up Card ideas, Stampin' Up Supplies
Cards | Stamping
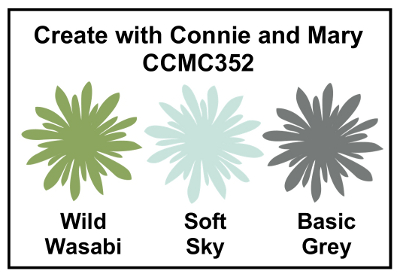
by Joanne James23. April 2015 08:05It's Thursday and that means a new challenge over at Create With Connie and Mary. This week it's colours:
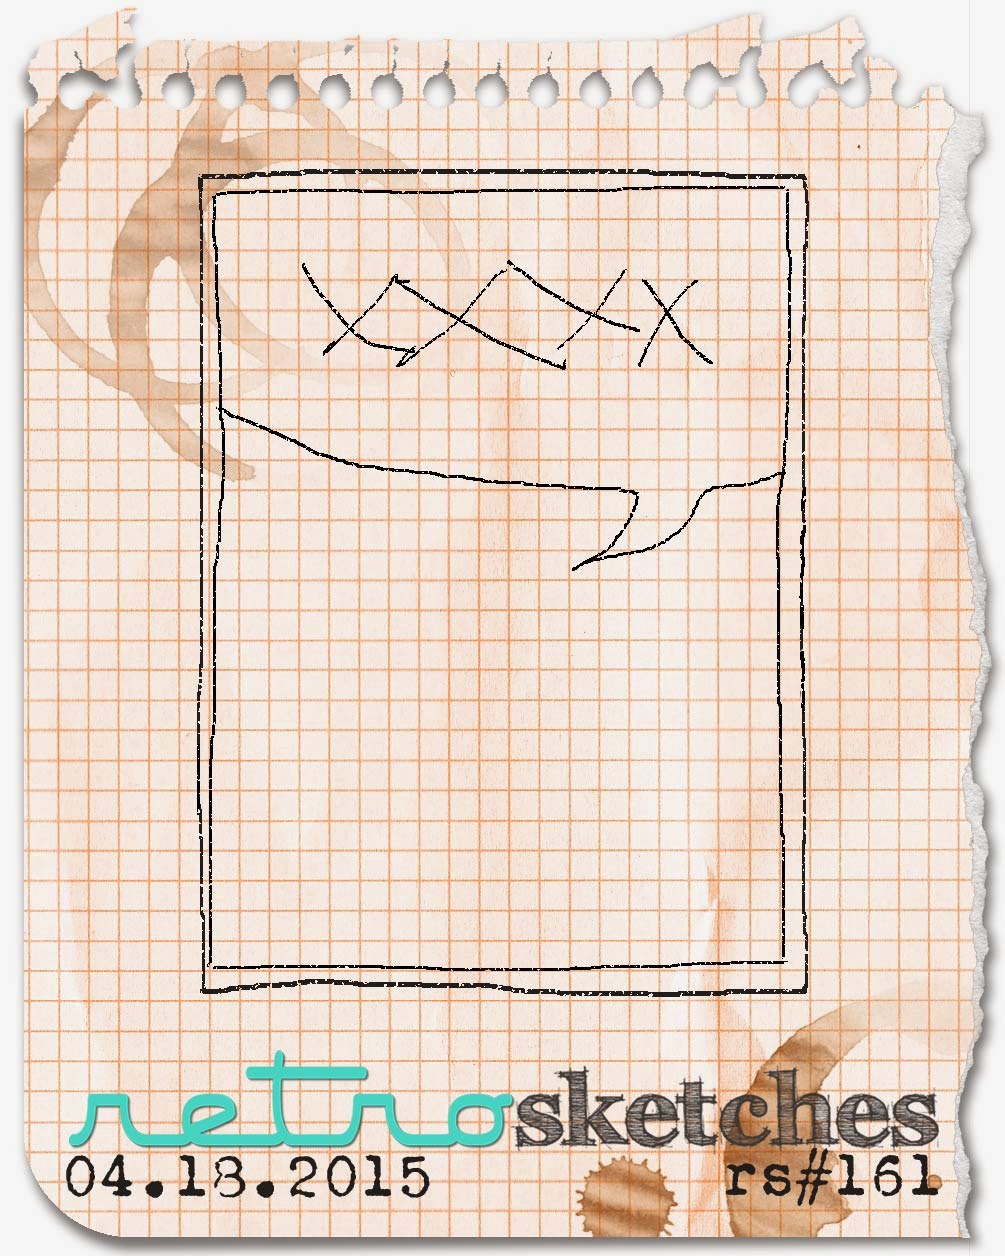
I'm also using this week's sketch over at Retrosketches for my layout. So I debated long and hard what to do with this colour combination; then I decided I would go with something fun! I used my Life in The Forest set - not inked up in a while and soon to be retired so it seemed like a good opportunity to use it:
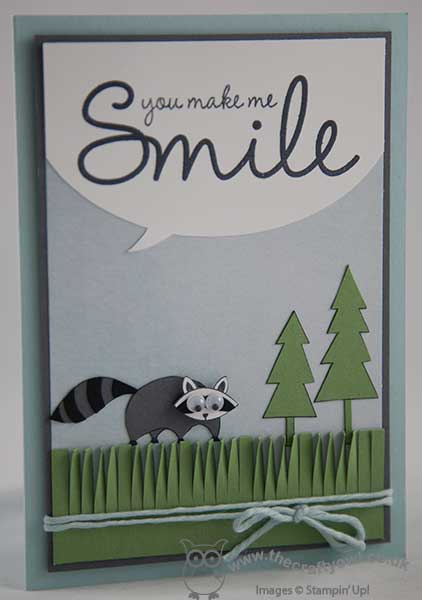
I used Soft Sky for my base, then created a little paper pieced scene for my racoon. I used the soft sky paper from the Painted Blooms DSP pack for my sky, then paper pieced my trees from Wild Wasabi cardstock and my racoon from a combination of Basic Grey, Basic Black and Whisper White cardstock. I cut my large word bubble out using my Big Shot and oval framelits, handcutting the speech piece and stamped the sentiment from the 'So You' stamp set. I love the addition of the wild wasabi grass, cut with my fringe scissors, and the Soft Sky Painted Blooms cotton twine, but my absolute favourite part of this card? The addition of the tiny googly eyes to my little racoon:

It brings out the child in me - so cute!!! Do hop on over to the other designers to see how they have interpreted this week's colours - I look forward to seeing your creations in the gallery.
I will be back tomorrow with another project; until then, happy stampin'!
Stampin' Up! Supplies Used:
- Life In The Forest
- So You Photopolymer Stamp Set
- Painted Blooms Designer Series Paper
- Big Shot Die-Cut Machine
- Ovals Collection Framelits Dies
- Fringe Scissors
- Painted Blooms Cotton Twine
- Tuxedo Black Memento Ink Pad
- Card Stock A4 Soft Sky
- Wild Wasabi A4 Card Stock
- Basic Gray A4 Card Stock
- Basic Black A4 Card Stock
- Whisper White A4 Card Stock
efff1472-c63c-4f2d-a157-b947133247ce|0|.0|96d5b379-7e1d-4dac-a6ba-1e50db561b04
Tags: Fringe Scissors, Life In The Forest, Shop online, So You, Stampin' Up Supplies, Stampin' Up Card ideas, Stampin' Up Card, Stampin' Up, Painted Blooms, Ovals Framelits, Big ShotCreate With Connie And Mary
Cards | Stamping
by Joanne James4. March 2015 08:57It's Wednesday so that means a new collection of Wednesday Weekly Deals! This week's deals are included below - they will be available for one week only, before a new collection of deals is announced.
As always, if you want to take advantage of any of the deals on offer, you can support my business by placing your order online by clicking here or using the link to my store on the right hand side of my blog page where it says 'Shop Online' or with me in person. Don't forget to add the Hostess Code for March (you can find this under the 'Shop Online' section on the right) and be sure to make sure that you don't check the 'no contact' box if you'd like to be kept updated with the progress of you order and receive a little thank you in the post from me.
Here's a summary of this week's one-week only Wednesday deals - click on each item to go to the online store to purchase:
This week we have a gift box kit - perfect for packaging small gifts in a hurry - and the Label Love stamp set and co-ordinating punch, a great opportunity to pick up this bundle for a bargain price. In addition, gold vellum, baker's twine and Epic Day washi tape, fringe scissors - perfect for grass on all those spring projects! - and the 'Lucky You' MDS download, which will make light work of decorations for any St Patrick's Day celebrations you might be planning.
Lots to choose from this week; I'll be back later with today's creative project, but until then happy shopping!
2621bb79-dc71-4369-ac51-f4f2581e50ee|0|.0|96d5b379-7e1d-4dac-a6ba-1e50db561b04
Tags: Artisan Label Punch, Label Love, Fringe Scissors, Washi Tape, Wednesday Weekly Deals, Promotions, Shop online, Stampin' Up, Stampin' Up Card, Stampin' Up Card ideas, Stampin' Up Supplies
Promotions | Shop Online
by Joanne James15. August 2014 21:00No blog post yesterday as I took the James juniors to the zoo for the day and had a team get-together in the evening and didn't manage to squeeze one in! We had a great day at the zoo and managed to dodge the worst of the rain showers, so all good. Today I'm sharing a quick shaker card designed by Monica Gale that we made at our last quarterly team training day:
Not the best of photos I'm afraid as I struggled to beat the refection and glare on the window sheet, but hopefully good enough to get the idea. Shaker cards are all the rage at the moment and whilst you can build a window with depth for a card with real 'shake-ability (I'm sure it's a word!), you can also get the effect simply and easily by creating a pocket behind a punched opening and adding just a few elements - I added some glitter stars and square confetti created with my fringe scissors. The front of the card is simply decorated with a few strips of All Abloom DSP, some stars punched from the new Dazzling Diamonds Glimmer paper and a tied bow made with 1/4" Real Red cotton ribbon.
Short and sweet today! Back tomorrow with another project. until then, happy stampin'!
Stampin' Up Supplies Used:
97147742-8c49-4452-a304-7de7cc3e4ecb|0|.0|96d5b379-7e1d-4dac-a6ba-1e50db561b04
Tags: All Abloom, Pictogram Punches, Fringe Scissors, Itty Bitty Accents Punch Pack, Shop online, Shaker cards, Stampin' Up, Stampin' Up Card, Stampin' Up Card ideas, Stampin' Up Supplies, circle punch
Cards | Stamping
by Joanne James5. August 2014 19:54Well, it's been a little colder here in the UK today and we've had a fair amount of rain, which has kept us largely indoors for most of the day, but we made the most of it with some early morning baking (chocolate chip muffins - yum!), an indoor picnic and a pleasant few hours catching up with friends so all in all not a bad Tuesday.
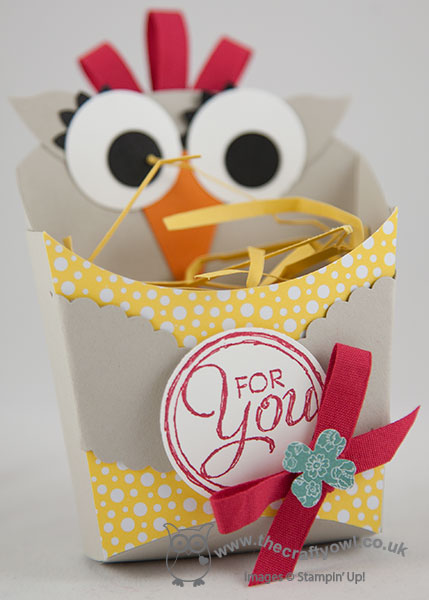
Today I thought I would share another 3D project with you - a cute little owl gift box made using the Fry Box Bigz L Die that we made at our last team training session. Check out this cute little fella:
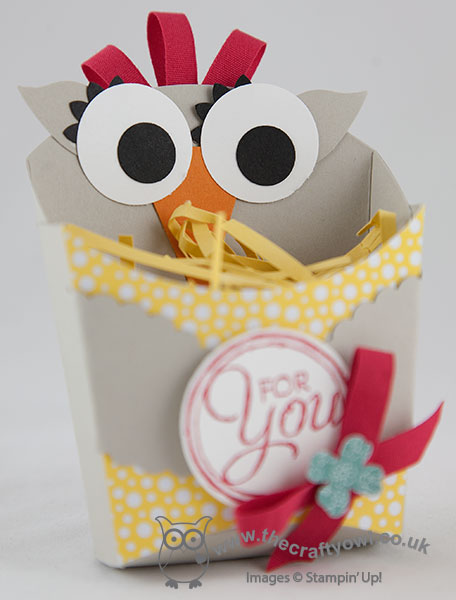
As 'The Crafty Owl', I was always going to like this cheeky chap, but the die itself has so many dress-up possibilities! The owl was so easy to make: the front of the box was covered with a piece of All Abloom DSP, then some black and white circles punched with the 1/2" and 1" circle punches, black eyelashes using the largest flower from the Boho Blossoms punch, ears from the Bird Builder punch and a Pumpkin Pie triangle nose from the Petite Pennants Builder punch then some Sahara Sand Scallop Ovals for wings. Some 1/4" red cotton ribbon was used to create a little plume of feathers and to tie a bow to adorn the 'For You' stamped greeting from the Chalk Talk stamp set, which was finally finished with a punched flower. Some filling was cut from yellow cardstock using the fringe scissors to support the box contents.
These fry boxes are the perfect size for a little gift or a few chocolates - look out for lots more variations on this in future posts.
Back tomorrow with the new weekly deals and my Design Team card for this week's challenge over at Colour Me...!
Until then, happy stampin'!
Stampin' Up! Supplies Used:
20e4e93b-5cc9-4ed2-824e-6c82962164c9|0|.0|96d5b379-7e1d-4dac-a6ba-1e50db561b04
Tags: 3D Projects, boxes, Fry Box Bigz L Die, Chalk Talk, circle punch, Itty Bitty Accents Punch Pack, Scallop Oval Punch, Boho Blossoms, bird builder punch, Petite Pennants Builder, All Abloom, Fringe Scissors, Shop online, Stampin' Up, Stampin' Up Supplies
3D Projects | Boxes
by Joanne James11. May 2014 20:42Today I have a special blog post for you - a guest blogger, none other than my 8 year old daughter! As I was eating my breakfast and minding my own business one day, she was reading over my shoulder and fell in love with the card featured - this fabulous card featuring the fox from the Life in The Forest set, by the talented Erica Cerwin. She promptly announced she just HAD to copy the card and as Rebecca has always fancied the idea of writing her own blog, I asked if she would like to write the blog post for it and she jumped at the chance! So here is her CASE of Erica's card and a few words about how and why she made it:
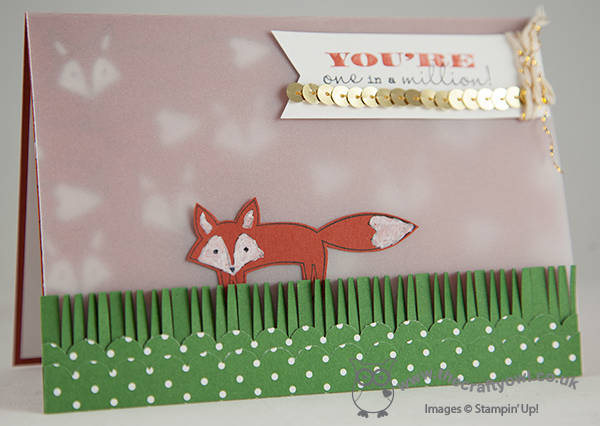
"I really liked this card when I saw it and decided it would make a perfect card for my singing teacher, to say thank you for her help in enabling me to get a distinction in my recent grade one singing exam. I stamped lots of foxes on the card base, and coloured in the white bits with a chalk marker. I love how you can see them through the vellum. I then stamped another fox and cut him out and stuck him on the front behind the grass, which I cut with fringe scissors. I made the banner with 'You're one in a million' but added a row of gold sequins to mine too, for extra sparkle. I also stamped a fox on the card envelope and coloured him in with a Cajun Craze marker pen. my singing teacher loved her card!"
I hope you like Rebecca's card - normal blog service resumes tomorrow! until then, happy stampin'!
Stampin' Up! Supplies Used:
by Joanne James4. March 2014 22:24Good evening lovely readers! I have finished editing my next video tutorial but have bumped it to tomorrow so that I can fit in a quick card that I made for this week's Paper Craft Crew challenge. here is this week's sketch layout:
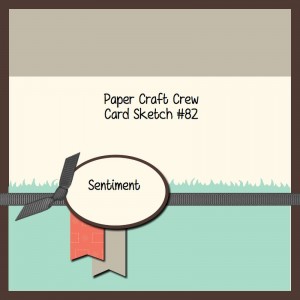
Here is the card I made using this layout:
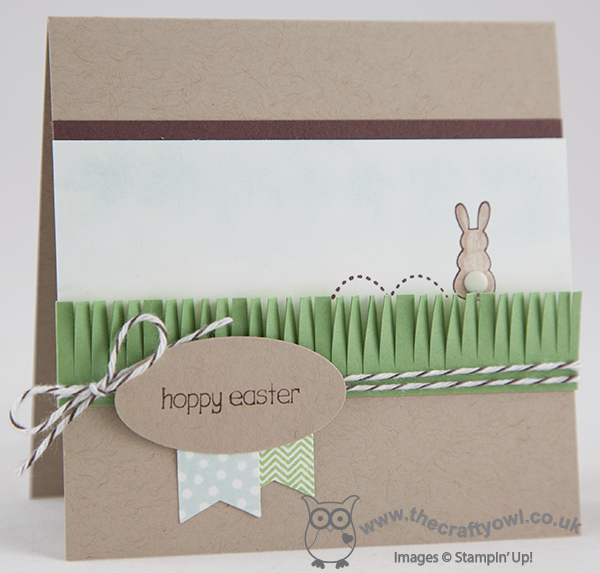
I went with a 4" square card for a change and a Crumb Cake base, then took a strip of Whisper White that I lightly sponged in Soft Sky across the top with Wild Wasabi across the bottom, then stamped the bunny minus the sentiment in Chocolate Chip and coloured him with Crumb Cake ink and a blender pen, before adding a candy dot for his tail. I matted this section on a strip of Chocolate Chip and then added a fringe of Wild Wasabi to the front of the card to make it look like the bunny was hiding in the grass. The new fringe scissors are great for creating grass in an instant and add a lovely texture. I then finished by wrapping some Early Espresso baker's twine around my card and tying in a bow. I stamped the sentiment onto an oval of Crumb Cake cardstock and finished with two co-ordinating banners, stamped using the Banner Blast stamp set and punched out with the matching punch. Both of these items are available free with a spend of £45 or more during Sale-A-Bration - contact me or visit my online store if you would like to place a £45 order and receive these gifts for free.
I've had a busy day today so am off to bed for a well-earned rest; back tomorrow with the second in my 'Any Size' box tutorial series. Until then, happy stampin'!
Stampin' Up! Supplies Used:
857a10ab-e2de-414a-a7f9-f2ec4120ed25|0|.0|96d5b379-7e1d-4dac-a6ba-1e50db561b04
Tags: Candy Dots, Easter, Earn Free Products, Sale-a-bration 2014, Sale-a-bration, Shop online, Stampin' Up, Stamp-a-ma-jig, Stampin' Up Card, Stampin' Up Supplies, Eggstra Spectacular, Fringe Scissors
Cards | Sale-a-bration | Stamping