Timeless Arrangements Thank You Card CCS534

by Joanne James2. April 2024 13:00

It's Tuesday and time for a new challenge over at CAS Colours & Sketches. Rachel is hosting for the month of April and our first challenge is a colour challenge: 


For my card today I used the layout over at Sketch Saturday and used Rachel's fresh colour combination for a pretty floral thank you card - take a look:


Here's the low-down on today's card:

I stamped my sentiment from the 'Timeless Arrangements' stamp set onto a label from the same set, and backed it with a selection of diecuts in the challenge colours. I also stamped and coloured a couple of flower stems and added them to the mix. I used diecuts that broadly followed the diagonal shape of the lines on the sketch and added seven scored lines with my scoring tool to my white cardbase - you can see the detail if you look closely below:


The scored lines add a real touch of elegance to the card and are a great way to incorporate the stripes in a more subtle way. A trio of pink pearls was all I needed to complete my card. 

I will so miss the Timeless Arrangements bundle when it retirees - it makes the prettiest thank you cards.

Here is the visual summary of the key products used on today's project for you to pin for easy reference:


You can see all of my 'How To' summaries on my 'How To - Tips and Techniques' Pinterest board in case you've missed any. 

As a reminder, for our colour challenges, you must use all of the stated challenge colours. You may also use neutral colours; however, the challenge colours should be the most noticeable ones featured on your card. We use Stampin' Up! colour names for reference, but you are welcome to use any other companies' products as long as you match the challenge colours as closely as possible.

Enjoy your day and I'll be back tomorrow with another project. Until then, happy stampin'!


Stampin' Up! Supplies Used:

Table built using Product Table Builder by The Crafty Owl - Independent Stampin' Up! Demonstrator.

A Clean and Simple TapTapTap Thank You

by Joanne James8. November 2021 09:00

Happy Monday everyone! An early and super-quick post from me today as I take a trip down memory lane with a clean and simple card inspired by a few challenges that caught my eye this week:


I couldn't resist that pink typewriter in the Fusion photo and delved into the retired stamp box to find my 'TapTapTap' stamp set that had the perfect image - take a look:


Do you remember this stamp set? The typewriter meant it was always going to be a keeper for me; for today's card I stamped it in Memento Black and coloured it with my Polished Pink Blends markers. Whilst I love the Fusion sketch too, I decided instead to use the sketch over at AAA Cards and stamped my alphabet of typed letters behind for the horizontal element. I'm also linking up over at CASology where the cue word is 'type' so today's card is right on point.

The eagle-eyed amongst you will notice that I used a typed 'thank you' sentiment on the paper in my typewriter and if you own(ed) this stamp set, will also know that this isn't a sentiment that it includes. Some clever masking and use of my Stamparatus made it easy to create this custom sentiment using other elements of the set - for a more complete explanation, check out this older post.


No visual summary or supplies list today - today's card is simply for your viewing pleasure. I would so love to own a pink retro typewriter just like this one! Enjoy your day; I will be getting together with a bunch of lovely ladies for a class this morning, where we will be making Christmas packaging - fun! Then more class planning and blog posts to follow before I head out on my afternoon school run  - the life of a busy Mum and part-time Stampin' Up! demonstrator is always a full one!

I'll be back tomorrow with another project - my second week hosting our challenge over at CAS Colours & Sketches. Until then, happy stampin'!


Bonanza Buddies Dotty Presents Thank You Cards

by Joanne James27. May 2020 20:45


Today I'm sharing a card for the current challenges over at Less Is More and Addicted to CAS:


In looking for 'dotty' stamps that would work well for a one layer card, I found this great present stamp in the Bonanza Buddies stamp set that had a 'reverse' dotty pattern and used that as the basis for my card, creating a row of dotty rainbow gifts - this was my first attempt:


I ended up making two cards though as I thought this one looked a little too 'clean and simple' without a sentiment - I went for a large one that I found in my retired box - an old Sale-A-Bration set which despite its size still gives a CAS feel to my card I think with plenty of white space:


So which one do you prefer? I'm veering toward the one with the sentiment, so that's my link up today.

You can see all of my 'How To' summaries on my 'How To - Tips and Techniques' Pinterest board in case you've missed any. 

Enjoy your evening and I'll be back tomorrow with another project. Until then, happy stampin'!


Stampin' Up! Supplies Used:

Table built using Product Table Builder by The Crafty Owl - Independent Stampin' Up! Demonstrator.

Country Home Thankful Cards for PP462

by Joanne James6. October 2019 09:00

Today it's Sunday and time for this week's new challenge over at The Paper Players! It's my turn to host this week and I have a seasonal theme challenge for you to work with:


At this time of year our thoughts often turn to giving thanks so I thought this would be a good theme for this week. I created not one but two cards this week, both using the colour combination over at TGIF Challenges. The first one uses this week's Fusion sketch (sketch only). I wanted to use the Country Home set for my cards today; it's one of my favourite sets for autumn thank you cards. For my first card I paired my milk churn of autumn foliage with some of the gorgeous patterned papers from the Woven Threads suite, along with some Grapefruit Grove coloured ribbon and pearls:


I tweaked my sentiment by replacing the stamped word 'happy' with a diecut from the Word Wishes Framelits set for added emphasis and finished my sentiment on the inside of my card:


My second card for Just Add Ink uses one of the other sentiments and foliage arrangements from the same set, this time with a piece of linen effect designer series paper from the Pressed Petals Specialty DSP that I embossed with my Tin Tile Embossing Folder for added texture:


You can see it more closely here, along with the detail on my cotton balls:


In Europe, due to ongoing customs issues we have been unable to obtain the Snowfall Accents Puff Paint on page 19 of the Autumn-Winter catalogue since the catalogue launch, which is a shame as it would be perfect to use on these. This week we learned that this product will not arrive before the catalogue end and as such has now been withdrawn from sale. Never fear though - I have a plan! I created exactly the same effect using some Tombo adhesive and white embossing powder using the same technique I used previously for an aeroplane smoke trail. I even made a video - here it is in case you aren't familiar with this technique and would like to see how it's done:

Give it a try and let me know how you get on and what you use it for - I'd love to see your projects!

Here is the visual summary of the key products used on today's projects for you to pin for easy reference:


You can see all of my Product and 'How To' summaries on my 'How To - Tips and Techniques' Pinterest board in case you've missed any. 

Before you reach for your ink and papers, check out what our amazing team has created to inspire you this week:

Here's a quick recap of our challenge rules:
 
1.  Create a new paper project
2.  Upload your creation to your blog with a link back to us and provide a direct link to the post featuring your challenge submission.
3.  Please link your card to no more than four challenges, TOTAL.
4.  Have FUN!

You can see all of my 'How To' summaries on my 'How To - Tips and Techniques' Pinterest board in case you've missed any. 

Enjoy your day; I am busy with preparations for my upcoming luxury weekend crafting retreat so I will hopefully be spending some time in my craft room ticking a few more jobs off my list, in between the usual weekend homework and a birthday party run for one of the James Juniors tomorrow afternoon. I'll be back soon with another project. Until then, happy stampin'!


Stampin' Up! Supplies Used: 

Table built using Product Table Builder by The Crafty Owl - Independent Stampin' Up! Demonstrator.


Bella and Friends Clean and Simple Notecards

by Joanne James16. January 2019 21:00

Happy Wednesday everyone! I've decided to write a regular weekly slot dedicated to simple stamping and since today has been a busy one, I thought it was time for one such post! We all like quick and easy projects from time to time, either because you need something last-minute or you need a few of something and just want to run off some multiples. Equally, if you're new to crafting and don't have lots of supplies, simple stamping can be a way to stretch your supplies and focus on basic techniques whilst still producing something with a quality finish. I'll be using the hashtag #SimpleStamping - if you're a user of social media you should search under this hashtag from time to time for lots of papercrafting ideas that are easy to recreate, often using little more than basic supplies and stamps, ink and paper.

For this week's take on #SimpleStamping I have another couple of super simple thank you cards for you that could be whipped up in a jiffy:


I get through lots of thank you cards and sometimes I need to be able to turn out a lot in one go. I love a little colouring with my Blends markers too and sometimes, whilst relaxing, this can take a little while to do a good job. These little puppies are so quick to colour though you can honestly get each card finished in under a minute.  

These cards are also great examples of #SimpleStamping - a pack of notelets, a single stamped image courtesy of the 'Bella and Friends' stamp set in the annual catalogue, some Stampin' Blends and a little time for some colouring and done!

Here is the visual summary of the key products used on today's project for you to pin for easy reference:


You can see all of my 'How To' summaries on my 'How To - Tips and Techniques' Pinterest board in case you've missed any. 

I'll be back tomorrow with another project. Until then, happy stampin'!


Stampin' Up! Supplies Used:

Table built using Product Table Builder by The Crafty Owl - Independent Stampin' Up! Demonstrator.


Bee Thankful Simple Stamped Thank You Notelets

by Joanne James5. January 2019 20:00

I've been back in my craft room for a few hours today and yes, it felt good! I have some new makes to share with you this week as a result too. This evening I'm just popping in with a quick post to share a couple of super simple thank you cards that are perfect for the current challenge over at StampInkPaper:

Here's a close up of my card - I did a little basic ombre colouring on the lettering using two shades of the same colour Blend marker:


I made these with the James Juniors over the Christmas period - they make great thank you cards to send for gifts received. I encourage my children to keep up this polite tradition and they are not always that accommodating, however they had fun with this set and whilst they didn't write reams, it's the thought that counts and I'm sure the gesture will be appreciated.

These cards are also great examples of #SimpleStamping - a pack of notelets, a single stamped image courtesy of the 'Bee Thankful' stamp set in the annual catalogue and some Stampin' Blends and a little time for some colouring and done!


Here is the visual summary of the key products used on today's project for you to pin for easy reference:


You can see all of my 'How To' summaries on my 'How To - Tips and Techniques' Pinterest board in case you've missed any. 

I'll be back tomorrow with another project for the first challenge of the year over at The Paper Players - don't miss it! Until then, happy stampin'!


Stampin' Up! Supplies Used:

Table built using Product Table Builder by The Crafty Owl - Independent Stampin' Up! Demonstrator.

Nerf Party Ideas For The Stampin' Creative Blog Hop

by Joanne James30. June 2018 06:00

It's Saturday and today I have a special post for you since I, along with the talented Kayla Macaulay, am a guest with the lovely ladies over on the Stampin' Creative Design Team Blog Hop:

You may have just arrived from the colourful Pip Todman over at Queen Pip Cards or alternatively this may be your first stop. Either way, welcome and be sure to continue to the next stop along the hop by clicking on the next name in the list below for more creative ideas. This month the theme is 'party central' and there are lots of ideas and inspiration for parties for many different occasions throughout the hop. 

When I started thinking about what I was going to create today, I immediately jumped to my collection of new catalogue products wondering which new set to use. But in actual fact, I ended up using one of the most long-standing staple items in my crafting arsenal for the majority of my makes today: my Layering Circles Framelits. The next party that I need to plan will be that of the youngest of the James Juniors and whilst we've had lots of debate about what form it will take, one thing is for sure - no party that centres around 11 year old boys is complete without some form of Nerf battle these days, so I decided to get ahead and take the opportunity to start making with this in mind. 

First up is a birthday card that I actually made for a friend of his who is celebrating his birthday today: I used the currently popular 'impossible card' fancy fold and along with some partial diecutting to create a Nerf target for the popped-up section. These cards are really not at all tricky to make, despite their name! You simply score across the horizontal and then make a single cut at the centre of one panel at right angles to this (I made mine at 3"), followed by two cuts wherever you like on the facing panel (mine are at (1 5/8" in from each edge) and then fold each half in opposite directions, leaving a gap front and back and creating the central pop-up. I kept the colour scheme really simple, using the new in-colours Blueberry Bushel and Grapefruit Grove, both of which are a perfect match for Nerf guns and foam bullets, and having layered my diecut target circles added a sight and a bullet popped up on dimensionals for a fun touch. Some in-colour Blueberry Bushel patterned paper and a sentiment courtesy of the Perennial Birthday stamp set finish my card.

This 'impossible card' fold is a fun way to add dimension and interest to a card whilst still enabling it to be folded flat for mailing. My card is an irregular size, since the size of the base was determined by the diameter of the outer target circle. The card measures 5 1/4" x 6" when flat, so requires a bespoke envelope which I created using my trusty Envelope Punch Board with the help of my Envelope Expert tool. 
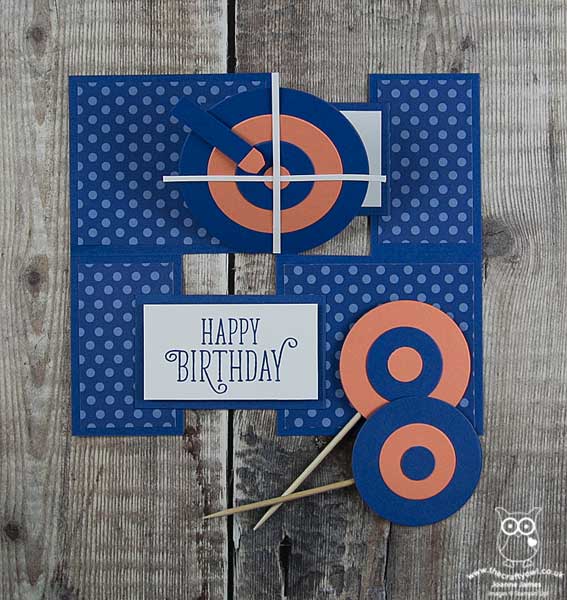
 

 The other targets you can see in the forefront of my card are some cake toppers I made. I am currently in the middle of a kitchen renovation and have only a microwave and the BBQ for cooking, so there was no opportunity to bake any cakes to put them in but I'm sure you get the idea!

I also created a fun party favour using Stampin' Up!'s Mini Pizza Boxes. I'm so glad these made it into the annual catalogue, they really are so useful for dressing up for all kinds of things. I brayed my box with Bluberry Bushel ink then created a belly band with another target on top and a thank you tag. Can you guess what is inside?
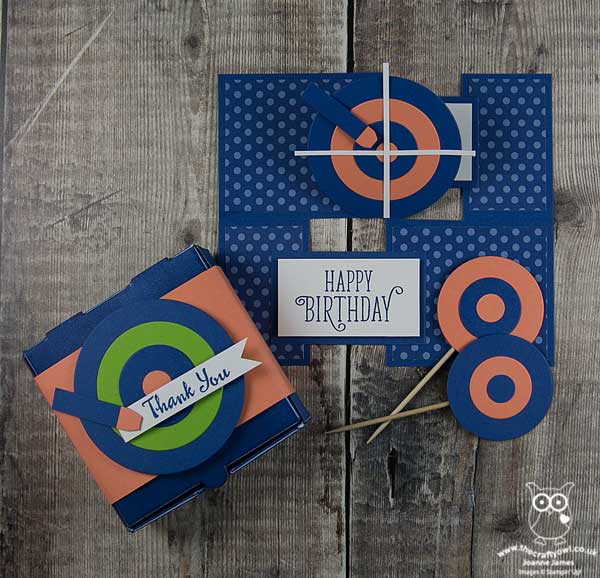
 

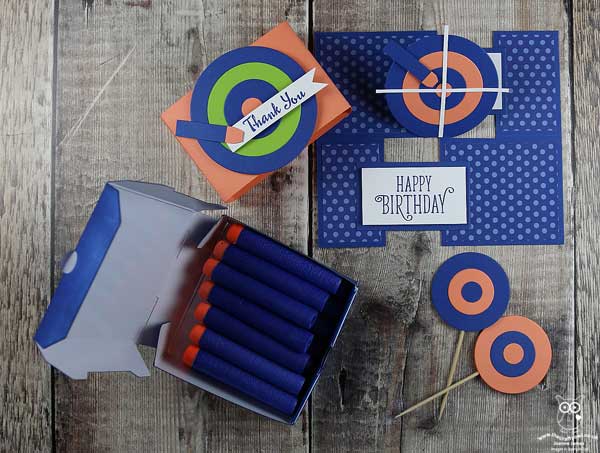
Yes, more foam Nerf bullets! The Mini Pizza Boxes are the perfect size to house 14 bullets and since the children seem to use hundreds of these when they are playing in their Nerf battles, I figured a few more each wouldn't go amiss!
 

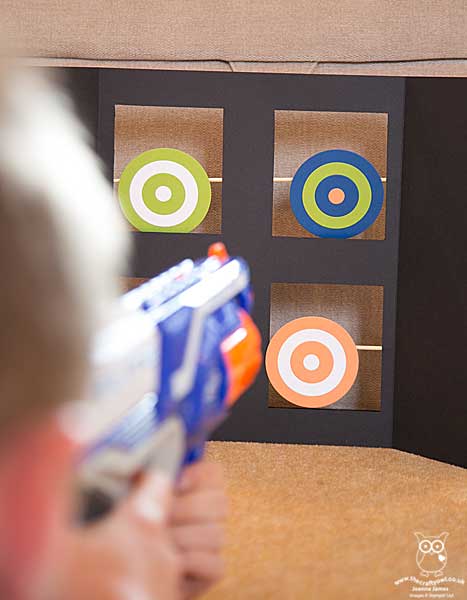
 Lastly for today I also created a set of freestanding spinning Nerf targets, based on this one I saw over at Frugal Fun 4 Boys. If you click on the link you can follow the instructions to make your own - I simply used a collection of layered circles, adding in some Whisper White and Granny Apple Green for more colour variety. This is great for indoor or outdoor use, so I'm sure will be added to the toybox supplies. This is my tester in action, declaring it to be too easy - I think he needs to move further away so that it's more of a challenge!
 

I hope you liked my collection of fun party ideas, that in fact require very little in the way of supplies to make. I have another Nerf-themed birthday card to share, which is the one I have made for Ben's birthday, but will save that for another time!

Here is the visual summary of the key products used on today's project for you to pin for easy reference:
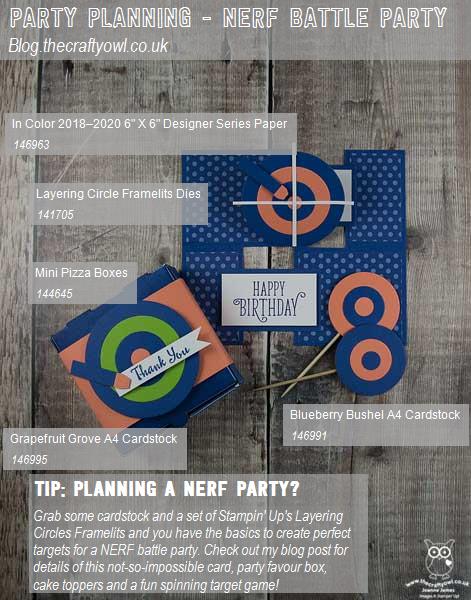
 

You can see all of my Product and 'How To' summaries on my 'How To - Tips and Techniques' Pinterest board in case you've missed any. 

For now, why not continue the blog hop for more creative party ideas? Do check out them rest of the Stampin’ Creative team to see what celebrations they have been preparing for. To carry on with the hop click on the names in the list below:


Enjoy the rest of your day. Mine will be a busy one, with a Family Fun Day, birthday party and sleepover (thankfully not at my house!) and the final performance of The Sound of Music for my eldest singing superstar - can't wait. I'll be back tomorrow with this week's post over at The Paper Players where the celebrations continue as we are celebrating our 400th birthday! We have a very special challenge for you as a result with lots of prizes to give away too so do pop back then - you are not going to want to miss it. Until then, happy stampin'!


Stampin' Up! Supplies Used: 

Table built using Product Table Builder by The Crafty Owl - Independent Stampin' Up! Demonstrator.

Give Thanks For Labels To Love And The Paper Players PP365

by Joanne James8. October 2017 09:00

It's Sunday and time for this week's new challenge over at The Paper Players! I am your host this week and I have a colour challenge for us to work with:


I took the opportunity to make a fall-inspired thank you card this week that works for a few additional challenges too; I used the sketch over at Just Add Ink, the middle vertical column of the tictactoe board over at Paper Craft Crew and the theme challenge over at Global Design Project:

Tic Tac Toe PCC Challenge 262         

My starting point for today's card was this gorgeous patterned paper from the Painted Harvest designer series paper pack - take a look:


Here's the low-down on today's card:

Even More Painted Autumn For Your Pennies - You all know how much I love designer series paper, and the Painted Autumn collection is definitely up there as one of this season's favourites. Bold, watercoloured images in beautiful autumnal colours what could be better? How about more for less? Yes, Painted Autumn is one of the designer series papers that is included in the 'Buy 3, get 1 free' sale that is running throughout October. You can read more about that here or purchase directly from my online store - I for one will be stocking up for sure. 

Give Thanks For Labels To Love - I used the sentiment and border stamp from the 'Labels To Love' stamp set on my card today. This set, on page 45 of the seasonal catalogue, is an additional set that coordinates with the Everyday Label Punch besides the 'Merry Little Labels' set that the punch is bundled with. There are some great sentiments in this set but I think this one is my favourite - we all have so much to be thankful for. I added a couple of the Touches of Nature wooden flowers that I heat embossed with some now-retired Crushed Curry embossing powder to my label, along with some vellum leaves and a leaf-embossed stitched circle behind to create a bit of a collage of my focal point. 

Not Just An Everyday Label - The Everyday Label Punch is proving a very popular choice for many of my customers and it's easy to see why: in addition to punching out the standard shape, there are a number of ways the punch can be used to make either shorter or longer labels, to create layers or even to create different shapes. By shortening my punched label I created more of a square shape for the sentiment on my card today. I love a punch that is versatile and has lots of alternative uses! 

Here is the visual summary of the key products used on today's project for you to pin for easy reference:


You can see all of my Product and 'How To' summaries on my 'How To - Tips and Techniques' Pinterest board in case you've missed any. 

Before you reach for your ink and papers, check out what our amazing team has created to inspire you this week:

The Paper Players Design Team
 
 
Here's a quick recap of our challenge rules:
 
1.  Create a new paper project
2.  Upload your creation to your blog with a link back to us and provide a direct link to the post featuring your challenge submission.
3.  Please link your card to no more than four challenges, TOTAL (that includes any you design for) .
4.  Have FUN! 


I look forward to seeing what you create with this week's colour palette. Enjoy the rest of your weekend as it will be over all too quickly; my niece is celebrating her 18th birthday this coming week so we are off for a family gathering of 'cake and cocktails' this evening to celebrate, which we are all looking forward to.

I'll be back tomorrow with another project; until then, happy stampin'!


Stampin' Up! Supplies Used: 

Table built using Product Table Builder by The Crafty Owl - Independent Stampin' Up! Demonstrator.

Thankful Thoughts Meets Succulent Garden

by Joanne James12. March 2017 09:00

It's Sunday and time for this week's new challenge over at The Paper Players! It's the turn of the wonderful Jaydee to host this week and she has a fun colour challenge for us to work with:


I love green, especially bright greens - Cucumber Crush is one of my all time favourites! - but for today's challenge I decided to go with an altogether more subtle green in Mint Macaron - take a look:


Here's the low-down on today's card:

Succulent Garden - I chose to use a 'tricky' piece of designer series paper on my card today from the Succulent Garden pack. I have been at a loss as to how I should use some of the papers and patterns in this pack and I felt that this sheet in particular lent itself to a monochromatic card in green and white, so used is to cover my entire card front.

A Bold Sentiment - With such a busy paper pattern, I needed a simple, bold sentiment so I chose this bold thank you from the 'Thankful Thoughts' stamp set. I stamped in Mint Macaron onto Whisper White and I used my Stitched Shape Framelits to add a little interest to my otherwise plain circle. With the exception of my row of stamped cacti inside my card and on the front of my co-ordinating envelope, this is all the stamping to feature on my card.

Triple Banners That Sparkle - I added a trio of banners to anchor my sentiment circle, one each in green and white and the third in Mint Macaron glimmer paper, the latest in the Sale-A-Bration free product offering. The sparkle and texture of the glimmer paper introduces another element yet is still in keeping with the overall monochromatic feel of my card.

Here is the visual summary of the key products used on today's project for you to pin for easy reference:


You can see all of my Product and 'How To' summaries on my 'How To - Tips and Techniques' Pinterest board in case you've missed any. 

So a super simple card today, but one with a very calming colour scheme that I hope Jaydee will appreciate.

Before you reach for your ink and papers, check out what our amazing team has created to inspire you this week:

The Paper Players Design Team
 
 
Here's a quick recap of our challenge rules:
 
1.  Create a new paper project
2.  Upload your creation to your blog with a link back to us and provide a direct link to the post featuring your challenge submission.
3.  Please link your card to no more than four challenges, TOTAL.
4.  Have FUN! 


I look forward to seeing what you create with this week's colour palette. Enjoy the rest of your weekend as it will be over all too quickly; I'll be back tomorrow with another project; until then, happy stampin'!


Stampin' Up! Supplies Used: 

Table built using Product Table Builder by The Crafty Owl - Independent Stampin' Up! Demonstrator.

Brights Layered Letters Alphabet Thank You Cards

by Joanne James25. July 2015 09:00

I have a quick card to share today that is set to brighten the days of those of you in the UK suffering from winds and rain (as I sit here in my deckchair enjoying the sunshine - sorry, enough about me!!!) - perhaps a rainbow is the order of the day:

This is a super clean-and-simple rainbow thank you notelet; I made a whole batch of these, along with co-ordinating tags, to pop in with my last batch of customer orders. I used Stampin' Up!'s ready folded notelets and envelopes for speed and used only one stamp set: The Layered Letters Alphabet. Great for stamping big words and the set includes two handy background stamps that you can use to add colour behind each letter to add the effect of another layer, whilst sticking to just one. In order to get my rainbow background, I had to clean the stamp each time, so I set up a mini production line and stamped the word on each notelet first, then all the red panels, all the orange panels, and so on until each of the colours were stamped. This meant the whole lot really took no time at all - here's a 'work in progress' shot of my desk:

You could use the same idea for any word with whatever combination of ink colours you have to hand - why don't you give it a go? I am linking my card today with the lovely ladies over at Addicted To Stamps - I have played along with them for a while and their theme this week is CAS - perfect!

I'll be back tomorrow with a new challenge over at The Paper Players; make sure you tune in, the lovely Sandy is hosting and you are not going to want to miss it! Until then, happy stampin'!


Stampin' Up! Supplies Used:

Table built using Product Table Builder by The Crafty Owl - Independent Stampin' Up! Demonstrator.


Scrapbooking

Stampin' Up! has introduced a new range of 12x12" scrapbooking product and kit - the full range is now available to purchase online. To download a copy of the new digital Scrapbooking Catalogue click here.

Mini Catalogue

BROWSE THE CATALOGUE

'Tis The Season - the new Stampin' Up! Mini Catalogue is here! For more details and to download your copy click here

Shop Online

Access my online shop 24 x 7, 365 days of the year:

Current September hostess code:

JQEHTZGK

Shop Online

2024-25 Annual Catalogue

BROWSE THE CATALOGUE

Click on the image to download your copy of the 2024-25 annual catalogue. For a full list of current SU! supplies, go to my online store. If you would like any help or advice, please drop me a line at joanne@thecraftyowl.co.uk or give me a call on 07773 421446 - I'd be happy to help.

Join My Team

It's always a great time to join Stampin’ Up! New team members can get £130 worth of products for only £99 + free business supplies + free shipping + all the fun being a part of Stampin’ Up! Stampin' Up! has something for everyone: join my growing team and benefit from my support to enjoy Stampin' Up! however you choose.

If you're interested, call me for a chat to understand how I can help you realise your goals. Alternatively, if you have already decided to sign up and you just can't wait, please click here for the link to the online form where you can sign up and order your starter kit right away! 

Latest Kits!

Stampin Cut and Emboss

The Christmas Ornaments Kit and Card Keeper Kit are the latest kits that will be arriving in the online store later this month - get yours here!

New Online Exclusives

There are new products available exclusively in the online store from 3 July - check them out here.

About Me

Hi I'm Joanne and live in Northampton and when I'm not looking after my husband and two beautiful children, am an avid crafter with a passion for all things Stampin' Up!

I must confess that I have never been a big rubber stamper - until I discovered Stampin' Up! that is. I love the fact that I can get such great results with co-ordinating stamps, inks, papers and punches - the possibilities are endless! Join me on my stamping journey as I share the things I love and be inspired to create amazing things yourself!

Follow Me

Monthly Newsletter

Box Builder

Click the button above to use Box Buster to create your custom box design using the Envelope Punch Board!

Kits Collection Now Available!

Stampin Cut and Emboss

The new Kits Collection from Stampin' Up! is now available!

Click here to see the current kits available and order yours online today.

I Design For


Stampin' Up Stuff

This is my personal blog and is not endorsed by Stampin’ Up! I hope you find it a plentiful source of ideas and personal inspiration but please don't copy my designs for contest submission or use for classes, publication or sale without express permission.