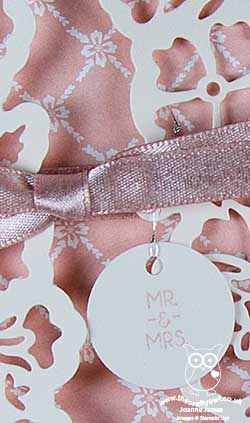
Dainty Delights For A White Wedding

by Joanne James31. January 2023 11:14

Today I'm squeaking in another entry for the challenge over at Time Out that was also inspired by the current AAA Cards Challenge of white on white and this week's Global Design Project #GDP379 theme of Love:


I love that Beth Pearson quote on the Time Out badge and it got me thinking about love in the context of weddings - the time when everyone should feel this way about the person they are standing in front of, right? I love the purity of white for a wedding card so couldn't resist the opportunity to create a clean and simple wedding card featuring a little of 'something old, something new' take a look:


Here's the low-down on today's card:

All About Texture - When working with white-on-white, it's good to think about layers and texture to create interest. For a clean and simple card, there's a need to create interest without overwhelm and still preserve unpatterned 'white space'. The new Dainty Delight Dies are perfect for adding a delicate touch; each of the skinny flowers and stems has a subtle embossed detail that is perfect for clean and simple cards. I created a bough of flowers and greenery, and tucked it under my diecut sentiment and allowed it to flow freely across the front of my card. 

Forever and Always - I used a sentiment from the retired 'Forever and Always' bundle, heat-embossing the words 'Forever &' in silver and then adding the large diecut 'Always' as the main focus of my card. I do love a good sentiment diecut and can honestly say I will never part with my 'Always' dies. 

A Standout Cut - I adhered my thick white cardstock to a foam adhesive sheet before cutting out the word 'Always' as I wanted to create a little height another way to add interest to an all-white, clean and simple white-on-white card:


I really love this card - all I need now is the good news that anyone I now is getting married so that I have the opportunity to send it!

Here is the visual summary of the key products used on today's project for you to pin for easy reference:


You can see all of my 'How To' summaries on my 'How To - Tips and Techniques' Pinterest board in case you've missed any. 

Enjoy your day and I'll be back tomorrow with another project. Until then, happy stampin'!


Stampin' Up! Supplies Used:

Table built using Product Table Builder by The Crafty Owl - Independent Stampin' Up! Demonstrator.

Delightfully Detailed Forever Wedding Card

by Joanne James18. May 2020 07:00


Monday already - where does the week go?! I meant to blog this card last Friday and the end of the week simply ran away from me. Anyway, today I'm sharing a card that I made for this week's Less Is More Challenge and the current challenge over at Addicted to CAS:


Yes, LIM wanted cards in cream and white and Addicted to CAS have the code word of flower. I have done all-white type cards before and these are always a challenge. I haven't managed to play along over at Less Is More in a while so thought this would be a good time to remedy that - take a look at what I created:


Here's the low-down on today's card:

A Laser Cut Cheat - I used some retired Delightfully Detailed Lasercut Specialty Paper for my showcase floral flourish on today's card. It's white on one side and vanilla on the other. For today's card, I used the white side against a vanilla card base and snipped a piece to the size I wanted from a larger 12" x 12" sheet. This paper is still available on the Clearance Rack (just click on the link below) if you would like to recreate my card.

It's All About Texture - When using only shades of cream and white, I find texture plays an important role in creating interest, whilst maintaining a clean and simple feel. So in addition to my laser-cut floral flourish, I embossed my card base with the Subtles Embossing Folder and added a simple diecut sentiment from white sparkle glimmer paper for added interest. 

Inside Reversal - I added another piece of laser-cut paper inside my card, this showing the reversed side so that the vanilla shows up against the white lining. I stamped my sentiment in Sahara Sand to maintain the neutral feel: 


Here is the visual summary of the key products used on today's project for you to pin for easy reference:


You can see all of my 'How To' summaries on my 'How To - Tips and Techniques' Pinterest board in case you've missed any. 

I do have another card to share today so I'll be back with that later! Until then, happy stampin'!


Stampin' Up! Supplies Used:

Table built using Product Table Builder by The Crafty Owl - Independent Stampin' Up! Demonstrator.

Wedding Invites Made Easy - All It Takes Is A Little Planning!

by Joanne James19. May 2018 18:00


Good evening everyone! Well, today has been a special day here in the UK - we celebrated the royal wedding of HRH Prince Harry and Meghan Markle. Whilst I'm not a devoted Royal watcher, I do think the Monarchy has an important role to play and one thing's for sure: I love a wedding, royal or otherwise! I enjoyed watching the wedding from my office as I was crafting this morning and ooh'ed and ahh'ed at the flowers, the dresses and those adorable and so well-behaved bridesmaids and page boys. Such a glorious day for it too and the bride was truly stunning.

Since weddings are the order of the day, I thought it would make a great topic for today's blog post too so I'm sharing with you the invites I designed recently for a bride who was keen to create her own stationery for the big day.

Making your own wedding stationery is a great way to create something individual and personal to you - take a look at the design we agreed upon:
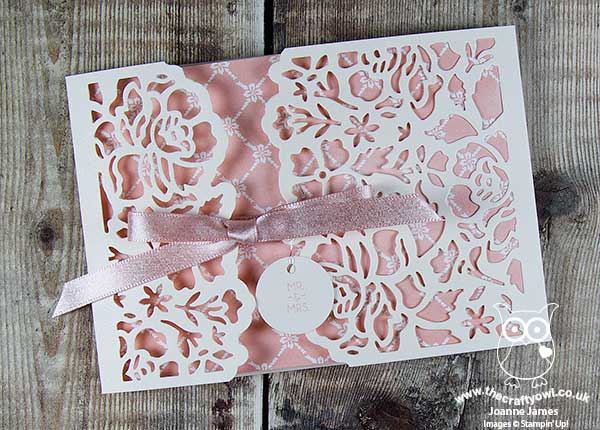
 

The key things to remember when designing your own wedding stationery are as follows:

Make It Your Own - When you make your own wedding stationery, you are able to create something unique and personal to you in a way that off-the-shelf invitations will never be able to deliver. You can choose colours that co-ordinate with your scheme for the day and flowers or emblems that tie in with your chosen theme. For this wedding, the bride was keen to incorporate pale pink, but otherwise had no fixed views on design. This is one of the things I love about being a Stampin' Up! demonstrator - I love to design cards and projects, so working to a bride-to-be's brief is always an exciting prospect. It's great for the bride too - often they are keen to make their own stationery but have never done this (or sometimes any papercrafting) before, so they are keen to work with someone who can take their ideas and make them into a workable, reproductable, design. 

Keep It Simple - The key to good wedding stationery design is to keep it simple. Sometimes you may only have to make 20 invitations, but sometimes it is 120! For any kind of mass production, it's important to have a design that can be easily reproduced many times, each time as good as the last, so keeping it simple is key. For this invitation, we used the Detailed Floral Thinlits to create a gatefold-style card, with a Powder Pink Fresh Florals Designer Series Paper insert that was adhered on one side. When opened, the invitation wording was then on the inside.

Finishing Touches - Whilst the design is simple and easy to reproduce, the finishing touches are all-important to add that of luxury: the outer gatefold was cut from Shimmery White cardstock, with the addition of Powder Pink Shimmer Ribbon to create the tied closure that co-ordinates with the DSP lining. We also added a small round punched tag, with the words 'Mr & Mrs' from the 'Beautiful Bouquet' set stamped on it in pink, using a length of silver thread.  

These invitations were really not too tricky at all to make, armed with the right tools and a few pairs of hands. The most important thing to consider when making your own wedding stationery is to plan ahead - don't underestimate the time it takes to mass produce invitations and other stationery items and be sure to allow enough time to actually put it all together. This is the perfect activity to involve friends and bridesmaids in - after all, many hands make light work!

Here is the visual summary of the key products used on today's project for you to pin for easy reference:
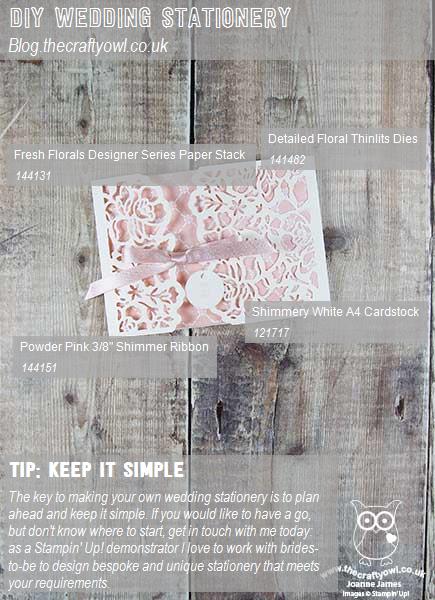
 

You can see all of my 'How To' summaries on my 'How To - Tips and Techniques' Pinterest board in case you've missed any. 

If you are reading this and thinking you would like some help in designing your own wedding invitations, please don't hesitate to get in touch - I'd love to discuss your requirements and help you create the unique, bespoke stationery of your dreams.

Enjoy your day and I'll be back tomorrow with another project. Until then, happy stampin'!


Stampin' Up! Supplies Used:


Table built using Product Table Builder by The Crafty Owl - Independent Stampin' Up! Demonstrator.

Sweet Soiree Silver Mini Gable Gift Box

by Joanne James12. March 2018 21:00

Another Monday, another week! Today I'm sharing a cute packaging option that is perfect as a wedding favour or thank you gift and takes minutes to put together - take a look:


Here's the low-down on today's project:

Gifts And Goodies - Have you spotted these lovely silver mini gable boxes on page 13 of the current seasonal catalogue? I'm all for making my own boxes, but sometimes you just need the speed and convenience of something off-the-shelf - and the silver gable box is the answer. Whether used as they are, or dry embossed (perhaps with the new Petal Pair embossing folders) or decorated with some designer series paper to dress them up a little, these sturdy little boxes are easy to turn from their flat-packed state into something robust enough to carry a small gift: perhaps some truffles, nail polish, or a few reinkers or embellishment sets ... and lots more besides! You can even turn them inside out so that you have a white outer that can then also be coloured as you choose.

Sweet Soiree - I've added a wrap with a piece of Sweet Soiree Specialty Designer Series Paper to my container. These gorgeous silver foiled designs give the hand-painted appearance of these papers a textured look all of their own and co-ordinate perfectly with the silver box - minimum effort, maximum impact!

Finishing Touches - I've added some Berry Burst metallic-edge ribbon and a small circle-punched tag, stamped with the Cake Soiree stamp set, to my box as a finishing touch. So pretty, I almost don't want to give it away!

Here is the visual summary of the key products used on today's project for you to pin for easy reference:


You can see all of my 'How To' summaries on my 'How To - Tips and Techniques' Pinterest board in case you've missed any. 

I'll be back tomorrow with another project. Until then, happy stampin'!


Stampin' Up! Supplies Used:

Table built using Product Table Builder by The Crafty Owl - Independent Stampin' Up! Demonstrator.

So In Love Concertina Wedding Card

by Joanne James25. May 2017 06:00

Today I'm sharing a card from this month's technique class which featured the So In Love bundle and the beautiful Falling In Love designer series paper - take a look:


 Here's the low-down on today's card:

So Detailed Thinlits - The main feature on the front of these cards is the pair of diecut panels cut using the Big Shot and the largest of the So Detailed Dies. They really are so beautiful! I backed them with some of the Falling In Love designer series paper - these papers have some lovely subtle images, some of them photographic, that make a perfect background for these detailed diecuts. Unfortunately both of these items are now sold out here in the UK - I love this card though and just had to share it so hopefully for those of you who already have these items this will still serve as useful inspiration.

So In Love - I used the So In Love stamp set to stamp my greeting on my label wrap and to decorate the inside of my card. This card is larger than usual at 6" square and opens in a concertina style - this really shows the diecuts off to full advantage. 

A New Favourite - Yes, it's here again - I used the Pretty Label Punch for my sentiment panel on the front of my card, backed with a pinched circle - can you tell how much I LOVE this new punch?!

This card is subtle in colour, using only Very Vanilla and Sahara Sand - perfect for a wedding that doesn't have a strong colour scheme. It would work well and could be adapted as an invitation too, so lots of creative possibilities and it really is the Big Shot that does all the work on this one (a die brush is essential to poke all those little pieces out cleanly!)

Here is the visual summary of the key products used on today's project for you to pin for easy reference:


You can see all of my 'How To' summaries on my 'How To - Tips and Techniques' Pinterest board in case you've missed any. 

Enjoy your day and I'll be back tomorrow with another project. Until then, happy stampin'!


Stampin' Up! Supplies Used:

Table built using Product Table Builder by The Crafty Owl - Independent Stampin' Up! Demonstrator.

Sunshine Wishes Glimmer Wedding Card PP341 and #GDP083

by Joanne James23. April 2017 21:02

A quick post with my second card today; you can see my card for this week's Paper Players Challenge here - this card is my second entry this week for the challenge over at Global Design Project and also happens to use this week's Paper Players sketch:


Whilst I loved my earlier entry for this week's Global Design Project challenge - you can see it here in case you missed it - I wanted to have another go with much more obvious sparkle and bling and this is what I came up with:


A little Falling In Love designer series paper, a Falling Petals embossed vellum overlay and not one but two glimmer papers: Blushing Bride for my Sunshine Wishes heart and Gold for my sentiment diecut from the same set and border. A gold metallic enamel heart shape, some gold thread and a little gold heat embossing finish my card. Very blingy for me and much more in keeping with the GDP challenge this week!

Here is the visual summary of the key products used on today's project for you to pin for easy reference:


You can see all of my 'How To' summaries on my 'How To - Tips and Techniques' Pinterest board in case you've missed any. 

It's the last day of the Easter school holidays here tomorrow; I'll be back on Tuesday with another project. Until then, happy stampin'!


Stampin' Up! Supplies Used:

Table built using Product Table Builder by The Crafty Owl - Independent Stampin' Up! Demonstrator.

Rose Wonder Wedding Wishes For Kylie Bertucci's International Blog Highlight LOVE

by Joanne James8. April 2016 09:30


Today the lovely Kylie Bertucci, an Australian Stampin' Up! demonstrator, is hosting an international blog highlight with the theme of 'love'. I am delighted to be taking part and since I have been working with the Rose Wonder stamp set and Rose Garden Thinlits a lot lately as they feature in one of my April Stamp technique Classes, I decided to use them to create a special wedding card to share with you today:

Whilst the photograph is lovely, I can't tell you just how pretty and sparkly this card is in real life! Every part of it shines. So here's the low down on today's card:

A White Wedding - Whilst white cards can be tricky to photograph, there is nothing more stunning for a special wedding card. I used shimmery white cardstock which has a wonderful subtle sparkle and lustre and is perfect for a special card. I also kept my roses white in colour, using Dazzling Diamonds glitter in its 'raw' state to add to the purity of my card. 

Roses, Roses - My regular blog followers will know that my style generally is very clean and layered and today's card is very typical of that. I decided to create an inset panel of roses using my Rose Garden Thinlits, cutting them to fit into a frame that I'd cut out using my Big Shot and Square Framelits. As an alternative to paper-piecing the outlines and centres, I decided to try something different: I backed my frame with acetate, turned it over and painted inside the rose outlines with Crystal Effects, then sprinkled it liberally with Dazzling Diamonds glitter and left it to dry. I then flipped it over again before adhering to my card. This creates a sparkle that will even outshine glimmer paper, but has the benefit of being contained within the frame so no worries about glitter shedding from the completed card. Bonus!

A Touch of Silver - The only colour other than white that I used on my card was silver, with silver foil for my background mat layer and for my heat embossed sentiment. Just enough to frame my card and enable my sentiment to stand out - well, you can't really read white-on-white can you?!  I did toy with adding some silver satin ribbon, but decided against it as it detracted from the clean lines of my frame. 

Here is the visual summary of the key products used on today's project for you to pin for easy reference:

You can see all of my 'How To' summaries on my 'How To - Tips and Techniques' Pinterest board in case you've missed any. 

Do check out the other cards in the blog hop for inspiration; I would love it if you could pop over and vote on my card in the gallery by clicking here - the designers of the cards with the most votes will get to participate in one of Kylie's monthly international blog hops, so your votes all count!

Back tomorrow with another project; until then, happy stampin'!


Stampin' Up! Supplies Used:

Table built using Product Table Builder by The Crafty Owl - Independent Stampin' Up! Demonstrator.

White on White Rose Garden Wedding Card

by Joanne James12. February 2016 21:18

Yay it's Friday - the weekend is almost here! I'm looking forward to mine, especially as it heralds the start of half-term and a welcome break from the routine of school, even if for just one week. Today I'm sharing a card that I made for this week's challenge over at Less Is More - one of my favourite challenges and this week it is celebrating it's 5th Birthday - amazing! Chrissie and the rest of the Design Team really are the friendliest bunch and do a tremendous job inspiring the masses each week. As it happens I am too late to join in the celebrations, the theme of this week being 'white on white', however I wanted to share my card anyway. I decided to make a wedding card using the Rose Garden framelits and co-ordinating Rose Wonder stamp set for my sentiment. Here is my card:

When making a white-on-white card, you have to use either shades of white or texture to add interest and contrast. I decided that texture and sparkle was the way to go, so using a base of Shimmery White cardstock, I added a layer of white Dazzling Diamonds glimmer paper, then another layer of Shimmery White onto which I added two diecut roses and leaves to opposing corners, allowing them to overhang the edge slightly. I added a simple sentiment, which I stamped in Versamark and heat embossed in silver along with a lovely verse inside to finish my card. 

This is one of those cards that looks so very pretty in real life - all shimmer and sparkle. Tricky to photograph though, so I hope you get the idea! I love these thinlits  too and am really looking forward to making more projects with them. They are also going to be featured in one of my April technique classes, so if you live in or around Northampton and would be interested in attending, do get in touch for more details. I'm also linking today's card up with CAS Colours and Sketches as I used their sketch for my layout and Stamps Ink Paper where the theme is 'love' - a wedding definitely celebrates that!

   SIP Challenge 34 - Love 800

So happy birthday Less is More - hope you continue to inspire for the next 5 years and beyond. Back tomorrow with another project; until then, happy stampin'!


Stampin' Up! Supplies Used:

Table built using Product Table Builder by The Crafty Owl - Independent Stampin' Up! Demonstrator.


Love Blossoms Bloomin' Heart Shadow Box Frame Card

by Joanne James1. February 2016 21:11

Happy Monday everyone! Today I have a rather special card to share. I made another shadow box frame card using the same tutorial by the lovely Amanda Bates at The Craft Spa as the card I shared previously here  - she is without a doubt the queen of fancy folds in my book! The beautiful Bloomin' Heart thinlit was asking to be made into the centrepiece of a shadow box card I thought. So here's mine:

I made my base out of Whisper White with the heart cut out of Rose Red and embellished with Blushing Bride Glimmer Paper flowers and pearls and decorated my frame with a piece of Love Blossoms designer series paper. The square that I cut out of the centre was used to decorate the box that acts as the 'envelope' for the card:

I think this makes a great 'wow' card for a special birthday, Valentine, wedding, anniversary - and the boxed card can even be sent through the post as a large letter, although I must admit I think I'll be hand delivering mine!

That's all from me today; back tomorrow with another project. Until then, happy stampin'!


Stampin' Up! Supplies Used: 

Table built using Product Table Builder by The Crafty Owl - Independent Stampin' Up! Demonstrator.

Hello Life Wedding Hearts

by Joanne James1. November 2015 17:48

Another quick post from me today! I managed to get a little time yesterday to create a clean and simple wedding card for a couple of challenges today:


I was fortunate enough to be a winner over at The Challenge last week (you can see that card here -thank you ladies!) and I didn't want to miss the opportunity to join in again this week. The Challenge have a theme of weddings this week and CASology have a cue card of 'heart'; I thought I would make a card in warm Winter reds with a touch of gold using my 'Hello Life' stamp set and hearts border punch:


I used a card base of Cherry Cobbler with a split top panel of Very Vanilla, stamped with two overlaying hearts and heat embossed in gold with my 'love' sentiment and joined with a piece of gold foil cardstock punched with the hearts border punch to allow the red to show through the negative space. 

Super simple but rather pretty and perfect for a winter wedding when regal colours often feature.

That's all from me; back tomorrow with a festive project once more. Until then, happy stampin'!


Stampin' Up! Supplies Used:

Table built using Product Table Builder by The Crafty Owl - Independent Stampin' Up! Demonstrator.


Scrapbooking

Stampin' Up! has introduced a new range of 12x12" scrapbooking product and kit - the full range is now available to purchase online. To download a copy of the new digital Scrapbooking Catalogue click here.

Mini Catalogue

BROWSE THE CATALOGUE

'Tis The Season - the new Stampin' Up! Mini Catalogue is here! For more details and to download your copy click here

Shop Online

Access my online shop 24 x 7, 365 days of the year:

Current September hostess code:

JQEHTZGK

Shop Online

2024-25 Annual Catalogue

BROWSE THE CATALOGUE

Click on the image to download your copy of the 2024-25 annual catalogue. For a full list of current SU! supplies, go to my online store. If you would like any help or advice, please drop me a line at joanne@thecraftyowl.co.uk or give me a call on 07773 421446 - I'd be happy to help.

Join My Team

It's always a great time to join Stampin’ Up! New team members can get £130 worth of products for only £99 + free business supplies + free shipping + all the fun being a part of Stampin’ Up! Stampin' Up! has something for everyone: join my growing team and benefit from my support to enjoy Stampin' Up! however you choose.

If you're interested, call me for a chat to understand how I can help you realise your goals. Alternatively, if you have already decided to sign up and you just can't wait, please click here for the link to the online form where you can sign up and order your starter kit right away! 

Latest Kits!

Stampin Cut and Emboss

The Christmas Ornaments Kit and Card Keeper Kit are the latest kits that will be arriving in the online store later this month - get yours here!

New Online Exclusives

There are new products available exclusively in the online store from 3 July - check them out here.

About Me

Hi I'm Joanne and live in Northampton and when I'm not looking after my husband and two beautiful children, am an avid crafter with a passion for all things Stampin' Up!

I must confess that I have never been a big rubber stamper - until I discovered Stampin' Up! that is. I love the fact that I can get such great results with co-ordinating stamps, inks, papers and punches - the possibilities are endless! Join me on my stamping journey as I share the things I love and be inspired to create amazing things yourself!

Follow Me

Monthly Newsletter

Box Builder

Click the button above to use Box Buster to create your custom box design using the Envelope Punch Board!

Kits Collection Now Available!

Stampin Cut and Emboss

The new Kits Collection from Stampin' Up! is now available!

Click here to see the current kits available and order yours online today.

I Design For


Stampin' Up Stuff

This is my personal blog and is not endorsed by Stampin’ Up! I hope you find it a plentiful source of ideas and personal inspiration but please don't copy my designs for contest submission or use for classes, publication or sale without express permission.