Freaky Friends Halloween Joke Card

by Joanne James6. October 2014 10:41

Happy Monday everyone! It might be raining outside but I guarantee today's card will cheer you up! It's a Halloween card with a difference using this week's sketch over at The Paper Craft Crew:
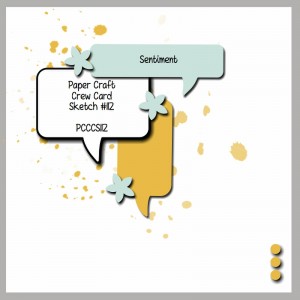
This sketch is quite similar to the sketch from a couple of weeks ago (you can see my card for that sketch here - and this card earned me a Featured Artisan spot too, so thank you Paper Craft Crew!) and whilst I did choose to use the word bubbles literally, the layout of this sketch was perfect for something that I've been wanting to create for a while - a Halloween joke card! Take a look: 
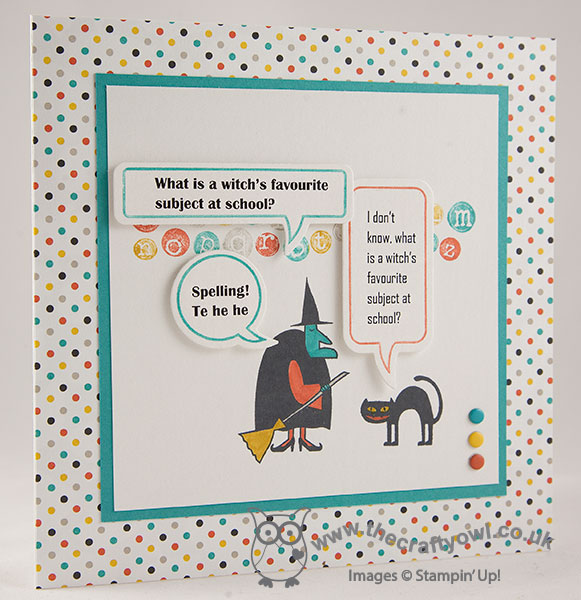
Fun, eh?! Every time I've looked at using the witch and cat from 'Freaky Friends' together, the witch just looks to me like she is saying something to the cat - so I decided a suitably-themed joke was in order! I made my card 6" square and used a Whisper White card base, covering the entire front section with a piece of Motley Monsters DSP and matting my central Whisper White panel with a mat of Bermuda Bay.

I stamped the witch and cat in Memento Black ink and coloured in the open spaces with my Bermuda Bay, Crushed Curry, Sahara Sand and Tangerine Tango Stampin' Write marker pens. My joke is computer-generated, which I printed out on Whisper White then inked the borders of the Just Sayin' stamps that co-ordinate with the Word Bubble framelits with my markers and stamped these over the top using my stamp-a-ma-jig for placement before rolling out with my Big Shot. I stamped the alphabet letters from the 'Tap Tap Tap' stamp in the background, colouring the individual letters with my markers, before positioning my word bubbles on top and adhering with dimensionals. To finish, I added a trio of candy dots in the corner.

I think this card is really fun; I made it to give to my 7 year old son, who is and always has been joke-mad. When he saw it he proclaimed it 'definitely funny', so I guess it passed the test. His first and favourite joke of all time is still this one:

Why did the banana go to the doctors?

Because he wasn't peeling very well!

This still sends him into fits of giggles every time he tells it!
Ok enough jokes from me today - before I go, just a reminder that today is the last day to take advantage of 'stamp, stock and save' - selected ink pads, paper, envelopes, and adhesive are available at a 15% discount! There are also a number of select stamps that are 20%! Full details of the products included in this offer can be found in the offer flyer here or you can go straight to my online store here to place your order - don't forget to include October's hostess code SFEXF44E.

That's all from me today - back tomorrow with another project. Until then, happy stampin'!


Stampin' Up! Supplies Used:

Table built using Product Table Builder by The Crafty Owl - Independent Stampin' Up! Demonstrator.


Thankful For ... You! Thank You Card

by Joanne James23. September 2014 13:30

Hello everyone! Today I'm sharing my card for this week's challenge over at The Paper Craft Crew, for which I also used the current colour palette over at The Card Concept:


I thought the sketch layout with the word bubbles and the leafy inspiration photo would combine to create the perfect opportunity to showcase the sentiments in the 'Gratitude For Days' stamp set - a rather unsung hero from the current seasonal catalogue I think, but a set that I have used lots and lots. Here is my card:

I used a combination of Real Red, Crushed Curry and Wild Wasabi for my card and inked the outlines of the Just Sayin' stamped word bubbles using my markers then stamped the insides with various 'gratitude' stamps in contrasting colours. I used some little leaves cut with my Fall Fest framelits as the embellishment for the word bubbles, and gradually layered them over a Gorgeous Grunge background to achieve my finished design. I think this still qualifies as 'clean and layered' as far as The Card Concept is concerned (if you've ever wondered about the definitions of the various cardmaking styles, you should check out their site - it gives some great guidelines), maybe bordering on 'freestyle collage', although probably not random enough to truly be a collage!

Hope you like my card; I'll pop back later with another quick make today for this week's challenge over at Create With Connie and Mary, so stay posted. until then, happy stampin'!


Stampin' Up! Supplies Used:

Table built using Product Table Builder by The Crafty Owl - Independent Stampin' Up! Demonstrator.


You're How Old - Really??! Birthday Card

by Joanne James21. September 2014 07:00

It's Sunday so I'm here with my card for this week's challenge over at The Paper Players, where Jaydee has the following clean and simple challenge for us:


I also used the above sketch from Freshly Made Sketches again for my card this week and this week's card is a lot more 'clean' than last weeks - here is my card:

My card is really simple, with a piece of the numbered Typeset paper mounted on Basic Black as the central panel of my card, with a couple of strips of Flashback DSP behind to add some colour and the focal point word bubble 'You're How Old?' stamped in Real Red. I finished my card with the sentiment 'happy birthday Grandpa' (stamped with my vintage 'For My Family' stamp set - a keeper!) and a punched star.

Yesterday was my Dad's 70th birthday and I made this card for him from the children - they think 70 is positively ancient, so the word bubble was entirely appropriate! - however it occurred to me as I typed up my post that not only could you change out the sentiment to just say 'happy birthday' or include the role of any family member (dad, brother, uncle, etc.) this might also work as a fun tongue-in-cheek card with the sentiment as is. So beware any male that feels he's 'over the hill', because one of these cards could be heading your way Grandpa!

Do check out the other design team cards this week; as always, there is some great inspiration and I look forward to seeing your challenge entries in the gallery. Right, I'm off to prepare for Sunday lunch and hopefully enjoy a restful family day before the onset of a new week. Enjoy your weekends everyone!

Back tomorrow with another project; until then, happy stampin'!


Stampin' Up! Supplies Used:

Table built using Product Table Builder by The Crafty Owl - Independent Stampin' Up! Demonstrator.


Gorgeous and Bright Grunge!

by Joanne James7. April 2014 21:18

When I saw the colour combo over at Dynamic Duos this week, I just knew I was going to have to make a card for this challenge! Of all the colour collections, Brights is my most favourite and this pink and blue combination just rocks!

Here is my card: 

I decided to combine it with the sketch over at CAS(E) This Sketch this week too, where I decided to use the pattern literally and stamp my background with Gorgeous Grunge. For my sentiment I wanted something contemporary and in keeping with the grunge look, so I decided to go with a word bubble, stamped in Versamark onto vellum then heat embossed with Melon Mambo embossing powder - the photograph really doesn't do this justice, in real life it has a lovely raised sheen. The word bubble was adhered using rolled glue dots, hidden along the stamped outline; this gives just enough height but doesn't allow them to show through the vellum.

I think this would make a great card for a teenager, or just a general card to cheer someone up. I like this minimalist card so much, I might have to make a few more in alternative colour combinations!

Back tomorrow with another project and some important Stampin' Up! news that you won't want to miss; until then, happy stampin'! 


Stampin' Up! Supplies Used:

Table built using Product Table Builder by The Crafty Owl - Independent Stampin' Up! Demonstrator.


Mum You're The Best!

by Joanne James27. March 2014 22:12

It's all go in the office of The Crafty Owl - I've been busy finishing my last Mother's Day cards today and I've recorded two video tutorials, along with all of the other things mothers do in a day. I won't bore you with that list, but I'm sure lots of you are reading this thinking "I know what you mean!" :-) Anyway, today I have a Mother's Day card to share with you, which I made using this week's sketch over at The Paper Players. This is Sandy's sketch:

I loved the layered circles on this sketch and it allowed me to get out on paper an idea I've had floating around in my head for a while (love it when that happens!) So here is my card:

I used Coastal Cabana for my base, then cut out a 'window' using my Word Bubble framelits through to the stamped sentiment "You're the best!" on the inside, used my largest circle for my bespoke 'Mum' sentiment where I used two circles cut with my Circles framelits to create an inset so that I have a border without an extra layer here. I then added an ‘xoxo’ cut out with my Circle Card thinlit set, attached with rolled glue dots, and lastly my final layer with the ‘love ya’ word bubble, stamped, cut and mounted with dimensionals for height. The cut-out on the front gives a glimpse of what’s inside – here’s the close-up:

Now I know this is not such a typical Mother's Day card: not traditional colours, no flowers in sight. It's quite clean and graphic in nature, but I really like it! I think it’s a great card for a Mum who likes something a little different; I for one would be thrilled to receive this card (hint, hint James Juniors!)


That’s me for today; come back tomorrow to see my entry for this week’s Less is More challenge. Until then, happy stampin’!


Stampin’ Up! Supplies Used:
 

Table built using Product Table Builder by The Crafty Owl - Independent Stampin' Up! Demonstrator.

Monster Hugs Valentine's Day Card - Paper Players #181

by Joanne James5. February 2014 18:33

A quick early post from me today as I'm out for my second class of the week this evening. Today's card is for this week's challenge over at The Paper Players, where the lovely Ann-Marie has chosen a 'sweet treat' theme:

When I saw the theme of the challenge, I knew immediately what I was going to create - don't you just love it when that happens?! Here's my card:

Quite a simple exterior with a border cut from the Fresh prints paper stack, the addition of a nice fat chocolate heart and one of those lovely Just Sayin' speech bubbles - here's a close up:


But the real fun element to this card is that she is mounted on a window sheet. Why? Well, because this way you get to see her behind (literally!!) - this is the inside reverse of the first image above:

How cute is that?!!! It seemed such a shame to lose the reverse by sticking it straight onto cardstock - these are such fun kits and it's so great that the 'Whole Lot of Love' promotion has now been extended right through to Valentine's Day, so these cute little gals (and guys!) are still available to purchase.

Hop on over to The Paper Players to see what everyone else has created this week - there are some great cards and 3D projects to see. I've also linked up to the monthly challenge over at Catherine and Cathy Create, where the theme is 'hearts a flutter' and love.

Right, I'm off to class! Back tomorrow with another project; until then, happy stampin'!


Stampin' Up! Supplies Used:

Table built using Stampin' Up! Product Table Builder from The Crafty Owl.


Just Sayin' CCMC Spring 2014 Sketch Challenge

by Joanne James31. January 2014 08:55

Another early post from me today - I must be organised, or at least more organised than usual! Today's card uses the sketch over at Create with Connie and Mary for the 2014 Spring Collection Challenge. Here is the sketch:

Having enjoyed the 'reveal' aspect of the hidden message tag card I made for the Paper Players yesterday, I thought I would do something similar with this card - the cut-away and the scalloped edge layer seemed to be calling for a pull-out. So here is my card:

This is the first time I've used the new Retro Fresh Designer Series paper and I love it - the colours are, well retro and fresh!! I made the pattern a feature of my card and embellished with another of the Just Sayin' word bubbles, this time layered and mounted on a base cut with the co-ordinating Word Bubbles framelits - don't you just love a matching framelit?! (and you save 15% if you buy them together) I also created a joining piece from the new Retro Fresh washi tape which I stuck on some Very Vanilla cardstock (I love how the little arrows draw your eye to the speech bubble).

I chose to make a pocket from the top layer so that the scalloped edge section could be pulled out to reveal another of the 'See Ya Later' Sale-A-Bration stamps, that I coloured with my Tangerine Tango, Coastal Cabana and Baked Brown Sugar Stampin' Write markers:

I made this card for a friend of mine who is celebrating a 'significant birthday' this week; I'll spare her modesty by not revealing her age, but let's just say the sentiment on this card just seemed very appropriate! I'm also going to link this card up with Create With Connie and Mary's colour challenge this week, which I didn't see until after I made my card but is featuring the colour palette that I've used this week:

I am loving these colours - might have to try and do another card or two now I've opened that new paper pack!

EDIT: By popular request, here are the dimensions for the above card:

  • Tangerine Tango Card Base: 14.9cm x 18.5cm (scored at 8cm)
  • Retro Fresh DSP: 10cm x 8cm
  • Extra Tangerine Tango Bottom Front Section: 4.9cm x 8cm
  • Attach the DSP to the bottom orange front section using the Retro Fresh washi tape
  • Attach this panel front to the front card base on 3 sides only with Tombo (the section measuring 8cm x 14.9cm as opposed to the larger section measuring 10.5cm x 14.9cm) - this creates the pocket
  • Very Vanilla Insert: 12.5cm x 8cm, edged with the Large Scallop Edgelit
  • Adhere a strip of Coastal Cabana cardstock measuring 3cm x 14.9cm to the inside edge of the back panel of the card base

I'm off to watch Rebecca play in a netball match this afternoon - pray for fine weather for me, or at least that the match gets moved onto the indoor court! Back tomorrow with another project; until then, happy stampin'! 


Stampin' Up! Supplies Used:

Table built using Stampin' Up! Product Table Builder from The Crafty Owl.


Tags: , , , , , , , ,

Cards | Stamping

See Ya Later Alligator PP180

by Joanne James29. January 2014 22:26

Today I'm sharing my entry to this week's Paper Players challenge, which has this great sketch by Ann Schach as the starting point:

I love the idea of the 'hidden message' tag on the front of this card. I got out some Sale-A-Bration goodies and another new stamp from the Spring-Summer catalogue and this is the card that I came up with: 

This is the outside of my card, using the alligator stamp from the 'See Ya Later' stamp set - free with a £45 spend during Sale-A-Bration. I chose the bold in-colours of Gumball Green and Raspberry Ripple for my card and I partially inked my stamp using Stampin' Write markers, as I didn't want to include the bottom bit of the sentiment - and this is the reason why:

I made a pull-out tag with the new Scalloped Top Tag Punch and stamped it with one of the Just Sayin' word bubble stamps - how cute is that?! Here's another photo of it sticking out of the card at a jaunty angle (not so sure about this now, but seemed like a good idea at the time!!):

 Some ribbon to pull the tag and a few hearts punched out using my trusty owl punch complete this card. I like this idea a lot and am sure I will be using this layout again. If you like it too, pop on over to the Paper Players page and check out this week's Design Team inspiration; there's some great work there and I particularly love Ann's card - the detail is amazing!

I'm off to get on with the big basket of ironing that I've been putting off for too many days now; still, I'm meeting up with some of my Stampin' Up! team this afternoon, so that is definitely something nice to look forward to.

Back tomorrow with another card; until then, happy stampin'!


Stampin' Up! Supplies Used:

Table built using Stampin' Up! Product Table Builder from The Crafty Owl.


Mini Catalogue

BROWSE THE CATALOGUE

The mini catalogue is now live! Read and download your copy here.

Shop Online

Access my online shop 24 x 7, 365 days of the year:

Current April hostess code:

VDKNV7BH

Shop Online

Join My Team

It's always a great time to join Stampin’ Up! New team members can get £130 worth of products for only £99 + free business supplies + free shipping + all the fun being a part of Stampin’ Up! Stampin' Up! has something for everyone: join my growing team and benefit from my support to enjoy Stampin' Up! however you choose.

If you're interested, call me for a chat to understand how I can help you realise your goals. Alternatively, if you have already decided to sign up and you just can't wait, please click here for the link to the online form where you can sign up and order your starter kit right away! 

Latest Kit!

Stampin Cut and Emboss

The Rock Legend Kit has all you need to make 8 cards with coordinating envelopes. Along with the new Panda Friends Kit, both are available from January 4th for just £14 each - get yours here!

2023-24 Annual Catalogue

BROWSE THE CATALOGUE

Click on the catalogue for a full list of current SU! supplies - if you would like to order any of the items featured, please drop me a line at [email protected] or give me a call on 07773 421446 - I'd be happy to help.

New Online Exclusives

There are new products available exclusively in the online store from 5 March - check them out here.

About Me

Hi I'm Joanne and live in Northampton and when I'm not looking after my husband and two beautiful children, am an avid crafter with a passion for all things Stampin' Up!

I must confess that I have never been a big rubber stamper - until I discovered Stampin' Up! that is. I love the fact that I can get such great results with co-ordinating stamps, inks, papers and punches - the possibilities are endless! Join me on my stamping journey as I share the things I love and be inspired to create amazing things yourself!

Follow Me

Monthly Newsletter

Box Builder

Click the button above to use Box Buster to create your custom box design using the Envelope Punch Board!

Kits Collection Now Available!

Stampin Cut and Emboss

The new Kits Collection from Stampin' Up! is now available!

Click here to see the current kits available and order yours online today.

I Design For


Stampin' Up Stuff

This is my personal blog and is not endorsed by Stampin’ Up! I hope you find it a plentiful source of ideas and personal inspiration but please don't copy my designs for contest submission or use for classes, publication or sale without express permission.