Blackberry Beauty A Reason To Celebrate CCS 441

by Joanne James12. October 2021 13:00

It's Tuesday and time for a new challenge over at CAS Colours & SketchesThis week's challenge is a sketch challenge and our hostess Vicky has asked that we create a card with a jaunty angle:


Feel free to flip or rotate the sketch when making your card.

I'm also linking up my card today with the team over at AAA cards who are celebrating their 200th challenge since my card has also been made to celebrate something special - take a look:


Here's the low-down on today's card:

A dear blogging friend of mine recently got married to her original childhood sweetheart, having been widowed for the past 11 years. I was delighted to hear this happy news and couldn't wait to create a card to send her my congratulations. I decided the Blackberry Beauty gold foiled paper was the perfect paper to showcase on that jaunty angled piece of the sketch, so I cut it with one of my Basic Borders Dies and added a simple gold embossed 'congratulations' greeting from the Art Gallery set.

Whilst this completed the outside of my card, I had to add some additional decoration to the inside, using both a floral image (stamped in gold) and a sentiment from the retired set 'Wonderful Romance':


I just love this set for wedding cards! I am sending this card overseas, so the flat clean and simple design is perfect. I wanted it to be special for my friend when she opened it though, so I created a custom envelope using shimmer gold vellum with a co-ordinating envelope flap to house her card, that I will then place inside another standard envelope for mailing:


I love the monochrome look for a clean and simple card and this elegant card is great for wedding congratulations I think - and definitely an event to be celebrated!

Here is the visual summary of the key products used on today's project for you to pin for easy reference:
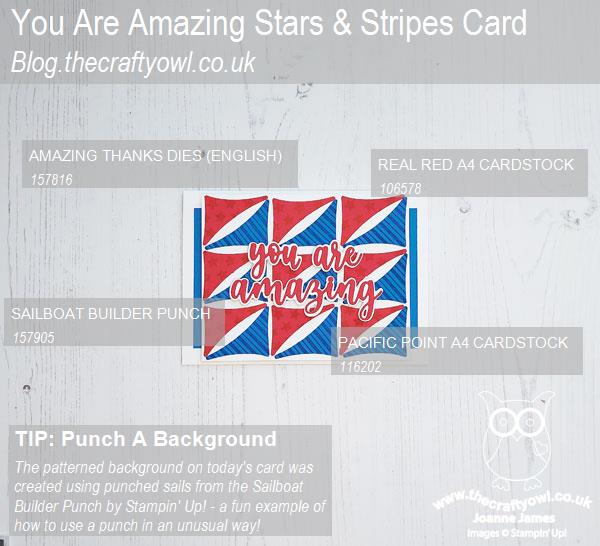
 

You can see all of my 'How To' summaries on my 'How To - Tips and Techniques' Pinterest board in case you've missed any. 

Enjoy your day and I'll be back tomorrow with another project. Until then, happy stampin'!

Stampin' Up! Supplies Used:
Table built using Product Table Builder by The Crafty Owl - Independent Stampin' Up! Demonstrator.

Seasonal Swirls And A Pine Cone Christmas Wreath

by Joanne James11. October 2021 09:00

I have card class this morning so am getting my blog post out early! Today I'm sharing a card that uses Amy's sketch this week over at Freshly Made Sketches:

My card is also inspired by a recent Inspired By challenge photo that I loved but didn't get the opportunity to play along with at the time ( you can read all about that here). I made another Christmas card for my growing pile - take a look:


Here's the low-down on today's card:

Seasonal Swirls - Today's card features another Seasonal Swirls wreath, this time a Christmas one adorned with holly, pine cones and mistletoe pearl berries. This die set is perfect for making endless combinations of wreath decoration! I stamped a simple 'Noel' greeting from 'Tidings and Trimmings' in the centre of my wreath.

Not So Halloween Gingham - I used the central diagonal to accommodate a gingham bow with a (retired) sparkly jewel at it's centre. You may well have missed this ribbon in the current seasonal catalogue - it's on page 51 nestled amongst the Cute Halloween suite, but I think this ribbon is a winner with all-year round appeal. 

An Acetate Trick - For the other two elements of diagonal detail, I used some of the Hydrangea Hill Mercury Glass Designer Acetate - but featured the reverse side which is a lovely silver colour, rather than the lilac/pink front. Using the reverse makes this great for adding a touch of festive metallic to those festive projects:


I was initially a little unsure about the diagonals on Amy's sketch, but I actually like the way the sit against my Christmas wreath and am quite pleased with how this card turned out.

Here is the visual summary of the key products used on today's project for you to pin for easy reference:


You can see all of my 'How To' summaries on my 'How To - Tips and Techniques' Pinterest board in case you've missed any. 

Enjoy your day and I'll be back tomorrow with another project. Until then, happy stampin'!


Stampin' Up! Supplies Used:

Table built using Product Table Builder by The Crafty Owl - Independent Stampin' Up! Demonstrator.

Seasonal Swirls Harvest Thanks PP562

by Joanne James10. October 2021 08:00

Today it's Sunday and time for this week's new challenge over at The Paper Players! It's the turn of the fabulous Anne Marie to host this week and she has a colour challenge for you to work with:


I thought Anne Marie's colour palette was perfect for an autumn and decided to make another card using my Seasonal Swirls Dies featuring orange pumpkins; my card is much more about fall thanks than Halloween spooks this week though - take a look:


Here's the low-down on today's card:

Seasonal Swirls - I'm a sucker for a good wreath die and the Seasonal Swirls Dies are no exception. On today's card I layered two of the leaf/twig dies, one in Crumb Cake and one in Early Espresso and decorated it with some cute pumpkins that I had sponged with Pumpkin Pie ink for a little added dimension and tied with linen thread bows.

Thinking Thanks - My extra-large sentiment across the front of my card is from the 'Thinking Thanks and Peace' stamp set. I stamped it in Early Espresso onto Pale Papaya cardstock (minus the wheatsheaf) and fussy cut it before adding to the centre of my wreath. I also did a little stamping on the inside of my card using a sentiment from the 'Sparkle of the Season' stamp set:


A Word About Colour - I used Crumb Cake as my fourth colour to complete today's colour combination. Technically this could count as a neutral so I could justify it as a 'free' colour, but I did deliberately choose it as I wanted to keep a brown/orange colour scheme on today's card. The background is a piece of retired DSP from my collection, but you could easily splatter a piece of Crumb Cake cardstock with the tip of an Early Espresso marker and achieve the same effect:


I was quite sparing with my use of Pale Papaya on today's card, but in using it for my base and to ground my sentiment, I think it adds a nice freshness to these otherwise rich autumn colours. What do you think? Do leave me a comment below - as always, I'd love to hear your thoughts.

Here is the visual summary of the key products used on today's project for you to pin for easy reference:


You can see all of my Product and 'How To' summaries on my 'How To - Tips and Techniques' Pinterest board in case you've missed any. 

Before you reach for your ink and papers, check out what our amazing team has created to inspire you this week:

Here's a quick recap of our challenge rules:
 
1.  Create a new paper project
2.  Upload your creation to your blog with a link back to us and provide a direct link to the post featuring your challenge submission.
3.  Please link your card to no more than four challenges, TOTAL.
4.  Have FUN!

You can see all of my 'How To' summaries on my 'How To - Tips and Techniques' Pinterest board in case you've missed any. 

Enjoy your day; no special plans in the James household today. I'll be back tomorrow with another project. Until then, happy stampin'!


Stampin' Up! Supplies Used: 

Table built using Product Table Builder by The Crafty Owl - Independent Stampin' Up! Demonstrator.


Giving Gifts Autumn Leaves Thank You Card TTT134

by Joanne James7. October 2021 18:00

It's Thursday and time for a new challenge over at TicTacToe! It's the turn of Team X to host this week and I am the featured designer this week. This is the fun board that we are playing along with: 


I decided to go across the middle of the grid with leaves/thanks/shades of brown for a clean and simple card. I used the layout and layering idea from the CASE The Designer challenge over at Global Design Project and the colours over at Color Throwdown that are perfect for Autumn. I will also be linking up over at Addicted to CAS, having finally managed to create something suitably clean and simple befitting their Autumn codeword - take a look:


Here's the low-down on today's card:

Beauty Of Tomorrow - I love the large sentiment in the 'Beauty of Tomorrow' stamp set which sums up the changing seasons and advent of autumn beautifully I think so I had to feature this on the front of my card. Since this doesn't directly have anything to do with my middle square of 'thanks', I added one of my favourite stamps from the 'Well Defined' set to the inside of my card:


I love the idea of sending a card to someone thanking them for being part of my world, rather than as a show of gratitude for something someone did and this sentiment is so perfect for that.

Giving Gifts Autumn Leaves - I created a cascade of falling autumn leaves that I diecut from a piece of cardstock onto which I blended a selection of oranges and browns (see below) using the leaf die in the Giving Gifts Dies set. One of my blogging friends, the lovely Kim Singdahlsen of Joyful Creations with Kim, has made some fabulous cards with the dies in this set and was a total enabler when it cam to me puchasing these dies - I could resist no longer!  I particularly love the diecut detail on each leaf; I glued each of them on one half only, so that they could be gently folded upwards to add to the sensation of falling leaves - slightly easier to see on the angled photo below:

A Surprise Find - Finally, to add a little extra autumn-inspired detail to my card, I added some Grey Granite ink using a blending brush and an old stencil I found in my stash with a large knit pattern and faded it out from opposing corners. I am seeing some wonderful stencilling in the blogosphere lately, none more so than from my fellow Paper Player designer and CAS supremo the lovely Jaydee of Stampin! With Jaydee. She has a beautiful fine-knit stencil from The Greetery that she has been using lots lately and when I found this in my stash I thought it would be a good stencil to create a similar look and feel. This was also a good way to incorporate the soft, warm grey tones of the Color Throwdown palette. 

Here is the visual summary of the key products used on today's project for you to pin for easy reference:


You can see all of my Product and 'How To' summaries on my 'How To - Tips and Techniques' Pinterest board in case you've missed any. 

This is one of those cards that for all its simplicity seemed to take forever; it took a truck load of inspiration to get me there, but I must say I love the result and ended up making a few of these to send out to friends.

A tictactoe board offers so many creative possibilities - how does this week's board inspire you? Why not have a go? We would love to see you in the gallery and who knows - you might be selected for Designer's Choice and be eligible to be a guest designer on a future challenge. 

Enjoy your day; I do not know where this week has disappeared! I am still busy harvesting produce and I made another batch of raspberry jam yesterday. Today is oddly warm for this time of year, but still rather grey and it certainly doesn't feel like the return of summer that the weather forecasters promised! I'll be back soon with another project. Until then, happy stampin'!


Stampin' Up! Supplies Used: 

Table built using Product Table Builder by The Crafty Owl - Independent Stampin' Up! Demonstrator.

Clean and Simple Christmas Tree Trio CCS 440

by Joanne James5. October 2021 13:00

It's Tuesday and time for a new challenge over at CAS Colours & Sketches. We are now in October which means a new host and a new guest designer. My CAS-loving friend Vicky is hosting this month and our first challenge is a colour challenge: 


For my card today I decided to go Christmas and use up some of my Sale-A-Bration freebies! I know - these colours aren't a typical festive colour palette, but I think they work - take a look:


Here's the low-down on today's card:

Christmas Tree Trio - I used the Christmas Tree Dies from the 'Whimsy and Wonder' Suite to create my trio of white Christmas trees and incorporated the colour with a set of overlapping inked circles in the challenge colours behind using the round stamp in the Sale-A-Bration 'Textures and Frames' stamp set. This is the kind of set that I struggle to use and am generally doesn't draw me in, much to the amusement of some of my customers and friends who always see the potential of these kinds of sets. I like the idea of using the stamps as a base to showcase something else as I've done here. 

A Whimsical Tree - Not much stamping on the front of my card, but I did use the 'Whimsical Trees' stamp set on the inside of my card for a little extra decoration:


Sparkle and Texture - I couldn't resist adding a sparkly garland to the white Christmas trees on the front of my card using another Sale-A-Bration freebie, the Be Dazzling paper; I love the shimmer and texture it adds, without detracting from the overall clean feel of my card: 

I know the Sale-A-Bration promotion is now over for another year, but hopefully you picked up some of these free items and are still looking for fun ways to use them. 

Here is the visual summary of the key products used on today's project for you to pin for easy reference:


You can see all of my 'How To' summaries on my 'How To - Tips and Techniques' Pinterest board in case you've missed any. 

As a reminder, for our colour challenges, you must use all of the stated challenge colours. You may also use neutral colours; however, the challenge colours should be the most noticeable ones featured on your card. We use Stampin' Up! color names for reference, but you are welcome to use any other companies' products as long as you match the challenge colours as closely as possible.

Enjoy your day and I'll be back tomorrow with another project. Until then, happy stampin'!


Stampin' Up! Supplies Used:

Table built using Product Table Builder by The Crafty Owl - Independent Stampin' Up! Demonstrator.

Spooky Halloween Wreath With Seasonal Swirls Dies PP561

by Joanne James3. October 2021 08:00

Today it's Sunday and time for this week's new challenge over at The Paper Players! It's the turn of the fabulous Laurie to host this week and she has a fun and seasonal theme challenge for you to work with:


I was initially a little concerned that I would struggle this week; I don't make many Halloween cards as I rarely send them as it isn't a big thing here in the UK and I don't really buy many Halloween sets as a result. I didn't even have any current Halloween paper! What to do?! I decided to take stock of all current sets and pull out anything that had something Halloween-related in it, whilst also taking inspiration from a few other challenges too, and ended up making a card really easily. Take a look at what I came up with:


Here's the low-down on today's card:

Halloween Seasonal Swirls - The star of today's card is most definitely the Seasonal Swirls Dies. They have this fun star wreath (which along with my bat silhouettes fulfilled my 'Just Choose 2' for Just Add Ink this week) which I cut out of sparkly black glitter paper, then embellished with a trio of pumpkins and witches' brooms cut from some retired textured kraft paper I had, which along with my purple background uses this week's Color Throwdown colours which are perfect for Halloween.

Sparkle of The Season and A Wish For Everything - Alongside my diecut wreath, there isn't much stamping on my card: the sentiment on the front comes from the 'Sparkle of the Season' stamp set that is bundles with the dies; I also found this fun Halloween sentiment in the 'A Wish For Everything' stamp set that I used on the inside of my card:


Perfect for the inside of my card!

Spooky? - I wasn't sure that my sparkly wreath alone could truly be considered 'spooky', but luckily Narelle's layout over at Freshly Made Sketches this week came to my rescue on that front: I took that second circle shape behind, masked off and sponged in a moon with white craft and a little  silver metallic ink for shading, along with the splatter stamp in the 'Quiet Meadow' stamp set for crate-like detail and a trio of black bats from 'Sparkle of The Season' for added spooky:


A final diecut bat, along with some blended tone-on-tone colour around the edge of my purple layer, complete my suitably spooky card.

I felt like I needed a lot of help to get me going with my card this week, but I'm really pleased with how it turned out. Even more impressive is that it didn't include a single Halloween-specific stamp set! So if you are looking at this week's theme and thinking you don't 'do Halloween', check out the stamp sets on your shelf or get creative with some punch art - like me, you might be surprised at what you'll find!

Here is the visual summary of the key products used on today's project for you to pin for easy reference:


You can see all of my Product and 'How To' summaries on my 'How To - Tips and Techniques' Pinterest board in case you've missed any. 

Before you reach for your ink and papers, check out what our amazing team has created to inspire you this week:

Here's a quick recap of our challenge rules:
 
1.  Create a new paper project
2.  Upload your creation to your blog with a link back to us and provide a direct link to the post featuring your challenge submission.
3.  Please link your card to no more than four challenges, TOTAL.
4.  Have FUN!

You can see all of my 'How To' summaries on my 'How To - Tips and Techniques' Pinterest board in case you've missed any. 

Enjoy your day; today is a very special day in the James household! Tomorrow is a milestone birthday for my 'significant other' ( also known as the first Mr James! - if you missed his card, I already shared that here); since his birthday falls on a day that is filled with work, school and sport for pretty much everyone in the James household, we are celebrating today. We have cake, balloons, fizz, presents and more so whilst he is not one to make a fuss, the children and I are ready to celebrate his half-century in style!  I'll be back tomorrow with another project. Until then, happy stampin'!


Stampin' Up! Supplies Used: 

Table built using Product Table Builder by The Crafty Owl - Independent Stampin' Up! Demonstrator.

Seasons of Fun Easy Autumn Leaves Shaker Card

by Joanne James2. October 2021 18:00

Happy World Card Making Day everyone! Have you crafted today? Today I'm sharing a card for the current challenges over at Global Design Project and Double D Challenge where they are both about leaves:


I’ve changed things up a little for my card with a super easy shaker card to really make the most of those autumn falling leaves - take a look:


Isn’t it just the cutest? Here's the low-down on today's card:

Seasons of Fun - The little boy having fun playing in the leaves is from the ‘Seasons of Fun’ hostess set in the mini catalogue and was the perfect background for my shaker. I stamped him onto a stitched rectangle and coloured him in with a variety of Stampin’ Blends, matching the colours to those of my falling diecut leaves to create a seamless picture.

How To Create An Easy Shaker Card - The shaker card element on today’s card was so easy and straightforward to create: all you need to do is place your shaker pieces - I used leaves cut with the Seasonal Swirls Dies and some gold sequins for a little sparkle - onto your background image and panel and carefully slide into an acetate sleeve, the kind you sometimes put finished cards into for sale, and fold the sides and tape behind. This creates a flat pocket with less depth and freedom of movement than a traditional shaker card, which is better for posting, but still allows the contents to move around and ‘shake’. 

Pattern Party With Colour - I placed my shaker pocket onto a background of leafy paper from the Pattern Party hostess paper pack. This is a black and white paper, but I coloured the leaves in with my Stampin’ Blends to further continue my leafy theme tie in my frame with the central image:


I deliberately left the front of my card sentiment-free, as I didn’t want to obscure my shaker and central image. I’m also not sure who I’m going to send this card to so it made more sense to add one at a later date if needed.

Here is the visual summary of the key products used on today's project for you to pin for easy reference:


You can see all of my 'How To' summaries on my 'How To - Tips and Techniques' Pinterest board in case you've missed any. 

Enjoy your day and I'll be back tomorrow with another project. Until then, happy stampin'!


Stampin' Up! Supplies Used:

Table built using Product Table Builder by The Crafty Owl - Independent Stampin' Up! Demonstrator.

Gingerbread and Peppermint Memories and More Christmas Cookies Card AYSI260 and FF00094

by Joanne James1. October 2021 09:00

Today I'm actually combining my design team card for both our new challenge over at As you See It where it's time for a sketch challenge and the new challenge over at Festive Friday:


It just so happened my card fulfilled both briefs, so I thought I would go with it as I've been time-pressed this week (nothing new there then!) At As You See It we have a sketch challenge and at Festive Friday we are celebrating World Apple Day - but if you check out my card, you'll see there's not an apple in sight! Take a look at my card and you'll see what I mean:


My card today is for a baker - and a Christmas baker at that! The fun thing is that at Festive Friday you do not need to actually celebrate the occasion; your goal is to simply use three or more items from the inspiration list on your project. This week I used red, green, baking and gingham on today's creation.

Here's the low-down on today's card:

Gingerbread and Peppermint - One of my many passions in life is to bake, and at Christmas time I am known for my gingerbread cookies, so the Gingerbread and Peppermint Suite from Stampin' Up! immediately appealed to my inner baker. I love the papers in particular, as they are perfect for fussy cutting and that's where I took my trio of gingerbread cookies from that are on my card today. If you're not a fan of fussy-cutting, the Gingerbread Dies fit some of the shapes on the designer series paper, but honestly they are super easy to kit by hand too. The gingham banner on my card is some old retired paper, as there isn't a pattern that is technically gingham in this paper pack. There are lots of check and plaid patterns, but since I was being a purist I grabbed some old papers, but if you wanted to CASE my card, I would totally use one of the other patterns in this paper pack.

Memories & More - One of the other things I love about the Gingerbread & Peppermint Suite is that it features this season's Memories and More cards too. I will be using them to document my own festive bakes, but they are also great for cards too and on today's card, they really are the star of the show. So many of the elements that you see on my card come from the Gingerbread & Peppermint Memories and More pack: The spatula, oven glove, foil embossed snowflakes, that fabulous metal cooling rack and even the sentiment, which I fussy cut from one of the cards in the pack. So many great elements to play with:


Look No Stamping - Did you notice there isn't a single stamp on today's card? Not even on the inside, where I decided to use one of the memories and More stickers:


They really do make for easy cards, but with so many bits and pieces you can have a lot of creative fun with them too. I will be sending this card to a friend along with some of my famous gingerbread cookies during December; I might have to make a few more too!

Here is the visual summary of the key products used on today's project for you to pin for easy reference:


You can see all of my 'How To' summaries on my 'How To - Tips and Techniques' Pinterest board in case you've missed any. 

Here's a summary of the As you See It challenge rules:

  • Create any card, scrapbooking page, 3D project or packaging project that fits the challenge.
  • Please include the challenge graphic and link back to the challenge in your blog post. Turn off word verification so we can leave you lots of lovely comments. Make sure you link the post not the whole blog to the Linky. Use #AYSIXXX when uploading to a public gallery.
  • If you’re unsure about ‘the rules’, check the details under the Challenge Guidelines tab on the As You See It Challenge homepage.
  • In a sketch challenge, you are welcome to rotate or flip a sketch. You can replace shapes used such as substituting a circle panel for a square panel. However, we must be able to still see the basis of the original sketch in your finished product.
We look forward to seeing your creations in the AYSI gallery. Likewise, How does our Festive Friday board inspire you? I can’t wait to see what you create! For more inspiration, be sure to visit the rest of the Festive Friday Challenge Design team:

Ann Schach

Beth McCullough

Sharon Hashimoto Burkert

Melanie Hungerford

Helen Jennings

Stephanie Lanzalotto

Melva Peters

Jaydee

Diane Evans 

Joanne James - that's me!

Enjoy your day and I'll be back tomorrow with another project. Until then, happy stampin'!


Stampin' Up! Supplies Used:

Table built using Product Table Builder by The Crafty Owl - Independent Stampin' Up! Demonstrator.


Blackberry Beauty Three Panel Nature Thank You CCS 439

by Joanne James28. September 2021 13:00

It's Tuesday and time for a new challenge over at CAS Colours & Sketches. Jenny's final challenge this month is a sketch challenge: 


Feel free to flip or rotate the sketch when making your card.

For my card today I decided to feature some designer series paper and went on the hunt for a pattern that lent itself to being split across three panels and accommodating a sentiment. This is where I ended up:


Here's the low-down on today's card:

This design in the Blackberry Beauty specialty designer series paper pack is one of my favourite designs and since all of the pattern is along the outer edges of the paper, it was perfect to cut down for a blank piece behind my sentiment and then two rectangles with pattern below. This paper has beautiful foil detailing, so I decided to add some gold foil mats to my rectangles and behind my sentiment. My 'thanks' is from the Word Wishes die for 'Thanksgiving' where I cut the 'giving' off the end. The dies aren't layered, so I created a gold mat for my diecut by gluing the Early Espresso diecut to gold foil, then carefully trimming around it with my paper snips to leave a layered border: 


The front of my card is stamp-free, so I added some stamping to the inside of my card to remedy that:


Here is the visual summary of the key products used on today's project for you to pin for easy reference:


You can see all of my 'How To' summaries on my 'How To - Tips and Techniques' Pinterest board in case you've missed any. 

Enjoy your day and I'll be back tomorrow with another project. Until then, happy stampin'!


Stampin' Up! Supplies Used:

Table built using Product Table Builder by The Crafty Owl - Independent Stampin' Up! Demonstrator.

Stitched Leaves Fall Hello PP560

by Joanne James26. September 2021 08:00

Today it's Sunday and time for this week's new challenge over at The Paper Players! It's my turn to host this week and I have my favourite, a sketch, for you to work with:


I designed this sketch months ago so had nothing in particular in mind when I created it. I actually intended to go with a Christmas card until I saw those lovely autumn leaves and trees in the Color Dare inspiration photo, which prompted me to go in a completely different direction - take a look:


Here's the low-down on today's card:

Beauty of The Earth - I decided to use a strip of the Beauty of the Earth designer paper for my border edge as it contained lots of lovely greens, reds, oranges and browns in a mottled leaf pattern that fitted my theme perfectly.

Stitched Leaves - I used the three squares of my sketch (you don't have to use squares - these can be any shape you like) to create a trio of diecut stitched leaves in co-ordinating colours, two of them offset within a couple of stitched squares and one tied with twine to accent my sentiment:


I added a trio of brushed metallic dots to my card front too - love these!

Love of Leaves - The only  stamping on the front of my card is the sentiment, from the 'Lots of Leaves' stamp set; I did add a little more to the inside of my card, including a sponged leaf with diecut detail for decoration:


You may be wondering why my card base appears Garden Green in this photo, yet is Old Olive on the front; in the interest of full disclosure, I must confess I started out with a Garden Green base, but it just wasn't working for me. I fiddled about with various card front colours, in the end settling on Old Olive - but instead of cutting a new card base just added a panel to the front of my card. I also experimented with texture and additional detail on the panel, but in the end decided to leave it plain. So there you have it!

Here is the visual summary of the key products used on today's project for you to pin for easy reference:


You can see all of my Product and 'How To' summaries on my 'How To - Tips and Techniques' Pinterest board in case you've missed any. 

Before you reach for your ink and papers, check out what our amazing team has created to inspire you this week - they created some fabulous designs inspired by this week's sketch:

Here's a quick recap of our challenge rules:
 
1.  Create a new paper project
2.  Upload your creation to your blog with a link back to us and provide a direct link to the post featuring your challenge submission.
3.  Please link your card to no more than four challenges, TOTAL.
4.  Have FUN!

You can see all of my 'How To' summaries on my 'How To - Tips and Techniques' Pinterest board in case you've missed any. 

Enjoy your day; no big plans here other than some cooking and collection of the youngest of the James Juniors following a weekend of hiking and camping as he completed his Duke of Edinburgh Bronze Expedition. Here's hoping for minimal blisters, a shower and an early night!! I'll be back tomorrow with another project. Until then, happy stampin'!

Stampin' Up! Supplies Used: 

Table built using Product Table Builder by The Crafty Owl - Independent Stampin' Up! Demonstrator.

New Online Exclusives

There are new products available exclusively in the online store from 5 November - check them out here.

Latest Kits!

Stampin Cut and Emboss

The Layered Landscapes Kit and Nature's Paintings Kit are the latest kits in the online store - get yours here!

Shop Online

Access my online shop 24 x 7, 365 days of the year:

Current November hostess code:

9NKXDTTR

Shop Online

Mini Catalogue

BROWSE THE CATALOGUE

'Tis The Season - the new Stampin' Up! Mini Catalogue is here! For more details and to download your copy click here

Scrapbooking

Stampin' Up! has introduced a new range of 12x12" scrapbooking product and kit - the full range is now available to purchase online. To download a copy of the new digital Scrapbooking Catalogue click here.

2024-25 Annual Catalogue

BROWSE THE CATALOGUE

Click on the image to download your copy of the 2024-25 annual catalogue. For a full list of current SU! supplies, go to my online store. If you would like any help or advice, please drop me a line at joanne@thecraftyowl.co.uk or give me a call on 07773 421446 - I'd be happy to help.

Join My Team

It's always a great time to join Stampin’ Up! New team members can get £130 worth of products for only £99 + free business supplies + free shipping + all the fun being a part of Stampin’ Up! Stampin' Up! has something for everyone: join my growing team and benefit from my support to enjoy Stampin' Up! however you choose.

If you're interested, call me for a chat to understand how I can help you realise your goals. Alternatively, if you have already decided to sign up and you just can't wait, please click here for the link to the online form where you can sign up and order your starter kit right away! 

About Me

Hi I'm Joanne and live in Northampton and when I'm not looking after my husband and two beautiful children, am an avid crafter with a passion for all things Stampin' Up!

I must confess that I have never been a big rubber stamper - until I discovered Stampin' Up! that is. I love the fact that I can get such great results with co-ordinating stamps, inks, papers and punches - the possibilities are endless! Join me on my stamping journey as I share the things I love and be inspired to create amazing things yourself!

Follow Me

Monthly Newsletter

Box Builder

Click the button above to use Box Buster to create your custom box design using the Envelope Punch Board!

Kits Collection Now Available!

Stampin Cut and Emboss

The new Kits Collection from Stampin' Up! is now available!

Click here to see the current kits available and order yours online today.

I Design For


Stampin' Up Stuff

This is my personal blog and is not endorsed by Stampin’ Up! I hope you find it a plentiful source of ideas and personal inspiration but please don't copy my designs for contest submission or use for classes, publication or sale without express permission.