A Big Thanks PP665

by Joanne James5. November 2023 08:00

Today it's Sunday and time for this week's new challenge over at The Paper Players! It's the turn of the fabulous Anne Marie to host this week and she has a great theme challenge for us to work with:


Giving thanks - everyone needs a good supply of thank you cards, right? With Thanksgiving later this month for my American friends, November is often a month more than most when we pause to reflect on the things we are grateful for. I could have gone with a card that was similarly seasonally themed, but I decided instead to go with something bold and bright that made the most of this week's Global Design Project sketch - take a look:


Here's the low-down on today's card:

Bold & Bright, Not Merry - For my vertical stripes, I used a panel of the Merry, Bold & Bright Designer series paper. Part of the Christmas product range, this is a paper pack with designs that really do work all year round and these stripes are perfect for my thank you card.

Many, Many Thanks - I decided to add some tone-on-tone stamping using a selection of the stamps in the 'Timeless Arrangements' stamp set. This set is choc-full of sentiments for all kinds of thank yous; I chose three different sentiments and stamped them repeatedly along the length of the stripes. This is a great way to add interest to a card and using the striped designer paper makes it really easy - no need to stress about accurately cutting your stripes to the same size. 

A Very Big Thanks - I heat-embossed another of the sentiments from the set in (retired) Blueberry Bushel embossing powder onto a vellum circle and decided I had to finish my card with  - a very big thanks, what else?! I added a layered a diecut of the retired thanks die from the Amazing Thanks Dies, slightly offset to reveal some blue beneath my bright green sentiment:


A trio of sparkly enamel dots complete my card. So what do you think? Who would you send today's colourful thank you to? Do leave me a comment below and let me know - I'd love to hear your thoughts.

Here is the visual summary of the key products used on today's project for you to pin for easy reference:


You can see all of my Product and 'How To' summaries on my 'How To - Tips and Techniques' Pinterest board in case you've missed any. 

Before you reach for your ink and papers, check out what our amazing team has created to inspire you this week:

Here's a quick recap of our challenge rules:
 
1.  Create a new paper project
2.  Upload your creation to your blog with a link back to us and provide a direct link to the post featuring your challenge submission.
3.  Please link your card to no more than four challenges, TOTAL.
4.  Have FUN!

Enjoy your day; our house seems super quiet today, with only the youngest of the James juniors and I in residence - the eldest is still enjoying university life and the hubby is on an extended trip to China and Vietnam. I wonder how long it will be before we are bored with each other's company?! I'll be back tomorrow with another project. Until then, happy stampin'!


Stampin' Up! Supplies Used: 

Table built using Product Table Builder by The Crafty Owl - Independent Stampin' Up! Demonstrator.

Perfectly Penciled Amazing You

by Joanne James26. April 2023 11:37

Today I'm sharing a card for the current Color Hues challenge:

Purple is one of my favourite colours so I knew I wanted to play along. I decided on some more colouring with my Stampin' Blends using up a little more retiring paper - take a look:


Here's the low-down on today's card:

The Perfectly Penciled papers are great for colouring with your Stampin' Blends markers - I made this card last week where I 'reverse coloured' the same pattern - you can see that card here if you missed it. This time I coloured the actual flowers in shades of purple and green and included a larger vertical panel, accenting with a diecut sentiment in black and white again using the Amazing Thanks Dies and pairing with a stamped 'YOU' from the 'Art Gallery' stamp set.


This paper and those fabulous Amazing Thanks Dies are all retiring at the end of this month - add them to your shopping basket via the links below whilst you still can!

Here is the visual summary of the key products used on today's project for you to pin for easy reference:


You can see all of my 'How To' summaries on my 'How To - Tips and Techniques' Pinterest board in case you've missed any. 

Enjoy your day and I'll be back tomorrow with another project. Until then, happy stampin'!


Stampin' Up! Supplies Used:

Table built using Product Table Builder by The Crafty Owl - Independent Stampin' Up! Demonstrator.

You Are Amazing Slimline Birthday Card

by Joanne James19. April 2023 19:00

I've a late post today but as promised I'm sharing a card that uses the same layout as yesterday's, this time using a trio of colours from the current Sunday Stamps palette:


I chose the two pinks and Starry Sky as my co-ordinating dark blue for a bright slimline birthday card - take a look:


Here's the low-down on today's card:

The card has a few more layers than yesterday and is all about the colour! I used the fabulous large floral die as my focal point then overlaid with the other diecut sentiment in the Amazing Thanks set, having combined this with a stamped sentiment from the Art Gallery set for a colourful birthday card:

This card is still easy to pull together and impactful with the hot pink! I thought this card might work with the addition of a sparkly diecut number as I have lots of friends and family celebrating milestone birthdays in the next few months. I need a card for an 18th birthday, so consulted with the James Juniors for their thoughts and was told in no uncertain terms that this was a card more suitable to older (much older!!) ladies! Oh well - clearly I might be the mother of two teenagers, but what do I know?! Back to the drawing board on that one!

Here is the visual summary of the key products used on today's project for you to pin for easy reference:


You can see all of my 'How To' summaries on my 'How To - Tips and Techniques' Pinterest board in case you've missed any. 

Enjoy your evening and I'll be back tomorrow with another project. Until then, happy stampin'!


Stampin' Up! Supplies Used:

Table built using Product Table Builder by The Crafty Owl - Independent Stampin' Up! Demonstrator.

Mint Macaron Perfectly Penciled Thank You Card CCS 509

by Joanne James18. April 2023 12:00

It's Tuesday and time for a new challenge over at CAS Colours & SketchesThis week's challenge is a sketch challenge and Valerie has asked that we create a slimline card with a square feature and overlapping sentiment:


Feel free to flip or rotate the sketch when making your card but remember to make it a slimline if you'd like to be considered for the winner's spot for this challenge. 

For my card today I ended up making two cards; I'll share the first one tomorrow as it was a little less clean and simple than I'd have liked. This is the card I settled on to share with you today:


Here's the low-down on today's card:

This is actually a no-stamping card. I used a piece of the retiring black and white Perfectly Penciled designer series paper and coloured the negative space around the florals using my Mint Macaron Blends, before cutting it out using one of my square Stylish Shapes Dies. I added this to a base of thick Basix White cardstock, and then added a layered thanks sentiment cut with the Amazing Thanks Dies on dimensionals to complete my card:

The Perfectly Penciled papers are great for colouring with your Stampin' Blends markers and this 'reverse colouring' really allows the black and white design to stand out. This paper, along with Mint Macaron and all its accessories and those fabulous Amazing Thanks Dies are all retiring at the end of this month - add them to your shopping basket whilst you still can - or maybe wait until 11pm this evening when the 24 hour free shipping promotion starts - you can read more about the free shipping promotion here!

I'm also linking today's card to the black, white and one colour challenge over at Color Dare and the current 'anything goes' challenge at Less Is More.


Here is the visual summary of the key products used on today's project for you to pin for easy reference:


You can see all of my 'How To' summaries on my 'How To - Tips and Techniques' Pinterest board in case you've missed any. 

As a reminder, for our colour challenges, you must use all of the stated challenge colours. You may also use neutral colours; however, the challenge colours should be the most noticeable ones featured on your card. We use Stampin' Up! color names for reference, but you are welcome to use any other companies' products as long as you match the challenge colours as closely as possible.

Enjoy your day and I'll be back tomorrow with another project. Until then, happy stampin'!


Stampin' Up! Supplies Used:

Table built using Product Table Builder by The Crafty Owl - Independent Stampin' Up! Demonstrator.

Sunshine Prints You Are Amazing Card

by Joanne James23. January 2023 09:00

Happy Monday everyone! Today I'm sharing another card using Jacquie's layout over at Freshly Made Sketches, this time paired with the palette over at Color Throwdown:


I thought Jacquie's layout was perfect to showcase a beautiful piece of designer series paper and I had just the sheet - take a look:


Here's the low-down on today's card:

Do you ever buy a pack of paper that you just don't want to cut into? This particular design in the Sun Prints pack was one of those for me! The botanical prints are so delicate and the cyanotype style of the papers gives them a beautiful soft and organic feel. I carefully chose a corner of my sheet and cut it to fit my centre panel, using a piece without a print for my mat layer and diecut sentiment. The Color Throwdown palette immediately made me think of the SunPrints papers, as grey is also a colour that features in this pack, albeit not on the sheet I wanted to use. The banner across the front of the sketch was a great way to incorporate the grey and add a touch of contrast though so both elements fitted together perfectly: 


That paper is so beautiful - sometimes you have to just #loveitchopit! 

Here is the visual summary of the key products used on today's project for you to pin for easy reference:


You can see all of my 'How To' summaries on my 'How To - Tips and Techniques' Pinterest board in case you've missed any. 

Enjoy your day. Mine will be filled with household chores, but needs must! I'll be back tomorrow with another project. Until then, happy stampin'!


Stampin' Up! Supplies Used:

Table built using Product Table Builder by The Crafty Owl - Independent Stampin' Up! Demonstrator.

Clean and Simple Dots and Spots Thank You Card

by Joanne James1. October 2022 18:00

Happy World Card Making Day everyone! No cardmaking for me today as both the James Juniors were hosts at their respective school open days this morning then one played hockey and I took the other to the theatre to watch 'An Inspector Calls'. I thought I'd pop by with a quick post to share a card that was inspired by the challenge over at AAA Cards that I made last week and have finally found time to blog.

I love the bright colours of the inspo photo and went with the option of dots & spots too for today’s no-stamping card - take a look:


Here's the low-down on today's card:

I used the Dots and Spots die for my background and cut it in each of the colours, so that once I’d put my Coastal Cabana panel onto my white card base, I could use some dots in the remaining colours to fill in some of the holes.

I added a layered diecut sentiment from the Amazing Thanks dies popped up on some dimensionals to complete my card:


That’s it - done! A perfect quick thank you and no stamping required!

Here is the visual summary of the key products used on today's project for you to pin for easy reference:


You can see all of my 'How To' summaries on my 'How To - Tips and Techniques' Pinterest board in case you've missed any. 

Enjoy your evening and I'll be back tomorrow with my card for this week's Paper Players challenge where I am the hostess this week. Until then, happy stampin'!


Stampin' Up! Supplies Used:

Table built using Product Table Builder by The Crafty Owl - Independent Stampin' Up! Demonstrator.

Awash In Beauty Garden Blooms Pair PP598

by Joanne James3. July 2022 08:00

Today it's Sunday and time for this week's new challenge over at The Paper Players! It's Laurie's turn to host this week and she has a theme challenge for us to work with:


We are a green-fingered bunch in the James household, however at this time of year the only flowers are those that have a fruit or vegetable attached - strawberries, climbing beans, courgettes and tomatoes to name a few. I don't have any vegetable stamps though, but never fear - this week's challenge can include everything from greenery, houseplants flowers and everything in between! I love flowers and with so many creative options, I was spoiled for choice. I was a little short on time though, so I decided to choose a beautiful new designer paper and let it do the heavy lifting - take a look:


Here's the low-down on today's card:

The beautiful Awash In Beauty designer paper makes a card all by itself - beautiful watercoloured blooms, with no effort! I added a diecut sentiment and a few iridescent rhinestones, and my card is complete!


I liked this card so much I used another one with the other half of the paper and changed up the sentiment for one from the 'Sending Smiles' bundle:


Check out the subtle sparkle from the rhinestones - so pretty!


I ended up liking this one the best! What about you - do you have a favourite?

Here is the visual summary of the key products used on today's project for you to pin for easy reference:


You can see all of my Product and 'How To' summaries on my 'How To - Tips and Techniques' Pinterest board in case you've missed any. 

Before you reach for your ink and papers, check out what our amazing team has created to inspire you this week:

Here's a quick recap of our challenge rules:
 
1.  Create a new paper project
2.  Upload your creation to your blog with a link back to us and provide a direct link to the post featuring your challenge submission.
3.  Please link your card to no more than four challenges, TOTAL.
4.  Have FUN!

Enjoy your day; ... I'll be back tomorrow with another project. Until then, happy stampin'!


Stampin' Up! Supplies Used: 

Table built using Product Table Builder by The Crafty Owl - Independent Stampin' Up! Demonstrator.

You Are Amazing Patriotic Card Of Sorts PP595

by Joanne James12. June 2022 08:00

Today it's Sunday and time for this week's new challenge over at The Paper Players! It's the turn of the fabulous Claire to host this week and she has a patriotic colour challenge for us to work with:


 I started out today's card not wanting to use anything other than Claire's trio of chosen colours, but also not wanting to create a patriotic Fourth of July card, since living in the UK we don't celebrate American Independence Day so I don't have much cause to send this kind of card. I did end up going a little rogue - take a look at my card below and you'll see what I mean:


Here's the low-down on today's card:

All About The Background - I had seen a great Instagram post recently by the talented Melody Hyde where she used the Sailboat Builder punch to create a fun background (you can see that card here) so decided I would have a go at creating something similar. I punched a whole bunch of red, white and blue sails, then decided to create a pattern using the red and blue ones. How fun is that?!

Patriotism Of Sorts - Having laid out my background, it did look a little plain so I decided to experiment with some tone-on-tone stamping. I did end up using both stars and stripes, creating my patterns using a tiny star from the 'Penguin Place' stamp set (available again 1st July) and some stripes using an old retired set called 'Your Presents'. Now before the eagle-eyed amongst you point out that my stars and stripes are the wrong way around for the American flag: I know - I stamped a whole bunch of sails, with red stars, blue stars, red stripes and blue stripes and decided this was the pattern combo I liked best - and since I wasn't setting out to create a 4th July card, that was fine. When I came to write up my post though I did have second thoughts and I did wonder if I should have gone with blue stars and red stripes, for fear that my American readers might question my patriotic allegiance or flag knowledge - but I'm hoping my explanation is sufficient to prevent me from a barrage of patriotic fury! Or even a different pattern altogether!! Of course, if you wanted to use this idea to create a stars-and-stripes 4th July card, be my guest - and do share your version with me!

Anyway, back to the card - you can see the detail of my tone-on-tone stamping below; I really like the resulting effect:


Amazing Thanks - I finished my card with a simple 'you are amazing' die cut sentiment using the Amazing Thanks Dies - I can use this card as a card to celebrate any kind of achievement. The sentiment also works well if you do want to use a similar layout and idea for a truly patriotic card to celebrate the achievements of those who fought for the independence of the USA from the British Empire all those years ago - you just need to switch those stars and stripes!

So what do you think? I love the way the Sailboat Builder Punch is used in such an unexpected way to create a fun background. Do you have any other punches that you use in interesting ways? Do leave me a comment below - I would love to hear your ideas!

Here is the visual summary of the key products used on today's project for you to pin for easy reference:


You can see all of my Product and 'How To' summaries on my 'How To - Tips and Techniques' Pinterest board in case you've missed any. 

Before you reach for your ink and papers, check out what our amazing team has created to inspire you this week:

Here's a quick recap of our challenge rules:
 
1.  Create a new paper project
2.  Upload your creation to your blog with a link back to us and provide a direct link to the post featuring your challenge submission.
3.  Please link your card to no more than four challenges, TOTAL.
4.  Have FUN!

Enjoy your day; we will be having some early birthday celebrations today, as the eldest of the James Juniors turns 17 this week but since it's a super busy school week, we are spreading out the celebrations and going with a 'little and often' rather than 'one and done' approach! I'll be back soon with another project. Until then, happy stampin'!


Stampin' Up! Supplies Used: 

Table built using Product Table Builder by The Crafty Owl - Independent Stampin' Up! Demonstrator.

Playful Alphabet Brilliant Rainbow and Sequins CAS Shaker Cards CCS 467

by Joanne James26. April 2022 13:00

00It's Tuesday and time for a new challenge over at CAS Colours & Sketches. This week it's our final challenge for the month of April and Bhavya has asked that we create something with three distinct sentiment elements for her final sketch challenge:
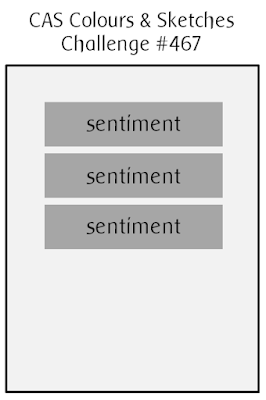
 

Feel free to flip or rotate the sketch when making your card. For my card today I ended up creating not one, not two but three cards! I'm sharing my favourite one first - a clean and simple shaker card - take a look:
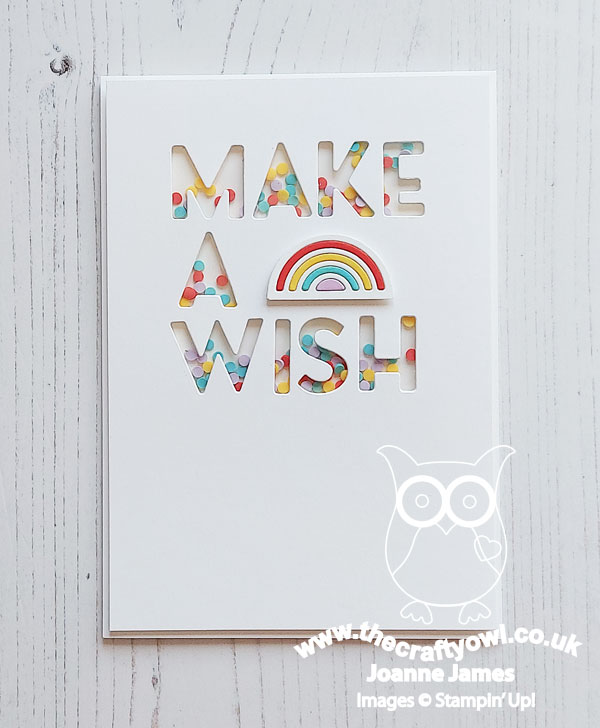
 

Here's the low-down on today's card:

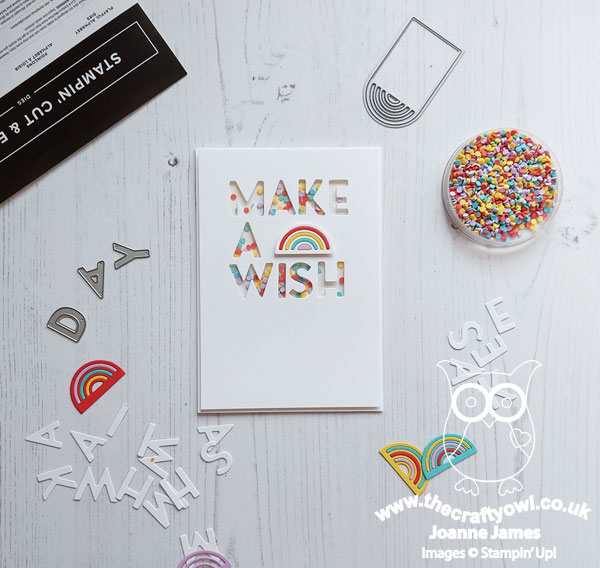
Farewell Playful Alphabet Dies - Time to say goodbye to a craftroom staple - the Playful Alphabet Dies! Yes, they are retiring with current annual catalogue next week and newsflash - there are NO alphabet die sets in the new annual catalogue, so not only will I be hanging on to my set, if you don't have them you have just one week to nab a set! I can't recommend them highly enough: they are so useful for personalising cards, but also to create bespoke messages or greetings. Use them flat or on dimensionals, or as I've done here to create a bespoke message that I then backed with window sheet to create a fun clean and simple shaker card! How cool is this?
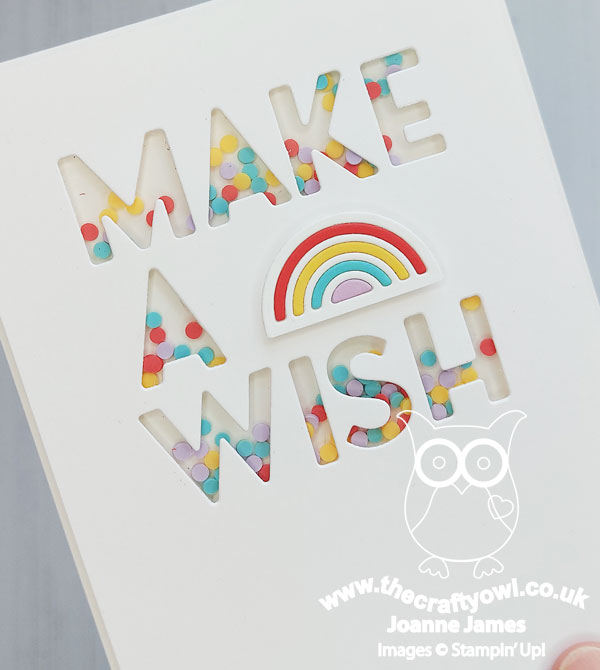
 

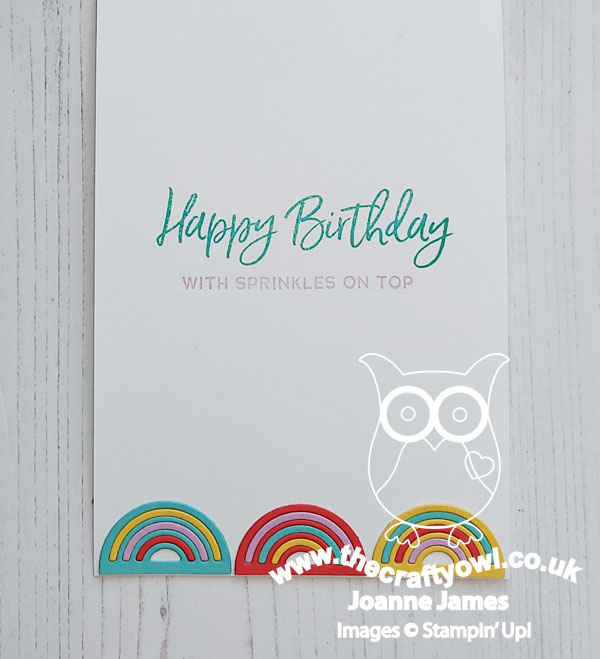
Rainbows or Candles? - My initial shaker was inspired by the inspiration challenge of 'make a wish - rainbows' over at TGIF Challenges this week and I paired my simple message with a paper-pieced rainbow made using my Beautiful Rainbow Dies and some scraps of cardstock in Poppy Parade, Daffodil Delight, Coastal Cabana and Fresh Freesia to co-ordinate with the (retired) Ice Cream Shaker Sprinkles that I used inside my shaker. I used my rainbow offcuts to add a decorative border to the inside of my card, along with a sentiment from the retiring 'Sweet Ice Cream' stamp set:
 

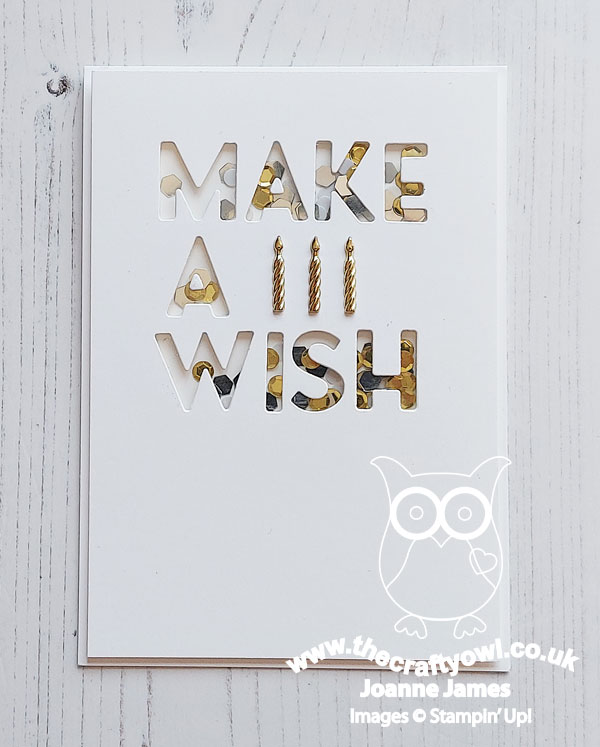
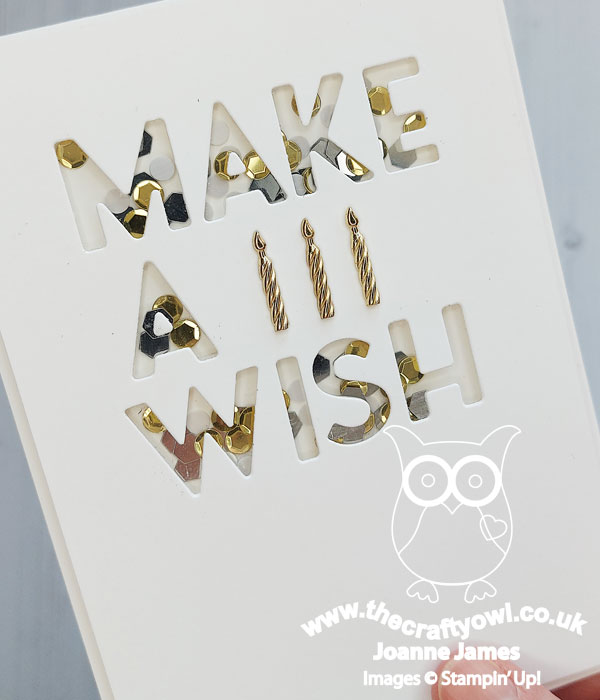
I liked this card so much, I made another one, this time using the retiring white, gold and silver Sequins For Everything (currently half price) for my shaker and a trio of (retired) gold Candle Embellishments I found on my shelf:
 

Check out the sparkles - how fun!
 

Here are both shakers together - which one do you prefer?
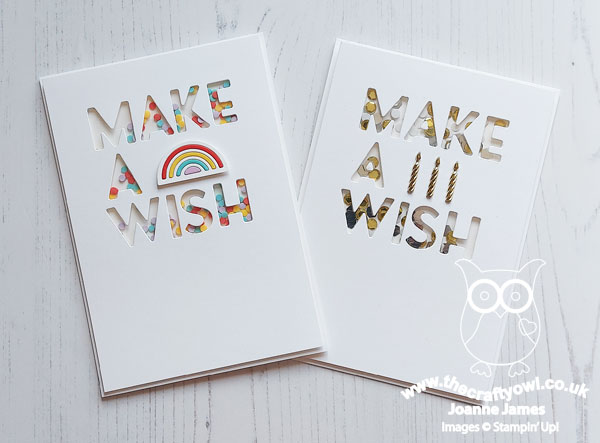
 

I honestly can't decide - I love this design so much I think I'm going to make a whole bunch more!!

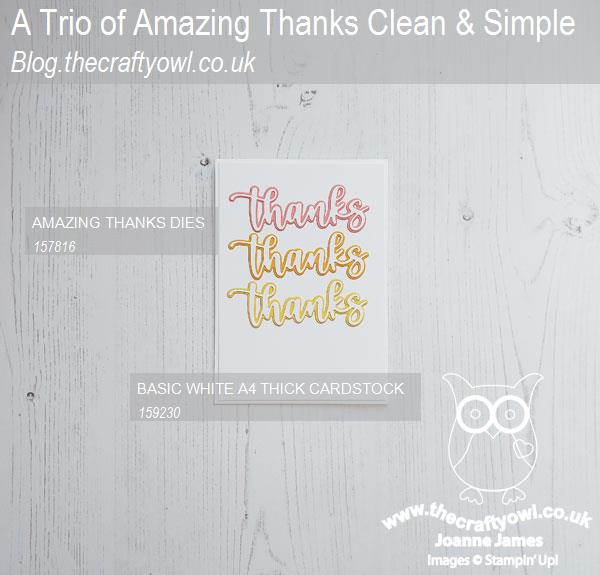
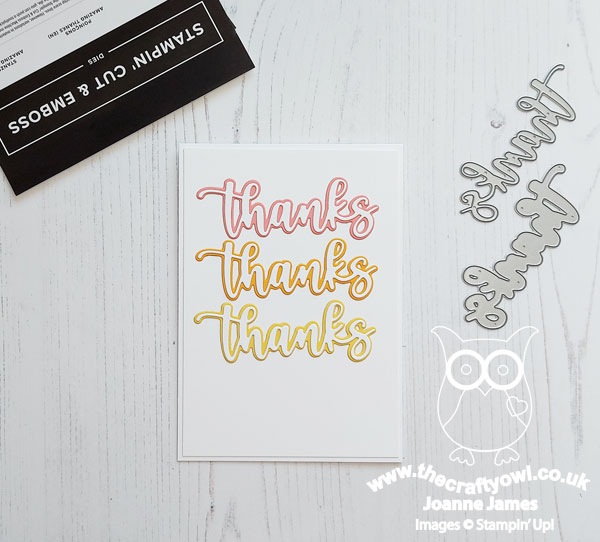
A CAS Thankyou Trio - Finally I have one extra 'bonus' card for you, that was the one I made before my shakers - a super simple repeating 'thanks' sentiment using a trio of dies cut with the Amazing Thanks Dies, with each one backed by the fresh colours of the current Color Dare challenge:
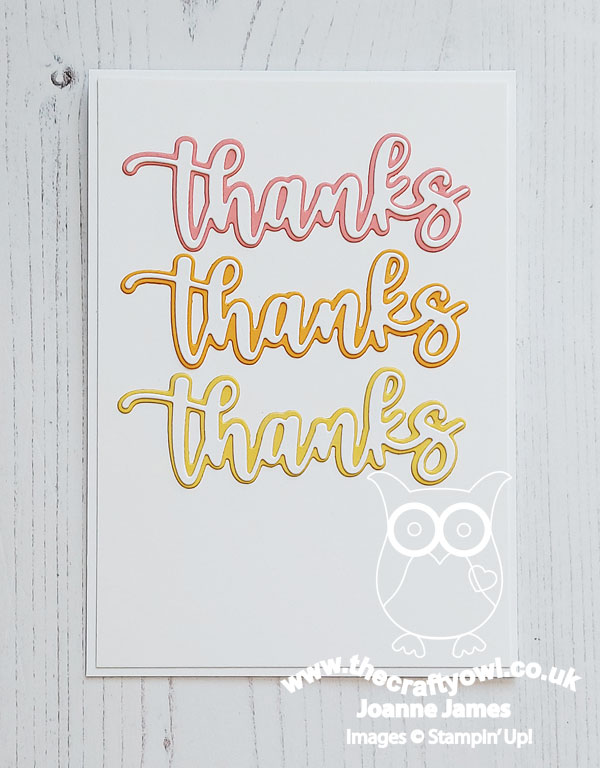
 

By using the colour for the base layer of the diecut and making the top layer white, it allows for a white base and preserves the clean and simple feel with all that 'white space'. This is a great way to use up scraps and whilst I love the fresh colour combo I used on today's card - Flirty Flamingo, Mango Melody, Daffodil Delight - this simple layout would work with whatever colours you have available.

Here are the visual summaries of the key products used on today's projects for you to pin for easy reference:
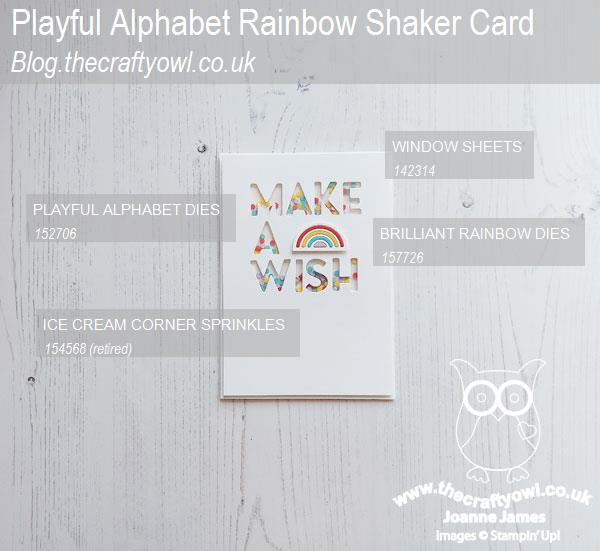
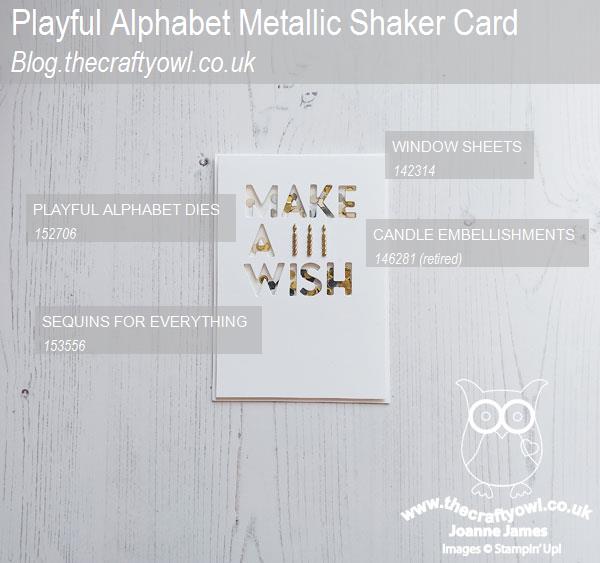


You can see all of my 'How To' summaries on my 'How To - Tips and Techniques' Pinterest board in case you've missed any. 

I actually made four cards for today's challenge; the first one was mediocre at best; I had an idea that just didn't look right when I made it - so much so, I'm not even going to share it with you!  So I left it and when I went back to desk 24 hours later, I started fresh and came up with my thankyou trio, quickly followed by my fun shaker cards - suddenly I was on a creative roll! Does that ever happen to you when your creating? How do you combat that feeling you get when you've made something but are just not 'feeling' it? Do leave me a comment below - I'd love to hear from you!

Enjoy your day; the James Juniors are both back to school today following the Easter break so I will be aiming to get more work done this week. This is a super-busy term, with everything from cricket fixtures to the school musical production, internal exams, speech days, university open days and lots more besides! I really do need to get organised!! On that note, I'll be back tomorrow with another project. Until then, there's work to do - happy stampin'!
    

Stampin' Up! Supplies Used:

Table built using Product Table Builder by The Crafty Owl - Independent Stampin' Up! Demonstrator.


Jewelled Trellis Thank You Card

by Joanne James7. March 2022 14:30

Happy Monday everyone! After a weekend out of action, I am feeling slightly better today and this morning had time to finish my card for this week's Freshly Made Sketches challenge:


I love Karren's sketch this week - wide open to interpretation. So much so, the eagle-eyed amongst you will have noticed I used the same layout for my Paper Players card that I posted yesterday (you can see that card here if you missed it). I didn't link that one up as whilst I loved the end result I felt it wasn't really 'clean' enough to do Karren's sketch justice. Not the case for today's card though - take a look:


Here's the low-down on today's card:

Slim Card Dies Trellis - The central panel of the sketch is perfect to showcase diecut detail; I used one of the Slim Card Dies in gold foil to create something that reminds me of a Moroccan trellis, cut down though to fit a standard sized card front. Just because the dies are made for slimline cards, doesn't mean they can't be used in this way too.  

Jewels of Colour - The colour scheme for today's card comes from the palette over at TGIF Challenges this week. This is not a trio of colours I would usually use together, but I thought they would make a rich blended backgound of graduated colour - the perfect backdrop for my trellis. As a bonus, I wanted to pick out elements of the trellis design with rhinestones or similar, and following a perusal of my collection found that the 2020-22 In Color Enamel Dots were perfect; two of the colours were spot on, and the Cinnamon Cider ones worked for the Soft Suede portion of my card where I only needed a couple because of my sentiment position (which I chose with this in mind). I think the addition of the enamel dots really makes a feature of the design:


Amazing Thanks - This is one of those rather rare no-stamping cards; I chose to use a layered 'thanks' diecut from the Amazing Thanks dies for my sentiment, layering gold foil onto Magenta madness layered with vellum to tone down the pink. These dies really are a keeper - so very useful! There will be some stamping on the inside of this card, but for the time being it's blank as I might use it for a specific type of thank you card. 

I really like this card and whilst this isn't a colour combo I would ordinarily have chosen (and in fact I originally made this card in an alternative colourway) I think it really makes it. I think it has a  very Aladdin and Arabian Nights vibe!

Here is the visual summary of the key products used on today's project for you to pin for easy reference:


You can see all of my 'How To' summaries on my 'How To - Tips and Techniques' Pinterest board in case you've missed any. 

Right - I'm off to squeeze in a few jobs before heading out on the school run. Enjoy the rest of your day and I'll be back tomorrow with another project. Until then, happy stampin'!


Stampin' Up! Supplies Used:

Table built using Product Table Builder by The Crafty Owl - Independent Stampin' Up! Demonstrator.

Mini Catalogue

BROWSE THE CATALOGUE

The mini catalogue is now live! Read and download your copy here.

Shop Online

Access my online shop 24 x 7, 365 days of the year:

Current March hostess code:

S9F2XJJW

Shop Online

Join My Team

It's always a great time to join Stampin’ Up! New team members can get £130 worth of products for only £99 + free business supplies + free shipping + all the fun being a part of Stampin’ Up! Stampin' Up! has something for everyone: join my growing team and benefit from my support to enjoy Stampin' Up! however you choose.

If you're interested, call me for a chat to understand how I can help you realise your goals. Alternatively, if you have already decided to sign up and you just can't wait, please click here for the link to the online form where you can sign up and order your starter kit right away! 

Latest Kit!

Stampin Cut and Emboss

The Rock Legend Kit has all you need to make 8 cards with coordinating envelopes. Along with the new Panda Friends Kit, both are available from January 4th for just £14 each - get yours here!

2023-24 Annual Catalogue

BROWSE THE CATALOGUE

Click on the catalogue for a full list of current SU! supplies - if you would like to order any of the items featured, please drop me a line at [email protected] or give me a call on 07773 421446 - I'd be happy to help.

New Online Exclusives

There will be new products available exclusively in the online store from 5 March - check them out here.

About Me

Hi I'm Joanne and live in Northampton and when I'm not looking after my husband and two beautiful children, am an avid crafter with a passion for all things Stampin' Up!

I must confess that I have never been a big rubber stamper - until I discovered Stampin' Up! that is. I love the fact that I can get such great results with co-ordinating stamps, inks, papers and punches - the possibilities are endless! Join me on my stamping journey as I share the things I love and be inspired to create amazing things yourself!

Follow Me

Monthly Newsletter

Box Builder

Click the button above to use Box Buster to create your custom box design using the Envelope Punch Board!

Kits Collection Now Available!

Stampin Cut and Emboss

The new Kits Collection from Stampin' Up! is now available!

Click here to see the current kits available and order yours online today.

I Design For


Stampin' Up Stuff

This is my personal blog and is not endorsed by Stampin’ Up! I hope you find it a plentiful source of ideas and personal inspiration but please don't copy my designs for contest submission or use for classes, publication or sale without express permission.