Bon Voyage Swirly Bird Boat Card

by Joanne James17. April 2017 04:00

Happy Easter Monday everyone! I hope you all enjoyed your fill of chocolate eggs yesterday - I know that we had more than our fair share here in the James household for sure! Today I'm sharing a card for this week's sketch over at Freshly Made Sketches:

I love Jen's sketch this week and knew immediately what I wanted to do with it; eventually on Saturday I managed to find some time to create - take a look:


Here's the low-down on today's card:

A Swirly Boat and Scribble - I used the edge of my wavy sea thinlit in my Swirly Scribble set to create the curved line as per in the sketch (I actually flipped my Very Vanilla piece over and used the reverse so that my wave followed the same contours as the sketch). This was the starting point for my card and everything else followed from there. I stamped my Swirly Bird boat and background splatters onto the Vanilla section, then fussy cut the sail and popped it up on a dimensional, having heat embossed the Calypso Coral sail with copper embossing powder for added shine. The Swirly Bird stamp set and co-ordinating Swirly Scribble thinlit dies are one of my favourite bundles in the current annual Stampin' Up! catalogue and I'm so pleased that they are carrying over into the new 2017-18 catalogue. The discounted bundle price won't be carrying over though, so if you want to save 10% by purchasing them together be sure to order them before the new catalogue goes live on 1st June.

By The Sea Shore - I used a layer of the retiring By The Shore paper for the bottom part of my card to provide the perfect seascape. I will be so sorry to see this paper leave us! It's still available on the retiring list whilst stocks last, so snap some up now before it's too late.

A Bon Voyage Banner - I decided to use a pair of curved sentiments from the 'Banners For You' set on my card today; they followed the contours of the curved edge perfectly and made for a fun 'Bon Vogage' type card. 

Here is the visual summary of the key products used on today's project for you to pin for easy reference:


You can see all of my 'How To' summaries on my 'How To - Tips and Techniques' Pinterest board in case you've missed any. 

Enjoy your day and I'll be back tomorrow with another project. Until then, happy stampin'!


Stampin' Up! Supplies Used:

Table built using Product Table Builder by The Crafty Owl - Independent Stampin' Up! Demonstrator.

A Gift Of Love Quilt-Inspired Valentine's Card

by Joanne James5. February 2017 09:00

It's Sunday and time for this week's new challenge over at The Paper Players! It's the turn of my sweet friend Claire to host this week and she has a timely theme challenge for us to work with:


I've been sharing lots of Valentine's-themed cards with you in recent weeks, almost all of which have featured the Sealed With Love bundle and Sending Love Designer Series Paper. For today though I wanted to go back to some products in the annual catalogue that would make a Valentine's card but are not designed specifically with that in mind. I had a few bits and pieces out on my desk, then when I saw this week's inspiration photo over at Fusion I knew exactly where I was headed - I even used the sketch layout too (turned through 90 degrees). Here's what I came up with:


Here's the low-down on today's card:

A Quilt Of Love - I drew inspiration from a number of elements of the Fusion photo for my card: the border of pink flowers (courtesy of the Jar of Love stamp set), the cream textured panel (created with the Happy Heart Textured Impressions Embossing Folder) and the red flower-entwined heart as a focal point. My colour scheme also came directly from the photo - here it is if it's one you would like to save to use too:


Have A Heart - I die cut the heart from the Sunshine Wishes Thinlits set and embellished this with flowers from the Jar of Love set and leaves from Swirly Bird too. 

A Gift Of A Sentiment - The sentiment on my pale pink banner comes from the exclusive hostess set 'A Gift of Love'. I love the soft script of the sentiments in this set and think this one is such a lovely way to let someone know how much they mean to you. 

I think this is a pretty Valentine's card that makes a softer alternative to the bright red and white colour schemes of my previous cards. I'm also linking up with the team over at SUO Challenges where they are also celebrating Valentine's this week.

Here is the visual summary of the key products used on today's project for you to pin for easy reference:


You can see all of my Product and 'How To' summaries on my 'How To - Tips and Techniques' Pinterest board in case you've missed any. 

Before you reach for your ink and papers, check out what our amazing team has created to inspire you this week:

The Paper Players Design Team
 
 
Here's a quick recap of our challenge rules:
 
1.  Create a new paper project
2.  Upload your creation to your blog with a link back to us and provide a direct link to the post featuring your challenge submission.
3.  Please link your card to no more than four challenges, TOTAL.
4.  Have FUN! 


I look forward to seeing what you create with our fun theme this week. Enjoy the rest of your weekend as it will be over all too quickly; we have a morning of sport and one of the James Juniors has a trampolining birthday party to attend this afternoon. I'll be back tomorrow with another project; until then, happy stampin'!


Stampin' Up! Supplies Used: 

Table built using Product Table Builder by The Crafty Owl - Independent Stampin' Up! Demonstrator.

Swirly Scribbles Flower Wreath Thank You

by Joanne James1. September 2016 08:05

This is my second post of the the day; if you missed my earlier post that tells you all about the new Stampin' Up! Autumn-Winter Seasonal Catalogue that launches today, click here. Today it's time for a new challenge over at Create With Connie and Mary and this week we have a colour combination for you:


These colours are not quite autumnal and to be honest I'm still firmly in summer mode as far as the weather is concerned, but I decided they would make a nice wreath. Here's my card:

Here's the low-down on today's card:

Swirly Scribbles Wreath - I used the largest 'scribble' in Sahara Sand for my wreath and backed it with some linen thread to break up the coral panel behind. I just love these thinlits - they are so versatile!

Swirly Bird Flowers - I stamped the three different flower designs in the other two challenge colours and used them to decorate the edge of my rustic wreath. I added some in-colour DSP in Peek-a-boo Peach to my card base too, as it really compliments the flowers.

A Thoughtful Banner -  I balanced my wreath with a sentiment from Thoughtful Banners, punched out with the Duet Banner Punch. I actually punched two of the banners so that I could pop up the central section for a little added dimension. A peach ribbon bow finishes my card.

I found this quite a challenging colour combination, as I'm not a big lover to orange on my cards, yet I really like how this one turned out. Ironic that the neutral was the colour I used the least of - go figure!

Here is the visual summary of the key products used on today's project for you to pin for easy reference:


You can see all of my 'How To' summaries on my 'How To - Tips and Techniques' Pinterest board in case you've missed any. 

Do visit the other Design Team members to see what they did with this week's colours; there's lots of inspiration over on their blogs too!

Enjoy your day; I'm having a little break at the seaside but will be back with a post for the new challenge over at The Paper Players on Sunday, if not before (it all depends on my wifi!) Until then, happy stampin'!


Stampin' Up! Supplies Used:

Table built using Product Table Builder by The Crafty Owl - Independent Stampin' Up! Demonstrator.

Swirly Bird Flowers Thank You Card

by Joanne James7. July 2016 08:05

Today it's time for a new challenge over at Create With Connie and Mary and this week we have a colour combination for you:


I initially was drawn to the lovely Fruit Stand designer series paper to make today's card, but when I'd finished my card decided it didn't have enough Cucumber Crush so decided to take a different approach. I will share my Fruit Stand card another day, but for now this is the card I came up with:


Here's the low-down on today's card:

Swirly Bird Scribble Flowers - I've been longing to use my Swirly Bird stamp set and co-ordinating Swirly Scribbles Framelits to create a modern floral card and today's bright and fresh colour combination provided the perfect opportunity. I stamped the bases in Peekaboo Peach and used the Scribbles in Tangerine Tango for a real pop of juicy colour. The Cucumber Crush provides wonderfully bright leaves and I added a few enamel dots too here and there.

Playful Palette Border - The hatched pattern from the Playful Palette DSP stack comes in both pink and Peekabooo Peach and it provided the perfect border for my card. I added a strip of Customer Crush to the stamped panel too for definition and contrast.

Thank You Tin of Cards - The sentiments in the 'Tin of Cards' stamp set are some of my 'go to' sentiments, I love the size and style of the scripting so much. Thank you Stampin' Up! for keeping this set, even though the Tin of Cards kit has had a refresh and makeover and now has a new set that co-ordinates with it. 

Here is the visual summary of the key products used on today's project for you to pin for easy reference:


You can see all of my 'How To' summaries on my 'How To - Tips and Techniques' Pinterest board in case you've missed any. 

Do visit the other Design Team members to see what they did with this week's colours; there's lots of inspiration over on their blogs too!

Enjoy your day and I'll be back tomorrow with another project; until then, happy stampin'!


Stampin' Up! Supplies Used:

  • Swirly Bird Photopolymer Bundle
  • Playful Palette Designer Series Paper Stack
  • Tin Of Cards Photopolymer Stamp Set
  • Cucumber Crush A4 Cardstock
  • Very Vanilla A4 Cardstock
  • Tuxedo Black Memento Ink Pad
  • Peekaboo Peach A4 Cardstock
  • Cucumber Crush Classic Stampin' Pad
  • Peekaboo Peach Classic Stampin' Pad
  • 2016-2018 In Color Enamel Shapes

Swirly Scribbles Tree Teacher Thank You Cards

by Joanne James6. July 2016 07:00

Happy hump day one and all! Today as promised I have this year's teacher thank you cards to share with you. Both of the James Juniors are moving schools at the end of this term so it feels like there are even more people to thank thank usual. Coupled with the fact that terms ends this week and we have all had packed social calendars, a seriously CAS card capable of mass production was the order of the day! Those of you that follow my blog will know that I generally like to send school thank you cards that are school/teacher themed, so they will often feature school imagery or apples - I don't know if it's just me, but I still think that the 'apple for a teacher' thing holds true!

Here is my final design: 


Here's the low-down on today's card:

Clean and Simple - This card is literally all about the white space! I used Whisper White Extra Thick cardstock for my base and used one simple image - the apple tree - alongside my sentiment to serve as a focal point. I added Cucumber Crush thick baker's twine to one of the cards, but didn't add it to the remainder as it was too much for my ultra clean and simple look.

Swirly Scribbles Meets Tree Builder - I could have created my tree using the Tree Builder Punch in its entirety, but I love the stylised look you get when you switch out the leaves for a Swirly Scribble diecut. I actually used two pieces from the this framelit set: the round Cucumber Crush circle is the inner piece from the large swirly scribble, and the darker Garden Green is the smaller swirly scribble die cut. So don't throw away those middles of the larger scribbles diecut - they have their uses too!

Helping Me Grow - My two-tone sentiment comes from the 'Helping Me Grow' stamp set, which as much as I love the flowers in this set, I must confess I bought it for this sentiment primarily; is there anything more fitting to put on a teacher appreciation card?

Here is the visual summary of the key products used on today's project for you to pin for easy reference:


You can see all of my 'How To' summaries on my 'How To - Tips and Techniques' Pinterest board in case you've missed any. 

I'll be back tomorrow with another project for this week's new challenge over at Create With Connie and Mary; until then, happy stampin'!


Stampin' Up! Supplies Used:

Table built using Product Table Builder by The Crafty Owl - Independent Stampin' Up! Demonstrator.

Swirly Bird World's Greatest Guy Sailing Card

by Joanne James6. June 2016 07:00

Happy Monday everyone! What a lovely day we had here in the UK yesterday - sunshine at last! I'm here bright and early this week as I have a busy one: two monthly technique classes today and tomorrow, my Project Life memory keeping class, a drop-in coffee and card session at Bells in Northampton and my Annual Catalogue Open House at the end of the week to look forward to, amongst other things! Today I'm back with another masculine card, this time for the colour challenge over at Pals Paper Arts:

Pals Paper Arts Color Challenge #PPA303

I thought these colours would suit a little ocean scene - I originally started out with the sketch I used for yesterday's card, but eventually my idea morphed into this:

Here's the low-down on today's card:

Sail Away With The Swirly Bird - It's official - I am in love with the Swirly Bird stamp set and co-ordinating thinlits! This bundle is definitely at the top of my list of favourite things from the new annual catalogue. It has flowers and birds, boats and kites and the splatters you see in the background behind my boat - such a fun set! I stamped my boat in Sahara Sand, then for the sails I stamped one in Night of Navy and the other in Mint Macaron (stamped off first) then overstamped the stripes in Night of Navy and clear heat embossed them for a lovely shine.

A Life on the Swirly Scribbles Ocean Wave - The sea on my card was made using a die from the co-ordinating Swirly Scribbles Thinlits: I cut it out of the top Mint Macaron layer, which was attached to my base layer with dimensionals, and paper-pieced the negative pieces into the space on my Night of Navy base layer. It's a little difficult to see in the photograph, but this gives a lovely added dimension to my rolling waves.

A Swirly Greatest Greeting - I wanted my sentiment to follow the curve of my cardstock, so I used my sentiment from the 'Greatest Greetings' stamp set and curved it to follow the contours of the cut line before adhering to my stamp and stamping it. This is much easier to do with photopolymer stamps, however since I hadn't adhered the word image to the back of the stamp it was a little more sticky than would otherwise have been the case and held in place on my block long enough for me to get a shaped image. I then finished this with some retired Mint Macaron It's My Party enamel dots. 

I love this fresh colour scheme and although my card features only the tiniest pieces of Sahara Sand for the hull of my sail boat, I think my design really makes the most of these colours.

Here is the visual summary of the key products used on today's project for you to pin for easy reference:

You can see all of my 'How To' summaries on my 'How To - Tips and Techniques' Pinterest board in case you've missed any. 

I'm off to get ready for my class. I'll be back tomorrow with another masculine project; until then, happy stampin'!


Stampin' Up! Supplies Used: 

Table built using Product Table Builder by The Crafty Owl - Independent Stampin' Up! Demonstrator.

Swirly Scribbles Bird's Nest Baby Card

by Joanne James22. May 2016 09:00


It's Sunday and time for a new challenge over at The Paper Players! It's the turn of the queen of diecuts, the lovely Laurie, to host our challenge this week and she has a fun sketch for you to play along with:


As you know, I love a good sketch and for my card this week I had so many ideas! I will be using this sketch for my card tomorrow too; today I decided to feature a die from one of my favourite sets from the new catalogue called the Swirly Scribbles Thinlits and make not one, but two, new baby cards featuring two of the new in-colours. 

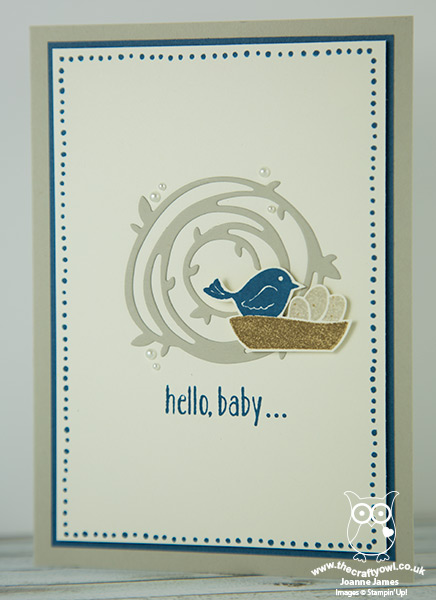
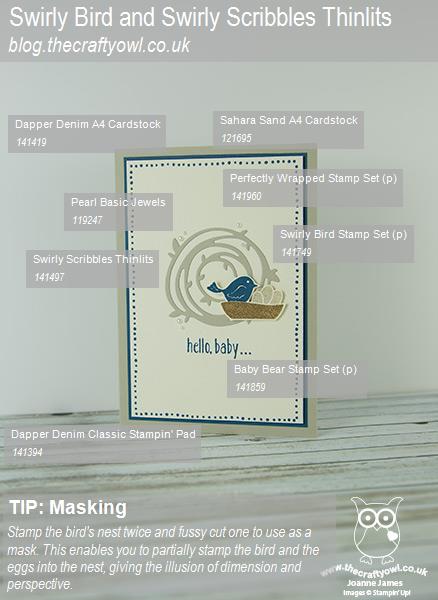
Here is the first one, a baby boy card featuring the new blue, Dapper Denim:
 

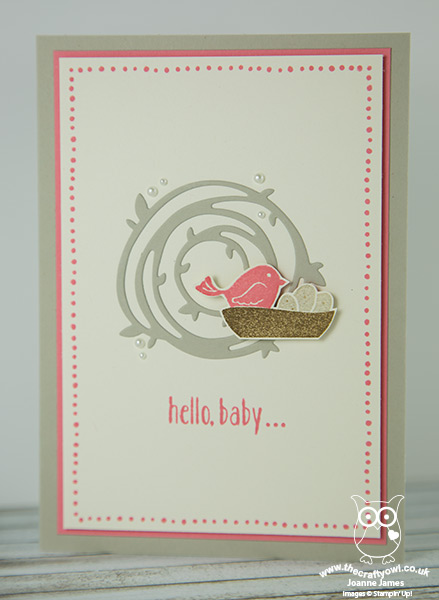
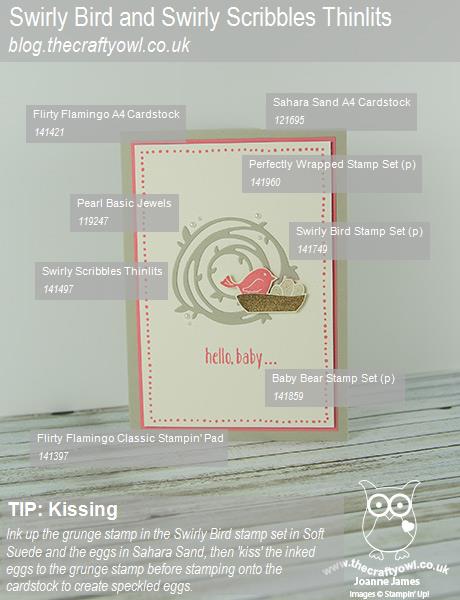
Here is the second baby card, featuring the new pink, Flirty Flamingo: 
 

Now I know I'm biased, but aren't they just the cutest?! Here is the low-down on today's card:

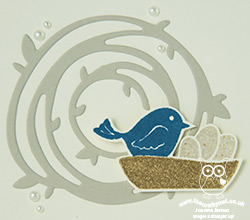
Swirly Scribbles Thinlits - There are some great swirl, flower and leaf dies in this set - the one that I used here makes the cutest bird's nest backdrop for the cute birdie ready to welcome her babies to the world.

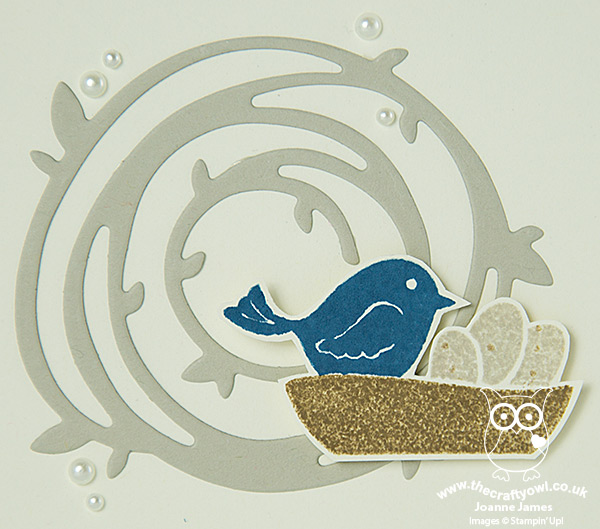
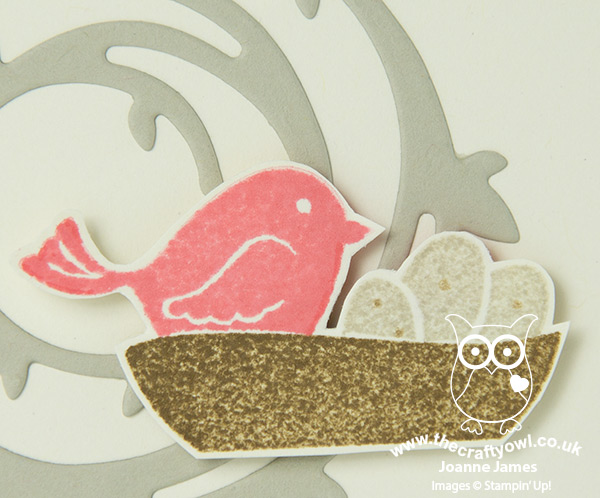
Swirly Bird Masking and Kissing - I did some masking and kissing of the stamps to create my little bird in her nest: first, I stamped the nest twice in Soft Suede, and cut one of them out and used it as a mask so that I could stamp my bird and eggs in the nest. I also created some light speckling on my eggs by inking the 'grunge' stamp in the set in Soft Suede, inking the eggs in Sahara Sand, then 'kissing' the two together before stamping them into the nest. You can get a closer look at this on these close up images below:
 

Perfectly Wrapped Border - I used a mat of each of the new in-colours that I featured on my cards to accentuate the colour and decided to add an additional border detail as per the stitched detail on the sketch. I used one of the border stamps from the 'Perfectly Wrapped' stamp set; this set is photopolymer which makes lining up a breeze. 

Hello Baby Bear - I couldn't finish today's write-up without a nod to the sentiment on today's card. This is one from an adorable set called 'Baby Bear' that also features in the new catalogue and is finished on the inside of the card with '...welcome to the world!'. Perfect for today's card.

I love these dies and the co-ordinating stamp set; you can be sure you'll be seeing lots more projects with them. 

Here is the visual summary of the key products used on today's project for you to pin for easy reference:

Baby Boy Dapper Denim card, with a masking tip:
Flirty Flamingo baby girl card, with a kissing technique tip:
 

You can see all of my 'How To' summaries on my 'How To - Tips and Techniques' Pinterest board in case you've missed any. 

We do rather have birds on the brain in our house at the moment; the baby blue tits in our nesting box hatched about 10 days ago and we are watching the bird cam with interest on a daily basis. There are seven healthy babies and the mum and dad spend many hours each day flying in and out with caterpillars and bugs to feed the young chicks. Here is a photo of them waiting to be fed:


Apologies for the poor photo - the quality isn't great - but I can honestly say watching these little chicks grow is the best tv drama ever, they are so entertaining! Hopefully I'll be able to get some photos of them as they leave the nest when they are grown and share those at a later date.

Before you reach for your ink and papers, check out what our amazing team has created to inspire you this week:

The Paper Players Design Team
 
 
Here's a quick recap of our challenge rules:
 
1.  Create a new paper project
2.  Upload your creation to your blog with a link back to us and provide a direct link to the post featuring your challenge submission.
3.  Please link your card to no more than four challenges, TOTAL.
4.  Have FUN! 


I look forward to seeing how you interpret this week's sketch. We are off to basketball today and are then looking forward to a restful afternoon, with either some time in the garden weather-permitting or indoors watching a movie and the antics of our own baby bird family!

Back tomorrow with another card that also uses this sketch, but is quite different in terms of execution; until then, happy stampin'!


From Land To Sea Turtle One Layer Card

by Joanne James15. May 2016 09:00

It's Sunday and time for a new challenge over at The Paper Players! It's the turn of my good friend LeAnne to host our challenge this week and she has a fun clean-and-simple theme for you to play along with:


For my card this week I wanted to use my 'From Land To Sea' stamp set. I bought this set for the turtle - I love turtles! - but to date have only used the lighthouse stamp, so this week's challenge gave me the opportunity to change that. The ladies over at Less is More have a one layer challenge with the theme 'At Sea' so I'm linking my card with them too, along with the challenge over at Just Add Ink where the theme is 'masking'. I've a new product 'sneak peek' for you today as well! Without further ado, here is my card:


This isn't the first card I made for this week's challenge: I remembered 'wild animal' but forgot 'clean and simple' on my original card, so I will share that one with you later. As far as this card goes though, I just love it! Here's the low-down on how I created my card:

Sea-faring Turtle - Turtles are the one species of sea creature that has always captivated me. I have spent many hours BC (before children!) scuba diving in the warm waters of the Caribbean and nothing ever thrilled me more than to come across a turtle in its natural habitat. They really are so graceful and fascinating to observe. I stamped my turtle in Archival Black ink, once directly onto my extra-thick Whisper White card base, and again onto a post-it note. I cut the second one out and used it as a mask to cover the one on my card base, whilst I sponged in the sea behind. 

Swirly Scribbles Stencil - Secondly, the 'sneak peek'! I made a stencil with the wavy die in the new Swirly Scribbles Thinlits set from the forthcoming new annual catalogue by cutting one and then placing across a masked rectangle behind my turtle. With my turtle masked, I sponged through the stencil with Pool Party, Bermuda Bay and Island Indigo inks to create the seascape and then removed both the stencil and turtle mask and coloured my turtle with inks and a blender pen.

A Teeny Tiny Sentiment - To finish my card, I added a sentiment from the Teeny Tiny Sentiments set. This stamp set has a great variety of sentiments for each and every occasion that are suitably small and work perfectly with this layout. I chose my sentiment with the recipient of my card in mind; we haven't had a diving holiday with our good friends Cathy and Andy in such a long time, so this card is perfect to send to them to remind them that one day we will all dive together again!

Here is the visual summary of the key products used on today's project for you to pin for easy reference:


You can see all of my 'How To' summaries on my 'How To - Tips and Techniques' Pinterest board in case you've missed any. 

Before you reach for your ink and papers, check out what our amazing team has created to inspire you this week:

The Paper Players Design Team
 
 
Here's a quick recap of our challenge rules:
 
1.  Create a new paper project
2.  Upload your creation to your blog with a link back to us and provide a direct link to the post featuring your challenge submission.
3.  Please link your card to no more than four challenges, TOTAL.
4.  Have FUN! 


I look forward to seeing your wild animal CAS creations this week. We have double basketball today: training this morning them both James Juniors are playing at a tournament this afternoon - on opposing teams! One is playing for school and the other for club, so that should be interesting!!

Back tomorrow with another project; until then, happy stampin'!


Stampin' Up! Supplies Used:

Table built using Product Table Builder by The Crafty Owl - Independent Stampin' Up! Demonstrator.

Mini Catalogue

BROWSE THE CATALOGUE

The mini catalogue is now live! Read and download your copy here.

Shop Online

Access my online shop 24 x 7, 365 days of the year:

Current April hostess code:

VDKNV7BH

Shop Online

Join My Team

It's always a great time to join Stampin’ Up! New team members can get £130 worth of products for only £99 + free business supplies + free shipping + all the fun being a part of Stampin’ Up! Stampin' Up! has something for everyone: join my growing team and benefit from my support to enjoy Stampin' Up! however you choose.

If you're interested, call me for a chat to understand how I can help you realise your goals. Alternatively, if you have already decided to sign up and you just can't wait, please click here for the link to the online form where you can sign up and order your starter kit right away! 

Latest Kit!

Stampin Cut and Emboss

The Rock Legend Kit has all you need to make 8 cards with coordinating envelopes. Along with the new Panda Friends Kit, both are available from January 4th for just £14 each - get yours here!

2023-24 Annual Catalogue

BROWSE THE CATALOGUE

Click on the catalogue for a full list of current SU! supplies - if you would like to order any of the items featured, please drop me a line at [email protected] or give me a call on 07773 421446 - I'd be happy to help.

New Online Exclusives

There are new products available exclusively in the online store from 5 March - check them out here.

About Me

Hi I'm Joanne and live in Northampton and when I'm not looking after my husband and two beautiful children, am an avid crafter with a passion for all things Stampin' Up!

I must confess that I have never been a big rubber stamper - until I discovered Stampin' Up! that is. I love the fact that I can get such great results with co-ordinating stamps, inks, papers and punches - the possibilities are endless! Join me on my stamping journey as I share the things I love and be inspired to create amazing things yourself!

Follow Me

Monthly Newsletter

Box Builder

Click the button above to use Box Buster to create your custom box design using the Envelope Punch Board!

Kits Collection Now Available!

Stampin Cut and Emboss

The new Kits Collection from Stampin' Up! is now available!

Click here to see the current kits available and order yours online today.

I Design For


Stampin' Up Stuff

This is my personal blog and is not endorsed by Stampin’ Up! I hope you find it a plentiful source of ideas and personal inspiration but please don't copy my designs for contest submission or use for classes, publication or sale without express permission.