Layers of Beauty Petunia Pop Thank You Card

by Joanne James20. September 2024 09:00

It's Fri-yay! Today I'm sharing a card that I made earlier in the week with a few challenges in mind:


The team over at The Flower Challenge want us to include a stamped flower, so I grabbed my Layers of Beauty stamp set and stencils and using the layout over at Tuesday Morning Sketches set to work - take a look:


 Here's the low-down on today's card:

Layers of Beauty - I love the single large floral spray stamp in the 'Layers of Beauty' stamp set and with a stamping platform, it's so easy to use - just ink and stamp! I used my coordinating stencils to colour it in using three shades of lilac/pink, one for each layer - the effect adds so much dimension:

The team over at Inkspirational have been asking us for coloured images using any medium - so this is my entry. I added a few shiny pearls for a little extra decoration.

Eyelet Embossing - The main stamped image takes up all of my layer, but I wanted to add a hint of something to my base beneath. I embossed it with the Eyelet 3D embossing folder for a little extra texture, and rolled the corner of my stamped panel to reveal a little more of it.

Scraps For Tags - I stamped and coloured my image twice, as I wanted to fussy cut a single rose to anchor my sentiment banner (I could have used one of the dies to cut this out, but I didn't want the white border). This did then leave me with a lot of the image left over; rather than waste it, I cut a couple of tags from it and added a sentiment:

Waste not, want not as they saying goes!

Here is the visual summary of the key products used on today's project for you to pin for easy reference:


You can see all of my 'How To' summaries on my 'How To - Tips and Techniques' Pinterest board in case you've missed any. 

Enjoy your day and I'll be back tomorrow with another project. Until then, happy stampin'!


Stampin' Up! Supplies Used:

Table built using Product Table Builder by The Crafty Owl - Independent Stampin' Up! Demonstrator.

Sending Birthday Wishes In Pink CCS 511

by Joanne James16. May 2023 13:00

It's Tuesday and time for a new challenge over at CAS Colours & SketchesThis week's challenge is a sketch challenge and Cecile has asked that we make a square card with a focal sentiment and patterned background:


Feel free to flip or rotate the sketch when making your card. 

For my card today I chose monochromatic pinks with a touch of silver to create a simple stencilled background for a feminine birthday card for a discerning teenager - take a look:


Here's the low-down on today's card:

I took my square card base and using some stencils I made with various circle punches and some window sheet, I added Melon Mambo and Bubble Bath ink using my blending brushes, varying the intensity to give some depth to the colour. I heat-embossed part of my sentiment in silver and used a diecut 'sending' in silver foil backed with vellum as my centrepiece:


A sprinkle of basic rhinestones added a final touch of sparkle. This is one of those cards that could work in lots of colours and is thoroughly inoffensive - so perfect for the discerning teenager! Since I went with pinks, I'm also playing along over at Addicted to CAS with my monochrome pinks and also celebrating with the team over at AAA Cards as they celebrate their 9th birthday with CAS pink birthday cards too - the balloons on the inspo board also inspired my bubbly background!

Here is the visual summary of the key products used on today's project for you to pin for easy reference:


You can see all of my 'How To' summaries on my 'How To - Tips and Techniques' Pinterest board in case you've missed any. 

Please excuse today's photos - I struggled with that foil diecut and the lighting and didn't have time to retake. I have a super-short day today as the youngest of teh James Juniors has 2 exams and is on early pick up, so just time for a speedy lunch then I'm back in the car for the school run! Enjoy your day and I'll be back tomorrow with another project. Until then, happy stampin'!


Stampin' Up! Supplies Used:

Table built using Product Table Builder by The Crafty Owl - Independent Stampin' Up! Demonstrator.

Simply Fabulous Stencilled Slimline Birthday Card AYSI285

by Joanne James7. October 2022 12:00

Today I'm sharing my design team card for our new challenge over at As you See It where it's time for a bold colour challenge:
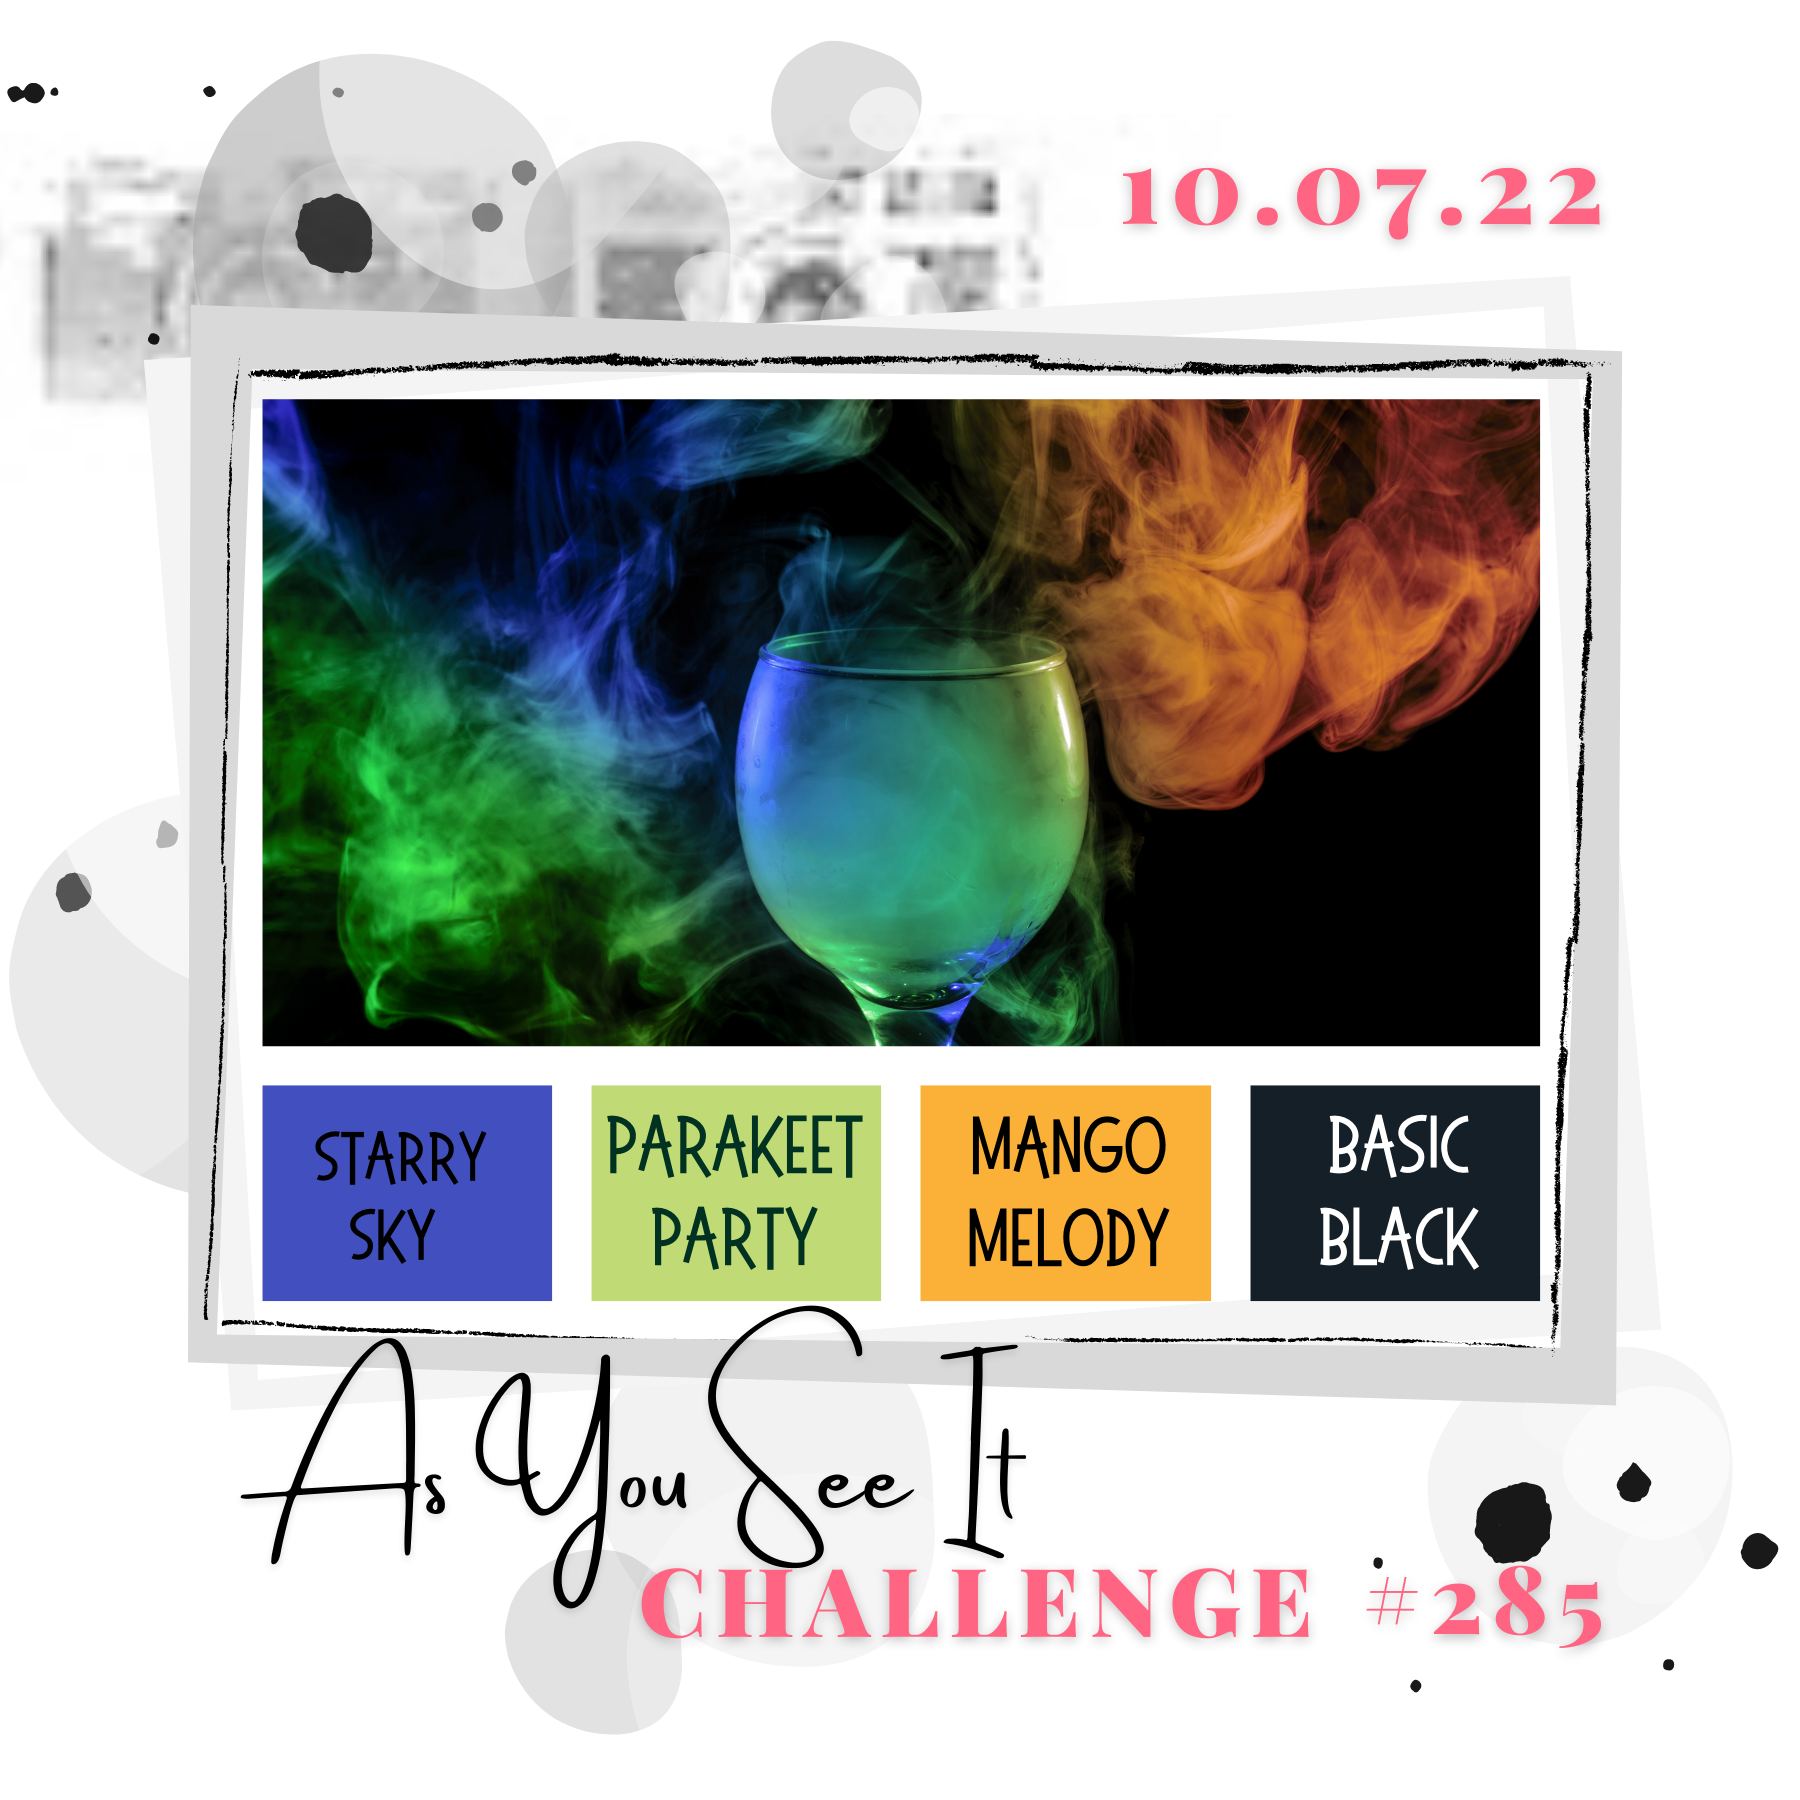
    

I love this week's colour palette, although the bold colours did mean I had to get my thinking cap on. I decided they would be perfect for me to try out an idea I've had buzzing around for a while - take a look:
 

Here's the low-down on today's card:

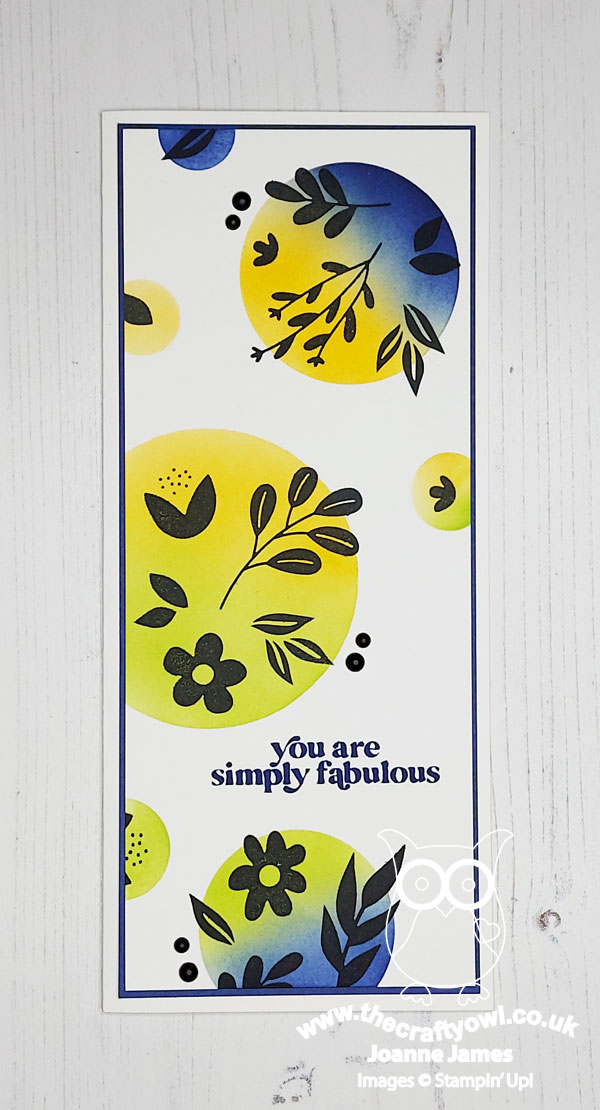
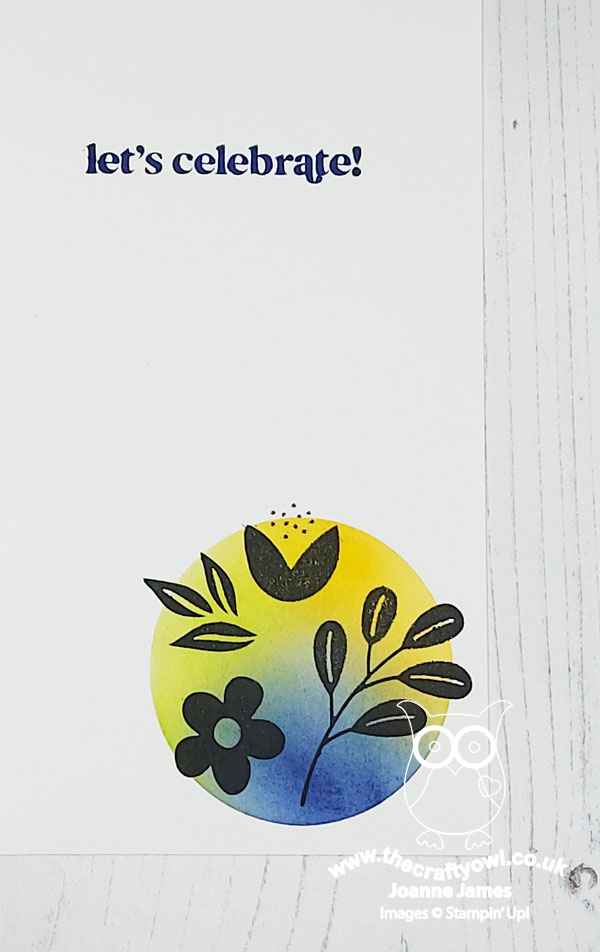
Simply Fabulous - I've made no secret of how much I love the 'Simply fabulous' stamp set - to me, it is just that! So versatile, with great sentiments and fonts and bold floral images, if you do a search you'll find lots of examples of where I've used it on other cards. Instead of stamping in colour, I wanted to see what it would look like stamped in black onto a coloured base. The images are small and easy to combine and the subtle leaf detail on some of the images mean this works really well. I used my Stamparatus to stamp clusters of images at a time, reinking to make sure I had a nice solid black image. I also added a little additional detail on the inside:
DIY Stencils - I decided that I would use some circle shapes to highlight my clusters of silhouetted images and use a combination of blended colours in each one. I made my own set of circle stencils, using some window sheet and my Layering Circles Dies, so carefully positioned them where I wanted my images, starting with the large ones and adding a few smaller ones around the edge to fill in the gaps. I used my blending brushes to add a combination of two colours to each circle. I love using stencils and don't have many in my collection, but I'm always looking at ways in which I can use my dies to create custom stencils - do you do this too? My stencilling here is simple but I think quite effective; I'm linking up with the challenge over at Inkspirational where they are asking us to use stencils this week - do check out the DT and gallery cards, there are some great examples of the way stencils can be used on your projects.


Finishing Touches - To finish my card, I added a few matte black dots to the outer borders of the larger circles as an accent:
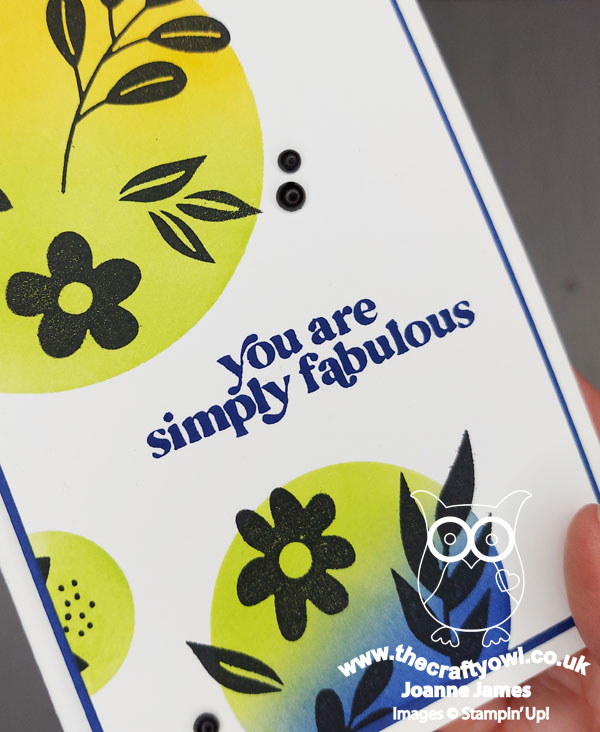
I really love this card and am glad I used a slimline design too as it meant I got more circles onto my card front. If I could change one thing, I think I would stamp my sentiment in black rather than Starry Sky; I wanted to tie it in to the mat layer, but I think black would have given a crisper finish. I'll save that for my next one! 

Here is the visual summary of the key products used on today's project for you to pin for easy reference:
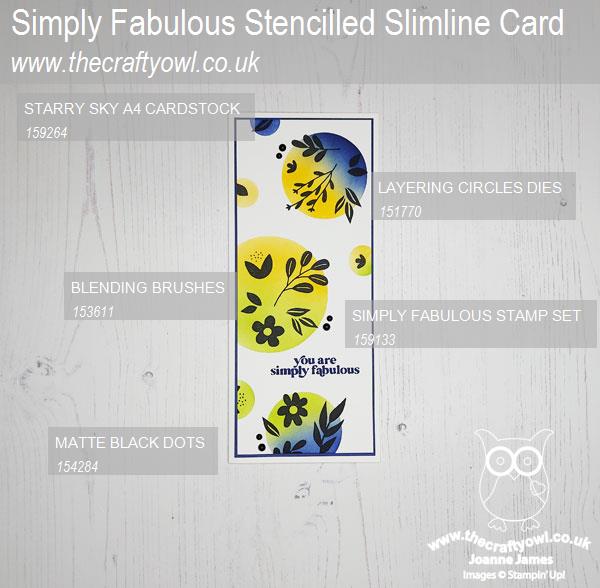
 

You can see all of my 'How To' summaries on my 'How To - Tips and Techniques' Pinterest board in case you've missed any. 

Here's a summary of our challenge rules:

  • Create any card, scrapbooking page, 3D project or packaging project that fits the challenge.
  • Please include the challenge graphic and link back to the challenge in your blog post. Turn off word verification so we can leave you lots of lovely comments. Make sure you link the post not the whole blog to the Linky. Use #AYSIXXX when uploading to a public gallery.
  • If you’re unsure about ‘the rules’, check the details under the Challenge Guidelines tab on the As You See It Challenge homepage.
  • In a colour challenge, black or other neutral can be used in outlines and sentiments but no other colours should be included. Stampin’ Up colours are used for reference but colours that are a close match are welcome.
We look forward to seeing your creations in the AYSI gallery.

Enjoy your day. Mine will be filled with laundry and housework and maybe a little crafting! I am on late pickup this evening, as one of the James Juniors has a social evening and quiz night at school, which after this morning's rush hour I am particularly thankful for: a beer tanker had overturned and completely blocked the dual carriageway that is only minutes into our journey, necessitating a massive diversion and delay - not what you need when you have a 60 mile round trip to embark on at 7.15am! Still, everyone got to school on time and I'm thankful we weren't involved in the incident itself, so all good. I'll be back tomorrow with another project. Until then, happy stampin'!


Stampin' Up! Supplies Used:
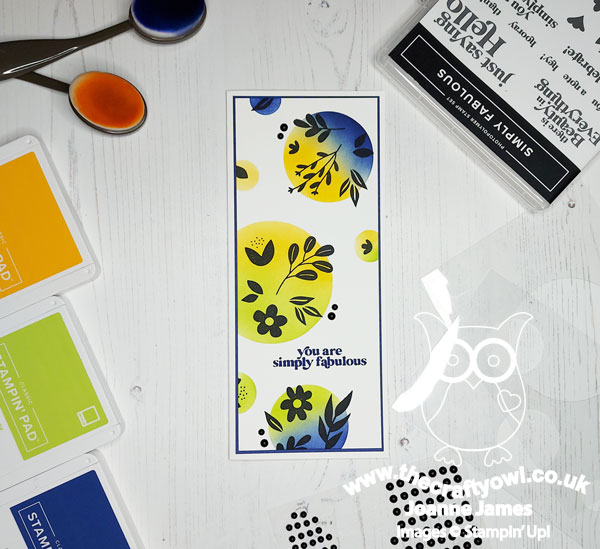
Table built using Product Table Builder by The Crafty Owl - Independent Stampin' Up! Demonstrator.

Celebrate Sunflowers Thank You

by Joanne James26. September 2022 12:44

Here's my second card for today! This one was inspired by both the colours and inspiration photo over at Color Throwdown and uses the sketch over at Try Stamping on Tuesday for my layout:


Another card with a dark background - this time courtesy of some (retired) Pretty Peacock cardstock - the perfect base for some vibrant sunflowers - take a look:


Here's the low-down on today's card:

I used an embossed tree ring for the centre of my card and added my quartet of sunflowers, coloured with a combination of Stampin' Write and Blends markers, and some diecut green leaves around this. I added a heat embossed sentiment with some twine and enamel dots for extra touches of gold. Whilst it's tricky to see on the main photo, I did add in the option of stencilling to the card base, by using some tone-on-tone blending through a stencil made from one of my Sunflower Dies - you can see it a little better on the photo below:


I also used my (retired) Pretty Peacock Blends to colour the edges of my stamped sunflower images to remove the harsh white border against my background. I haven't used the oldie-but-goodie 'Celebrate Sunflowers' stamp set in ages, but it is so perfect for this time of year as summer fades all too quickly into autumn. Another thank you card that will be winging its way to one of my lovely customers this month!

Here is the visual summary of the key products used on today's project for you to pin for easy reference:


You can see all of my 'How To' summaries on my 'How To - Tips and Techniques' Pinterest board in case you've missed any. 

Enjoy your day and I'll be back tomorrow with another project for our new challenge over at CAS Colours & Sketches. Until then, happy stampin'!


Stampin' Up! Supplies Used:

Table built using Product Table Builder by The Crafty Owl - Independent Stampin' Up! Demonstrator.

Sending Thanks with Quiet Meadow

by Joanne James26. September 2022 11:49

Happy Monday everyone! I managed to spend some quality time in my craft room over the weekend and as a result of trying to overcome my 'crafting hiatus' I've a couple of extra cards to share with you today! The first one uses Karren's layout over at Freshly Made Sketches this week and the fabulously bold Colour Inkspiration colour palette:

   May be an image of scooter and text

I really wanted to make the most of the bright blue and mango of the inspiration photo, so I went with a bold use of colour - take a look:


Here's the low-down on today's card:

I used one of my (retired) stencils to add some tone-on-tone colour to my Starry Sky card base, then added a cluster of Meadow Dies flowers to the right hand side in the challenge colours, having added a light touch of Starry Sky ink to my cornflower and embellished my Mango Melody flowers with some sparkly rhinestones.


For the horizontal element of the sketch, I layered a diecut 'Sending' in silver foil on white with the remainder of the sentiment stamped and heat embossed in silver directly onto the cardbase. I finished the inside of my card and the corner of my envelope with a collage of stamped images in co-ordinating colours from the 'Quiet Meadow' stamp set:


A liberal interpretation of this week's FMS sketch for me, although the shapes are clearly visible - I just love this card! What do you think? Do leave me a comment below, I'd love to hear your thoughts!

Here is the visual summary of the key products used on today's project for you to pin for easy reference:


You can see all of my 'How To' summaries on my 'How To - Tips and Techniques' Pinterest board in case you've missed any. 

Enjoy your day and I'll be back shortly with card number two. Until then, happy stampin'!


Stampin' Up! Supplies Used:

Table built using Product Table Builder by The Crafty Owl - Independent Stampin' Up! Demonstrator.

Happy And Heartfelt CAS Friendship Card

by Joanne James10. March 2022 09:00

Today I have two posts for you! First up I'm sharing a card inspired by a few challenges:


The team over at Just Us Girls have 'lucky' as their word of the week. When I think 'lucky', four-leaf clovers and black cats come to mind, so I'm also entering today's clean and simple card over at Addicted To CAS where their codeword is 'feline', with green and gold being the only colours to feature outside of the black and white neutrals - perfect for my second entry over at Color Hues, this time with the colour scheme they originally intended for the current challenge. I also used the sketch and silhouette combo over at AAA Cards for my layout. That sounds like a lot of inspiration, but my card actually came together really easily - take a look:


Here's the low-down on today's card:

I went on a hunt through my current stamps for a four leaf clover as I often do at this time of year, and when I came across my 'Flowers of Friendship' set I had a flash of inspiration: I could use the co-ordinating Flowers & Leaves Punch to make a stencil! I think I am becoming a little stencil-obsessed of late!! Anyway, I made a couple of small stencils using both this punch and a tiny four-leafed retired Itty Bitty Punch, cutting out stems by hand. I masked off a circular shape and then stencilled my clovers in randomly using a sponge dauber and some Just Jade ink. I added a punched black cat silhouette on dimensionals and added a gold twine bow detail:

My 'lucky me' sentiment is from the 'Happy and Heartfelt' stamp set and completes on the inside of the card with 'I have you'. A clean and simple card to let a friend know how lucky I am to have them! How does the word 'lucky' inspire you? Do let me know in the comments below - I'd love to hear your thoughts!

Here is the visual summary of the key products used on today's project for you to pin for easy reference:


You can see all of my 'How To' summaries on my 'How To - Tips and Techniques' Pinterest board in case you've missed any. 

Enjoy your day; I have lots of jobs to do today so mine will be a busy one! I'll be back later though with my card for the new challenge over at TicTacToe this week. Until then, happy stampin'!


Stampin' Up! Supplies Used:

Table built using Product Table Builder by The Crafty Owl - Independent Stampin' Up! Demonstrator.

Giving Gifts of Snowflake Stencils CCS458

by Joanne James22. February 2022 13:00

It's Tuesday and time for a new challenge over at CAS Colours & Sketches. This is the final challenge this month and YoonYoung is ending her hostess duties in style with this great sketch for us: 


Feel free to flip or rotate the sketch when making your card. I combined today's card with my entries for the current challenges over at Addicted to CAS where the codeword is 'snowflake' and the lovely ladies over at The Alphabet Challenge Blog where Melanie has chosen 'W is for Winter'. The recent storms we've had here in the UK with wind, sleet and rain definitely had me thinking about the weather and although we have yet to get a proper snowfall here so far this winter I decided YoonYoung's sketch would be the perfect opportunity to add one to my card - take a look:


Here's the low-down on today's card:

Following on from my experiment of using dies as stencils last week (you can see my first example of this in last week's post here), I decided to have another go at this technique. YoonYoung's sketch made me think of a window and I was inspired by the beautiful stencilled snowflakes on Jaydee's ATCAS card, so I took the snowflake die from the now retired giving Gifts Dies from last season and created a stencil by cutting the twice and then masking a central column using some washi tape to create my four quadrants (you can see my mask on the photo further down this post). 

I then used a combination of Balmy Blue and Pacific Point inks with my blending brushes to add ink to my card, concentrating the darker colour across the diagonal and fading to the outer corners. Similarly inspired by Vicky's beautiful stencilled snowflake creation over at ATCAS where she used a contrasting bright orange for her sentiment, I decided to use bright pink and used a simple sentiment from the retired 'Sparkly Seasons' set for a pop of contrasting colour:


I also added some iridescent rhinestones to the centre of some of the snowflakes for a touch of subtle sparkle - I love the way they take on a slightly pink hue to compliment the sentiment too.


I didn't add a sentiment to the inside of my card as I haven't decided whether to use it as a Christmas card or just send as a festive winter notecard and write a note inside. 

The James Juniors have been wishing for snow since the wintry weather arrived in October; anything for a day off school, or so they thought. Rebecca was most perplexed when we received a letter home from school recently stating that the plan should we be subject to inclement weather from this point onwards would no longer involve a day off; instead all learning would simply move online. Covid clearly has a lot to answer for - it would seem that improved use of technologies is not always welcome, for the pupils at least!! 

Enjoy your day and I'll be back tomorrow with another project. Until then, happy stampin'!


Stampin' Up! Supplies Used:

Table built using Product Table Builder by The Crafty Owl - Independent Stampin' Up! Demonstrator.

Butterflies And Flowers Stencilled Amazing Thanks Card

by Joanne James31. January 2022 11:32

Today I'm sharing a card that I made for a couple of current challenges:


I just loved Lori's colours over at Color Throwdown this week and when I saw the photo inspiration over at Paper Craft Crew I knew it was time to dig out my new Butterflies and Flowers Layering Decorative Masks and get stencilling to create some floral love with a thank you card for one of my lovely customers - take a look:


Here's the low-down on today's card:

Stencilling is very on-trend right now and I've been wanting to experiment more with background stencilling so couldn't wait to have a go with these new Layering Decorative Masks. I chose to feature the florals on my card today and I can honestly say they are so easy and fun to work with! I added the first layer of colour in Blushing Bride and then added the detail in Highland Heather, using a blending brush to build up the intensity of the colour. I then swapped out the masks and added two lots of leaves in two shades of green. It really takes no time at all to create these fun floral patterns. I then added a layered 'thanks' using some vellum and picking out the Highland Heather for the main sentiment - love these Amazing Thanks Dies too! A trio of clear elegant faceted gems complete my card:


I actually think I could get quite addicted to stencilling with these flowers - look out for lots more in different colours in the coming weeks!

Here is the visual summary of the key products used on today's project for you to pin for easy reference:


You can see all of my 'How To' summaries on my 'How To - Tips and Techniques' Pinterest board in case you've missed any. 

I have a busy week so today is being spent largely at my desk in an effort to get organised! Enjoy your day and I'll be back tomorrow with another project and news of an exciting pre-release from the upcoming annual catalogue. Until then, happy stampin'!


Stampin' Up! Supplies Used:

Table built using Product Table Builder by The Crafty Owl - Independent Stampin' Up! Demonstrator.

Hydrangea Haven Lilacs For CCS422

by Joanne James1. June 2021 12:00

It's Tuesday and time for a new challenge over at CAS Colours & Sketches. Shannon is hosting this month and our first challenge is a colour challenge: 


For my card today I decided these colours would be perfect to re-create those beautiful lilacs in the Inspired By challenge photo ... but I have no lilac stamps! So what to do? I decided to get creative - take a look:


Here's the low-down on today's card:

When Is A Hydrangea Not A Hydrangea? - When it's a lilac, of course! I decided that the die with the row of four-petal flowers in the Hydrangea Dies set would be perfect to create some lilac blossom too. I diecut a whole bunch of them in Fresh Freesia cardstock and added a little Fresh Freesia ink to the edges of some with a sponge dauber and added some Gorgeous Grape ink to others, along with a dot in the centre of each. 

A Stem Trick - The main thing that distinguishes a lilac blossom is its triangular shape. In order to get the shape I wanted, I used the berry die from the Poinsettia dies set and stuck two together to create a triangle shape, then added my petals to the berries. I love the way there is a hint of green peeking through between the petals, as it would with an actual lilac blossom in real life. I added a couple of Pierced Blooms leaves for some added extra greenery.

A Foray Into Stencils - I've seen so many wonderful examples of stencilling on cards recently I decided to dig out mine that I haven't used for ages and used an old one to create a background that mimics the shape of the Inspired By sketch to add some pale green dots, fading out from the bottom corner of my card. I finished with a sentiment from the Hydrangea Haven stamp set in Gorgeous Grape. Check out the detail on those blossoms - so pretty!

So what do you think? Did my hydrangea turned lilac tick the creative box? Do you ever look at your dies and see a different purpose for them?

Here is the visual summary of the key products used on today's project for you to pin for easy reference:


You can see all of my 'How To' summaries on my 'How To - Tips and Techniques' Pinterest board in case you've missed any. 

As a reminder, for our colour challenges, you must use all of the stated challenge colours. You may also use neutral colours; however, the challenge colours should be the most noticeable ones featured on your card. We use Stampin' Up! color names for reference, but you are welcome to use any other companies' products as long as you match the challenge colours as closely as possible.

Enjoy your day and I'll be back tomorrow with another project. Until then, happy stampin'!


Edited to add: I was the winner over at Inspired By with this card!

Sandi

Stampin' Up! Supplies Used:

Table built using Product Table Builder by The Crafty Owl - Independent Stampin' Up! Demonstrator.

Peaceful Poppies in Red, White and Grey CTD578

by Joanne James3. February 2020 19:00

I'm here with my second card of the day - and on a class day too, go me! And it's only Monday - let's hope that this is a sign of a productive week! This card is one of the ones that we made in my technique class this morning featuring the Painted Poppies bundle and I used this week's colours over The Color Throwdown as my inspiration:

This is the card I came up with: 


Here's the low-down on today's card:

Painted Poppies and Peaceful Moments - All of our class cards featured the Peaceful Poppies stamps and co-ordinating Painted Labels Dies. Here the poppies were simply coloured using Real Red ink and the watercolour 'splodge' stamp in the set, with a little detailing added with a marker and then diecut. The leaves were stamped in black and some tiny splodges added in Smoky Slate before fussy cutting by hand. We paired it with a sentiment of our choice from the 'Peaceful Moments' set - I chose this one, but everyone in my class used the 'With Deepest Sympathy as they thought this card wold work well as a sympathy card.  

Sweetly Stitched - I used the largest of the Stitched So Sweetly rectangular dies as the mat on my card; these are on page 20 of the Spring-Summer mini catalogue and worth a look if you've passed over them as they are easy to miss, especially if the co-ordinating stamp set is one that doesn't appeal. You're welcome ;-) 

A Pattern Party - I sponged some darker Basic Grey onto my scalloped rectangle piece using one of the Pattern Party masks, graduating the colour outwards from the corner, to add interest and tie in with my flowers. I added some clear sequins and some black pearls (regular ones coloured with a black marker) to the centre of my flowers to finish.

Here is the visual summary of the key products used on today's project for you to pin for easy reference:


You can see all of my 'How To' summaries on my 'How To - Tips and Techniques' Pinterest board in case you've missed any. 

This was the middle card from my class today and it's fair to say the ladies loved it. I'll share the others another time; in the meantime, if you live in or around Northampton and would like to attend a class, do get in touch - we would love you to join us! The next one features the 'Peaceful Moments' bundle and will be held on Monday 9th March - the day after my residential weekend craft retreat!

Enjoy your evening; I have to go and start on my ironing pile now - I can't put it off any longer! I'll be back tomorrow with another project. Until then, happy stampin'!


Stampin' Up! Supplies Used:

Table built using Product Table Builder by The Crafty Owl - Independent Stampin' Up! Demonstrator.

Current Promotions

Stampin Cut and Emboss

Save up to 30% off on all your favourite kits from 1 to 31 October! 

Click here to see the current kits available and order yours online today.

Join My Team

It's always a great time to join Stampin’ Up! During October you can get even more in your starter kit! New team members can get £160 worth of products for only £99 + free business supplies + free shipping + all the fun being a part of Stampin’ Up! Stampin' Up! has something for everyone: join my growing team and benefit from my support to enjoy Stampin' Up! however you choose.

If you're interested, call me for a chat to understand how I can help you realise your goals. Alternatively, if you have already decided to sign up and you just can't wait, please click here for the link to the online form where you can sign up and order your starter kit right away! 

Shop Online

Access my online shop 24 x 7, 365 days of the year:

Current October hostess code:

9NKXDTTR

Shop Online

Scrapbooking

Stampin' Up! has introduced a new range of 12x12" scrapbooking product and kit - the full range is now available to purchase online. To download a copy of the new digital Scrapbooking Catalogue click here.

Mini Catalogue

BROWSE THE CATALOGUE

'Tis The Season - the new Stampin' Up! Mini Catalogue is here! For more details and to download your copy click here

2024-25 Annual Catalogue

BROWSE THE CATALOGUE

Click on the image to download your copy of the 2024-25 annual catalogue. For a full list of current SU! supplies, go to my online store. If you would like any help or advice, please drop me a line at joanne@thecraftyowl.co.uk or give me a call on 07773 421446 - I'd be happy to help.

Latest Kits!

Stampin Cut and Emboss

The Christmas Ornaments Kit and Card Keeper Kit are the latest kits in the online store - get yours here!

New Online Exclusives

There are new products available exclusively in the online store from 5 November - check them out here.

About Me

Hi I'm Joanne and live in Northampton and when I'm not looking after my husband and two beautiful children, am an avid crafter with a passion for all things Stampin' Up!

I must confess that I have never been a big rubber stamper - until I discovered Stampin' Up! that is. I love the fact that I can get such great results with co-ordinating stamps, inks, papers and punches - the possibilities are endless! Join me on my stamping journey as I share the things I love and be inspired to create amazing things yourself!

Follow Me

Monthly Newsletter

Box Builder

Click the button above to use Box Buster to create your custom box design using the Envelope Punch Board!

Kits Collection Now Available!

Stampin Cut and Emboss

The new Kits Collection from Stampin' Up! is now available!

Click here to see the current kits available and order yours online today.

I Design For


Stampin' Up Stuff

This is my personal blog and is not endorsed by Stampin’ Up! I hope you find it a plentiful source of ideas and personal inspiration but please don't copy my designs for contest submission or use for classes, publication or sale without express permission.