Bon Voyage Swirly Bird Boat Card

by Joanne James17. April 2017 04:00

Happy Easter Monday everyone! I hope you all enjoyed your fill of chocolate eggs yesterday - I know that we had more than our fair share here in the James household for sure! Today I'm sharing a card for this week's sketch over at Freshly Made Sketches:

I love Jen's sketch this week and knew immediately what I wanted to do with it; eventually on Saturday I managed to find some time to create - take a look:


Here's the low-down on today's card:

A Swirly Boat and Scribble - I used the edge of my wavy sea thinlit in my Swirly Scribble set to create the curved line as per in the sketch (I actually flipped my Very Vanilla piece over and used the reverse so that my wave followed the same contours as the sketch). This was the starting point for my card and everything else followed from there. I stamped my Swirly Bird boat and background splatters onto the Vanilla section, then fussy cut the sail and popped it up on a dimensional, having heat embossed the Calypso Coral sail with copper embossing powder for added shine. The Swirly Bird stamp set and co-ordinating Swirly Scribble thinlit dies are one of my favourite bundles in the current annual Stampin' Up! catalogue and I'm so pleased that they are carrying over into the new 2017-18 catalogue. The discounted bundle price won't be carrying over though, so if you want to save 10% by purchasing them together be sure to order them before the new catalogue goes live on 1st June.

By The Sea Shore - I used a layer of the retiring By The Shore paper for the bottom part of my card to provide the perfect seascape. I will be so sorry to see this paper leave us! It's still available on the retiring list whilst stocks last, so snap some up now before it's too late.

A Bon Voyage Banner - I decided to use a pair of curved sentiments from the 'Banners For You' set on my card today; they followed the contours of the curved edge perfectly and made for a fun 'Bon Vogage' type card. 

Here is the visual summary of the key products used on today's project for you to pin for easy reference:


You can see all of my 'How To' summaries on my 'How To - Tips and Techniques' Pinterest board in case you've missed any. 

Enjoy your day and I'll be back tomorrow with another project. Until then, happy stampin'!


Stampin' Up! Supplies Used:

Table built using Product Table Builder by The Crafty Owl - Independent Stampin' Up! Demonstrator.

Easter Basket Bunch For The Paper Players

by Joanne James26. March 2017 09:00

To all my UK readers - Happy Mother's Day! It is of course Sunday and time for this week's new challenge over at The Paper Players! My good friend the super-talented Claire is the hostess this week and she has a sketch for us to work with:


I love a good sketch and this one has some great layering options. I decided that I would use the pretty Spring colours over at Fab Friday to create a basket of flowers for an Easter card - take a look:


Here's the low-down on today's card:

I kept my layers fairly neutral - a stitched circle in Mint Macaron, a panel of Calypso Coral By The Shore designer series paper - and used the Easter sentiment from the 'Suite Sentiments' set on a Very Vanilla banner, with the real focal point for my card being my basket of flowers. I cut and layered my basket using the Basket Builder framelits then stamped my daffodils and peach flowers in Memento Black onto solid colour cardstock using the Basket Bunch set and cut the out with the co-ordinating framelits, finishing them with some Calypso Coral subtles candy dots. I love the Basket Bunch bundle, not only for the Easter eggs and bunny, but also the perfect daffodils (well, I am Welsh so it is to be expected!). The framelits make cutting out these little pieces so easy and offer some great layering options too.

I'm also linking up with those lovely ladies over at As You See It too - for me, there is nothing that says Spring more than daffodils. They are so bright and cheery and inexpensive and I love to have them cut in a vase, but also to see them along the banks and hedgerows as I drive around the countryside. At the moment there are rows and rows of them on my journey driving Ben to school - they never fail to brighten my day!

Here is the visual summary of the key products used on today's project for you to pin for easy reference:


You can see all of my Product and 'How To' summaries on my 'How To - Tips and Techniques' Pinterest board in case you've missed any. 

Before you reach for your ink and papers, check out what our amazing team has created to inspire you this week:

The Paper Players Design Team
 
 
Here's a quick recap of our challenge rules:
 
1.  Create a new paper project
2.  Upload your creation to your blog with a link back to us and provide a direct link to the post featuring your challenge submission.
3.  Please link your card to no more than four challenges, TOTAL.
4.  Have FUN! 


I look forward to seeing what you create with our sketch this week. Enjoy the rest of your weekend as it will be over all too quickly; I'm looking forward to a family lunch and maybe, just maybe, a sneaky visit into my craft room this afternoon. I'll be back tomorrow with another project; until then, happy stampin'!


Stampin' Up! Supplies Used:

Table built using Product Table Builder by The Crafty Owl - Independent Stampin' Up! Demonstrator.

High Tide By The Shore

by Joanne James18. March 2017 21:00

Today I'm sharing a card for this week's sketch over at Freshly Made Sketches that also fits the current code word over at Addicted to CAS:

I decided to create a little scene for that central panel using the High Tide stamp set - take a look:


 Here's the low-down on today's card:

High Tide - High Tide is one of those sets that has oodles of possibilities: great for masculine cards and beach scenes, with some great sentiments too. The lighthouse is a two-step stamp, but because it is photopolymer this makes the stamps really easy to align the images. 

By The Shore - The colours for my card today were inspired by that wonderful striped panel from the By The Shore Designer Paper. It actually reminds me of old fashioned deckchairs on the beach, so reminiscent of my childhood when I spent many hours happily whiling away my summer days at the beach. 

The Obvious Mistake - Did you spot the obvious mistake on my card today? I didn't until I glued my card together; the funny thing is, I then stamped an alternative panel without the mistake and it wasn't as well balanced - so I went with my original design! If you've spotted it then do leave me a comment below and let me know if you think I should have changed it; if you're reading this and wondering what I'm talking about, then I guess it's not as obvious as one might think - and you should continue, none the wiser!

Here is the visual summary of the key products used on today's project for you to pin for easy reference:


You can see all of my 'How To' summaries on my 'How To - Tips and Techniques' Pinterest board in case you've missed any. 

I'll be back tomorrow with this week's card for the new challenge over at The Paper Players where I am the hostess this week. Until then, happy stampin'!


Stampin' Up! Supplies Used:

Table built using Product Table Builder by The Crafty Owl - Independent Stampin' Up! Demonstrator.

Hoping Your Day Goes Swimmingly By The Shore Nautical Card

by Joanne James24. July 2016 10:00

It's Sunday and time for a new challenge over at The Paper Players! It's the turn of my sweet friend LeAnne to host this week and she has my favourite, a sketch challenge for us to play along with:
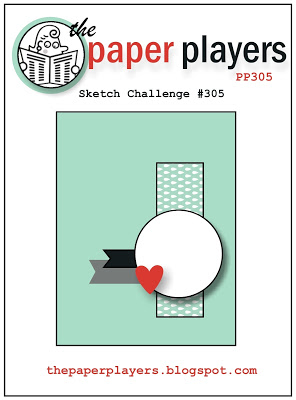
    

This is one of those sketches that has so many possibilities and when I sat down with my sketch book I came up with about six different cards straight off, there were just so many choices! In the end I decided to go with the soft and nautical By The Shore suite to create a rather fishy card today - take a look:
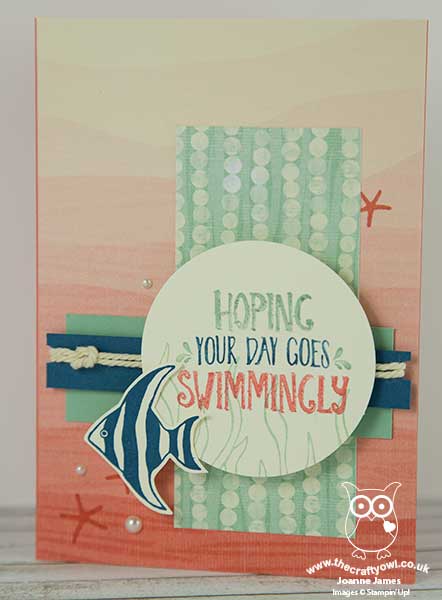
 

Here's the low-down on today's card:

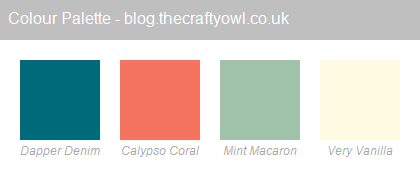
Under The Sea - My regular readers will know that the James' are a family of keen swimmers and scuba divers, so this was never going to be a set I could pass up for long! Fishes, seaweed, bubbles, an anchor, shells and starfish, along with some great sentiments and rope/border stamps - a veritable underwater cornucopia. I used the main sentiment on my card today, inked up using my Stampin' Write marker to easily incorporate each of the three colours that feature most strongly in this suite and cut out with my circle framelits and used the seaweed in Mint Macaron to add a little background interest, stamping off once first to give a paler colour. I used an all-blue angel fish (if there is such a thing!) as my embellishment element as per the sketch, popping it up slightly higher than my sentiment circle. Here is today's colour combination should you wish to save it to use again too:
 

By The Shore - The By The Shore Designer Series paper has some wonderful patterns, including two sheets of ombre in coral and denim blue. The Calypso Coral ombre worked perfectly for my card base, and I also used a piece with a circular pattern for my vertical banner - it reminded me of bubbles, in an abstract way, so it co-ordinates with the other elements of my card.

Nautical Details - In addition to my sentiment and fish, I added a few other nautical details: I stamped a trio of starfish on my card base directly onto the ombre paper, added some pearls and finally a sailor's reef knot in vanilla baker's twine around my horizontal banners. This adds a lot of dimension to my card, making it a little un-post friendly, but I like the added texture and detail it gives so I will just save this card for someone closer to home.  

Here is the visual summary of the key products used on today's project for you to pin for easy reference:
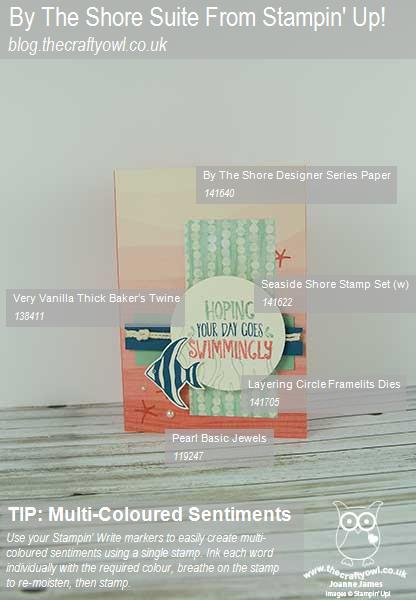
 

You can see all of my 'How To' summaries on my 'How To - Tips and Techniques' Pinterest board in case you've missed any. 

I love this fun set and just know I will get tons of use from it. The lovely Linda Callaghan also used this set this week - her card is beautiful and quite different to mine so be sure to check it out for additional nautical inspiration.

Before you reach for your ink and papers, check out what our amazing team has created to inspire you this week:

The Paper Players Design Team
 
 
Here's a quick recap of our challenge rules:
 
1.  Create a new paper project
2.  Upload your creation to your blog with a link back to us and provide a direct link to the post featuring your challenge submission.
3.  Please link your card to no more than four challenges, TOTAL.
4.  Have FUN! 


I look forward to seeing what you create with our sketch this week.

Back tomorrow with another project; until then, happy stampin'!


Stampin' Up! Supplies Used:

Table built using Product Table Builder by The Crafty Owl - Independent Stampin' Up! Demonstrator.

New Online Exclusives

There are new products available exclusively in the online store from 5 November - check them out here.

Latest Kits!

Stampin Cut and Emboss

The Perpetual Beauty Calendar Kit and Cherry Blossoms Treat Boxes Kit are the latest kits in the online store - get yours here!

Shop Online

Access my online shop 24 x 7, 365 days of the year:

Current December hostess code:

9NKXDTTR

Shop Online

Mini Catalogue

BROWSE THE CATALOGUE

'Tis The Season - the new Stampin' Up! Mini Catalogue is here! For more details and to download your copy click here

Scrapbooking

Stampin' Up! has introduced a new range of 12x12" scrapbooking product and kit - the full range is now available to purchase online. To download a copy of the new digital Scrapbooking Catalogue click here.

2024-25 Annual Catalogue

BROWSE THE CATALOGUE

Click on the image to download your copy of the 2024-25 annual catalogue. For a full list of current SU! supplies, go to my online store. If you would like any help or advice, please drop me a line at joanne@thecraftyowl.co.uk or give me a call on 07773 421446 - I'd be happy to help.

Join My Team

It's always a great time to join Stampin’ Up! New team members can get £130 worth of products for only £99 + free business supplies + free shipping + all the fun being a part of Stampin’ Up! Stampin' Up! has something for everyone: join my growing team and benefit from my support to enjoy Stampin' Up! however you choose.

If you're interested, call me for a chat to understand how I can help you realise your goals. Alternatively, if you have already decided to sign up and you just can't wait, please click here for the link to the online form where you can sign up and order your starter kit right away! 

About Me

Hi I'm Joanne and live in Northampton and when I'm not looking after my husband and two beautiful children, am an avid crafter with a passion for all things Stampin' Up!

I must confess that I have never been a big rubber stamper - until I discovered Stampin' Up! that is. I love the fact that I can get such great results with co-ordinating stamps, inks, papers and punches - the possibilities are endless! Join me on my stamping journey as I share the things I love and be inspired to create amazing things yourself!

Follow Me

Monthly Newsletter

Box Builder

Click the button above to use Box Buster to create your custom box design using the Envelope Punch Board!

Kits Collection Now Available!

Stampin Cut and Emboss

The new Kits Collection from Stampin' Up! is now available!

Click here to see the current kits available and order yours online today.

I Design For


Stampin' Up Stuff

This is my personal blog and is not endorsed by Stampin’ Up! I hope you find it a plentiful source of ideas and personal inspiration but please don't copy my designs for contest submission or use for classes, publication or sale without express permission.

DSP Special Release

Check out 3 popular designer series paper designs in fresh new colourways! Available exclusively in the online store from 3 December - check them out here

Last Chance Products

Last Chance Products will now be updated every other month - check them out here.