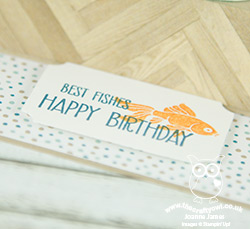
A Gift Of Love Quilt-Inspired Valentine's Card

by Joanne James5. February 2017 09:00

It's Sunday and time for this week's new challenge over at The Paper Players! It's the turn of my sweet friend Claire to host this week and she has a timely theme challenge for us to work with:


I've been sharing lots of Valentine's-themed cards with you in recent weeks, almost all of which have featured the Sealed With Love bundle and Sending Love Designer Series Paper. For today though I wanted to go back to some products in the annual catalogue that would make a Valentine's card but are not designed specifically with that in mind. I had a few bits and pieces out on my desk, then when I saw this week's inspiration photo over at Fusion I knew exactly where I was headed - I even used the sketch layout too (turned through 90 degrees). Here's what I came up with:


Here's the low-down on today's card:

A Quilt Of Love - I drew inspiration from a number of elements of the Fusion photo for my card: the border of pink flowers (courtesy of the Jar of Love stamp set), the cream textured panel (created with the Happy Heart Textured Impressions Embossing Folder) and the red flower-entwined heart as a focal point. My colour scheme also came directly from the photo - here it is if it's one you would like to save to use too:


Have A Heart - I die cut the heart from the Sunshine Wishes Thinlits set and embellished this with flowers from the Jar of Love set and leaves from Swirly Bird too. 

A Gift Of A Sentiment - The sentiment on my pale pink banner comes from the exclusive hostess set 'A Gift of Love'. I love the soft script of the sentiments in this set and think this one is such a lovely way to let someone know how much they mean to you. 

I think this is a pretty Valentine's card that makes a softer alternative to the bright red and white colour schemes of my previous cards. I'm also linking up with the team over at SUO Challenges where they are also celebrating Valentine's this week.

Here is the visual summary of the key products used on today's project for you to pin for easy reference:


You can see all of my Product and 'How To' summaries on my 'How To - Tips and Techniques' Pinterest board in case you've missed any. 

Before you reach for your ink and papers, check out what our amazing team has created to inspire you this week:

The Paper Players Design Team
 
 
Here's a quick recap of our challenge rules:
 
1.  Create a new paper project
2.  Upload your creation to your blog with a link back to us and provide a direct link to the post featuring your challenge submission.
3.  Please link your card to no more than four challenges, TOTAL.
4.  Have FUN! 


I look forward to seeing what you create with our fun theme this week. Enjoy the rest of your weekend as it will be over all too quickly; we have a morning of sport and one of the James Juniors has a trampolining birthday party to attend this afternoon. I'll be back tomorrow with another project; until then, happy stampin'!


Stampin' Up! Supplies Used: 

Table built using Product Table Builder by The Crafty Owl - Independent Stampin' Up! Demonstrator.

Jar of Love Freestanding Pop Up Card

by Joanne James20. July 2016 07:00

Today I'm sharing the third and final card from my second of this month's technique class featuring the very on-trend Jar of Love stamp set and co-ordinating Everyday Jars Framelits Dies. Each of the ladies received the bundle and as always I was on a mission to use as wide a variety as possible of the stamps in this set to showcase its versatility.

This card is a lovely freestanding pop-up card that was inspired by this card created by Lou Kitzelman. I loved it so much I had to have a go at making my own so here's my version:


Here's the low-down on today's card:

Jar of Flowers - Here I've used the Jar of Love set to create a jam jar full of pretty flowers. I love the little flowers in this set and the co-ordinating Everyday Jar Framelits make light work of cutting them out. Each flower is done in a single colour, with the base flower stamped off once to give the contrast with the smaller piece. I chose a mix of purples, pink and orange for my little posy - feel free to hover and pin this colour combination if it's one that appeals to you too:


Kraft Hardwood Table - I used some retired pre-embossed kraft cardstock in my class, however by stamping the Hardwood stamp in Versamark and clear embossing on plain kraft cardstock you can achieve a similar woodgrained effect for your 'table' base.

Another Fun Fold - This freestanding pop-up card is easier to re-create than it looks. It is a great statement card that also folds completely flat for postage which is always a bonus. 

Here's a quick step-by-step tutorial should you wish to have a go:

Freestanding Pop-Up Jar of Love card - Metric Version

Using the diagram below as your guide:

  • Cut a piece of kraft cardstock to 10.5cm wide x 28cm long
  • Stamp the cardstock in Versamark with the Hardwood stamp and heat emboss with clear embossing powder for a woodgrain effect.
  • LANDSCAPE score as per dotted lines:
  • 2.5cm, 7cm, 9.5cm, 18.5cm, 21cm and 25.5cm
  • At 14cm, punch a small hole using a 1/8" punch or crop-a-dile 1.5cm in from both ends and cut a narrow channel approx. 2mm wide between them (i.e. 1.5-9cm)
  • Fold each of the score lines with mountain folds
  • Cut a small strip of Whisper White measuring 3cm x 8cm and attach this using fast fuse in the centre of the end panel on the front (right side)
  • Turn the base over, and folding the end section in a mountain fold from the front back on itself, feed this white piece through the slit from the back of the card to the front.
  • Folding the base in on itself to form a figure 8 shape, adhere both of the front ends together, making sure the white card is through the slit as this is what your jar will be stuck to. As you pull this piece upwards, your freestanding table mechanism forms.
  • This completes your base - you then need to adhere your jars and flowers to the front of the white piece of card, and add a plain jar to the back when complete to neaten things up and give you space to write your sentiment.
 
Isn't this such a fun way to create a pop-up? I'm sure there are lots of other ways that this design could be used too.

Here is the visual summary of the key products used on today's project for you to pin for easy reference:


You can see all of my 'How To' summaries on my 'How To - Tips and Techniques' Pinterest board in case you've missed any. 

The Jar of Love and Everyday Jars Framelits bundle is another of those that has just has so many creative possibilities! If you haven't bought yours yet, this month would be the perfect time to do so; if you purchase the bundle at £48.50 you will earn yourself a £4.50 money-off coupon any purchases next month too - bargain! Just click on the links below to hop on over to my online store to order yours today - and don't forget to add this month's hostess code 63RNATE3 to get a little thank you in the post from me too.

I'll be back tomorrow with the second of the cards from my Jar of Love class; come back then, you won't want to miss it! Until then, happy stampin'!


Stampin' Up! Supplies Used:

Table built using Product Table Builder by The Crafty Owl - Independent Stampin' Up! Demonstrator.

Jar of Love Mini Centre Step Easel Card

by Joanne James19. July 2016 07:00

Today I'm sharing the second of the cards from my second of this month's technique class featuring the very on-trend Jar of Love stamp set and co-ordinating Everyday Jars Framelits Dies. Each of the ladies received the bundle and as always I was on a mission to use as wide a variety as possible of the stamps in this set to showcase its versatility.

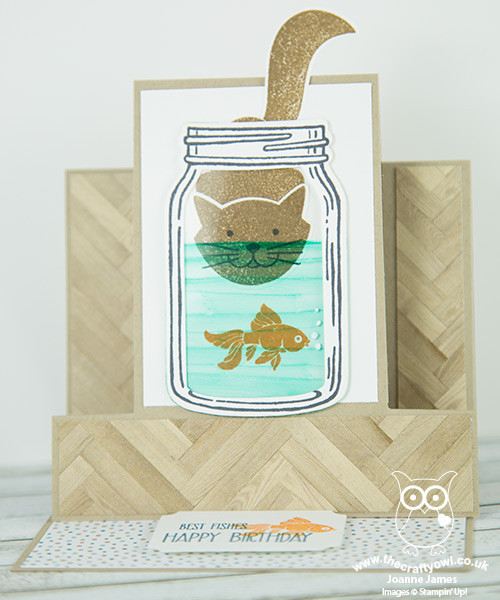
This card was a punny fun-fold card using the goldfish and a feline friend - take a look:
 

Here's the low-down on today's card:

Here Fishy, Fishy - I wanted to create something using the punny 'Best Fishes' sentiment and decided to have a little fun. Whilst my goldfish is swimming innocently in his jar, he is being watched by a mischievous pussy cat - and he has no idea! I stamped both my goldfish and my stalking kitty directly onto a panel of Whisper White (I stamped and punched his tail separately so that it would overhang) then stamped my jar separately and using the framelit cut out the centre too. To this I adhered a piece of window sheet that I had coloured with one of my retired Blendabilities - a light blue Sharpie or similar would also do the job - and stuck this over the top of the stamped panel. Lastly, I added a few bubbles with my white gel pen.

Serene Scenery Parquet - I used a couple of the patterned papers from the Serene Scenery DSP stack to decorate my card: a spotted one to highlight my greetings label, and one of the photographic images with a pattern that reminds me of a wooden parquet floor to the sides. 

A Fun Fold - I chose to create a centre step easel card to showcase my kitty and jar. I have admired a number of versions of this type of card create by my fellow demonstrator, the talented Amanda Bates at the Craft Spa however I wanted a card that would still fit into a C6 envelope when complete, so I created my own mini version.

Here's a quick step-by-step tutorial should you wish to have a go:

Mini Centre Step Easel Card (portrait) - Metric Version

Using the diagram below as your guide:
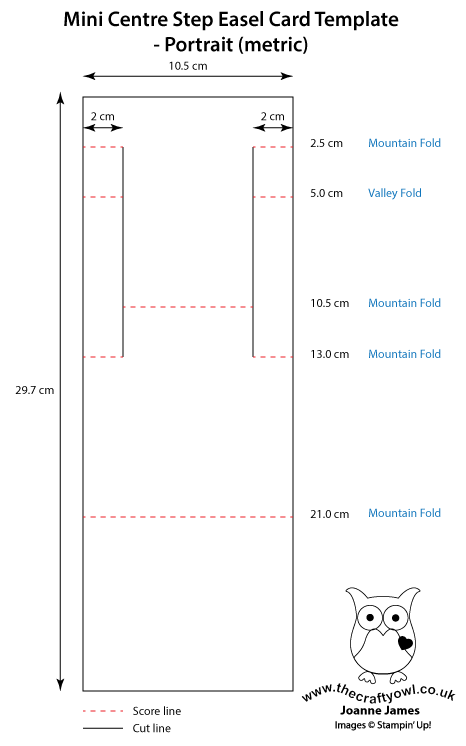
  • Cut A4 cardstock to 10.5cm wide ( xA4L i.e. 29.7cm long)
  • PORTRAIT at 2cm on Top Bar RHS ( i.e. to Right Hand Side)
  • Cut 2.5 to 13cm
  • PORTRAIT at 2cm on Top Bar LHS ( i.e. to Left Hand Side)
  • Cut 2.5 to 13cm 
  • LANDSCAPE With cuts to Left Hand Side, score as per dotted lines:
  • 2.5 cm on Top Bar (LHS) Score outside sections ( i.e. 0-2cm; LIFT; 8.5 to 10.5cm)
  • 5cm on Top Bar (LHS) Score outside sections ( i.e. 0-2cm; LIFT; 8.5 to 10.5cm)
  • 13cm on Top Bar (LHS) Score outside sections ( i.e. 0-2cm; LIFT; 8.5 to 10.5cm)
  • LANDSCAPE With cuts to Left Hand Side:
  • 10.5cm on Top Bar (LHS) Score across middle section. ( i.e. 2 to 8.5cm)
  • 21cm on Top Bar (LHS) Score across whole card drop ( i.e. 0 to 10.5cm)
  • Fold lightly:
  • Outer Sections – 2.5cm Mountain, 5cm Valley, 13cm Mountain
  • Middle Section at 10.5cm – Mountain
  • Whole Section at 21cm – Mountain
This then gives you the basic shape to which you can add your Designer Series Paper and stamped panels. 
 
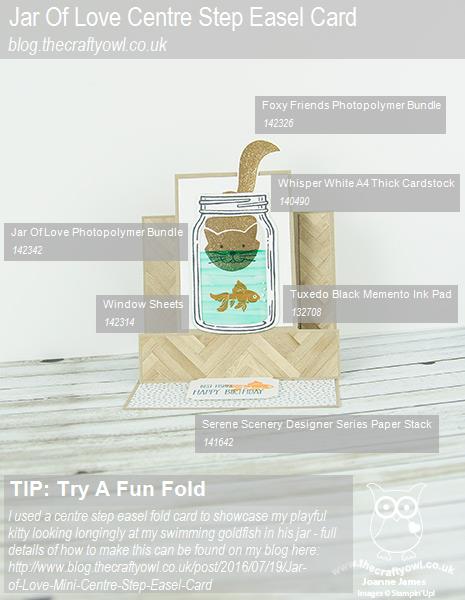
Here is the visual summary of the key products used on today's project for you to pin for easy reference:
 

You can see all of my 'How To' summaries on my 'How To - Tips and Techniques' Pinterest board in case you've missed any. 

The Jar of Love and Everyday Jars Framelits bundle is another of those that has just has so many creative possibilities! If you haven't bought yours yet, this month would be the perfect time to do so; if you purchase the bundle at £48.50 you will earn yourself a £4.50 money-off coupon any purchases next month too - bargain! Just click on the links below to hop on over to my online store to order yours today - and don't forget to add this month's hostess code 63RNATE3 to get a little thank you in the post from me too.

I'll be back tomorrow with the second of the cards from my Jar of Love class; come back then, you won't want to miss it! Until then, happy stampin'!


Stampin' Up! Supplies Used:

Table built using Product Table Builder by The Crafty Owl - Independent Stampin' Up! Demonstrator.

Pop Of Pink Jar of Love Shaker Card

by Joanne James18. July 2016 07:00

Today I'm sharing the first of the cards from my second of this month's technique class featuring the very on-trend Jar of Love stamp set and co-ordinating Everyday Jars Framelits Dies. Each of the ladies received the bundle and as always I was on a mission to use as wide a variety as possible of the stamps in this set to showcase its versatility.

This was the easiest cards of the three - a fun 'pop of pink' shaker card:


Here's the low-down on today's card:

Pop of Pink - The colour scheme for my fun shaker is inspired by the Pop of Pink Suite of Products; I used some of the Pop of Pink washi tape to embellish with a little gold ribbon - here's the colours if you'd like to save them for inspiration too:


A Sweet Sentiment - This card uses one of the many sweet sentiments from the 'Jar of Love' stamp set and is perfect for the loveheart theme of my card. I added a Brights enamel heart too for added shine.

Confetti Fun - My confetti is a mix of Melon Mambo hearts, cut out with the little framelit in the Everyday Jars set, and the hearts in the metallic sequins assortment; I usually pick these out when I do other projects, so I had quite the collection for my shaker! 

Here is the visual summary of the key products used on today's project for you to pin for easy reference:


You can see all of my 'How To' summaries on my 'How To - Tips and Techniques' Pinterest board in case you've missed any. 

The Jar of Love and Everyday Jars Framelits bundle is another of those that has just has so many creative possibilities! If you haven't bought yours yet, this month would be the perfect time to do so; if you purchase the bundle at £48.50 you will earn yourself a £4.50 money-off coupon any purchases next month too - bargain! Just click on the links below to hop on over to my online store to order yours today - and don't forget to add this month's hostess code 63RNATE3 to get a little thank you in the post from me too.

I'll be back tomorrow with the second of the cards from my Jar of Love class; come back then, you won't want to miss it! Until then, happy stampin'!


Stampin' Up! Supplies Used:

Table built using Product Table Builder by The Crafty Owl - Independent Stampin' Up! Demonstrator.

Blue Jar of Thanks Card

by Joanne James4. July 2016 22:04

Happy Monday everyone! I hope yours was a good one; I had a very early class today, followed by school sports day for the James Juniors, the bad weather having caused it to be postponed from last week. Today was beautifully sunny though and there was some great sporting action out on the field. Back to a late blog post though as a result!

Whilst finishing up the preparations for my classes this week on Saturday I managed to sneak in an extra card too, using this week's Colour Q colours (or their closest current equivalents):


One of my classes this week features the Jar of Love stamp set, and I've been having so much fun stamping and cutting out the flowers that I decided to make another card with it - take a look:


Here's the low-down on today's card:

Jar of Blooms - The 'Jar of Love' set has a trio of jars, each a different size, with so many content options. My jar today is a vase filled with a mix of blue and orange blooms, stamped off first for the base layer of colour to allow for contrast - and cut out easily using my Big Shot and co-ordinating Everyday Jars Framelits Dies. There are also a host of co-ordinating sentiments. I've used the retro-styled 'thanks' on my card today, heat embossed in white onto Night of Navy cardstock.

Gorgeous Grunge Border - I used the striped stamp in the Gorgeous Grunge set for my border, stamped in Pumpkin Pie for a bright pop of orange.

Soften With Vellum - I stamped my jar, water and leaf stems directly onto my Whisper White cardstock. To soften the appearance of my glass jar, I used my framelits to cut a jar out of vellum and adhered it over the top, adding some Night of Navy twine around the neck of the jar and finishing with a bow.

Here is the visual summary of the key products used on today's project for you to pin for easy reference:


You can see all of my 'How To' summaries on my 'How To - Tips and Techniques' Pinterest board in case you've missed any. 

I'll be back tomorrow with another project; until then, happy stampin'!


Stampin' Up! Supplies Used:

Table built using Product Table Builder by The Crafty Owl - Independent Stampin' Up! Demonstrator.

Mini Catalogue

BROWSE THE CATALOGUE

The mini catalogue is now live! Read and download your copy here.

Shop Online

Access my online shop 24 x 7, 365 days of the year:

Current April hostess code:

VDKNV7BH

Shop Online

Join My Team

It's always a great time to join Stampin’ Up! New team members can get £130 worth of products for only £99 + free business supplies + free shipping + all the fun being a part of Stampin’ Up! Stampin' Up! has something for everyone: join my growing team and benefit from my support to enjoy Stampin' Up! however you choose.

If you're interested, call me for a chat to understand how I can help you realise your goals. Alternatively, if you have already decided to sign up and you just can't wait, please click here for the link to the online form where you can sign up and order your starter kit right away! 

Latest Kit!

Stampin Cut and Emboss

The Rock Legend Kit has all you need to make 8 cards with coordinating envelopes. Along with the new Panda Friends Kit, both are available from January 4th for just £14 each - get yours here!

2023-24 Annual Catalogue

BROWSE THE CATALOGUE

Click on the catalogue for a full list of current SU! supplies - if you would like to order any of the items featured, please drop me a line at [email protected] or give me a call on 07773 421446 - I'd be happy to help.

New Online Exclusives

There are new products available exclusively in the online store from 5 March - check them out here.

About Me

Hi I'm Joanne and live in Northampton and when I'm not looking after my husband and two beautiful children, am an avid crafter with a passion for all things Stampin' Up!

I must confess that I have never been a big rubber stamper - until I discovered Stampin' Up! that is. I love the fact that I can get such great results with co-ordinating stamps, inks, papers and punches - the possibilities are endless! Join me on my stamping journey as I share the things I love and be inspired to create amazing things yourself!

Follow Me

Monthly Newsletter

Box Builder

Click the button above to use Box Buster to create your custom box design using the Envelope Punch Board!

Kits Collection Now Available!

Stampin Cut and Emboss

The new Kits Collection from Stampin' Up! is now available!

Click here to see the current kits available and order yours online today.

I Design For


Stampin' Up Stuff

This is my personal blog and is not endorsed by Stampin’ Up! I hope you find it a plentiful source of ideas and personal inspiration but please don't copy my designs for contest submission or use for classes, publication or sale without express permission.