It's Sunday and time for a new challenge over at The Paper Players! It's the turn of my dear friend LeAnne to host our challenge this week and she has a great colour combination for you to play along with:

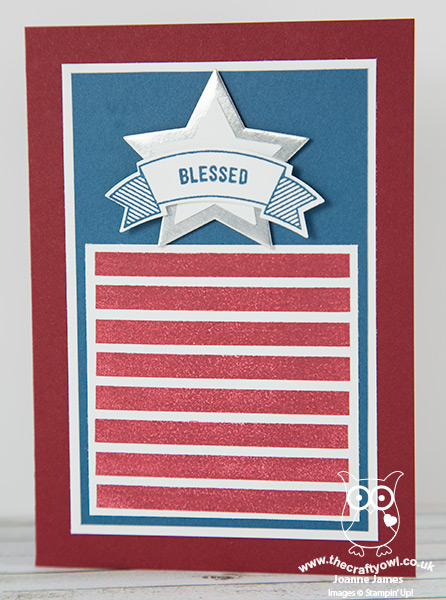
I thought these colours were calling out for a patriotic red, white and blue card. I toyed with creating something in honour of HM Queen Elizabeth II who is celebrating her official 90th birthday this weekend, but in the end decided to go with something more appropriate for American Independence day as 4th July is not that far away. This is what I came up with:
Here's the low-down on today's card:
Thoughtful Banners - I used the new 'Thoughtful Banners' stamp set to create my abstract stars and stripes card today. This set is all about the sentiments, with many combinations to choose from. It also has a useful stripe stamp, that can be used with or without the words and banners to create a striped pattern, as I've done here. This is a photopolymer stamp set too which makes it easy to line up without the need for a stamp-a-ma-jig - bonus!
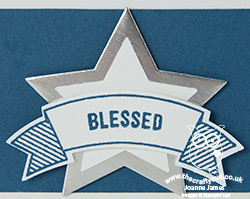
Duet Banner Punch - I could have used so many of the stamps in this set on my card today, however when I thought about independence and the armed forces both here in the UK and abroad, the one word that summed up how I felt was 'blessed' - blessed that so many men and women are prepared to serve our countries and protect the rights and freedoms we so often take for granted, so this was the word I chose to feature on the banner of my card. A banner that was easily created with the co-ordinating Duet Banner Punch. Buy this with the Thoughtful Banners stamp set as a bundle and save 10%; don't mind if I do!
Shine Like A Star - I backed my sentiment banner with a layered star, cut from silver foil with the Star Framelits and centred with a smaller one in Whisper White.
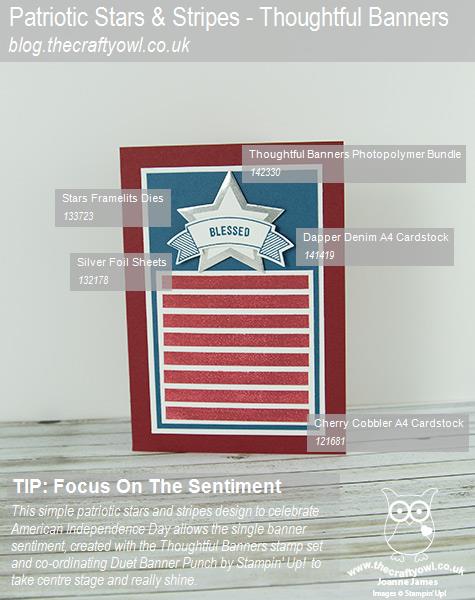
Here is the visual summary of the key products used on today's project for you to pin for easy reference:
You can see all of my 'How To' summaries on my 'How To - Tips and Techniques' Pinterest board in case you've missed any.
I hope this card is a fitting tribute to those who give of themselves in order to protect the freedoms of us all, for whom we should all feel truly blessed.
I'm linking up with the ladies over at SUO Challenges today where their current challenge is Summer Celebrations.
Before you reach for your ink and papers, check out what our amazing team has created to inspire you this week:
The Paper Players Design Team
Here's a quick recap of our challenge rules:
1. Create a new paper project
2. Upload your creation to your blog with a link back to us and provide a direct link to the post featuring your challenge submission.
3. Please link your card to no more than four challenges, TOTAL.
4. Have FUN!
I look forward to seeing what you create with our colour palette this week. We have basketball this morning then an afternoon of music practice for Rebecca who is singing in a concert on Monday evening, along with more practice of her lines in readiness for her stage performance as Dorothy in her school production of the Wizard of Oz in just a few short weeks time.
Back tomorrow with another project; until then, happy stampin'!
Stampin' Up! Supplies Used: