Birthday Delivery Chef Card

by Joanne James16. June 2017 07:00

Yay it's Friday! Another busy day for me and I'm starting it by sharing today's card for this week's Less Is More challenge with you:

One layer week and a theme of 'sweet things'. I've pondered this theme all week and whilst I was originally thinking ice-creams, on Wednesday afternoon as I iced Rebecca's birthday cakes I suddenly had a brainwave - take a look:


How cute is this little chap?! Here's the low-down on today's card:

A Birthday Chef - This little chef with his piping bag is just one of the fun images in the Birthday Delivery stamp set. I stamped him in Memento Black and dry-coloured him in with my watercolour pencils, stamping him on Crumb Cake so that his chef whites would really stand out. You can see a close-up of him above.

Ice, Ice Baby - The Happy Birthday' sentiment I used on my card looks just like icing so was the perfect choice to accompany my piping chef. I stamped my sentiment in Versamark and heat embossed it with white embossing powder in order to give a little more depth, dimension and shine to my one layer card. 

Oodles of Doodles - I created a border around the front of my card with one of the stamps in the retired 'Tin Of Cards' stamp set. You could just as easily use a fineliner and doodle your own.

What's sweeter than icing sugar? Such a fun card. Here is the visual summary of the key products used on today's project for you to pin for easy reference:


You can see all of my 'How To' summaries on my 'How To - Tips and Techniques' Pinterest board in case you've missed any. 

What a fun one layer challenge - I hope the ladies at LIM like today's card. Enjoy your day and I'll be back tomorrow with another project. Until then, happy stampin'!


Stampin' Up! Supplies Used:

Table built using Product Table Builder by The Crafty Owl - Independent Stampin' Up! Demonstrator.

Tags: , , , , ,

Cards | Shop Online | Shop Stampin' Up! Online | Stamping

Adult Colouring With Inside The Lines

by Joanne James8. February 2017 11:47

I'm back at my desk this morning so I'm getting in a nice early post (well, early for me!) Today I'm sharing a couple of cards using one of the great free Sale-A-Bration items, the Inside The Lines Designer Series Paper:

Adult colouring is a hot trend: adult colouring books feature consistently in the Amazon top selling books list across all categories. Did you know though that there are proven health and psychological benefits to colouring? Colouring is a great stress-reliever: colouring is said to calm the amygdala, the part of the brain related to the fear/stress response while stimulating the parts of the brain responsible for creativity and logic. A 2005 study documented a reduction in anxiety in subjects after a short time of colouring geometric patterns. In addition to reducing stress, there is also evidence to suggest that even a short colouring session is good for sharpening focus and encouraging creativity, making it popular with high flying business and creative professionals alike. Colouring can also make a great alternative to meditation, the psychological benefits of which are well documented; the ability to 'do' something without the need for active concentration produces a similar benefit to meditation in the brain, so if you are someone who finds it it difficult to 'switch off' and calm your mind, colouring may help you find your 'inner peace'.

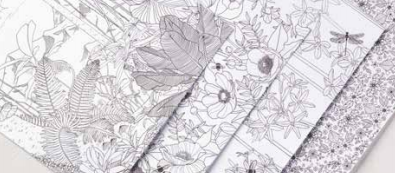
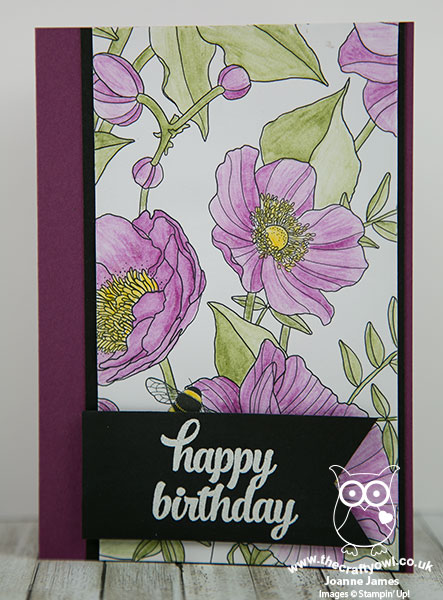
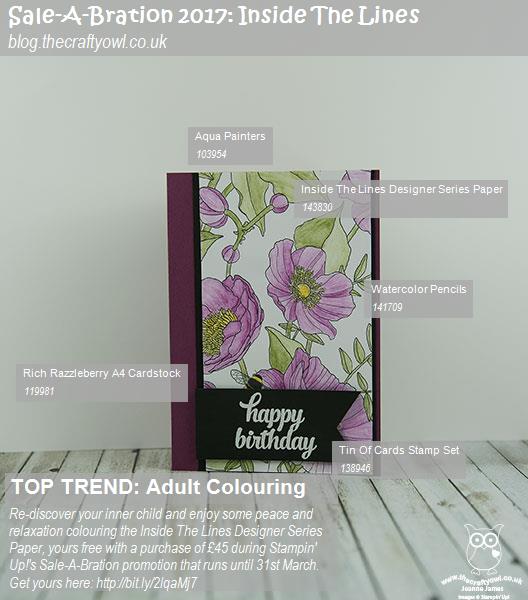
I am the proud owner of a 'mindfulness' adult colouring book and a page a day calendar (you can read about that in my previous post here) however being the crafty soul that I am, I'm always looking at how I can use my coloured images in a constructive way, rather than just leave them completed in my book. That's one of the reasons that the Inside The Lines paper appeals to me: with 12 sheets each measuring 12" x 12", 3 each of 4 designs, they are great for making into cards or home decor projects once your colouring is complete. Here's the first of my cards, coloured with Stampin' Up!'s new watercolour pencils and my aquapainter, adhered to a Rich Razzleberry card base and a simple sentiment banner featuring one of my go-to sentiment sets, Tin of Cards:


The paper is pretty enough though to stand up in its own right; this CASE of a card by Louise Sharp (you can see her original card here) leaves the main panel of the paper blank, with just a small area of the pattern coloured and cut out and used to embellish the sentiment panel:


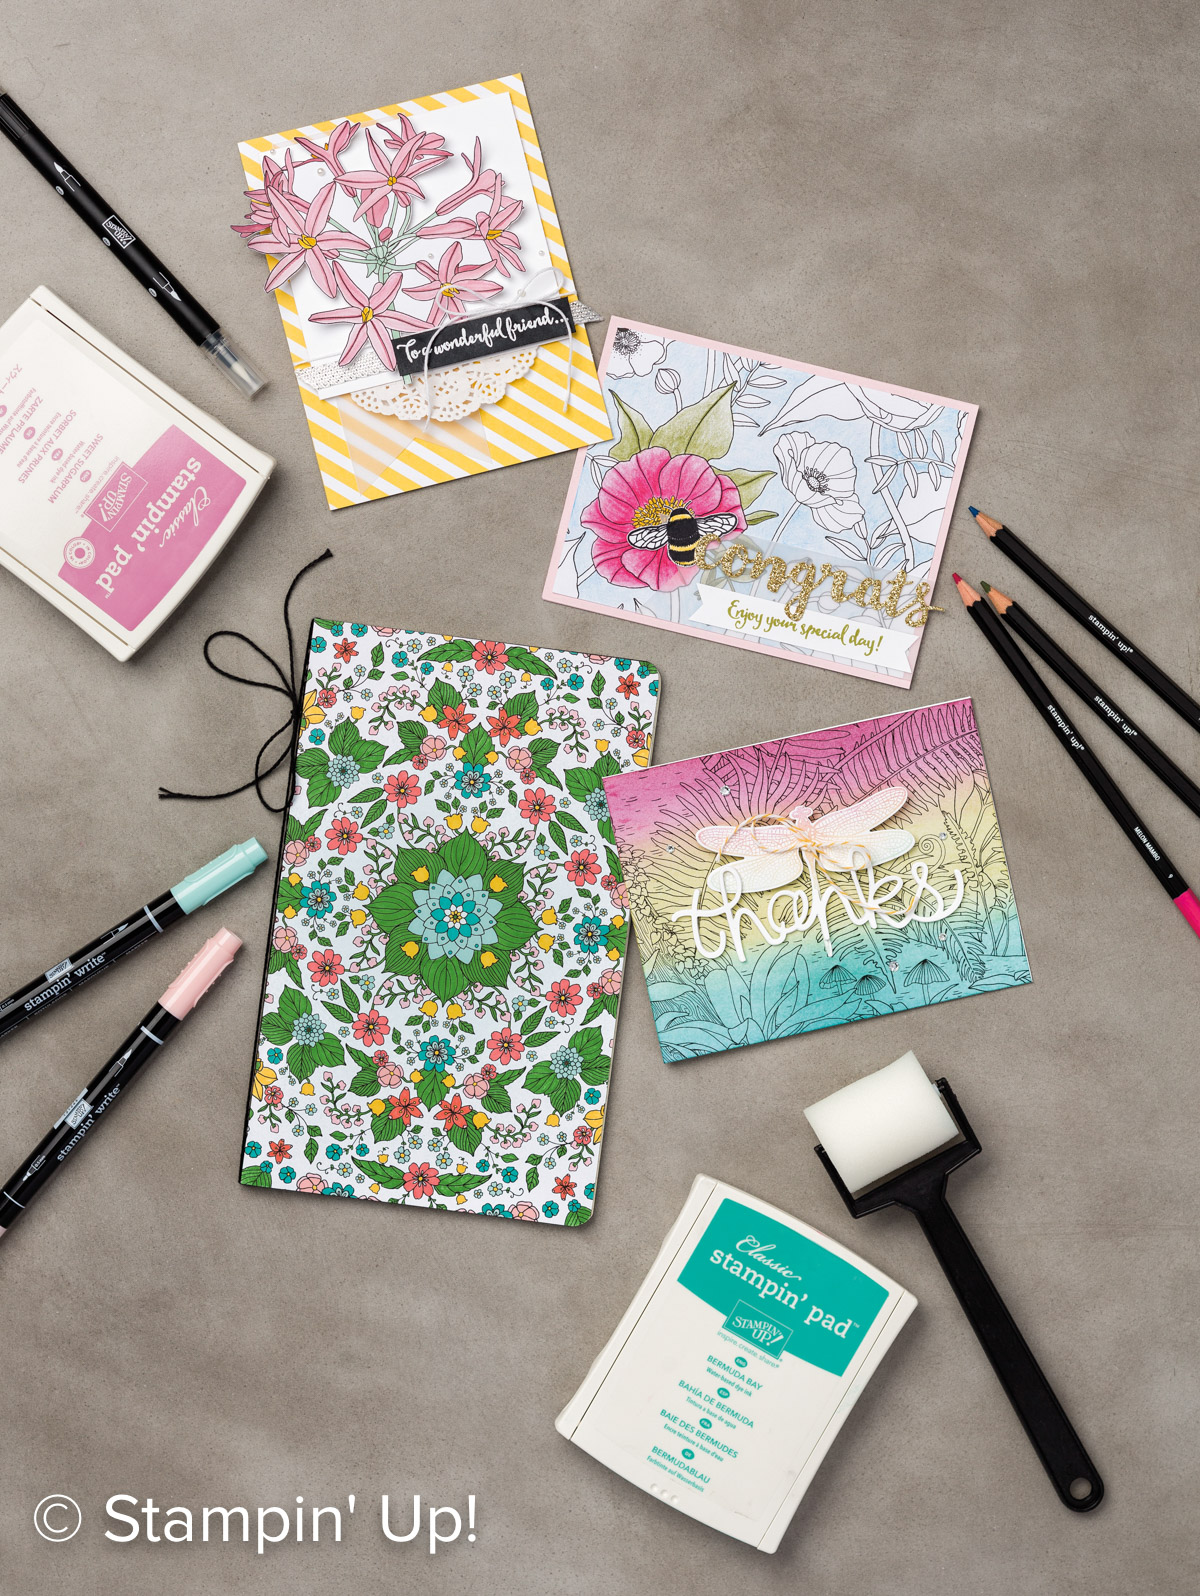
Here are some additional samples created by the Home Office Creative Team that show just some of the ways that this paper can be transformed with colour:


As if that wasn't enough, the lovely people at Stampin' Up! have even created a video demonstrating some fun techniques that can be used with this paper - take a look:

Here is the visual summary of the key products used on today's project for you to pin for easy reference:


You can see all of my 'How To' summaries on my 'How To - Tips and Techniques' Pinterest board in case you've missed any. 

If you like adult colouring or just want to rediscover your 'inner child', then all you have to do is place an order for £45 or more and you can receive the Inside The Lines paper for FREE! If you are ordering online, simply add the item code (143830) to your shopping basket once you've added your other items and it will add it free of charge. If you are ordering online (it's easy to do: just click on the shopping basket link in the 'Shop Online' basket on the right of this page, or alternatively click on any of the product links in the supply table below) don't forget to add this month's hostess code 4X3KWTZY in order to receive an extra little thank you in the post separately from me. 

So what are you going to create with Inside The Lines? Do let me know in the comments below - I'd love to hear your thoughts.

Enjoy your day and I'll be back tomorrow with another project. Until then, happy stampin'!


Stampin' Up! Supplies Used:

Table built using Product Table Builder by The Crafty Owl - Independent Stampin' Up! Demonstrator.

Petals and Paisleys Thank You

by Joanne James19. November 2016 20:00

Good evening everyone! I have been making some last minute samples for my Petals and Paisleys class next week and I decided to make a quick card to share with you using this week's Mojo Monday sketch:


This card is also perfect for the current colour challenge over at Fab Friday, since their trio of colours all feature in the Petals and Paisleys Specialty Designer Series Paper and the thankful challenge over at CAS-ual Fridays. Here's my card:


Here's the low-down on today's card:

Petals and Paisleys -  I covered the lower portion of my card with a piece of patterned paper from the Petals and Paisleys DSP which features all three of the challenge colours. I used the two least dominant colours, the Rich Razzleberry and Mint Macaron, for my topper and ribbon detail for added emphasis.

Paisley Framelits - The leaf that features in the paper pattern also has a corresponding framelit, so I cut one out in Mint Macaron as the perfect co-ordinating embellishment. I backed it with a fold of purple ribbon and anchored it using a Razzleberry enamel shape. Perfect!

Stitched Thinlit Dies - My sentiment from the 'Tin of Cards' stamp set is one of my 'go to' stamps for squares, as the font and size fits perfectly. What makes this one stand out is the layering with the stitched border,cut with the new Stitched Shape Thinlits. I've been using these a lot this week and love how they add interest to an otherwise plain shape.

Here is the visual summary of the key products used on today's project for you to pin for easy reference:


You can see all of my 'How To' summaries on my 'How To - Tips and Techniques' Pinterest board in case you've missed any. 

Do visit the other Design Team members to see what they did with this week's colours; there's lots of inspiration over on their blogs too!

Enjoy your day and I'll be back tomorrow with this week's new challenge over at The Paper Players. Until then, happy stampin'!


Stampin' Up! Supplies Used:

Table built using Product Table Builder by The Crafty Owl - Independent Stampin' Up! Demonstrator.

Noel, Noel - Hang Your Christmas Stocking!

by Joanne James17. November 2016 08:05

Today it's time for a new challenge over at Create With Connie and Mary and this week we have a sketch for you:


I decided this sketch was perfect to hang my stocking - literally! Take a look:


Here's the low-down on today's card:

Hang Your Stocking - My diecut stocking is cut using the Christmas Stocking Thinlits Dies. This set has lots of fun pieces to create stockings in three different sizes and add decorative trims - so many creative possibilities! It also comes with this great Noel diecut - perfect for edging a mantlepiece or adding a border trim to patterned paper, as I've done on my card today.

A Trio of Stamp Sets For Less - The diecut stocking is the clear winner on today's card, but this creation is by no means stamp-free; in fact, I used three stamps from three different stamp sets on my holiday card, all of them available this month at 25% off - what a bargain! You can read about the offer in full here along with the details of our new stitched framelit dies (these have been incredibly popular and will only now be orderable until 21st November before orders are put on hold whilst stocks are replenished - so you need to order them in the next few days to be assured of a timely delivery); in the meantime, did you spot them all? They are the stocking heel, toe and cuff detail and mini snowflakes from Hang Your Stocking, the large snowflake from Tin of Tags and the snowflake splatter from Christmas Pines. My stamping is subtle, yet each stamp contributes to the finished card.

Sparkle and Shine - I used Heat and Shine and Dazzling Diamonds along with the snowflake splatter stamp in the Christmas Pines set to add sparkle to the white section of my card. Difficult to photograph, but in real life so pretty! My Noel is also cut from a piece of red foil cardstock that I found in my scrapbox for a little extra shine and I added a sprinkle of rhinestones to finish. I love this festive colour combination, inspired by the Presents and Pinecones Designer Series Paper set - feel free to save it if it's one you like too:

Here is the visual summary of the key products used on today's project for you to pin for easy reference:


You can see all of my 'How To' summaries on my 'How To - Tips and Techniques' Pinterest board in case you've missed any. 

Do visit the other Design Team members to see what they did with this week's sketch; there's lots of inspiration over on their blogs too!

Enjoy your day and I'll be back soon with another project; until then, happy stampin'!


Stampin' Up! Supplies Used:

Table built using Product Table Builder by The Crafty Owl - Independent Stampin' Up! Demonstrator.

Happy Hello From A Foxy Friend

by Joanne James12. July 2016 18:00

I've been enjoying a nice couple of days of rest and relaxation but today am back to it from my sun lounger! I have a nice and easy Foxy Friends card for you, featuring the cute fox! Take a look:


Here's the low-down on today's card:

Take One Fox - I stamped the fox in Calypso Coral directly onto a circle of Whisper White, then stamped his head again onto a piece of scrap paper, punched it out and popped it over the main image on dimensionals. 

Spots and Chevrons - I paired the fox with a couple of pieces of patterned paper: the chevron pattern is from the A Little Foxy DSP Stack and the polka dot banner from the Subtles stack (my paper is actually the old design as I was using up some of my stash, but there is an almost identical pattern in the current Subtles DSP stack - the dots are just slightly bigger).

Add A Happy Hello - I finished my card with a sentiment from one of my 'go to' sentiment sets, Tin of Cards, stamped in Archival Black. I love the sentiments in this set - the font seems to go with everything and they are a great size for most cards.

I also added a piece of retired Basic Grey stitched ribbon, as this was all that I had to hand when I made this card; the new Smoky Slate stitched Ribbon would work beautifully for this card though - I've included the link for this in the supplies table below.

This is the card that I made at my last Coffee and Card session at Bell of Northampton before we broke up for the summer and this little chap proved very popular. The Foxy Friends bundle just has so many creative possibilities! If you haven't bought yours yet, this month would be the perfect time to do so; if you purchase the bundle and a pack of the 'A Little Foxy' Designer Series Paper Stack together you will have spent £45 and so you will earn yourself a £4.50 money-off coupon any purchases next month too - bargain! Just click on the links below to hop on over to my online store to order yours today - and don't forget to add this month's hostess code 63RNATE3 to get a little thank you in the post from me too.

Here is the visual summary of the key products used on today's project for you to pin for easy reference:


You can see all of my 'How To' summaries on my 'How To - Tips and Techniques' Pinterest board in case you've missed any. 

Back tomorrow with another project; until then, happy stampin'!


Stampin' Up! Supplies Used:

Table built using Product Table Builder by The Crafty Owl - Independent Stampin' Up! Demonstrator.

Swirly Bird Flowers Thank You Card

by Joanne James7. July 2016 08:05

Today it's time for a new challenge over at Create With Connie and Mary and this week we have a colour combination for you:


I initially was drawn to the lovely Fruit Stand designer series paper to make today's card, but when I'd finished my card decided it didn't have enough Cucumber Crush so decided to take a different approach. I will share my Fruit Stand card another day, but for now this is the card I came up with:


Here's the low-down on today's card:

Swirly Bird Scribble Flowers - I've been longing to use my Swirly Bird stamp set and co-ordinating Swirly Scribbles Framelits to create a modern floral card and today's bright and fresh colour combination provided the perfect opportunity. I stamped the bases in Peekaboo Peach and used the Scribbles in Tangerine Tango for a real pop of juicy colour. The Cucumber Crush provides wonderfully bright leaves and I added a few enamel dots too here and there.

Playful Palette Border - The hatched pattern from the Playful Palette DSP stack comes in both pink and Peekabooo Peach and it provided the perfect border for my card. I added a strip of Customer Crush to the stamped panel too for definition and contrast.

Thank You Tin of Cards - The sentiments in the 'Tin of Cards' stamp set are some of my 'go to' sentiments, I love the size and style of the scripting so much. Thank you Stampin' Up! for keeping this set, even though the Tin of Cards kit has had a refresh and makeover and now has a new set that co-ordinates with it. 

Here is the visual summary of the key products used on today's project for you to pin for easy reference:


You can see all of my 'How To' summaries on my 'How To - Tips and Techniques' Pinterest board in case you've missed any. 

Do visit the other Design Team members to see what they did with this week's colours; there's lots of inspiration over on their blogs too!

Enjoy your day and I'll be back tomorrow with another project; until then, happy stampin'!


Stampin' Up! Supplies Used:

  • Swirly Bird Photopolymer Bundle
  • Playful Palette Designer Series Paper Stack
  • Tin Of Cards Photopolymer Stamp Set
  • Cucumber Crush A4 Cardstock
  • Very Vanilla A4 Cardstock
  • Tuxedo Black Memento Ink Pad
  • Peekaboo Peach A4 Cardstock
  • Cucumber Crush Classic Stampin' Pad
  • Peekaboo Peach Classic Stampin' Pad
  • 2016-2018 In Color Enamel Shapes

Botanical Builder Flowers And A Happy Hello From The Paper Players

by Joanne James10. April 2016 09:00

It's Sunday and time for a new challenge over at The Paper Players! It's my turn to host our challenge this week and I have an interesting colour combination for you to play along with:


I knew when I chose my colour palette some months ago that I would do something with flowers; for my card this week I was inspired to use the Botanical Builder Framelits Dies - I just love those flowers and I knew they would be great to create the tropical flowers I had in mind with my colour scheme. I also used this week's sketch over at Mojo Monday for the layout for my card:


Here's the low-down on today's card:

Lots of Layers - I love layers and this card has lots of them! I kept them either plain or with a unified pattern of polka dots so that they wouldn't overwhelm the sentiment and flowers that are the focal point of my card.

Subtles versus Brights - Balancing my colour choices today may be considered a challenge in itself. I used my Brights largely as accent colours, although the one thing I did differently on my card was stamp my sentiment if Soft Sky, the lightest colour. This is a real departure for me as normally I would stamp it in the strongest darkest colour for impact, yet sometimes it pays to take a more subtle approach - I hope you agree :-)

The Perfect Accent - Yes I used those White Perfect Accents for my flowers again - I love them, whether left 'naked' as here today or coloured up using my Sharpies. They make such a great flower centre.

Here is the visual summary of the key products used on today's project for you to pin for easy reference:


You can see all of my 'How To' summaries on my 'How To - Tips and Techniques' Pinterest board in case you've missed any. 

Before you reach for your ink and papers, check out what our amazing team has created to inspire you this week:

The Paper Players Design Team
 
 
Here's a quick recap of our challenge rules:
 
1.  Create a new paper project
2.  Upload your creation to your blog with a link back to us and provide a direct link to the post featuring your challenge submission.
3.  Please link your card to no more than four challenges, TOTAL.
4.  Have FUN! 


I look forward to seeing what you create with this week's colours. We are off to basketball today but no hockey - one more week off for Easter until we are back on the pitch! This means cycling if the sun is shining or board games if it rains - let's see where we end up!

Back tomorrow with another project; until then, happy stampin'!


Stampin' Up! Supplies Used:

Table built using Product Table Builder by The Crafty Owl - Independent Stampin' Up! Demonstrator.

Color Me Irresistible Botanical Blooms Happy Birthday

by Joanne James3. March 2016 08:05

Today it's time for a new challenge over at Create With Connie and Mary and this week we have a colour combination for you:


I thought this colour combination was quite an unusual one and I did spend a lot of time working out what to do with it! Eventually there were two things that set me off on the path that led to today's card: one was the desire to use a piece of the coloured Color Me Irresistible Specialty Designer Series Paper and the other was this card by the lovely Connie Babbert! I loved the layout of Connie's card and knew when I saw it that it would be perfect for what I had in mind - here is the end result:


I decided to use Hello Honey for my card base and make a feature panel of the Color Me Irresistible paper - this paper is quite dramatic but the hint of pattern and combination with the other two challenge colours worked perfectly. A few layered Botanical Builder flowers and a happy birthday sentiment from the 'Tin of Cards' stamp set, finished with a black satin ribbon bow, finish my card. I just love the flower combinations that you can achieve with the Botanical Builder Framelit Dies - in addition by sponging the centres and edges and adding feathered lines using the tip of your Stampin' Write marker, as I did on the largest of the blooms on today's card, it's easy to create beautifully realistic and dimensional flowers. 

Here is today's visual summary for easy reference:


Do visit the other Design Team members to see what they did with this week's colours; there's lots of inspiration over on their blogs too!

Enjoy your day and I'll be back tomorrow with another project; until then, happy stampin'!


Stampin' Up! Supplies Used:

  • Tuxedo Black Memento Ink Pad
  • Botanical Builder Framelits Dies
  • Tin Of Cards Photopolymer Stamp Set
  • Color Me Irresistible Specialty Designer Series Paper
  • Very Vanilla A4 Cardstock
  • Hello Honey A4 Cardstock
  • Hello Honey Classic Stampin' Pad
  • Cajun Craze Classic Stampin' Pad
  • Cajun Craze A4 Cardstock
  • Basic Black 3/8" Stitched Satin Ribbon
  • Neutrals Candy Dots
  • Project Life Corner Rounder

Botanical Builders Purple Flowers Birthday Card

by Joanne James30. January 2016 08:50

It's Sunday and time for a new challenge over at The Paper PlayersThis week it is the turn of the sweet Jaydee to host and she has a tic-tac-toe for you to play along with:


When I was considering which squares to use to create my card, I noticed that none of the other girls on the team had used purple. This is one of my favourite colours, so I decided to use this as my starting point. I was also drawn to the black and white striped background and central focal image of Connie Collins' card for 'Case The Designer' over at The Global Design Project, so wanted to combine the two. I settled on the top row - flowers, bling, purple - for my card today:

My background paper is from the 'Go Wild' paper stack - these papers are not just great for animal prints! I used a trio of purples for my flowers, die cut using the Botanical Builder Framelits Dies, and I used them to frame my birthday sentiment from the Tin of Cards stamp set - I just love the fonts in this set. My 'bling' is in the form of a liberal dose of Wink of Stella on my main flower and a scattering of rhinestones across my card. 

Before you reach for your ink and papers, check out what our amazing team has created to inspire you this week:

The Paper Players Design Team
 
 
Here's a quick recap of our challenge rules:
 
1.  Create a new paper project
2.  Upload your creation to your blog with a link back to us and provide a direct link to the post featuring your challenge submission.
3.  Please link your card to no more than four challenges, TOTAL.
4.  Have FUN! 


I look forward to seeing what you create with this week's tic-tac-toe challenge - so many creative possibilities! Rebecca is playing in a hockey tournament today so I shall be wrapped up warm with a mug of tea in hand as I watch and hoping for a little craft time this afternoon. Enjoy your Sunday however you are spending it!

Back tomorrow with another project; until then, happy stampin'!


Stampin' Up! Supplies Used: 

Table built using Product Table Builder by The Crafty Owl - Independent Stampin' Up! Demonstrator.

Stampin' Up! Kits - The Perfect Christmas Present!

by Joanne James7. December 2015 21:08

Today's blog post is something of a public service announcement: with eighteen days until Christmas and just 6 days until you can place your Stampin' Up! orders in order to guarantee delivery in time for Christmas - last date for orders guaranteed to deliver before Christmas is Sunday 13th December - I wanted to share with you two of the most popular kits in the Stampin' Up! range that make the perfect Christmas present. 

The first is the Tin of Cards Project Kit that features on the front of the annual catalogue. Here's a picture of everything that's included:


The kit contains blanks and envelopes to create 16 cards and comes with a lovely card organiser storage tin and dividers to keep them in when you're done. Add a Tin of Cards stamp set, a couple of ink pads and some adhesive and you are good to go! Or if you're an existing crafter with supplies, you could use any ink pads and stamp set to achieve great results. Here's a picture I took of my finished set:


Those helpful people at the Stampin' Up! Home Office have even produced a little video showing you how easy this kit is to put together - you can see it here:

My favourite kit of all though has to be the Watercolour Wishes Card Kit. Whether a seasoned crafter or someone who has never stamped or even crafted before, this is a fabulous all-inclusive kit that contains everything you need to create 20 unique cards with pre-watercoloured designs. Check out the kit contents:


The kit has envelopes, card blanks, die cut pieces and flowers, sequins, dimensionals, wooden embellishments, a roll of washi tape and an acrylic block, two mini ink pads and a 12 piece stamp set - and it comes in a beautiful gift box all ready to gift. All this for £31.50; this kit really does make the perfect gift! There will be lots of embellishments left over and the ink pads and stamp set can be used for lots of other projects when the kit cards have been completed. 

Here's a photo of just some of my completed kit:


I love to sit and make up my kits with my good friend Barbara; they are so quick to make and have full colour instructions that are so easy to follow. It always makes for a pleasant couple of hours!

If you needed further convincing, then here's another video with more detail:

If you would like to order either of the above kits, please click on the links below  to order from my online store or if you live in or around Northampton, please email me or give me a call - I will even gift wrap for you if you wish!

Christmas shopping with Stampin' Up! is easy - and who wouldn't love to receive such a lovely gift in their Christmas stocking??!

That's all from me today; back tomorrow with another project. Until then, happy shopping!


Links to my Stampin' Up! Store - Watercolour Wishes Kit:

Table built using Product Table Builder by The Crafty Owl - Independent Stampin' Up! Demonstrator.


Links to my Stampin' Up! Store - Tin Of Cards Project Kit:

Table built using Product Table Builder by The Crafty Owl - Independent Stampin' Up! Demonstrator.


Mini Catalogue

BROWSE THE CATALOGUE

The mini catalogue is now live! Read and download your copy here.

Shop Online

Access my online shop 24 x 7, 365 days of the year:

Current April hostess code:

VDKNV7BH

Shop Online

Join My Team

It's always a great time to join Stampin’ Up! New team members can get £130 worth of products for only £99 + free business supplies + free shipping + all the fun being a part of Stampin’ Up! Stampin' Up! has something for everyone: join my growing team and benefit from my support to enjoy Stampin' Up! however you choose.

If you're interested, call me for a chat to understand how I can help you realise your goals. Alternatively, if you have already decided to sign up and you just can't wait, please click here for the link to the online form where you can sign up and order your starter kit right away! 

Latest Kit!

Stampin Cut and Emboss

The Rock Legend Kit has all you need to make 8 cards with coordinating envelopes. Along with the new Panda Friends Kit, both are available from January 4th for just £14 each - get yours here!

2023-24 Annual Catalogue

BROWSE THE CATALOGUE

Click on the catalogue for a full list of current SU! supplies - if you would like to order any of the items featured, please drop me a line at [email protected] or give me a call on 07773 421446 - I'd be happy to help.

New Online Exclusives

There are new products available exclusively in the online store from 5 March - check them out here.

About Me

Hi I'm Joanne and live in Northampton and when I'm not looking after my husband and two beautiful children, am an avid crafter with a passion for all things Stampin' Up!

I must confess that I have never been a big rubber stamper - until I discovered Stampin' Up! that is. I love the fact that I can get such great results with co-ordinating stamps, inks, papers and punches - the possibilities are endless! Join me on my stamping journey as I share the things I love and be inspired to create amazing things yourself!

Follow Me

Monthly Newsletter

Box Builder

Click the button above to use Box Buster to create your custom box design using the Envelope Punch Board!

Kits Collection Now Available!

Stampin Cut and Emboss

The new Kits Collection from Stampin' Up! is now available!

Click here to see the current kits available and order yours online today.

I Design For


Stampin' Up Stuff

This is my personal blog and is not endorsed by Stampin’ Up! I hope you find it a plentiful source of ideas and personal inspiration but please don't copy my designs for contest submission or use for classes, publication or sale without express permission.