It's Sunday and time for this week's new challenge over at The Paper Players- what's more, it's the last one of 2017! It's the turn of my good friend, the lovely and talented Claire, to host this week and she has a bright colour challenge for us to end the year with:
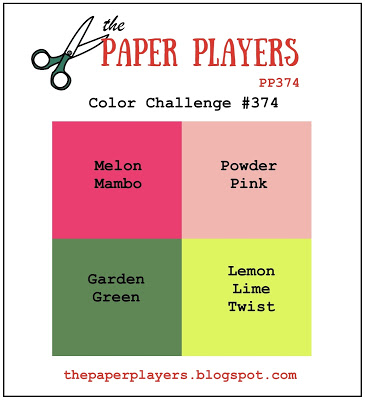
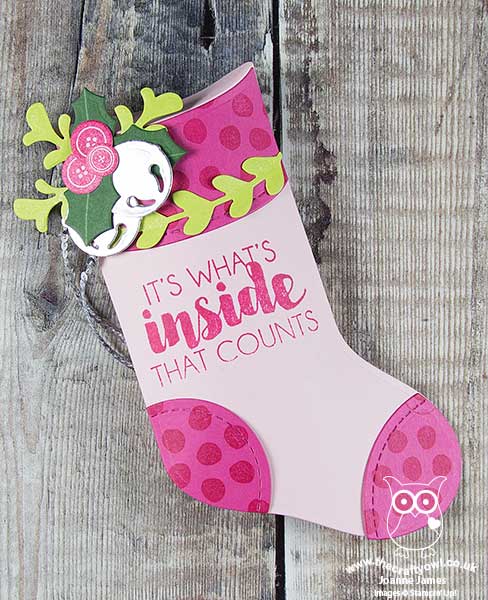
This is a palette with lots of options - you could still craft for Christmas, or use these colours for a non-festive project, it's up to you. Our design team this week has done a little of both, so there's lots of inspiration for you. I took the opportunity to squeeze in another Christmas project, but went with a 3D gift box rather than a card today. In fact, a Christmas stocking - take a look:
Here's the low-down on today's project:
Trim Your Stocking - These colours were perfect for a pink and girly Christmas stocking, complete with spotty heel, toe and cuff trim then finished off with a sprig of festive greenery. I've used the Trim Your Stocking Thinlits on this card previously but whatever your project, this set has an abundance of useful dies that are perfect for all kinds of embellishments.
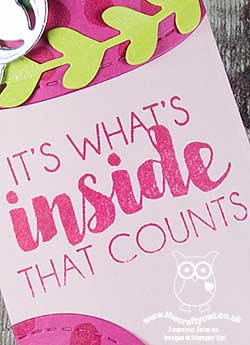
It's What's Inside That Counts - I love this sentiment! Whether it's a little chocolate - the content of choice of Rebecca - or money (most definitely the content of choice for my teenage niece!), the pillow box on the reverse of this stocking is just big enough for either. I haven't yet decided who this stocking will be heading for and for me how it looks on the outside is the most important thing, but one thing is for sure, for the recipient it's definitely what's inside that counts!
A Little Added Sparkle - I couldn't resist adding in a little sparkle to my festive stocking, with a silver foil bell, some mini sequin trim and a liberal dose of clear Wink of Stella on the lime green pieces - I'm hoping Claire considers silver (almost) a neutral such that I can get away with it - I just couldn't resist, those jingle bell dies are my favourite!
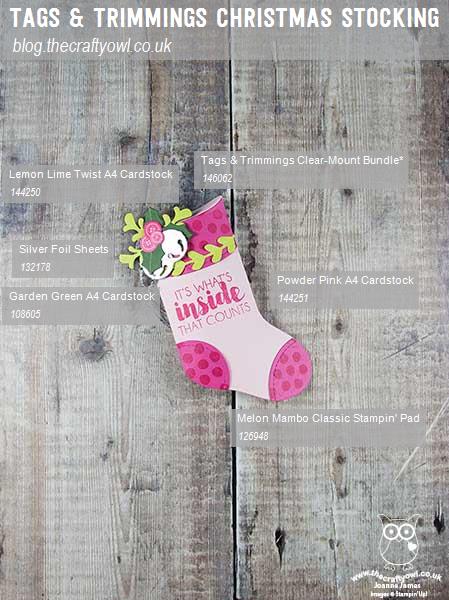
Here is the visual summary of the key products used on today's project for you to pin for easy reference:
You can see all of my Product and 'How To' summaries on my 'How To - Tips and Techniques' Pinterest board in case you've missed any.
Before you reach for your ink and papers, check out what our amazing team has created to inspire you this week:
The Paper Players Design Team
Here's a quick recap of our challenge rules:
1. Create a new paper project
2. Upload your creation to your blog with a link back to us and provide a direct link to the post featuring your challenge submission.
3. Please link your card to no more than four challenges, TOTAL.
4. Have FUN!
I look forward to seeing what you create with this week's colour palette. As I mentioned above, this is our last challenge for 2017; we will be taking a two week break before returning with a fresh new set of challenges for 2018 starting on Sunday 7th January 2018. Thanks to everyone who plays along each week, to this year's guest designers, Crystal and Valentyna, Deanne, Jan and Annie, and everyone of you who visits our blogs and leaves us encouraging comments each week - it's great to know that you enjoy our creations! We will be announcing our new guest designers for the first half of 2018 this coming Wednesday, in my mid-week reminder post, so be sure to check back then to see who will be joining us to kick off the Paper Players fun at the start of 2018!
Enjoy the rest of your weekend as it will be over all too quickly; we are hoping to put our Christmas tree up and decorate the house tomorrow - then it really will feel like Christmas! I'll be back soon with another project; until then, happy stampin'!
Stampin' Up! Supplies Used: