Seasons of Fun Easy Autumn Leaves Shaker Card

by Joanne James2. October 2021 18:00

Happy World Card Making Day everyone! Have you crafted today? Today I'm sharing a card for the current challenges over at Global Design Project and Double D Challenge where they are both about leaves:


I’ve changed things up a little for my card with a super easy shaker card to really make the most of those autumn falling leaves - take a look:


Isn’t it just the cutest? Here's the low-down on today's card:

Seasons of Fun - The little boy having fun playing in the leaves is from the ‘Seasons of Fun’ hostess set in the mini catalogue and was the perfect background for my shaker. I stamped him onto a stitched rectangle and coloured him in with a variety of Stampin’ Blends, matching the colours to those of my falling diecut leaves to create a seamless picture.

How To Create An Easy Shaker Card - The shaker card element on today’s card was so easy and straightforward to create: all you need to do is place your shaker pieces - I used leaves cut with the Seasonal Swirls Dies and some gold sequins for a little sparkle - onto your background image and panel and carefully slide into an acetate sleeve, the kind you sometimes put finished cards into for sale, and fold the sides and tape behind. This creates a flat pocket with less depth and freedom of movement than a traditional shaker card, which is better for posting, but still allows the contents to move around and ‘shake’. 

Pattern Party With Colour - I placed my shaker pocket onto a background of leafy paper from the Pattern Party hostess paper pack. This is a black and white paper, but I coloured the leaves in with my Stampin’ Blends to further continue my leafy theme tie in my frame with the central image:


I deliberately left the front of my card sentiment-free, as I didn’t want to obscure my shaker and central image. I’m also not sure who I’m going to send this card to so it made more sense to add one at a later date if needed.

Here is the visual summary of the key products used on today's project for you to pin for easy reference:


You can see all of my 'How To' summaries on my 'How To - Tips and Techniques' Pinterest board in case you've missed any. 

Enjoy your day and I'll be back tomorrow with another project. Until then, happy stampin'!


Stampin' Up! Supplies Used:

Table built using Product Table Builder by The Crafty Owl - Independent Stampin' Up! Demonstrator.

A Clean and Simple Christmas Crowd for PP468

by Joanne James17. November 2019 09:00

Today it's Sunday and time for this week's new challenge over at The Paper Players! It's the turn of the fabulous Jaydee to host this week and she has a great seasonal Clean and Simple challenge for you to work with:


Since this challenge theme was the North Pole, I had to go with a Santa and his festive friends - take a look:


Here's the low-down on today's card:

I used this week's CAS(E) This Sketch for my layout and heat embossed my sentiment in white onto my Real Red card base before stamping my single stamp image from 'Christmas Crowd' in Tuxedo Black Memento ink onto my top layer of Whisper White and colouring with my Stampin' Blends. I added some clear Wink of Stella to the fur on Santa's suit and a sprinkling of snowflake sequins, before popping my panel up on dimensionals and attaching to the front of my card base. I also stamped the outline image on the inside of my card behind my sentiment:

Now I know not all of Santa's Christmas crowd can be normally found in the North Pole (cue the penguin!!) however I think for such a cute bunch we can make an exception and grant a little creative licence!

Here is the visual summary of the key products used on today's project for you to pin for easy reference:


You can see all of my Product and 'How To' summaries on my 'How To - Tips and Techniques' Pinterest board in case you've missed any. 

Before you reach for your ink and papers, check out what our amazing team has created to inspire you this week:

Here's a quick recap of our challenge rules:
 
1.  Create a new paper project
2.  Upload your creation to your blog with a link back to us and provide a direct link to the post featuring your challenge submission.
3.  Please link your card to no more than four challenges, TOTAL.
4.  Have FUN!

You can see all of my 'How To' summaries on my 'How To - Tips and Techniques' Pinterest board in case you've missed any. 

Enjoy your day; we had a day packed with sport yesterday so today will be about homework and baking for tomorrow's school charity bake sale. I have a busy week ahead but I have managed to make and photograph some other projects, so I'll be back tomorrow with more Christmas goodness to share. Until then, happy stampin'!


Stampin' Up! Supplies Used: 

Table built using Product Table Builder by The Crafty Owl - Independent Stampin' Up! Demonstrator.

A Good Man Times Two For One Of The Best

by Joanne James17. June 2019 12:18

Happy Monday everyone! Today I'm sharing two cards made using this week's Freshly Made Sketches layout:

Yesterday was Father's Day here in the UK and I used the FMS sketch and one of my new stamp sets to create a pair of co-ordinating cards from each of the James Juniors for their Dad to celebrate this special day. Here's the first one, from Rebecca:


And here's the second one, from Ben:


Here's the low-down on today's card:

A Good Man - How I love this stamp set! The first time I saw it, it went straight to the top of my wish list. I am fond of the other sets in this style by this particular concept artist (Let It Ride, Beautiful You and Wonderful Moments) with their loose lines and almost handwritten sentiments, but this set with its girl and boy and father figure could have been made for me, it looks so much like my children and their Dad; here's a picture of all of us together so that you can see what I mean:


 They are both a little older now than they were when this picture was taken, but you get the idea! So this set was the perfect way to celebrate a special Dad on Father's Day.

A Split Sentiment - The 'A Good Man' stamp set has some wonderful sentiments, that would work just as well on a birthday card too. To work with the layout, I split both of my sentiments and included the first portion on the three horizontal elements and then the second piece on the main panel, next to the fussy cut images that I coloured with my Stampin' Blends. 

Sail Away Stripes - For a little extra detail, I added a base layer of striped patterned paper featuring two of the designs from the 'Come Sail Away' designer series paper pack. This pack has some great designs and in addition to the obviously nautical sailboats and anchors, these stripes are great for all kinds of cards and projects, with not a boat in sight!

Here is the visual summary of the key products used on today's projects for you to pin for easy reference - for the first card:


And for the second card:


You can see all of my 'How To' summaries on my 'How To - Tips and Techniques' Pinterest board in case you've missed any. 

Enjoy your day and I'll be back tomorrow with another project. Until then, happy stampin'!


Stampin' Up! Supplies Used:

Table built using Product Table Builder by The Crafty Owl - Independent Stampin' Up! Demonstrator.

Perfectly Paired Decoupage Welcome New Baby Card

by Joanne James3. May 2019 08:00

Today I'm sharing a card for the current baby theme challenge over at Inspire.Create:

 There are a couple of cute baby sets in the Spring-Summer catalogue and both are set to retire at the end of the month. I used my favourite, Perfectly Paired, to create a colourful and fun baby card - take a look:


Here's the low-down on today's card:

I've created a whole host of cards with the Perfectly Paired stamp set (check out this post here if you missed it) but they have all involved using the stamp in a single colour. This is such a fabulous stamp set to colour though and I spent a pleasant couple of hours with my Blends markers creating this card. I haven't listed them all out in the table below as I pretty much used all of them in one way or another! I stamped the image twice and coloured a few of the animals and fussy cut them and popped them up on dimensionals to create a fun decoupage detail. you can see that in this close up here:

I added a border using my favourite gingham paper and a stitched diecut edge using the Be Mine Stitched Framelits to finish my card.

Here is the visual summary of the key products used on today's project for you to pin for easy reference:


You can see all of my 'How To' summaries on my 'How To - Tips and Techniques' Pinterest board in case you've missed any. 

Enjoy your day and I'll be back tomorrow with another project. Until then, happy stampin'!


Stampin' Up! Supplies Used:

Table built using Product Table Builder by The Crafty Owl - Independent Stampin' Up! Demonstrator.

Bella and Friends Clean and Simple Notecards

by Joanne James16. January 2019 21:00

Happy Wednesday everyone! I've decided to write a regular weekly slot dedicated to simple stamping and since today has been a busy one, I thought it was time for one such post! We all like quick and easy projects from time to time, either because you need something last-minute or you need a few of something and just want to run off some multiples. Equally, if you're new to crafting and don't have lots of supplies, simple stamping can be a way to stretch your supplies and focus on basic techniques whilst still producing something with a quality finish. I'll be using the hashtag #SimpleStamping - if you're a user of social media you should search under this hashtag from time to time for lots of papercrafting ideas that are easy to recreate, often using little more than basic supplies and stamps, ink and paper.

For this week's take on #SimpleStamping I have another couple of super simple thank you cards for you that could be whipped up in a jiffy:


I get through lots of thank you cards and sometimes I need to be able to turn out a lot in one go. I love a little colouring with my Blends markers too and sometimes, whilst relaxing, this can take a little while to do a good job. These little puppies are so quick to colour though you can honestly get each card finished in under a minute.  

These cards are also great examples of #SimpleStamping - a pack of notelets, a single stamped image courtesy of the 'Bella and Friends' stamp set in the annual catalogue, some Stampin' Blends and a little time for some colouring and done!

Here is the visual summary of the key products used on today's project for you to pin for easy reference:


You can see all of my 'How To' summaries on my 'How To - Tips and Techniques' Pinterest board in case you've missed any. 

I'll be back tomorrow with another project. Until then, happy stampin'!


Stampin' Up! Supplies Used:

Table built using Product Table Builder by The Crafty Owl - Independent Stampin' Up! Demonstrator.


Bee Thankful Simple Stamped Thank You Notelets

by Joanne James5. January 2019 20:00

I've been back in my craft room for a few hours today and yes, it felt good! I have some new makes to share with you this week as a result too. This evening I'm just popping in with a quick post to share a couple of super simple thank you cards that are perfect for the current challenge over at StampInkPaper:

Here's a close up of my card - I did a little basic ombre colouring on the lettering using two shades of the same colour Blend marker:


I made these with the James Juniors over the Christmas period - they make great thank you cards to send for gifts received. I encourage my children to keep up this polite tradition and they are not always that accommodating, however they had fun with this set and whilst they didn't write reams, it's the thought that counts and I'm sure the gesture will be appreciated.

These cards are also great examples of #SimpleStamping - a pack of notelets, a single stamped image courtesy of the 'Bee Thankful' stamp set in the annual catalogue and some Stampin' Blends and a little time for some colouring and done!


Here is the visual summary of the key products used on today's project for you to pin for easy reference:


You can see all of my 'How To' summaries on my 'How To - Tips and Techniques' Pinterest board in case you've missed any. 

I'll be back tomorrow with another project for the first challenge of the year over at The Paper Players - don't miss it! Until then, happy stampin'!


Stampin' Up! Supplies Used:

Table built using Product Table Builder by The Crafty Owl - Independent Stampin' Up! Demonstrator.

Peaceful Poinsettia Christmas Card Two Ways PP422

by Joanne James9. December 2018 09:00


It's Sunday and time for this week's new challenge over at The Paper Players! It's my turn to host this week and for our final challenge this year I have a festive colour challenge for you to work with:
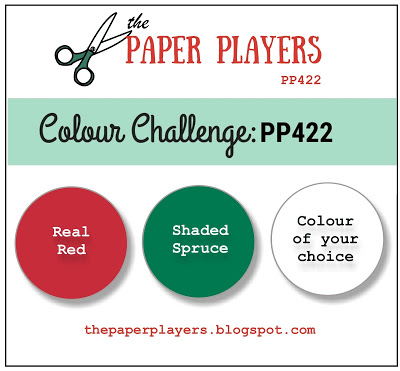
 

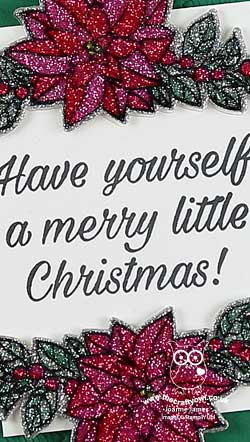
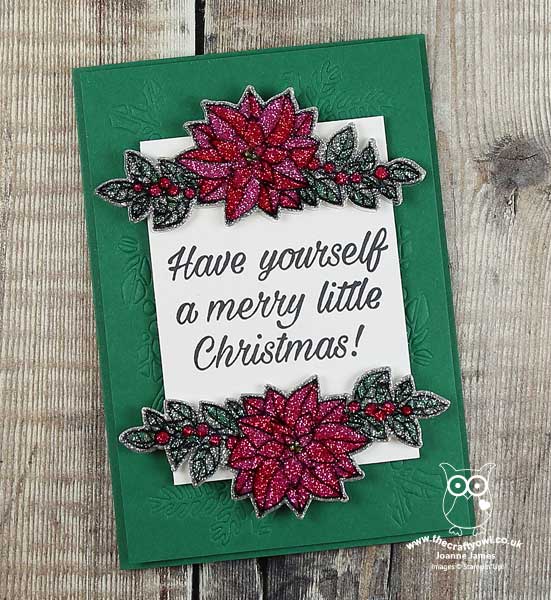
Red, green and a colour of your choice - to retain the festive theme! I have not one but two Christmas cards to share with you this week both of which feature a traditional flower for this time of year. My cards are identical, I simply used Shaded Spruce for the base of one and Real Red for the base of the other. Take a look at the first one on the base of Shaded Spruce:
 

And here's the second one, on a Real Red base:


Here's the low-down on today's cards:

Peaceful Poinsettia - I'm not sure whether my colour scheme inspired my choice of poinsettia for today's card, or the other way around - maybe a bit of both! Either way I thought that the two were a perfect match, so used an inverted pair of the festive boughs from the Peaceful Poinsettia stamp set to frame this sentiment from the same set which seemed fitting for our final Paper Players challenge of the year. 

Detailed Poinsettia Embossing - I used the Detailed Poinsettia Thinlits Dies to cut out my floral boughs but also used the corner pieces and smaller detailed dies to create an embossed panel for the base of my card by using the Big Shot embossing mat to emboss using the thinlits rather than diecut with them. I love the effect this gives and the subtle detail it adds.

Added Floral Sparkle - For added sparkle to my poinsettias, I chose silver as my additional colour of choice and used the same technique that I used on this card here where you stamp onto a piece of acetate window sheet using Stazon ink and flip it over and colour the reverse with Stampin' Blends. This is then backed with silver glimmer paper for a sparkly coloured effect. This is such a fun technique and really very pretty in real life.

I'm not sure which of these cards I prefer - that's why I shared both; I'd love to know which one is your favourite. 

Here is the visual summary of the key products used on today's projects for you to pin for easy reference:
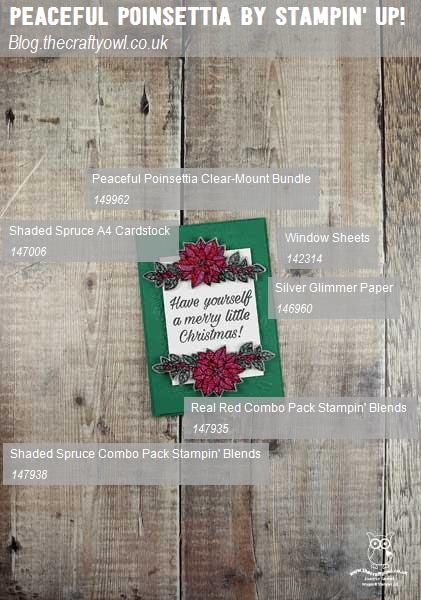
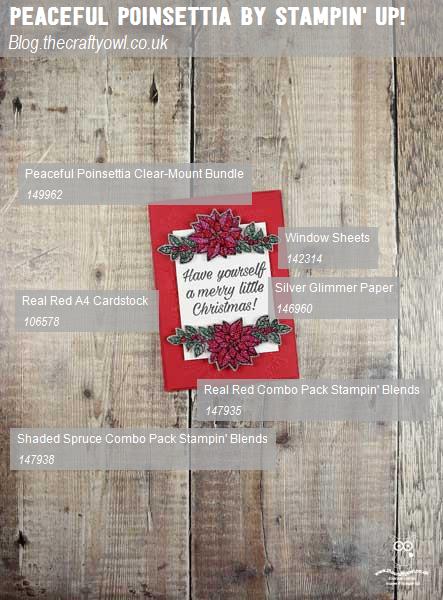


You can see all of my Product and 'How To' summaries on my 'How To - Tips and Techniques' Pinterest board in case you've missed any. 

Whilst I've included the link to the bundle below, the Peaceful Poinsettia  stamp set is currently available at 20% off and the dies at a whopping 30% off as part of the year-end closeouts, so if they are on your wish list, now is the time to snap them up at a bargain price before they retire for good. You can access the complete Year-End Closeouts list here

Before you reach for your ink and papers, check out what our amazing team has created to inspire you this week:

Here's a quick recap of our challenge rules:
 
1.  Create a new paper project
2.  Upload your creation to your blog with a link back to us and provide a direct link to the post featuring your challenge submission.
3.  Please link your card to no more than four challenges, TOTAL.
4.  Have FUN!

I can't wait to see what you create with this week's colours and look forward to visiting your blogs this week. This is our last challenge before we take a two-week break to celebrate the Christmas period with our families, so we hope you'll find the time to join us! We will be taking a two week break before returning with a fresh new set of challenges for 2019 starting on Sunday 6th January 2019. Thanks to everyone who plays along each week, to this year's guest designers Jan, Elizabeth and Annie, and everyone of you who visits our blogs and leaves us encouraging comments each week - it's great to know that you enjoy our creations! 

Enjoy the rest of your weekend as it will be over all too quickly. I am hoping to decorate the house for the holidays today and put the Christmas tree up. I made a wreath for the front door yesterday however at the moment due to family and sports commitments that is the extent of the decorations, so it's about time we rectified that! I'll be back tomorrow with another project; until then, happy stampin'!


Stampin' Up! Supplies Used: 

Table built using Product Table Builder by The Crafty Owl - Independent Stampin' Up! Demonstrator.

Country Lane Thank You Card and Chocolate Slider Gift Packaging

by Joanne James3. September 2018 09:00


Today I'm sharing a card and co-ordinating chocolate slider gift package that I actually made for last week's challenge over at Just Add Ink  but didn't get to photograph in time to play along;luckily for me, it is perfect for this week's Just Add Ink challenge too - if you take a look at the challenge badges, you will see what I mean: 


I absolutely loved the JAI colour palette last week and I couldn't resist breaking out some of my new products to create a card and matching gift packaging - luckily there's plenty of texture in there too! Firstly, here's the card I created:


Here's the low-down on today's projects:

Country Home - From the Country Lane Suite in the new Autumn-Winter catalogue, the Country Home stamp set is all about country living, with some great thanks sentiments and it's perfect for colouring too. I used my Blends to add colour to my Fall florals and fussy cut them out ready to layer onto my card. I also stamped a border using the tiled stamp in the set for some 'faux texture' with some Bermuda Bay tone-on-tone stamping, tucked under my sentiment.

Tin Tile Metallics - The background panel of my card is a piece of silver foil cardstock that has been embossed with the new Tin Tile Dynamic Textured Impressions Embossing Folder and given a slightly aged/distressed look by sponging with some Soft Suede ink. I just love the embossed pattern of this folder; it's so pretty. I know I'm going to use it lots!

Thankful For ... Chocolate - I loved my card so much, I thought I would create a matching slider gift package using exactly the same layout and design to make a slider wrap for one of my favourite bars of chocolate, ready to gift to someone; it's always nice to be able to share a sweet treat, especially when beautifully packaged I think - I love going to the trouble to make something quite ordinary appear to be rather special: 


These wraps are very straightforward - and when you pull the ribbon bow and tag, the chocolate bar slides outwards:


Finally, here's a shot of both items together:


Here is the visual summary of the key products used on today's project for you to pin for easy reference:


You can see all of my 'How To' summaries on my 'How To - Tips and Techniques' Pinterest board in case you've missed any. 

I think this set will be heading for my local postmaster as a thank you for his help with my Autumn-Winter catalogue mailings this week (yes, if you're one of my customers the catalogues are in the post!) He is used to me appearing with bags full of catalogues to be mailed at this time of year and we have a great system going now, which makes the process efficient and keeps ongoing queues to a minimum! I like to give him a bar of chocolate as a thank you for his help and to keep him sweet :-) On the subject of Autumn-Winter catalogues: if you don't have a demonstrator and would like me to add you to my list, then do get in touch and I can pop one in the post to you too. The electronic version of the catalogue will be available here online tomorrow when it launches.

Enjoy your day and I'll be back tomorrow with another project. Until then, happy stampin'!


Stampin' Up! Supplies Used:

Table built using Product Table Builder by The Crafty Owl - Independent Stampin' Up! Demonstrator.

Farewell You've Got This

by Joanne James16. April 2018 12:00

Happy Monday everyone! It's a tad chilly here in the UK but the sun is trying to shine, so I'll take that as the start to a good week! Today is the last day of the Easter holidays for one of the James Juniors at least so we are making the most of it! I'm sharing a card that I made at the weekend for one of my favourite challenges, As You See It (it's been too long since I've played along with these lovely ladies!) and uses the fresh Spring colour palette over at The Color Throwdown:


My card today says farewell to one of my favourite florals from the Annual Catalogue - which makes it perfect for the current challenge over at SUO Challenges too - take a look:


Here's the low-down on today's card:

Farewell Flower - 'You've Got This' is one of my favourite florals and I will be sad to see it retire next month, I love that single peony-like bloom and the hatched background is so useful, both as a background for this flower and lots of other projects too. Here I've used it in one of my favourite ways, fussy cutting the flower and popping up on dimensionals. I stamped the background onto my white cardbase in Pool Party and coloured my flower with my Daffodil Delight Blends and retired Wild Wasabi Blendabilities alcohol markers.  

Raindrops On Petals - I added a few glitter epoxy raindrops onto my flower petals and leaves for a little sparkle and detail, without detracting from the flower itself. You can see them better on the close-up here:


As You See It - I was intrigued by the current As You See it sketch: whilst my hatched background is not as brave as some of the beautiful watercoloured or inked backgrounds of the design team, I think it does a good job of representing the idea of the sketch. The thing I like the most about the sketch though is the positioning of the sentiment; having rotated the sketch through 90 degrees, this put my sentiment running sideways along the central fold of my card. This is not a position that I would have naturally chosen for my wording, yet I think it really rings the changes and I love the finished card. I love how sketches encourage us to push the boundaries of convention sometimes.

Here is the visual summary of the key products used on today's project for you to pin for easy reference:


You can see all of my 'How To' summaries on my 'How To - Tips and Techniques' Pinterest board in case you've missed any. 

Yes, I will miss this stamp and the wonderfully uplifting and encouraging sentiments that go with it - I 'm not too sad though, a new catalogue always provides opportunities for new favourites to come along!

Enjoy your day and I'll be back tomorrow with another project. Until then, happy stampin'!


Stampin' Up! Supplies Used:

Table built using Product Table Builder by The Crafty Owl - Independent Stampin' Up! Demonstrator.

New Sale-A-Bration Items Added And Color Me Happy Card Kit

by Joanne James21. March 2018 12:00

I am a little behind in sharing this one (life seems to be getting in the way of blogging lately!) but I wanted to make sure that you were all aware that new products have been added to the Sale-A-Bration gift list for the final two weeks of this fabulous promotion. You all know that this year's Sale-A-Bration promotion will end on 31st March and in addition to hosting and joining benefits (you can read about those here) you also earn a free product for every £45/90 spend - you can see the existing items here and here.

Good news: from now until the 31st March, you will also be able to choose from the catalogue items below (you must use the special code as detailed as opposed to the usual item code to get one of these items free with a £45/90 spend):


To make things easier for you, I've created a table linking each of the products directly to the promotional item in my online store - just click on the links below:

Table built using Product Table Builder by The Crafty Owl - Independent Stampin' Up! Demonstrator.

Remember, if you aren't placing your order via the above links, you need to use the special Sale-A-Bration item code for each product - these are different to the standard product codes for these items, which are still available to purchase in the annual catalogue.

One of the new products available free with a £45 spend is the Color Me Happy Project Kit - designed to be used with the Color Me Happy stamp set and launched to celebrate the release of our new Stampin' Blends alcohol markers and as it isn't a set that you can see in either of the current catalogues, I though this would be a good day to share mine here with you so that you can get a closer look. As with so many of Stampin' Up!'s kits, the kit is choc-full of embellishments and high-quality pre-printed card bases, along with foiled envelopes, so that you can stamp and colour to complete 16 gorgeous cards, 4 each of 4 designs - take a look:

Here's the first one, along with its co-ordinating envelope:

Here's the second one - a fun little card to brighten someone's day:

The third design:


And finally the fourth design - some of my customers will be receiving this card this month as a token of my appreciation:


And finally here's a shot of all four card designs together:


Whether you use in conjunction with the Color Me Happy stamp set or substitute with other stamps from your collection, the kit is definitely worth getting your hands on - especially if you pick it up for FREE!

Both the stamp set and card kit are still available to purchase too, at a 10% discount if you buy together as a bundle, whilst stocks last - the links for these are included below. Better still, why not purchase the stamp set and markers that you need and pick up the kit as a Sale-A-Bration item for free? This would also make for a fun crafty evening with friends - please get in touch if you'd like to talk to me about hosting one of these in either April or May - my diary is booking up fast!

If you have your eye on any of the other Sale-A-Bration items, do bear in mind that they will only be available whilst stocks last - it is possible that they could run out before the end of the promotion, so don't leave it to late to place your order. 

I'll be back soon with another project. Until then, happy stampin'!


Stampin' Up! Supplies Used:


Table built using Product Table Builder by The Crafty Owl - Independent Stampin' Up! Demonstrator.

Scrapbooking

Stampin' Up! has introduced a new range of 12x12" scrapbooking product and kit - the full range is now available to purchase online. To download a copy of the new digital Scrapbooking Catalogue click here.

Mini Catalogue

BROWSE THE CATALOGUE

'Tis The Season - the new Stampin' Up! Mini Catalogue is here! For more details and to download your copy click here

Shop Online

Access my online shop 24 x 7, 365 days of the year:

Current September hostess code:

JQEHTZGK

Shop Online

2024-25 Annual Catalogue

BROWSE THE CATALOGUE

Click on the image to download your copy of the 2024-25 annual catalogue. For a full list of current SU! supplies, go to my online store. If you would like any help or advice, please drop me a line at joanne@thecraftyowl.co.uk or give me a call on 07773 421446 - I'd be happy to help.

Join My Team

It's always a great time to join Stampin’ Up! New team members can get £130 worth of products for only £99 + free business supplies + free shipping + all the fun being a part of Stampin’ Up! Stampin' Up! has something for everyone: join my growing team and benefit from my support to enjoy Stampin' Up! however you choose.

If you're interested, call me for a chat to understand how I can help you realise your goals. Alternatively, if you have already decided to sign up and you just can't wait, please click here for the link to the online form where you can sign up and order your starter kit right away! 

Latest Kits!

Stampin Cut and Emboss

The Christmas Ornaments Kit and Card Keeper Kit are the latest kits that will be arriving in the online store later this month - get yours here!

New Online Exclusives

There are new products available exclusively in the online store from 3 July - check them out here.

About Me

Hi I'm Joanne and live in Northampton and when I'm not looking after my husband and two beautiful children, am an avid crafter with a passion for all things Stampin' Up!

I must confess that I have never been a big rubber stamper - until I discovered Stampin' Up! that is. I love the fact that I can get such great results with co-ordinating stamps, inks, papers and punches - the possibilities are endless! Join me on my stamping journey as I share the things I love and be inspired to create amazing things yourself!

Follow Me

Monthly Newsletter

Box Builder

Click the button above to use Box Buster to create your custom box design using the Envelope Punch Board!

Kits Collection Now Available!

Stampin Cut and Emboss

The new Kits Collection from Stampin' Up! is now available!

Click here to see the current kits available and order yours online today.

I Design For


Stampin' Up Stuff

This is my personal blog and is not endorsed by Stampin’ Up! I hope you find it a plentiful source of ideas and personal inspiration but please don't copy my designs for contest submission or use for classes, publication or sale without express permission.