Little Kindness Elephant For TTT 56

by Joanne James19. March 2020 11:00

Apologies for my blog-free days so far this week; as I'm sure is the same for you, things have been anything but normal this past couple of weeks and I seem to have been pulled every which way and not once in the direction of my craft room. Far from being excited at the prospect of no school until September, both of the James Juniors are finding that an unwelcome concept and combined with the enforced closure of all of their sporting activities, they have needed much encouragement to find an upside to the current state we find ourselves in. I'm sure we will work it all out; meanwhile it's Thursday and time for a new challenge over at TicTacToe! It's the turn of Team X to host this week and the lovely LeAnne is our featured designer this week. This is the fun board that we are playing along with: 


I went down the middle with Blue-Umbrella-Designer Paper but my card also works for the diagonal Yellow-Umbrella-Bow. I used the current Fab Friday sketch for my layout (although I inadvertently centred my squares - I was distracted by the gingham!) along with an 'oldie but goodie' stamp set from the annual catalogue - take a look:


Here's the low-down on today's card:

Little Elephant - When I was considering what to work with today, I pulled out both the 'Under My Umbrella' set and the 'Little Elephant' stamp set as both feature umbrellas. I made a card with each, but preferred this one - such a long time since I've used this set! - and I don't think I've ever used the little umbrella before, so this was a good opportunity. I did a little masking on the front to make it look as if the elephant was holding the umbrella over the bluebird and also stamped the larger elephant with some hearts on the inside too:

In Stitches - I used both a stitched square for my main image and a stitched rectangle for my heat embossed sentiment panel for a little subtle extra detail. I wouldn't be without my Stitched Shapes Framelits and love that extra something they add to a shape.

Raindrops Keep Falling On My Head - I decided to add a few raindrops from the 'Under My Umbrella' set above the umbrella to add to my little scene and some white twine tied in a bow completes my card. 

A sweet and cheery little card with all that yellow and a sentiment that seems so appropriate given the unprecedented times we find ourselves in at the moment. I encourage you to show someone a little kindness today, because yes, it is a big thing and for some can make all the difference.

Here is the visual summary of the key products used on today's project for you to pin for easy reference:


You can see all of my Product and 'How To' summaries on my 'How To - Tips and Techniques' Pinterest board in case you've missed any. 

A tictactoe board offers so many creative possibilities - how does this week's board inspire you? Why not have a go? We would love to see you in the gallery and who knows - you might be selected for Designer's Choice and be eligible to be a guest designer on a future challenge. 

Enjoy your day; I am hoping to regain my creative mojo and spend some time crafting once I've tackled my ironing pile, since it will be all too soon before I am home-schooling the James Juniors from next week, when I suspect my crafting time might be further squeezed. I'll definitely be back tomorrow with another project - I might even share my alternative umbrella project! Until then, happy stampin'!


Stampin' Up! Supplies Used: 

Table built using Product Table Builder by The Crafty Owl - Independent Stampin' Up! Demonstrator.

Clean and Simple Timeless Tulips for PP482

by Joanne James15. March 2020 10:00

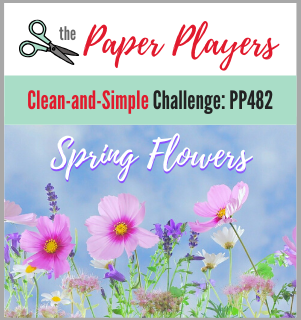
Today it's Sunday and time for this week's new challenge over at The Paper Players! I am the hostess this week and I have a clean and simple challenge for you to work with:


The daffodils are blooming in my garden and after an extremely wet and windy winter here in the UK, I am so ready for Spring! In addition to that, and the current battoning down the hatches in light of the Corona virus worldwide, I think we could all do with a little colour in our lives, so I hope you will play along with my challenge this week!

Remember in addition to the theme of "Spring Flowers", this week is a Clean-and-Simple (CAS) challenge!  What do we mean by CAS?

  • Minimal layers and embellishments
  • Plenty of open space, aka "white" space
  • Simple and uncluttered

I've made lots of projects using the Timeless Tulips bundle but haven't shared many of any on my blog so thought that today would be a good opportunity to remedy this! I grabbed the fabulous sketch over at CAS(E) This Sketch this week and set to work - take a look:


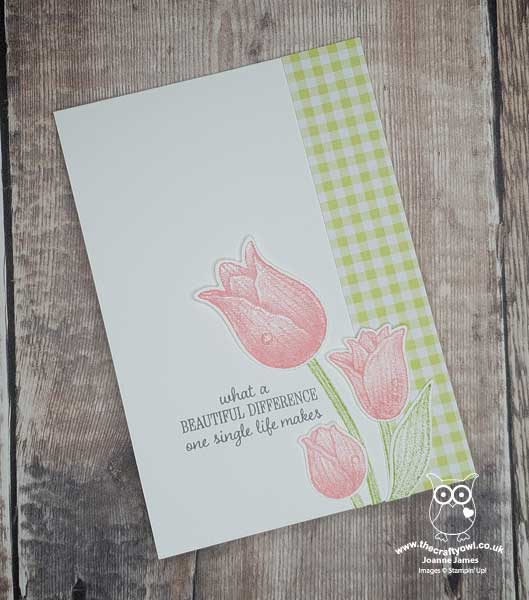
I deliberated for ages over my card, as I so often do when it's clean-and-simple week, but in the end came up with something that was so easy to create. I added a strip of gingham check to the edge of my card, stamped my sentiment in Basic Grey then added a trio of short stemmed tulips stamped in Flirty Flamingo pink, one in each size that is included in the set, and either fussy cut them or used the co-ordinating Tulip Builder punch. I adhered them at the base so that they had a slight lift and added some small epoxy dots to symbolise raindrops to the petals to finish. As easy as that - another #SimpleStamping card this week, we all need some of those!

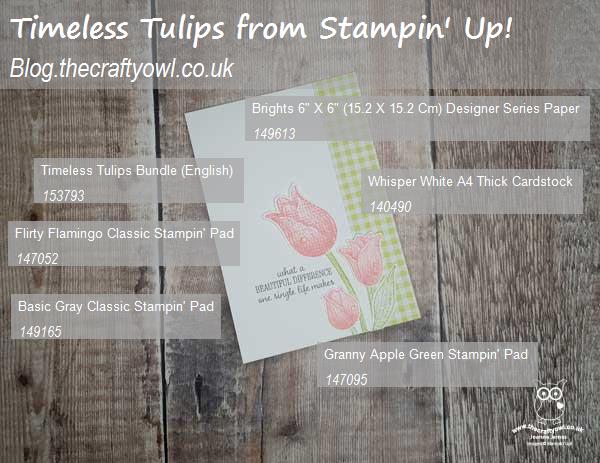
Just 6 items is all it took to create this sweet tulip card; here is the visual summary of the key products used on today's project for you to pin for easy reference:


You can see all of my Product and 'How To' summaries on my 'How To - Tips and Techniques' Pinterest board in case you've missed any. 

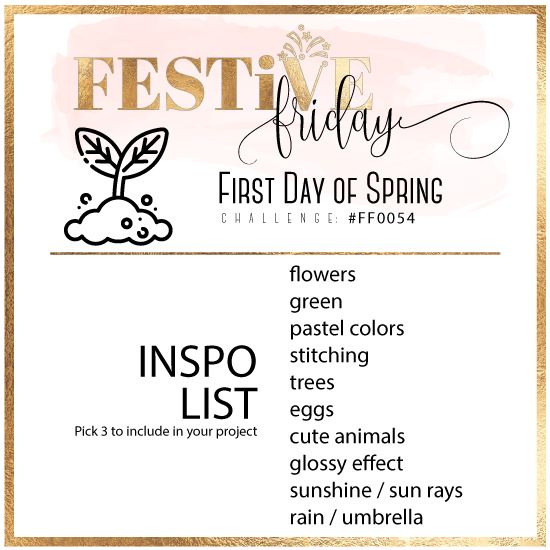
I'm also linking up with the lovely ladies over at Festive Friday where they are celebrating spring - my choices from the inspo list are flowers, green, pastels (and raindrops!)

Before you reach for your ink and papers, check out what our amazing team has created to inspire you this week:

Here's a quick recap of our challenge rules:
 
1.  Create a new paper project
2.  Upload your creation to your blog with a link back to us and provide a direct link to the post featuring your challenge submission.
3.  Please link your card to no more than four challenges, TOTAL.
4.  Have FUN!

Enjoy your day; it's wet and miserable here today and I was hoping to hibernate to my craft room, but against all my better judgements I might have to venture out to the supermarket, since all of the panic buying has resulted in my regular weekly shop being delivered minus much of what I ordered so I'm not quite sure how I am going to feed the James family this week! I'll be back tomorrow with another project. Until then, happy stampin'!


Stampin' Up! Supplies Used: 

Table built using Product Table Builder by The Crafty Owl - Independent Stampin' Up! Demonstrator.

On To Adventure Holidaymaker for PP481

by Joanne James8. March 2020 10:00

Today it's Sunday and time for this week's new challenge over at The Paper Players! It's the turn of the fabulous Laurie to host this week and she has a vibrant colour challenge for you to work with:


I spent much of this week undertaking last-minute preparations for my weekend craft retreat, so was short on time to create and lacking my creative mojo. Anyway, I had to keep it quick and this is what I came up with - take a look:


I stamped my lady from the 'On to Adventure' stamp set and coloured her with my Stampin' Blends, then mounted her on a layered circle and stamped my sentiment onto a Coastal Cabana scalloped rectangle. A sprinkling of champagne rhinestones finish my card.

Super simple this week!

Here is the visual summary of the key products used on today's project for you to pin for easy reference:


You can see all of my Product and 'How To' summaries on my 'How To - Tips and Techniques' Pinterest board in case you've missed any. 

Before you reach for your ink and papers, check out what our amazing team has created to inspire you this week:

Here's a quick recap of our challenge rules:
 
1.  Create a new paper project
2.  Upload your creation to your blog with a link back to us and provide a direct link to the post featuring your challenge submission.
3.  Please link your card to no more than four challenges, TOTAL.
4.  Have FUN!

Enjoy your day; I will be on day two of my weekend craft retreat. Yesterday we had a ball, so I'm sure today will be just as much fun! More about that later in the week. I'll be back in a couple of days with another project. Until then, happy stampin'!


Stampin' Up! Supplies Used: 

Table built using Product Table Builder by The Crafty Owl - Independent Stampin' Up! Demonstrator.

Pleased As Punch To Be Under My Umbrella TTT 54

by Joanne James5. March 2020 09:00

It's Thursday and time for a new challenge over at TicTacToe! It's the turn of Team X to host this week and I have the honour of being our featured designer this week. This is the fun board that I designed for your inspiration: 


I took the first column and used the sketch at CAS(E) This Sketch layout - this time for a much better attempt at clean and simple than my card earlier this week - take a look:


Here's the low-down on today's card:

I paired some retired sunny yellow gingham check paper with a raindrop background and a bright umbrella punched from the Pleased As Punch designer series paper - I do love a paper that can be punched into lots of bits and pieces with a co-ordinating punch - and a sentiment from the 'Under My Umbrella' stamp set on a stitched rectangle. The weather here is mostly rain of late, but occasionally we get a glimpse of spring sunshine so it was nice to capture that in today's card! 

Here is the visual summary of the key products used on today's project for you to pin for easy reference:


You can see all of my Product and 'How To' summaries on my 'How To - Tips and Techniques' Pinterest board in case you've missed any. 

A tictactoe board offers so many creative possibilities - how does this week's board inspire you? Why not have a go? We would love to see you in the gallery and who knows - you might be selected for Designer's Choice and be eligible to be a guest designer on a future challenge. 

Enjoy your day; I'll be back tomorrow with another project. Until then, happy stampin'!


Stampin' Up! Supplies Used: 

Table built using Product Table Builder by The Crafty Owl - Independent Stampin' Up! Demonstrator.
 

Welcome Bunny Pastel New Baby Card

by Joanne James2. March 2020 20:30

Happy Monday everyone! I need to have a productive week this week - my to-do list is long! - this week's post maybe a little short and sweet - so let's go!


I still had the 'Welcome Easter' stamp set out on my desk having made this card last week, so decided to use the colours over at Just Add Ink where I haven't managed to play along in a while (hello lovely JAI ladies!) and this week's CAS(E) This Sketch layout from the lovely Brian King and an altogether different look to create a sweet baby card - take a look:


Here's the low-down on today's card:

I grabbed a piece of Pleased As Punch DSP for the pink check layer and added a horizontal piece with a stitched diecut border detail before anchoring with my bunny. I stamped him on Shimmery White cardstock in Smoky Slate, then used my aquapainter to colour him in, keeping the colours soft and muted and layered on a scalloped circle.

Now whilst I used the CAS(E) This Sketch layout, I may well get thrown out with this card as I broke my own clean and simple rule here - not only did I add a sprinkle of adhesive-backed sequins, but I also tied the Soft Sea Foam panel with a piece of Whisper White crinkle seam binding ribbon! In my defence, this ribbon is so soft and lightweight, it squishes to nothing (good for cards that need to be mailed!) and I kind of figured since it was a new baby card, a little embellishment makes it special. Not much of a defence to Brian and the CTS design team - if it helps, I used this sketch for another card that I'm going to share later in the week that is perfectly CAS in everyway, as Mary Poppins would say. 

So what do you think - is that little guy sweet or what?! He reminds me of Thumper from the Disney classic 'Bambi', (another Disney reference - not that I'm counting down to a special vacation to the happiest place on earth or anything...) but I digress...! 

Here is the visual summary of the key products used on today's project for you to pin for easy reference:


You can see all of my 'How To' summaries on my 'How To - Tips and Techniques' Pinterest board in case you've missed any. 

Enjoy your evening and I'll be back tomorrow with some exciting Sale-A-Bration news so do come back to find out more. Until then, happy stampin'!


Stampin' Up! Supplies Used:

Table built using Product Table Builder by The Crafty Owl - Independent Stampin' Up! Demonstrator.


Easter Promise Heat Embossed Crocus – PP480

by Joanne James1. March 2020 10:00

Today it's Sunday and it's also the first of March - happy St David's Day to all my fellow Welsh men and women! It's time for this week's new challenge over at The Paper Players! It's the turn of the wonderful Anne Marie to host this week and she has a theme challenge for you to work with:


 I am in a bit of a clean and simple card making groove of late - and today I have another CAS creation for you. I decided to take this week's sketch over at CAS Colours & Sketches and make another Easter card - take a look:


Here's the low-down on today's card:

Turn Up The Heat - Do you remember the first time you practised heat embossing? It's one of those techniques that is always a real 'wow' as you turn on your heat gun and see the powder turn into molten metallic magic on your stamped image. It adds such a great shine to projects and a raised edge that makes it easy to colour inside too. If you look at the close up photo below you can see the dimension and shine that it adds:


My top tip for a neat effect and minimal splatter when heat embossing is to always rub your cardstock with an embossing buddy before you stamp your image in Versamark and sprinkle with your embossing powder; this will keep the powder where you want it and not cause it to stick in areas where it isn't required.

Crocus Colours - The colour scheme on today's card is inspired by the most common traditional crocus colours: a warm honey yellow, bright purple and pale yellow. I used a Highland Heather base - I embossed the front using my Subtles Embossing Folder - and coloured my flowers using Highland Heather, Mango Melody and So Saffron Stampin' Blends markers to compliment my gold heat embossing.

Easter Promise - The stamp set I used today is called 'Easter Promise' and has both sentiments and these gorgeous crocus flowers that are perfect for celebrating Easter. I heat embossed the trio of crocus and then used my largest Stitched Circle Die to create a partial diecut around them (that's the 'hat' shape on the sketch!) and I then heat embossed my sentiment and fussy cut it so that I could position it where I wanted it. I also decorated the envelope front and back and the inside of my card and continued with the heat embossing and colouring theme:

For a CAS card it took a little while with all of the heat embossing and colouring, but it was so worth it - this card is so, so pretty! Here is the visual summary of the key products used on today's project for you to pin for easy reference:


You can see all of my Product and 'How To' summaries on my 'How To - Tips and Techniques' Pinterest board in case you've missed any. 

Before you reach for your ink and papers, check out what our amazing team has created to inspire you this week:

Here's a quick recap of our challenge rules:
 
1.  Create a new paper project
2.  Upload your creation to your blog with a link back to us and provide a direct link to the post featuring your challenge submission.
3.  Please link your card to no more than four challenges, TOTAL.
4.  Have FUN!

Enjoy your day; I will be spending the day at home escaping the winds and rain and hoping to get some quality time in my craft room in between catching up on household chores and making sure the youngest of the James Juniors is prepared for this week's mock Common Entrance examinations - not much then!  I'll be back tomorrow with another project. Until then, happy stampin'!


Stampin' Up! Supplies Used: 

Table built using Product Table Builder by The Crafty Owl - Independent Stampin' Up! Demonstrator.

An Easter Chick for AYSI 220

by Joanne James28. February 2020 12:00

As I type my post it's miserable and raining outside so I'm glad to have something bright and cheery to share with you! Today I'm sharing my design team card for our new challenge over at As you See It where it's time for a cheery colour challenge from the lovely LeAnne:


I used Jen B's current sketch over at Freshly Made Sketches for my layout and decided LeAnne's colours would be perfect for a sweet Easter chick - take a look:


Here's the low-down on today's card:

A Colour Confession - I feel I need to confess upfront as the eagle-eyed amongst you will have spotted I used Daffodil Delight in place of the Mango Melody that LeAnne chose on today's card. This was a genuine oversight on my part (lots on at the moment and having designed my card on the move just grabbed for the wrong supplies!) I didn't have time to remake, which is a shame as I'm sure my cute chick would look equally warm and fluffy in Mango Melody, but I'm hoping you will all forgive me. It does give me an opportunity to point out though that if you are ever put off participating in colour challenges because you don't have the 'correct' colour to hand, most of them - and certainly those for As You See It and The Paper Players which I design for - are perfectly ok for you to substitute with the nearest colour in your stash, whatever the brand. I actually used only the smallest drop of Grapefruit Grove - for my chick's beak and legs - and the same for Poppy Parade - for his comb and also to accent my banner with some gorgeous (retired) Poppy Parade mini striped ribbon. 

Welcome Easter - The star of my card today is the super-cute Easter chick. He features in the 'Welcome Easter' stamp set in the Spring mini catalogue and is perfect for some quick colouring. The set also features a sweet lamb and cute bunny (keep an eye out for him in another post over the next few days, as he will be making an appearance!) along with some Easter/baby sentiments and a few smaller stamps, a couple of which I used to add a little decoration to the inside of my card:


How cute is that?!

Gingham Gorgeousness - Lastly, I embossed my cardfront with my Subtle Embossing Folder for some light texture and interest and used a piece of gingham to make a quick banner using my Triple Banner Punch (so useful!) out of the now retired Gingham Gala DSP. This paper was a deliberate choice, as I wanted to incorporate a little more white into my card. I've linked to the Brights DSP pack below though as the gingham pattern it contains is a good match that is readily available. There is definitely something about colourful gingham that makes me feel like Spring - does it give you that feeling too?

Here is the visual summary of the key products used on today's project for you to pin for easy reference:


You can see all of my 'How To' summaries on my 'How To - Tips and Techniques' Pinterest board in case you've missed any. 

Before you put your creative thinking caps on, why not check out the blogs of the other As You See It team members:

Amy Jasper

Heather Cooper

Jan Clothier

Jane Knudsen

LeAnne Pugliese

Here's a summary of our challenge rules:

  • Create any card, scrapbooking page, 3D project or packaging project that fits the challenge.
  • Please include the challenge graphic and link back to the challenge in your blog post. Turn off word verification so we can leave you lots of lovely comments. Make sure you link the post not the whole blog to the Linky. Use #AYSIXXX when uploading to a public gallery.
  • If you’re unsure about ‘the rules’, check the details under the Challenge Guidelines tab on the As You See It Challenge homepage.
  • In a colour challenge, black or other neutral can be used in outlines and sentiments but no other colours should be included. Stampin’ Up colours are used for reference but colours that are a close match are welcome.

We look forward to seeing your creations in the AYSI gallery.

Enjoy your day and I'll be back tomorrow with another project. Until then, happy stampin'!


Stampin' Up! Supplies Used:

Table built using Product Table Builder by The Crafty Owl - Independent Stampin' Up! Demonstrator.

A Neutral Home Decor Note

by Joanne James27. February 2020 09:00

Today I'm sharing a card that was inspired by the current challenge over at Fusion:

    RRCB 129

I love the sketch but was also unusually (for me) inspired by the photo and all those neutrals as well this week. It's also a great opportunity to link up with the gals over at Retro Rubber too as their theme is 'anything goes' and I am giving an old stamp set some love - take a look at what I came up with:


Here's the low-down on today's card:

I used a whole bunch of retired product on today's card; I still had these neutral 'Go Wild' designer papers left out on my desk from my card yesterday, and thought they would make a great background for my shelf of knick-knacks. I used two contrasting papers with the same design and split the mats to compliment each one. I like the contrast, but it does give this card something of a 'magic eye' effect I think! I used my retired 'Bookcase Builder' stamp set for my shelf with a mixture of various bits and pieces (this set dates back to the Spring 2017 seasonal catalogue), keeping in with the neutral colour scheme. I decided to leave off a sentiment as my cardfront was busy enough and I will probably use this card as a notecard to write a letter in, so it is ok without. 

Here is the visual summary of the key products used on today's project for you to pin for easy reference:


You can see all of my 'How To' summaries on my 'How To - Tips and Techniques' Pinterest board in case you've missed any. 

Enjoy your day and I'll be back tomorrow with another project for this week's new challenge over at As You See It. Until then, happy stampin'!


Current Stampin' Up! Supplies Used:

Table built using Product Table Builder by The Crafty Owl - Independent Stampin' Up! Demonstrator.

Time For Confetti Birthday Card

by Joanne James25. February 2020 09:00

Today I'm sharing a card that uses both the CAS(E) This Sketch layout and the theme over at Time Out this week:


I have a combination of old and new for my card today! I've been desperately trying to increase my stash of on-hand birthday cards and use up some of my stash of retired designer series paper so the above challenges gave me the perfect opportunity - take a look:


Here's the low-down on today's card:

So Sentimental - I used the 'This calls for confetti!' stamp from the new 'So Sentimental' stamp set as the starting point for today's card, picking up on the theme over at Time Out and paired this with some retired Picture Perfect Party DSP that has a fun scattered confetti photographic print for a fun birthday party vibe - which just so happened to perfectly fit the CAS(E) This Sketch layout too.

Label Me Fancy - I heat embossed my sentiment into silver onto some Pool Party cardstock and punched it out with the new Label Me Fancy punch, and backed it with one in a contrasting colour that I'd split in half so that you can just see a border. I added a tiny piece of retired ribbon from my scrapbox for a little extra detail (this ribbon is currently available on the Clearance Rack if you would like to stock up on a ribbon bargain!). 

Sending You Thoughts - I used the Sale-A-Bration free stamp set, Sending You Thoughts, for the inside of my card, along with a little sprinkle of stamped confetti to finish off my celebratory card:

I also added the offcut of my DSP to the envelope flap for a little extra envelope decoration. So a super simple card that meant I could run off a few to add to my stash of birthday cards for when the James Juniors need one for a friend in a hurry!

Here is the visual summary of the key products used on today's project for you to pin for easy reference:


You can see all of my 'How To' summaries on my 'How To - Tips and Techniques' Pinterest board in case you've missed any. 

So it's Shrove Tuesday today - hands up who's having pancakes for dinner this evening? I have been badgered all the way to school today to make some this evening - but just to whet your appetite, here are some American-style ones I had for brunch at the weekend - can you spot the 'hidden Mickey' (or Minnie, with the bacon bow!) - fellow Disney fans, this one is for you!


They were delicious! Enjoy your day and I'll be back tomorrow with another project. Until then, happy stampin'!


Stampin' Up! Supplies Used:

Table built using Product Table Builder by The Crafty Owl - Independent Stampin' Up! Demonstrator.

Colour Blocked Easter Daffodil Card

by Joanne James24. February 2020 09:00

Happy Monday everyone! The kiddos are back to school so I'm hoping for a productive crafting week! Today I'm sharing the other card that I made using this week's Paper Players sketch (you can see my design team post from yesterday here if you missed it) that was inspired by the spring colours over at CAS Colours and Sketches this week:

I bought my first bunches of daffodils last week and have been busy working with Spring flowers in my craft room for the last few days in readiness for my upcoming Spring Weekend Craft Retreat; it's pouring down with rain here in the UK again and I am so keen to see an end to Winter now! I'm ready to welcome Spring and these colours were perfect to bring a little more seasonal colour my way - take a look:


Here's the low-down on today's card:

I stamped this stem of daffodils from the retired set 'You're Inspired' stamp set and coloured them with my Stampin' Blends and then created another colour blocked background using the three challenge colours and my stitched rectangle dies to sit behind it. These kinds of backgrounds are easy to create - my top tip would be to cut your three strips of coloured cardstock and adhere them to a piece of Whisper White cardstock before running through the diecutting machine; this keeps them perfectly aligned and in one piece. I added a heat embossed sentiment and some twine to my stamped layer to complete my card.

Daffodils are one of my favourite flowers; I love their sunny colour combinations and they are so cheery when the weather outside is anything but!

Here is the visual summary of the key products used on today's project for you to pin for easy reference:


You can see all of my 'How To' summaries on my 'How To - Tips and Techniques' Pinterest board in case you've missed any. 

Enjoy your day; I'll be spending mine escaping from the weather and instead being brightened up with the colours of my craft supplies! I'll be back tomorrow with another project. Until then, happy stampin'!


Stampin' Up! Supplies Used:

Table built using Product Table Builder by The Crafty Owl - Independent Stampin' Up! Demonstrator.

Shop Online

Access my online shop 24 x 7, 365 days of the year:

Current May hostess code:

3NR3FB9W

Shop Online

2024-25 Annual Catalogue

BROWSE THE CATALOGUE

Click on the image to download your copy of the 2024-25 annual catalogue. For a full list of current SU! supplies, go to my online store. If you would like any help or advice, please drop me a line at [email protected] or give me a call on 07773 421446 - I'd be happy to help.

Join My Team

It's always a great time to join Stampin’ Up but during May it's even better! New team members can get £78.25 of new In Color products for FREE! That's in addition to another £130 worth of products of your choice for only £99 + free business supplies + free shipping + all the fun being a part of Stampin’ Up! Stampin' Up! has something for everyone: join my growing team and benefit from my support to enjoy Stampin' Up! however you choose.

If you're interested, call me for a chat to understand how I can help you realise your goals. Alternatively, if you have already decided to sign up and you just can't wait, please click here for the link to the online form where you can sign up and order your starter kit right away! 

Latest Kits!

Stampin Cut and Emboss

The City Sights Kit has all you need to make 8 cards with coordinating envelopes for £20. Along with the new Happy Hollyhocks Kit, a no stamping kit including 9 cards for just £14, both are available from May 1st - get yours here!

New Online Exclusives

There are new products available exclusively in the online store from 5 March - check them out here.

About Me

Hi I'm Joanne and live in Northampton and when I'm not looking after my husband and two beautiful children, am an avid crafter with a passion for all things Stampin' Up!

I must confess that I have never been a big rubber stamper - until I discovered Stampin' Up! that is. I love the fact that I can get such great results with co-ordinating stamps, inks, papers and punches - the possibilities are endless! Join me on my stamping journey as I share the things I love and be inspired to create amazing things yourself!

Follow Me

Monthly Newsletter

Box Builder

Click the button above to use Box Buster to create your custom box design using the Envelope Punch Board!

Kits Collection Now Available!

Stampin Cut and Emboss

The new Kits Collection from Stampin' Up! is now available!

Click here to see the current kits available and order yours online today.

I Design For


Mini Catalogue


The next mini catalogue will be live in September! 

Stampin' Up Stuff

This is my personal blog and is not endorsed by Stampin’ Up! I hope you find it a plentiful source of ideas and personal inspiration but please don't copy my designs for contest submission or use for classes, publication or sale without express permission.