
Bloom And Grow Masked Floral Heart TTT108

by Joanne James8. April 2021 18:00

It's Thursday and time for a new challenge over at TicTacToe! It's the turn of Team X to host this week and our fearsome team leader Felicita is our featured designer this week. This is the fun board that we are playing along with: 


I went down the middle column with Florals, Free and Any Shape Die and used the current colours over at Less Is More for another outing with my Bloom and Grow stamp set - take a look:


Here's the low-down on today's card:

Bloom And Grow - I stamped the same floral bough that I used on Tuesday's card, but this time just used the outline in Basic Grey and stamped it onto a piece of Rococco Rose ombre paper, having first masked off my heart shape with copy paper, as I wanted the flowers to edge my heart but the heat itself to remain uninked. 

A Subtles Ombre - Before adding my diecut heart or sentiment or adhering to my card base, I ran my sheet of stamped ombre paper through my Subtles embossing folder for a little added textural detail. I cannot believe this embossing folder is retiring - it's a real 'how will I ever live without you?' product for me! 

A Stitched Heart - I decided to make a feature of the gold element on my card. so went for a simple stitched heart outline die that sat in front of those masked florals, and I wove my sentiment strip under and over it. I added a trio of opal rounds for a little extra pink/gold sparkle to complete my card:


So what do you think? Another trio of items from my craft stash I will be sad to say goodbye to. Thank goodness there is a new Stampin' Up! catalogue on the way to soften the blow!

Here is the visual summary of the key products used on today's project for you to pin for easy reference:


You can see all of my Product and 'How To' summaries on my 'How To - Tips and Techniques' Pinterest board in case you've missed any. 

A tictactoe board offers so many creative possibilities - how does this week's board inspire you? Why not have a go? We would love to see you in the gallery and who knows - you might be selected for Designer's Choice and be eligible to be a guest designer on a future challenge. 

Enjoy your evening; I am about to join an online catalogue launch event for demonstrators - exciting stuff! I'll be back tomorrow with another project. Until then, happy stampin'!


Stampin' Up! Supplies Used: 

Table built using Product Table Builder by The Crafty Owl - Independent Stampin' Up! Demonstrator.
 

Delighted that this card along with my other entry earned me LIM Monthly winner for April - yay!

Arrange A Wreath Easter Card PP534

by Joanne James28. March 2021 09:00

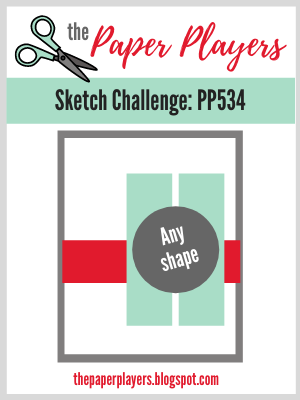
Today it's Sunday and time for this week's new challenge over at The Paper Players! It's the turn of the fabulous Anne Marie to host this week and she has my favourite, a sketch challenge for you to work with:
    

I got myself into something of a tizzy with this week's sketch and ended up making two cards - this one is for sure my favourite! I loved the inspiration photo over at Just Add Ink this week and thought an Easter wreath would be perfect for the shape in Anne Marie's sketch - take a look:
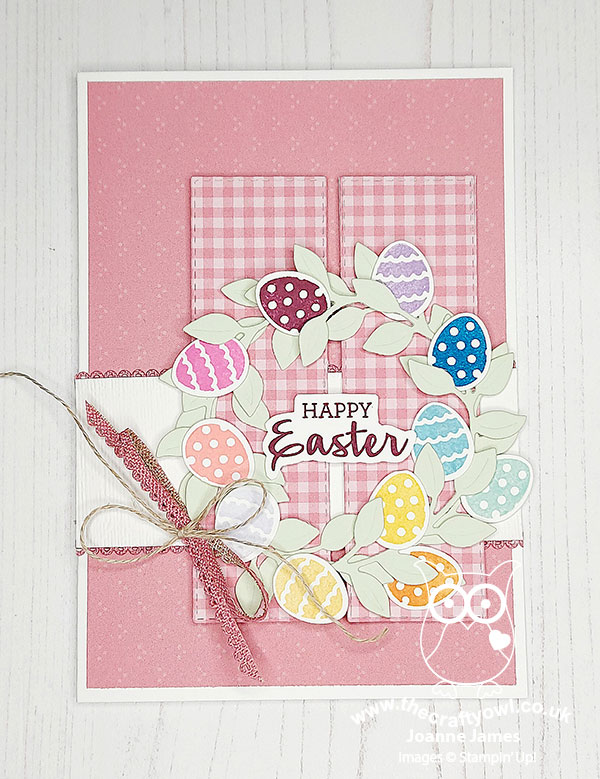
 

Here's the low-down on today's card:

Arrange A Wreath - The Arrange A Wreath bundle is perfect for an Easter wreath and this is the only type of wreath I think I've yet to make with this versatile set! I layered two pale green leaf wreath diecuts, then stamped a variety of rainbow-coloured Easter eggs and nestled them in between the leaves, mixing and matching the patterns:
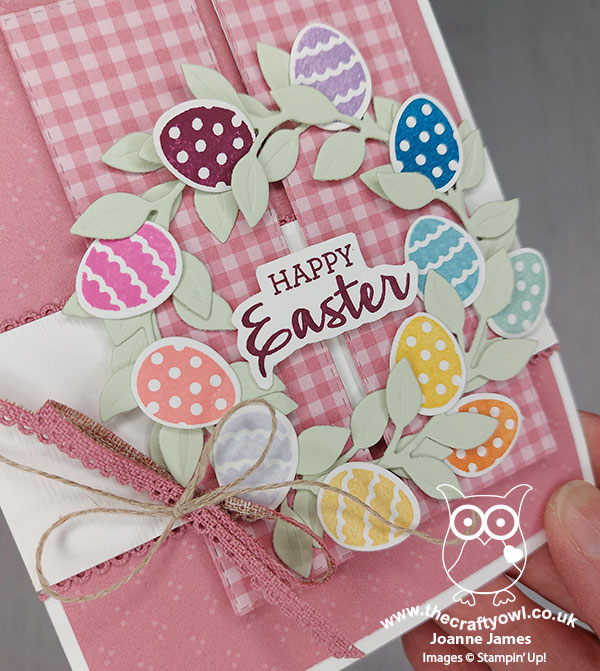
Pink Patterns - I decided to use a pink background for my wreath, again inspired by the JAI photo. I used a piece of Hydrangea Hill DSP in a soft Rococo Rose pattern. I wanted my vertical panels to co-ordinate but not be too busy, as I didn't want them to detract from the detail of my wreath, so I used some of last year's retired in-colour DSP in a gingham pattern.

Going, Going ... - Today's card features so many of my favourite things that will be retiring with the annual catalogue: The Arrange A Wreath stamp set and Wreath Builder Dies, the in-colour Rococo Rose in all its forms, and my favourite embossing folder, the Subtle 3D Embossing Folder. If these items are still on your wish list, you should snap them up now whilst you still can! You can find links to them in the online store below.

Here is the visual summary of the key products used on today's project for you to pin for easy reference:
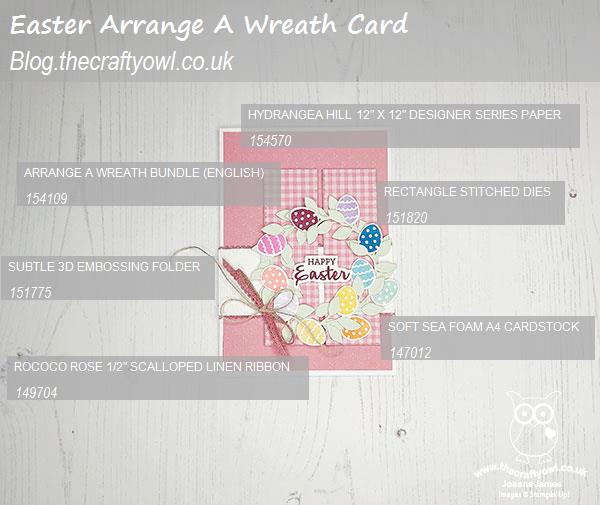
 

You can see all of my Product and 'How To' summaries on my 'How To - Tips and Techniques' Pinterest board in case you've missed any. 

Before you reach for your ink and papers, check out what our amazing team has created to inspire you this week:

Here's a quick recap of our challenge rules:
 
1.  Create a new paper project
2.  Upload your creation to your blog with a link back to us and provide a direct link to the post featuring your challenge submission.
3.  Please link your card to no more than four challenges, TOTAL.
4.  Have FUN!

You can see all of my 'How To' summaries on my 'How To - Tips and Techniques' Pinterest board in case you've missed any. 

Enjoy your day; if you're in the UK, did you remember to put your clocks back? Whilst we lose an hour, the additional hours of sunlight are always welcome - British Summer Time is here at last! I am planning on pottering in the garden today and may have to start eating the Easter eggs that are accumulating in the James household - I know Easter isn't until next weekend, but the temptation is proving too much! I'll be back tomorrow with another project. Until then, happy stampin'!


Stampin' Up! Supplies Used: 

Table built using Product Table Builder by The Crafty Owl - Independent Stampin' Up! Demonstrator.

Sweet Strawberry Thank You Card

by Joanne James22. March 2021 14:30

I've had a busy start to my week, with a run and a class featuring the beautiful 'Friends are like Seashells' bundle. Today I have a couple of blog posts, the first one using the sketch over at Hand Stamped Sentiments:


Such a great sketch! I decided to switch out the square for a circle to soften the edges and feature some yummy-looking strawberries and the Sweet Strawberry bundle - take a look:


Here's the low-down on today's card:

I cut up some of my Sale-A-Bration Berry Delightful DSP for my focal cluster of strawberries and blossoms, punching out the shapes with my Strawberry Builder Punch - I just love the easy watercoloured look of these papers, and added some tone-on-tone stamping of additional blossom and leaves from the Sweet Strawberry stamp set in Granny Apple Green onto my Soft Sea Foam base and blended in some extra Soft Sea Foam ink with my blending brush, before running through my Subtle Embossing Folder for some added light texture. I embossed my sentiment in white onto a contrasting Real Red banner, adding some twine and pearls to finish.


Here is the visual summary of the key products used on today's project for you to pin for easy reference:


You can see all of my 'How To' summaries on my 'How To - Tips and Techniques' Pinterest board in case you've missed any. 

I'm also liking today's card up over at SUO Challenges where they have the theme of 'sweet things - food and drink'. These strawberries definitely look good enough to eat, which will have to do for a few months yet until the real thing comes into season here in the UK in mid June.

Enjoy your day; I'm off on the school run but I'll be back later with another card from my crafty weekend endeavours! Until then, happy stampin'!


Stampin' Up! Supplies Used:

Table built using Product Table Builder by The Crafty Owl - Independent Stampin' Up! Demonstrator.

Forever and Always With Love VIntage Heart

by Joanne James10. February 2021 22:30

Today I'm sharing a quick card that I made at the weekend for the current challenge over at Inspired By this week where they have the most beautiful vintage linen hearts in their inspiration photo:

Despite my vast collection of patterned paper, I couldn't find anything with a ditsy floral pattern for my hearts in the same colourway as the inspiration photo, so instead I chose a retired pattern (apologies I cannot remember the name) went for a co-ordinating colour palette and built up from there - take a look:


Here's the low-down on today's card:

I used my Forever and Always dies again and paired them with the hearts from the Stitched Be Mine Dies to create my heart, with a subtle embossed top piece to mimic the linen look of the hearts in the photo:


A few additional flowers, pearls and a double linen bow all add to the vintage feel. A rather unconventional colour palette for a Valentine's card, but this card would work as well to send anyone a heartfelt message at any time, I think.

Here is the visual summary of the key current products used on today's project for you to pin for easy reference:


You can see all of my 'How To' summaries on my 'How To - Tips and Techniques' Pinterest board in case you've missed any. 

Enjoy your evening and I'll be back later in the week with another project. Until then, happy stampin'!


Stampin' Up! Supplies Used:

Table built using Product Table Builder by The Crafty Owl - Independent Stampin' Up! Demonstrator.

Berry Blessings For You PP526

by Joanne James31. January 2021 09:00

Today it's Sunday and time for this week's new challenge over at The Paper Players! It's the fifth Sunday of the month so the lovely Laurie is hosting this week and she has a fun tic-tac-toe challenge board for us to work with:


I used Julee's current Mojo Monday sketch as the basis for my card and went top left to bottom right on the diagonal across the board with die cut-embossing-blue for another fruity card for you this week - take a look:


Here's the low-down on today's card:

Berry Blessings - Today's card is all about the free - free product that is! Both the stamp set and the designer series papers on today's card are part of the Berry Blessings bundle that is one of the free products available with a Stampin' Up! order of £90 or more during Sale-A-Bration. I love the designer papers that feature both the blueberries and raspberries in the bundled stamp set and also the strawberries from the Sweet Strawberry bundle - fruity patterns and also some fabulous checks and plaid. This card is all about the blues and greens, so I chose two plaids that would co-ordinate with my blueberry focal point. They just so happen to also be perfect for Stesha's takeover at TGIF Challenges this week where they are all about the plaid too. I also used the stamp set for the sentiment and a little extra stamping on the inside of my card too:


Stitched Shapes - The layers of Julee's sketch allowed me to fully indulge of my love of stitched shapes: rectangles for the background and then a circle as the base for my fussy cut berries. These are my most used of all my dies and the circles are for sure a staple - I just love the way they elevate a humble shape into something just a little bit more.

It's In The Details - I did a lot of fussy cutting on my berries and leaves, so wanted to add only a few extra small details. The embossing that completes my tic-tac-toe line is both dry embossing using my favourite Subtles folder on the white layer, and a white heat-embossed sentiment on my blue sentiment banner. I also added a simple white twine bow (with my banner that makes my two things from the Just Add Ink list this week) and a single pearl to the centre of my blue flower. You can see those finishing touches better below:


I really love how this card came together. Pacific Point was one of the first ink pads I ever bought when I started stamping, yet it isn't a colour I use often now so it was great to get it out for this card. I love that most of the rest of the product that I used was free - links to the store below if you'd like to snap up this bundle too!

Here is the visual summary of the key products used on today's project for you to pin for easy reference:


You can see all of my Product and 'How To' summaries on my 'How To - Tips and Techniques' Pinterest board in case you've missed any. 

Before you reach for your ink and papers, check out what our amazing team has created to inspire you this week:

Here's a quick recap of our challenge rules:
 
1.  Create a new paper project
2.  Upload your creation to your blog with a link back to us and provide a direct link to the post featuring your challenge submission.
3.  Please link your card to no more than four challenges, TOTAL.
4.  Have FUN!

You can see all of my 'How To' summaries on my 'How To - Tips and Techniques' Pinterest board in case you've missed any. 

Enjoy your day; we were forecast more snow here in the UK this weekend, but yesterday both James Juniors were disappointed to find temperatures had plummeted but it was more like freezing rain than snow. Today they will be hoping for the proper white stuff so that we can build another snowman! If not, we have some cooking to do and we might even get cracking on a knitting project that we've been promising to start for a while. I'll be back tomorrow with another project. Until then, happy stampin'!


Stampin' Up! Supplies Used: 

Table built using Product Table Builder by The Crafty Owl - Independent Stampin' Up! Demonstrator.

Christmas Gleaming Ornaments in Silver and Gold PP521

by Joanne James13. December 2020 09:00

Today it's Sunday and time for this week's new challenge over at The Paper Players! It's our last challenge of 2020 and the turn of the amazing Claire to host this week. She has a colour challenge for you to work with:


I've been super busy this week so have not been a frequent blogger I'm afraid. To make amends, I have two cards for you today! I'm still making Christmas cards and wanted to play along with challenge over at The Card Concept because I loved the textures in the inspiration photo so I decided to make two cards, both using the Fab Friday sketch layout: a silver, black and white one for my Paper Players card and then a gold, black and white version for The Card Concept. So first up - here's my Paper Players card:


Here's the low-down on today's cards:

Both cards feature a pair of ornaments from the Christmas Gleaming set, one heat embossed on Whisper White card and the other onto Basic Black, along with piece of foil embossed with the Parisian Flourish 3D embossing folder and wiped with black ink for a slightly more aged look, black and silver/gold glimmer paper, tassels, gem embellishments and mesh ribbon and twine bows. Just check out the texture and detail:


I switched out the background embossing folder and one or two other small details to recreate a gold, black and white version:


I'm going for a 'classy and elegant' look with my cards today: the polished, shiny finish, layered textures and sparkly embellishments are a definite change from my normal 'clean and layered' style, but I quite like them. I think the sparkle and shine balances all the black and the textures are just lovely:


Here is the visual summary of the key products used on today's projects for you to pin for easy reference:


You can see all of my Product and 'How To' summaries on my 'How To - Tips and Techniques' Pinterest board in case you've missed any. 

Before you reach for your ink and papers, check out what our amazing team has created to inspire you this week:

Here's a quick recap of our challenge rules:
 
1.  Create a new paper project
2.  Upload your creation to your blog with a link back to us and provide a direct link to the post featuring your challenge submission.
3.  Please link your card to no more than four challenges, TOTAL.
4.  Have FUN!

This is our last challenge of the year before we take a short break over Christmas. It is time to say thank you and goodbye to Stef, Allisa and Mary, our fabulous guest designers this year. They have all been fabulous and we will miss them lots! 

Enjoy your day; I am going to try and finish writing my Christmas cards today, whilst also squeezing in some festive baking and maybe just a little crafting too. I'll be back tomorrow with another project. Until then, happy stampin'!


Stampin' Up! Supplies Used: 

Table built using Product Table Builder by The Crafty Owl - Independent Stampin' Up! Demonstrator.
 
 
Table built using Product Table Builder by The Crafty Owl - Independent Stampin' Up! Demonstrator.

Delightfully Detailed Forever Wedding Card

by Joanne James18. May 2020 07:00


Monday already - where does the week go?! I meant to blog this card last Friday and the end of the week simply ran away from me. Anyway, today I'm sharing a card that I made for this week's Less Is More Challenge and the current challenge over at Addicted to CAS:


Yes, LIM wanted cards in cream and white and Addicted to CAS have the code word of flower. I have done all-white type cards before and these are always a challenge. I haven't managed to play along over at Less Is More in a while so thought this would be a good time to remedy that - take a look at what I created:


Here's the low-down on today's card:

A Laser Cut Cheat - I used some retired Delightfully Detailed Lasercut Specialty Paper for my showcase floral flourish on today's card. It's white on one side and vanilla on the other. For today's card, I used the white side against a vanilla card base and snipped a piece to the size I wanted from a larger 12" x 12" sheet. This paper is still available on the Clearance Rack (just click on the link below) if you would like to recreate my card.

It's All About Texture - When using only shades of cream and white, I find texture plays an important role in creating interest, whilst maintaining a clean and simple feel. So in addition to my laser-cut floral flourish, I embossed my card base with the Subtles Embossing Folder and added a simple diecut sentiment from white sparkle glimmer paper for added interest. 

Inside Reversal - I added another piece of laser-cut paper inside my card, this showing the reversed side so that the vanilla shows up against the white lining. I stamped my sentiment in Sahara Sand to maintain the neutral feel: 


Here is the visual summary of the key products used on today's project for you to pin for easy reference:


You can see all of my 'How To' summaries on my 'How To - Tips and Techniques' Pinterest board in case you've missed any. 

I do have another card to share today so I'll be back with that later! Until then, happy stampin'!


Stampin' Up! Supplies Used:

Table built using Product Table Builder by The Crafty Owl - Independent Stampin' Up! Demonstrator.

Grace's Garden For A True Friend

by Joanne James13. May 2020 20:00

Today I'm sharing a card inspired by both the photo and the sketch over at Inspired By and the colours over at Hand Stamped Sentiments, which compliment the Inspired By photo perfectly:


As soon as I saw the Inspired By photo, I thought of the 'Grace's Garden' stamp set which is all about country garden florals. Here's the low-down on today's card:

This card was fairly quick for me to create as I had a selection of flowers stamped and diecut in my snippets box that were leftover from a recent class, so I simply got them out and coloured them with my Stampin' Blends, and added them to my Subtles-embossed card base. I heat embossed my sentiment in white, from the 'Strong and Beautiful' stamp set, such a great set for female-related sentiments. This one is a lovely way to let that special friend know how much they mean to you - I think I will pair this one with a surprise treat for one of my besties who I haven't seen in ages just to let her know I'm thinking of her. On that note I'm also linking today's card up with the ladies over at SUO Challenges too where they are 'Celebrating Women' - something that is always worthwhile as far as I'm concerned.

Here is the visual summary of the key products used on today's project for you to pin for easy reference:


You can see all of my 'How To' summaries on my 'How To - Tips and Techniques' Pinterest board in case you've missed any. 

Enjoy your evening and I'll be back tomorrow with another project. Until then, happy stampin'!


Stampin' Up! Supplies Used:

Table built using Product Table Builder by The Crafty Owl - Independent Stampin' Up! Demonstrator.

Fable Friends Card TTT 60

by Joanne James16. April 2020 12:00

It's Thursday and time for a new challenge over at TicTacToe! It's the turn of Team X to host this week and the lovely Shannon is our featured designer this week. This is the fun board that we are playing along with: 


I went with the first vertical column, Tilted-Stitched-Blue, and I'm also linking up with the current challenge over at Addicted to CAS where the code word is 'animal' as today's card features a furry friend - take a look:


Here's the low-down on today's card:

Fable Friends - For some the squirrel is considered more foe than friend and certainly my chickens think that of the grey squirrels that frequent my garden, but today I decided to go with a cheery red squirrel from 'Fable Friends' for my card. This isn't a stamp I use often so thought I would dust it off and give it some love and stamped him in Memento black onto a stitched rectangle of Whisper White and coloured him with my Blends markers, using another colour I don't often use outside of autumn, Cajun Craze, for my red colour. I do think he looks quite sweet in his sailor's outfit, even if I say so myself! 

On The Tilt - I considered trying to get away with the fact that the squirrel was wearing his hat at a jaunty angle for the 'tilted' element of today's board, but instead decided to 'embrace the wonky' and used an old sketch I had as the basis for my overlaid tilted panels and tilted strip of punched flowers, just like the daisy the squirrel is holding. I'm not generally one for tilted panels, as I like things to be 'just so', but I think they work ok here - I'm not sure I'll make a habit of it though!

Sideways Sentiment - The sketch layout I used had two sentiments, one vertical and another horizontal beneath the stitched panel. I used the former and considered adding 'Hello Spring' from the same stamp set beneath the panel too, but decided against it as I have lots of friends with birthdays in the next couple of months so wanted to leave this card open with the option of adding a birthday sentiment to the inside. On reflection, I think the second sentiment might have been a nice touch, but since I embossed the cardbase with my Subtles embossing folder after stamping the first one, unless I make another identical card and add it first we will never know!

Here is the visual summary of the key products used on today's project for you to pin for easy reference:


You can see all of my Product and 'How To' summaries on my 'How To - Tips and Techniques' Pinterest board in case you've missed any. 

A tictactoe board offers so many creative possibilities - how does this week's board inspire you? Why not have a go? We would love to see you in the gallery and who knows - you might be selected for Designer's Choice and be eligible to be a guest designer on a future challenge. 

Enjoy your day; the sun is shining so I'm hoping to get my chores out of the way this morning and then head outside to get some gardening for done this afternoon. That's one thing with that can be said for the current lockdown - our garden has never looked so good! I'll be back tomorrow with another project. Until then, happy stampin'!


Stampin' Up! Supplies Used: 

Table built using Product Table Builder by The Crafty Owl - Independent Stampin' Up! Demonstrator.


Pink Birthday Crocuses for PP484

by Joanne James29. March 2020 10:00


Today it's Sunday and time for this week's new challenge over at The Paper Players! It's my turn to host this week and as it's the fifth Sunday of the month we have a tic-tac-toe challenge for you to work with:


I'm getting used to the idea of a tic-tac-toe board; my starting point tends to be as many options as possible, so I ended up with 3 lines complete: central row - diecut, spring, birthday, and far right column - DSP, birthday, flowers and lastly the diagonal pink, spring, DSP - talk about over-achiever! I used Amy's sketch over at Freshly Made Sketches for my layout (great layout, Amy!) and decided to use one of my favourite new florals for a new purpose - take a look:


Here's the low-down on today's card:

Crocuses Are Not Just For Easter - I love the 'Easter Promise' stamp set and the crocus stamps. They are perfect for spring and I decided that they would make a pretty birthday card too. I chose my favourite pink, Melon Mambo, for today's card - did you know that you can actually get pink crocuses? I didn't, but Google showed me some so as my kids so often say, well it must therefore be true! I coloured and fussy cut a couple of the bunches for the front of my card, then added the row to the inside for a little extra detail:


Label Me Bold - I used the Happy Birthday from 'Label Me Bold' on today's card; plain block sentiments are perfect for something simple where the florals are the main focus. 

Pretty In Pink Watercolour - I decided to use a rough watercolour to colour my crocuses. I stamped them in Stazon on watercolour paper and then added loose colour in layers, deliberately not keeping inside the lines (which was hard for the perfectionist in me!) and I just love the finished effect:


I added a twine bow and some champagne rhinestones to complete my card. I just LOVE this card - do you ever make a card that totally ticks all of your boxes? This is one of mine!

Here is the visual summary of the key products used on today's project for you to pin for easy reference:


You can see all of my Product and 'How To' summaries on my 'How To - Tips and Techniques' Pinterest board in case you've missed any. 

Before you reach for your ink and papers, check out what our amazing team has created to inspire you this week:

Here's a quick recap of our challenge rules:
 
1.  Create a new paper project
2.  Upload your creation to your blog with a link back to us and provide a direct link to the post featuring your challenge submission.
3.  Please link your card to no more than four challenges, TOTAL.
4.  Have FUN!

You can see all of my 'How To' summaries on my 'How To - Tips and Techniques' Pinterest board in case you've missed any. 

Enjoy your day; the clocks went forward overnight so we have an hour less today, although in the grand scheme of things at the moment I'm not sure it will matter that much! We spent some time together yesterday completing a fiendishly tricky quiz that Ben has been set by school, so I think this afternoon it might be time to involve the grandparents in our endeavours! I'll be back tomorrow with another project. Until then, happy stampin'!


Stampin' Up! Supplies Used: 

Table built using Product Table Builder by The Crafty Owl - Independent Stampin' Up! Demonstrator.

New Online Exclusives

There are new products available exclusively in the online store from 5 November - check them out here.

Latest Kits!

Stampin Cut and Emboss

The Perpetual Beauty Calendar Kit and Cherry Blossoms Treat Boxes Kit are the latest kits in the online store - get yours here!

Shop Online

Access my online shop 24 x 7, 365 days of the year:

Current December hostess code:

9NKXDTTR

Shop Online

Mini Catalogue

BROWSE THE CATALOGUE

'Tis The Season - the new Stampin' Up! Mini Catalogue is here! For more details and to download your copy click here

Scrapbooking

Stampin' Up! has introduced a new range of 12x12" scrapbooking product and kit - the full range is now available to purchase online. To download a copy of the new digital Scrapbooking Catalogue click here.

2024-25 Annual Catalogue

BROWSE THE CATALOGUE

Click on the image to download your copy of the 2024-25 annual catalogue. For a full list of current SU! supplies, go to my online store. If you would like any help or advice, please drop me a line at joanne@thecraftyowl.co.uk or give me a call on 07773 421446 - I'd be happy to help.

Join My Team

It's always a great time to join Stampin’ Up! New team members can get £130 worth of products for only £99 + free business supplies + free shipping + all the fun being a part of Stampin’ Up! Stampin' Up! has something for everyone: join my growing team and benefit from my support to enjoy Stampin' Up! however you choose.

If you're interested, call me for a chat to understand how I can help you realise your goals. Alternatively, if you have already decided to sign up and you just can't wait, please click here for the link to the online form where you can sign up and order your starter kit right away! 

About Me

Hi I'm Joanne and live in Northampton and when I'm not looking after my husband and two beautiful children, am an avid crafter with a passion for all things Stampin' Up!

I must confess that I have never been a big rubber stamper - until I discovered Stampin' Up! that is. I love the fact that I can get such great results with co-ordinating stamps, inks, papers and punches - the possibilities are endless! Join me on my stamping journey as I share the things I love and be inspired to create amazing things yourself!

Follow Me

Monthly Newsletter

Box Builder

Click the button above to use Box Buster to create your custom box design using the Envelope Punch Board!

Kits Collection Now Available!

Stampin Cut and Emboss

The new Kits Collection from Stampin' Up! is now available!

Click here to see the current kits available and order yours online today.

I Design For


Stampin' Up Stuff

This is my personal blog and is not endorsed by Stampin’ Up! I hope you find it a plentiful source of ideas and personal inspiration but please don't copy my designs for contest submission or use for classes, publication or sale without express permission.

DSP Special Release

Check out 3 popular designer series paper designs in fresh new colourways! Available exclusively in the online store from 3 December - check them out here

Last Chance Products

Last Chance Products will now be updated every other month - check them out here.