
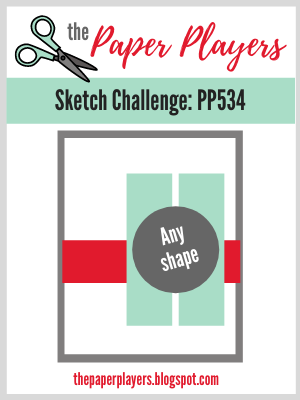
Today it's Sunday and time for this week's new challenge over at The Paper Players! It's the turn of the fabulous Anne Marie to host this week and she has my favourite, a sketch challenge for you to work with:

I got myself into something of a tizzy with this week's sketch and ended up making two cards - this one is for sure my favourite! I loved the inspiration photo over at Just Add Ink this week and thought an Easter wreath would be perfect for the shape in Anne Marie's sketch - take a look:

Here's the low-down on today's card:
Arrange A Wreath - The Arrange A Wreath bundle is perfect for an Easter wreath and this is the only type of wreath I think I've yet to make with this versatile set! I layered two pale green leaf wreath diecuts, then stamped a variety of rainbow-coloured Easter eggs and nestled them in between the leaves, mixing and matching the patterns:
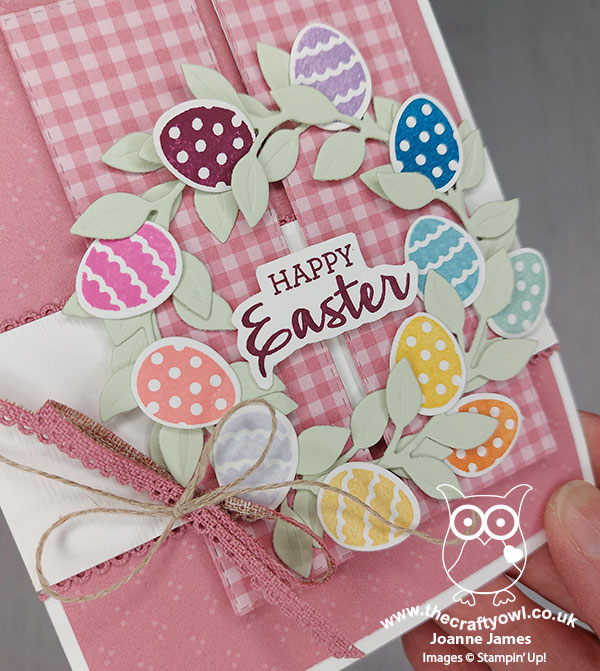
Pink Patterns - I decided to use a pink background for my wreath, again inspired by the JAI photo. I used a piece of Hydrangea Hill DSP in a soft Rococo Rose pattern. I wanted my vertical panels to co-ordinate but not be too busy, as I didn't want them to detract from the detail of my wreath, so I used some of last year's retired in-colour DSP in a gingham pattern.
Going, Going ... - Today's card features so many of my favourite things that will be retiring with the annual catalogue: The Arrange A Wreath stamp set and Wreath Builder Dies, the in-colour Rococo Rose in all its forms, and my favourite embossing folder, the Subtle 3D Embossing Folder. If these items are still on your wish list, you should snap them up now whilst you still can! You can find links to them in the online store below.
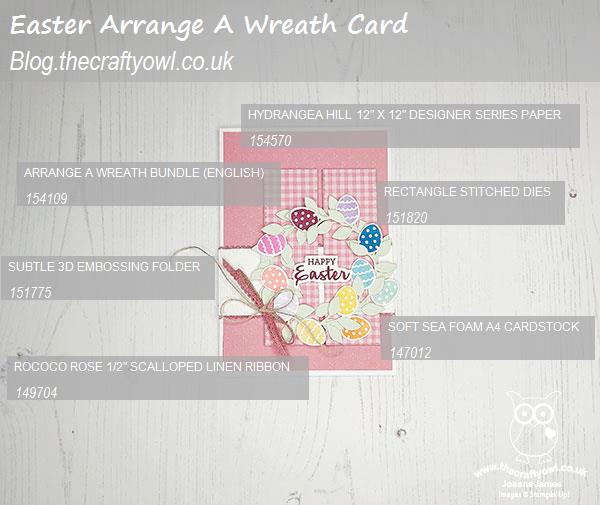
Here is the visual summary of the key products used on today's project for you to pin for easy reference:
You can see all of my Product and 'How To' summaries on my 'How To - Tips and Techniques' Pinterest board in case you've missed any.
Before you reach for your ink and papers, check out what our amazing team has created to inspire you this week:
The Paper Players Design Team
Here's a quick recap of our challenge rules:
1. Create a new paper project
2. Upload your creation to your blog with a link back to us and provide a direct link to the post featuring your challenge submission.
3. Please link your card to no more than four challenges, TOTAL.
4. Have FUN!
You can see all of my 'How To' summaries on my 'How To - Tips and Techniques' Pinterest board in case you've missed any.
Enjoy your day; if you're in the UK, did you remember to put your clocks back? Whilst we lose an hour, the additional hours of sunlight are always welcome - British Summer Time is here at last! I am planning on pottering in the garden today and may have to start eating the Easter eggs that are accumulating in the James household - I know Easter isn't until next weekend, but the temptation is proving too much! I'll be back tomorrow with another project. Until then, happy stampin'!
Stampin' Up! Supplies Used: