English Garden In Bloom Friendship Card

by Joanne James22. October 2015 08:05

Today it's time for a new challenge over at Create With Connie and Mary and this week we have a great colour challenge for you:


When I sat down to work on my card this week I realised that all of the challenge colours could be found in the lovely English Garden Designer Series Paper, so it seemed like the perfect opportunity to showcase it. I also used this week's sketch over at Retrosketches as the basis for my layout. Here's my card: 


I used a base of Hello Honey with a mat of Soft Suede, then covered my cardfront with a piece of floral patterned paper featuring all of the colours. I added a 2" circle of Mossy Meadow and cut my banner from a piece of neutral kraft corrugated paper, to add texture and detail without detracting from the pattern. I stamped my sentiment from the 'Garden In Bloom' set in Soft Suede on Whisper White and matted this on a banner of Hello Honey, both of which I punched with my Triple Banner Punch. I considered using the butterfly from this set too as my embellishment, however it was a little too small to really stand out. I decided to go with a simple layered butterfly instead, punched using my Bitty Butterfly and Elegant Butterfly punches, with a couple of strands of gold metallic thread for antennae. To finish, I added a trio of Mossy Meadow enamel dots. This is one of those cards that really is 'all about the paper' - the English Garden papers are so very pretty though, they deserve to take centre stage. 

Do visit the other Design Team members to see how they used this week's challenge colours; there's lots of inspiration over on their blogs too!

Enjoy your day and I'll be back tomorrow with another project; until then, happy stampin'!


Stampin' Up! Supplies Used:

  • Garden In Bloom Photopolymer Stamp Set
  • English Garden Designer Series Paper
  • Soft Suede Classic Stampin' Pad
  • Soft Suede A4 Cardstock
  • Hello Honey A4 Cardstock
  • Mossy Meadow A4 Cardstock
  • Gold Metallic Thread
  • 2" Circle Punch
  • Banner Triple Punch
  • Bitty Butterfly Punch
  • Elegant Butterfly Punch
  • Kraft And White Corrugated Paper


Sheer Perfection Vellum - Only 2 More Days To Grab Yours!

by Joanne James30. March 2015 07:00

It's Monday 30th March and that means only one thing - only 2 days left to go until the end of this year's Sale-A-Bration promotion! With this in mind, today's cards features one of the additional products introduced as a free gift when you spend £45 - sheer perfection vellum. I am entering today's card into both the Freshly Made Sketches and Color Throwdown challenges:


 I love this sheer vellum - it is printed with a variety of different patterns that are great for colouring with Stampin' Write markers. The sheet with the butterflies is a favourite, but today I chose one of the floral patterns - here is my card:

I used So Saffron for my base and then used a mat of Pear Pizzazz and a piece of Whisper White beneath my piece of vellum so that my colouring would be true. I coloured the flowers on my vellum piece with So Saffron and highlighted some areas with Daffodil Delight, then coloured the leaves with my Pear Pizzazz Stampin' Write marker. Before adhering my vellum to my base layer, I turned it over and rubbed over the reverse wide with my stylus to create a slightly raised effect when viewed from the front. It's quite difficult to see in the photograph, but adds a nice texture in real life. I finished my card with a banner, stamped in Basic Grey with the sentiment from another Sale-A-Bration free stamp set 'Simply Wonderful', and a layered butterfly, punched with my Elegant Butterfly and Bitty Butterfly punches and using a scrap of retired 'Riding Hood Red' cardstock for my pop of red. A few pearls to finish and done!

This Sheer Perfection Vellum really is lovely; it's such a shame that it's only available for two more days! You still have until 10pm tomorrow night to place an order for £45 and get yours for free - if you shop online with me and use the current code 4AHTZQVW, you will also receive an extra gift from me to say thank you (shipped separately) - so now there's two reasons to shop!

Right - I'm off to make a whole bunch of thank you cards and bag tags for this month's local customer orders - I'm using another Sale-A-Bration freebie this time, the 'For Being You' stamp set - getting inky is always fun and with free product, it's even better!

Back tomorrow with another project; until then, happy stampin'!


Stampin' Up! Supplies Used:

Table built using Product Table Builder by The Crafty Owl - Independent Stampin' Up! Demonstrator.


White With a Hint of Gold - Gratefulness Card

by Joanne James24. June 2014 13:00

This week the peeps over at CAS(E) This Sketch and Fusion have joined forces on their challenge blogs with a great sketch and inspiration photo:

I took the inspiration for my card from both the photo and the sketch and came up with the following card:

For a largely white card, there's a lot going on here; all-white cards are also incredibly difficult to photograph well, so I hope you can see some of the more subtle elements of design. Firstly, I used a Whisper White card base and ran this through my Big Shot with the Wildflower Meadow Textured Impressions Embossing Folder to give a nice relief pattern that I thought worked well with the butterfly. I created a layered banner using my Banner Framelits, cutting one in Whisper White and another slightly longer one in gold foil to extend beyond the length of it. On the uppermost white banner, I stamped my sentiment in Versamark and heat embossed it with gold embossing powder - this sentiment is a 'sneak peek' from a new set called 'Something to Say', out next week (not long now!).

I then did something I've never done before: I glittered a butterfly! Now whilst my 9 year old daughter loves anything with glitter, I'm generally not a fan of the stuff. I love Stampin' Up!'s glimmer paper as this is a great no-shed alternative, and I've had 2 pots of glitter sitting in my drawer since before Christmas and until now unopened for fear of the ensuing mess that would be created! As my card came together, I knew that glitter was going to be the only way to go to get the look I was after and create the contrast in texture of all the gold elements. So, I was brave - out came the heat and stick powder and gold glitter, and this sparkly vellum butterfly is the result. And I love it - even though I think I will be brushing gold glitter out of my butterfly punch for some time to come. Lastly, I substituted the stitching in the sketch layout for two rows of sequins to add one last gold element to my card.

I made this card with my Mother-In-Law in mind; she is always there to help me out of a fix and last week was no exception: Rebecca came home from school the week before last with instruction to make a weasel costume for the forthcoming production of 'Wind In the Willows' - to be held this week! Not only did she need a weasel costume, this weasel required a brightly coloured waistcoat and cravat to look the part. Fortunately for me MIL came to the rescue and a few days later had managed to tailor the most amazing waistcoat and cravat I've ever seen just from bits and bobs in her sewing box. Rebecca is destined to be the best dressed weasel around at her production on Thursday (I'll post a picture of her in costume later in the week!); as for me - my Mother-In-Law's goodness does indeed make me very grateful, so Kathy this one is for you!

Back tomorrow with another project and this week's Wednesday Deals; until then, happy stampin'!


Stampin' Up! Supplies Used:

* Something To Say Stamp Set - available 1st July

Table built using Product Table Builder by The Crafty Owl - Independent Stampin' Up! Demonstrator.


Mr & Mrs Wedding Card CCMC301

by Joanne James4. May 2014 20:57

I have a few wedding cards to make for a number of forthcoming nuptials and when I saw the sketch over at Create with Connie and Mary this week I knew it would be perfect for one of the cards I had in mind. Here is this week's sketch:

My wedding card needed to be Whisper White, Marina Mist and silver as I wanted it to reflect the wedding stationery which had been made by the mother of the bride a good friend and customer of mine. Here is my card:

It is very simple as I wanted my silver heat-embossed 'Mr & Mrs' to take centre stage and I layered my centre panel on dimensionals on a piece of brushed silver cardstock, both of which were cut out using the labels framelits. I turned the sketch around through 180 degrees, as I wanted my embellishment to be a silver glimmer butterfly and it looked better top right than bottom left and I used a piece of silver taffeta ribbon to create a band around my Marina Mist mat. Very simple but like the original wedding stationery, very elegant and with just a hint of sparkle.

If you'd like to see more great design inspiration for this sketch, check out what the CCMC design team have been up to - there are some great interpretations over there this week.

Back tomorrow with another card;; until then, happy stampin'!


Stampin' Up! Supplies Used:

Table built using Product Table Builder by The Crafty Owl - Independent Stampin' Up! Demonstrator.


Tags: , , , ,

Cards | Stamping | Weddings

Sale-A-Bration Scrap Book Page

by Joanne James18. February 2014 20:58

Good evening blog readers! Today I'm going to share a scrapbook page with you that I made at a recent team training event and designed by the lovely Bekka Prideaux. It features a number of the Sweet Sorbet paper designs and the Petal Parade stamp set - both items that can be yours free during Sale-A-Bration with an order of £45 or more - some new Spring-Summer items and a somewhat overlooked item in the annual catalogue (more on that in a moment). So here is my scrapbook layout:

I decided to use one of my summer holiday photos of Rebecca and Ben as the centrepiece; I have so many amazing photographs from our holiday that I have yet to do something with, so this seemed a good opportunity to start. They are participating in one of my favourite activities at a Disney theme park - no not a roller coaster, but the ritual eating of a Mickey ice-cream bar (I am rather partial to these!) - and the concentration on their faces is a concerted attempt to get them eaten before they melt in the extreme heat!

The bright colours and patterns in the papers make a great background for my photo. Did you spot the 'hidden treasure' from the annual catalogue? The photograph is mounted on to one of the Simply Fabulous Simply Sent cards, with another attached to the Scallop tag Topper Punch piece behind for hidden journaling. These cards are great for quick cards but can also be used for journaling or as a photo mount. Lastly, a fringe cut using the new fringe scissors adds texture and draws the eye in to the focal point.

Back tomorrow with another project; until then, happy stampin'!


Stampin' Up! Supplies Used:

Table built using Product Table Builder by The Crafty Owl - Independent Stampin' Up! Demonstrator.


Raspberry Ripple Covered Notebook

by Joanne James16. July 2013 21:59

A really quick post from me today to share a covered notebook I made for Rebecca's teacher last week to go with her end of term thank you gift. As someone who loves arts and crafts herself, Rebecca was keen to give her teacher a special book she could use to jot down notes and such like and was adamant that it should sparkle! So this is what we made:

Some More Amore DSP, glimmer paper and trusty elegant butterfly punch were all that we needed to turn a plain notebook into something special. We also added some in-colour satin stitched ribbon to the bind as a finishing touch. We also added a personal message inside, along with the poem 'Unity' by Cleo Swarat, which is all about the role of teacher and parent in educating a child and talks of the teacher being a sculptor, which given Rebecca's teacher majored in Art seemed appropriate for her.

That's all for today - back tomorrow with another project. until then, happy stampin'!


Stampin' Up Supplies:

Cardstock: Raspberry Ripple, More Amore (DSP)

Tools: Elegant Butterfly Punch, 1 3/4" Scallop Circle Punch, Itty Bitty Punches

Finishing Touches: Raspberry Ripple Satin Stitched Ribbon, Silver Glimmer Paper, Basics Rhinestones

Tags: , , , , ,

3D Projects

Scallop Envelope Gift Card Holder Card

by Joanne James24. June 2013 20:11

It's Monday, the start of a new working week and so I thought it would be a great opportunity to remind all you dedicated crafters out there that there are only another 7 days left to order from the retiring stamp and accessories lists before these items are gone for good. Lots of items have gone already but you still have until July 1st to pick up a bargain or two.

With this in mind, I'm back on the retiring products theme today and I'm actually sharing a card that isn't mine but one that I received in a swap at the UK regional training day in Telford last month and which features three retiring products. It's always nice to see what others have created and I received a few swaps that I really loved in their own right and would like to share with you. The first of these is this card by Kerry Newton:

I don't believe Kerry has a blog (she didn't leave details on her swap and I can't find her on an internet search), but if anyone reading this knows different do let me know as I will then update this post with a link to it.

There are so many things I like about this card: the colours (vanilla, crumb cake and indigo), the background stamping and blended colouring on the First Edition DSP, the feature gift card holder made using the Scallop Envelope Die and the little sentiment band and butterfly that just bring the whole design together. I think the card has quite a unique design, but one that is very effective.

Did you spot the retiring products? Yes, it's the Scallop Envelope Bigz Die, the First Edition printed designer series paper and the Very Vanilla Taffeta Ribbon. If you don't own these and would like to recreate this card, you have one week left to place your order before they're gone for good! Back tomorrow with another project; until then, happy stampin'!


Stampin' Up Supplies:

Stamps: Creative Elements, Petite Pairs

Cardstock: Island Indigo, Crumb Cake, Very Vanilla, First Edition DSP

Ink/Stampin' Write Markers: Basic Black, Island Indigo, Crumb Cake

Tools: Elegant Butterfly Punch, Scallop Envelope Bigz Die, Big Shot, Blender Pen

Finishing Touches: Basics Pearls, 1/8" Very Vanilla Taffeta Ribbon

Butterflies - for Mums everywhere

by Joanne James12. May 2013 21:58

Well, it's been a busy weekend: Stampin' Up! regional training in Telford yesterday, preparing for this week's classes today, so am rather behind with my posts. Yesterday was a great day, with lots to share in the coming weeks, however I returned home with the most dreadful headache, so couldn't focus long enough to finish yesterday's post. I will share my swaps tomorrow instead, as today's post is a timely one as it's International Mother's Day; we in the UK had our Mother's Day a while ago now, but for my American and Canadian friends celebrating today, I thought I would share the Mother's Day card I made for my Mother-In-Law, which I couldn't share at the time as she reads my blog and so I couldn't spoil the surprise! This was her card:


Very pink just about sums it up! Can you see the lovely shimmer on the butterflies? This is courtesy of the liberal spray of Vanilla Smooch Spritz - they really sparkle when they catch the light. This card would of course also make a lovely birthday card for a Mum.

One of my favourite books is 'Good Mother, Bad Mother' by Gina Ford (a modern day heroine in my view) and there is a line at the beginning that says "the hand that rocks the cradle is the hand that rules the world" - I so love that line, so to Mothers everywhere, this one's for you - hope you've had a lovely day.

Back tomorrow with my Telford swaps; until them, happy stampin'!


Stampin' Up Supplies:

Stamps: En Francais

Cardstock: Whisper White, Melon Mambo, Pretty in Pink

Ink/Stampin' Write Markers: Pretty in Pink

Tools: Elegant Butterfly Punch, Bitty Butterfly Punch, Typeset Alphabet

Finishing Touches: Vanilla Smooch Spritz, Basics Rhinestones


Feel Goods - The Best of Friends

by Joanne James20. April 2013 21:10

The sun is shining here in the UK - oh, happy days at last! Back to cards today and I thought I'd share a card I made a little while ago using one of the stamps in the 'Feel Goods' stamp set. I loved this stamp set the first time I set eyes on it - 5 great sayings that can be suitable for so many occasions. This is the first card I made with this set, although I will have many more to share in days to come I'm sure:

My favourite bright colours again for this card, with a ribbon of Summer Smooches designer series paper along with a couple of butterflies for interest. Centre stage absolutely goes to the 'feel good' though. I made this card for a good friend of mine for whom the sentiment absolutely fits. In the words of a Fergal Sharkey pop song from the 80s (I know, it shows my age when I start reminiscing like this!) 'A good heart these days is hard to find'. I think the same can be said of good friends - but the recipient of this card is one of the best!

Back tomorrow with another project - until then, enjoy the sunshine and happy stampin'!

Stampin' Up Supplies:

Stamps: Feel Goods

Cardstock: Real Red, Daffodil Delight, Rich Razzleberry, Whisper White, Brights DSP, Summer Smooches DSP

Ink/Stampin' Write Markers: Rich Razzleberry

Tools: Elegant Butterfly punch, Bitty Butterfly punch, Labels Framelits

Finishing Touches: Basics Rhinestones


Sunshine and Sprinkles Scrapbook Page

by Joanne James19. April 2013 21:09

Today I thought I would share something a little different: as many of my followers will know, I love to design and make cards. I'm not a scrapbooker - it's just not my 'thing'. In many ways this may surprise those close to me, as we are a household of keen photographers and have a collection of literally thousands of memories captured on slide, film and digitally. I love to have photographs on display - for me though, I struggle to design a page without a specific photograph in mind.

All that being said, I made a scrapbook page at training last Sunday and I thought I would share it with you, as even though I haven't yet chosen the photos to put on it, the layout could be used and adapted in so many ways I'm sure it will inspire some of you reading this, who I know are keen scrapbookers. Here is my finished page: 
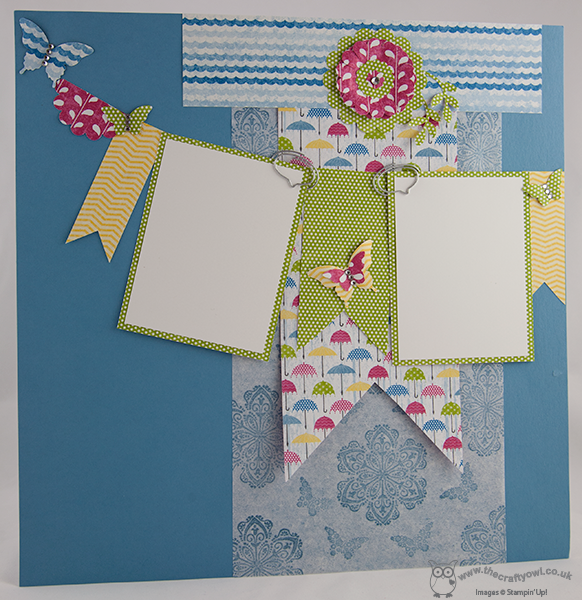
This page was designed by the lovely Bekka Prideaux and features one of my favourite current designer papers in the Spring Summer catalogue, Sunshine and Sprinkles. I also like the background stamped sheet - this is Marina Mist ink stamped straight on to filter paper.

Here's a close-up of the top section - there's so much going on here: 
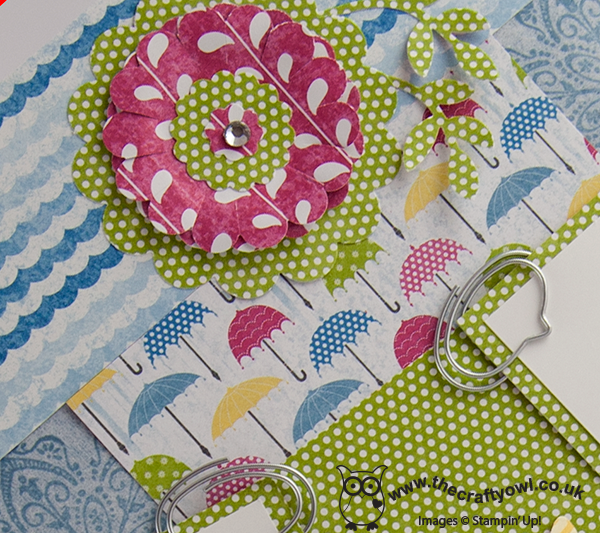
Did you notice the lovely speech bubble paper clips too - aren't they cute? You may have overlooked them in the catalogue (p.28, Spring Summer Cat.): there are 2 different packs - each with 8 of 3 different designs (there is an arrow and a coat hanger in this set too) and at £4.50 per pack they represent great value. One or two on a scrapbook page or card is enough to add just the right amount of detail. One more photo - a close-up of one of the butterflies:
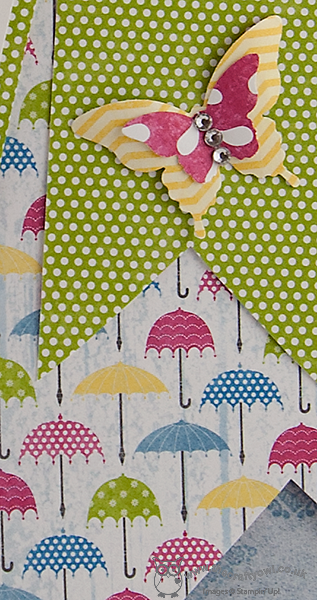
As Bekka herself would say, you can never have too many butterflies! I love the way the Bitty Butterfly punch is layered with the Elegant Butterfly punch to create a double one and the rhinestones add just enough 'bling' without overpowering the page. I really like this layout and there's even some space on the base page if you wanted to add some journalling or commentary. For those of you that enjoy journalling, I will have more great Stampin' Up! news coming soon - all 'top secret' currently, but watch this space - that's all I'm saying for now!

I hope you enjoyed the change in direction today; back with another card tomorrow. Unti then, happy stampin'!


Stampin' Up Supplies:

Stamps: Mixed Bunch, Papillon Potpourri

Cardstock: Marina Mist, Whisper White, Sunshine and Sprinkles DSP

Ink/Stampin' Write Markers: Marina Mist

Tools: Elegant Butterfly punch, Bitty Butterfly punch, 2-Step Bird punch, 1 3/4" Scallop Circle punch, 2 3/8" Scallop Circle punch, 7/8" Scallop Circle punch, Itty Bitty Shapes punch

Finishing Touches: Cute Clips, Basics Rhinestones

New Online Exclusives

There are new products available exclusively in the online store from 5 November - check them out here.

Latest Kits!

Stampin Cut and Emboss

The Perpetual Beauty Calendar Kit and Cherry Blossoms Treat Boxes Kit are the latest kits in the online store - get yours here!

Shop Online

Access my online shop 24 x 7, 365 days of the year:

Current December hostess code:

9NKXDTTR

Shop Online

Mini Catalogue

BROWSE THE CATALOGUE

'Tis The Season - the new Stampin' Up! Mini Catalogue is here! For more details and to download your copy click here

Scrapbooking

Stampin' Up! has introduced a new range of 12x12" scrapbooking product and kit - the full range is now available to purchase online. To download a copy of the new digital Scrapbooking Catalogue click here.

2024-25 Annual Catalogue

BROWSE THE CATALOGUE

Click on the image to download your copy of the 2024-25 annual catalogue. For a full list of current SU! supplies, go to my online store. If you would like any help or advice, please drop me a line at joanne@thecraftyowl.co.uk or give me a call on 07773 421446 - I'd be happy to help.

Join My Team

It's always a great time to join Stampin’ Up! New team members can get £130 worth of products for only £99 + free business supplies + free shipping + all the fun being a part of Stampin’ Up! Stampin' Up! has something for everyone: join my growing team and benefit from my support to enjoy Stampin' Up! however you choose.

If you're interested, call me for a chat to understand how I can help you realise your goals. Alternatively, if you have already decided to sign up and you just can't wait, please click here for the link to the online form where you can sign up and order your starter kit right away! 

About Me

Hi I'm Joanne and live in Northampton and when I'm not looking after my husband and two beautiful children, am an avid crafter with a passion for all things Stampin' Up!

I must confess that I have never been a big rubber stamper - until I discovered Stampin' Up! that is. I love the fact that I can get such great results with co-ordinating stamps, inks, papers and punches - the possibilities are endless! Join me on my stamping journey as I share the things I love and be inspired to create amazing things yourself!

Follow Me

Monthly Newsletter

Box Builder

Click the button above to use Box Buster to create your custom box design using the Envelope Punch Board!

Kits Collection Now Available!

Stampin Cut and Emboss

The new Kits Collection from Stampin' Up! is now available!

Click here to see the current kits available and order yours online today.

I Design For


Stampin' Up Stuff

This is my personal blog and is not endorsed by Stampin’ Up! I hope you find it a plentiful source of ideas and personal inspiration but please don't copy my designs for contest submission or use for classes, publication or sale without express permission.

DSP Special Release

Check out 3 popular designer series paper designs in fresh new colourways! Available exclusively in the online store from 3 December - check them out here

Last Chance Products

Last Chance Products will now be updated every other month - check them out here.