Fresh Prints Mixed Bunch Card

by Joanne James4. June 2014 10:13

Well Sunday's summer sunshine was definitely short-lived; the grey of yesterday has turned into steady and continuous pouring rain so far this morning - yuk! Still, today's card for the CAS Colours and Sketches Challenge will cheer you up I hope; this week it is a double challenge to use both the sketch and colour palette:

Firstly, a quick thank you to the ladies over at CAS for choosing me as one of their winners last week (you can see my winning card here). Someone I asked me recently how I get on with my challenge entries, as I don't often post the outcome here. I sometimes post a win on my Facebook page but the one place I try and keep track of all my wins is my Pinterest board here - so if you're ever interested to see my growing badge collection, pop on over and take a look.

Anyway, onto today's card! I used a piece of paper from the Fresh Prints DSP stack as the inspiration for today's card - these stacks are great and I'm so pleased that there are going to be some new ones appearing in the forthcoming new annual catalogue. Here is my card:

I love this Orla Kiely-inspired pattern - it always reminds me of flower stems, so it seemed appropriate to use a statement flower as my focal point in place of the arrow on the sketch and what better than that old favourite, Mixed Bunch (staying for next year's catalogue - hurrah!) I used Coastal Cabana for my card base and layered my DSP strip on a mat of Real Red cardstock. I then stamped my flower in Real Red ink on Whisper White, punched it out with the co-ordinating Blossom punch (got to love a matching punch!) and backed this with another flower punched from Baked Brown Sugar cardstock, which I offset slightly so that you could see it through the gaps of the petals of the top flower. I finished my flower with an in-colour Boutique Details in Coastal Cabana; it's not often I dip into my pot of these, but it provided the perfect finish to my bold flower here. Lastly, I added my 'Yippee Skippee!' sentiment from the stamp set of the same name in red to the card base.

A clean and simple card that could be used for lots of occasions and brings the challenge colours together nicely. I am also going to link my card up with the challenge over at 'Less is More' this week where the challenge is to use two different stamp sets; pretty good, considering there are only two actual stamped images on the whole card!

Back tomorrow with another card; until then, happy stampin'!


Stampin' Up! Supplies Used:

Table built using Product Table Builder by The Crafty Owl - Independent Stampin' Up! Demonstrator.


Tags: , , , , , , ,

Cards | Stamping

Mixed Bunch Meets Gorgeous Grunge

by Joanne James28. February 2014 21:01

Today I have a quick card for you which was inspired by both the sketch over at The Paper Players this week and last week's trio of colours over at Dynamic Duos. Here is Jaydee's sketch over at the Paper Players:

And here is my card:

I toyed with going with a literal interpretation of the sketch using nothing more than various papers for the design, but instead I decided to go down a different route and use a combination of washi tape to create my 'stripes', with a tone-on-tone Mixed Blossom flower as my focal point. I then used one of my Gorgeous Grunge stamps to add some interest to the background. This card was something of an experiment but I love the bright, bold colours and the addition of a green stem is just enough to lift the other key colours. I'm also just in time to link up with 'Less is More' where the challenge this week is to add metal to your card - whilst there is only one candy dot brad on my card, I think it serves an important purpose in bringing the whole design together.

That's all from me today; back tomorrow with another project. until then, happy stampin'!


Stampin' Up! Supplies Used:

Table built using Product Table Builder by The Crafty Owl - Independent Stampin' Up! Demonstrator.


A Card with the Midas Touch? CCMC287

by Joanne James28. January 2014 22:06

After all the news-related posts of the day, I thought I would share a quick creative post of a card I made using some of the new products that feature in the Stampin' Up! Spring-Summer catalogue released today. Today's card is my entry for this week's sketch challenge over at Create With Connie and Mary; last week I was delighted to be chosen as one of the 'Top 3 Picks' for the colour challenge with the card I featured here. This week's challenge is to design a card using the following sketch layout:

Here is my finished card:

So if you were expecting spring pastels, I'm afraid you're already disappointed!! This card is something of a departure for me - I don't often use black as a card base, but I was inspired recently by this card created by Justin Krieger (check out his blog here - I love his style.) and decided that black would provide the perfect backdrop to showcase lots of the new gold products that feature in the new seasonal catalogue.

I stayed quite faithful to the sketch and edged my oval in gold foil and embellished with a layered flower using the Flower Shop and Mixed Bunch stamp sets. I embossed the bottom flower in black on Very Vanilla and the top layer in gold on black to give it a luxurious feel - the photo at the bottom of this post really shows the detail. I finished with a vintage button threaded with the new gold baker's twine and some gold foil leaves punched from my two step bird punch. The background banner is made from one of the gold vellum sheets, another new product; each pack contains 3 designs (it also includes a spot and a heart pattern) and I love them! I finished by adding my floating dots of gold sequins, which I removed from the thread so that I could use them individually. Oh and I almost forgot - the 'Live happy' sentiment is one of those included in the Sale-A-Bration stamp set, 'You're Lovely'.

I hope you like my card; if you would like to see what the designers and other participants did with this sketch, pop over to the CCMC page for more design inspiration.

Back tomorrow with a video tutorial for you and an exciting make using a new stamp set from the Spring-Summer seasonal catalogue. Until then, happy stampin'!

Stampin' Up! Supplies Used:

Table built using Stampin' Up! Product Table Builder from The Crafty Owl.


Two For One - Times Two!

by Joanne James14. January 2014 12:51

Well, it had to happen - I successfully shared my cold with my daughter, who as a result is off school today feeling considerably down in the dumps! Even a bonus dose of 'Animal Rescue' on TV can't make up for missing two of her favourite lessons of the week - Art and PE. I'm sure a couple of days in the warm to catch up on some sleep and get things under control will help no end. As for me - my day is not quite turning out as planned, although this does mean one thing - an early blog post for a change!

The title of my post today is 'Two For One - Time Two' for two reasons: I am entering today's card into two challenges, and I also used two different flower sets to create my pattern. So, here is my card:

My card layout was inspired by this week's sketch challenge at Create with Connie and Mary CCMC285 - here is the sketch:

My colour combination was inspired by the current colour combination over at Dynamic Duos DD#85 - Summer Starfruit and Garden Green:

So here's a confession for you: I've had a Garden Green inkpad for 12 months and the first time I broke the seal on it was yesterday to make this card!! Whilst I use Garden Green card occasionally, I don't use Regals collection ink pads very often at all (Cherry Cobbler being the notable exception, of course). I have one other ink pad in this collection still in it's cellophane too; any guesses as to which one?! For a first time use, I quite like this colour combination. And for my other combination - did you spot which flower stamp sets my pattern came from? The yellow flower is from the 'Petal Parade' set that will be available during Sale-A-Bration at the end of the month and the green one is from 'Mixed Bunch'. I toyed with embellishing my flower centres, but decided against it, instead using three candy dots to 'anchor' my banner in place.

I'm off to replenish the tissue box and hopefully make a start on swaps for team training this weekend.

Back tomorrow with another card; until then, happy stampin'!


Stampin' Up! Supplies Used:

Table built using Stampin' Up! Product Table Builder from The Crafty Owl.


Tags: , , , , , , , ,

Cards | Stamping

Pool Party Mixed Bunch

by Joanne James8. May 2013 21:51

A quick post from me today, as I've spent most of my evening making a paper mache mask for my 5 year old to take into school tomorrow (apparently, this is Mum's homework - and that's according to the teacher, so I can't really quibble with my son!) My card is one I made to share with the ladies at my last stamp class, showing them the different effects you could get with the Blossom Punch flower:

I chose Pool Party as the feature colour for this card - I'm so glad this in-colour is staying. A simple stamped background, but by cutting the petals right through along their length it gives a very delicate finish. All finished off with a couple of scalloped circles and a large pearl - very simple and could be used for a variety of occasions.

That's all for today; there is lots happening in my craft room at the moment, with regional training swaps, commissions, class planning and lots more to share, so come back tomorrow for another project. Until then, happy stampin'!


Stampin' Up Supplies:

Stamps: Mixed Bunch

Cardstock: Pool Party, Whisper White

Ink/Stampin' Write Markers: Pool Party

Tools: Blossom Punch, 7/8" Scallop Circle Punch, Itty Bitty Punches

Finishing Touches: Basics Pearls

Tags: , , , , , , ,

Cards | Stamping

Sunshine and Sprinkles Scrapbook Page

by Joanne James19. April 2013 21:09

Today I thought I would share something a little different: as many of my followers will know, I love to design and make cards. I'm not a scrapbooker - it's just not my 'thing'. In many ways this may surprise those close to me, as we are a household of keen photographers and have a collection of literally thousands of memories captured on slide, film and digitally. I love to have photographs on display - for me though, I struggle to design a page without a specific photograph in mind.

All that being said, I made a scrapbook page at training last Sunday and I thought I would share it with you, as even though I haven't yet chosen the photos to put on it, the layout could be used and adapted in so many ways I'm sure it will inspire some of you reading this, who I know are keen scrapbookers. Here is my finished page: 

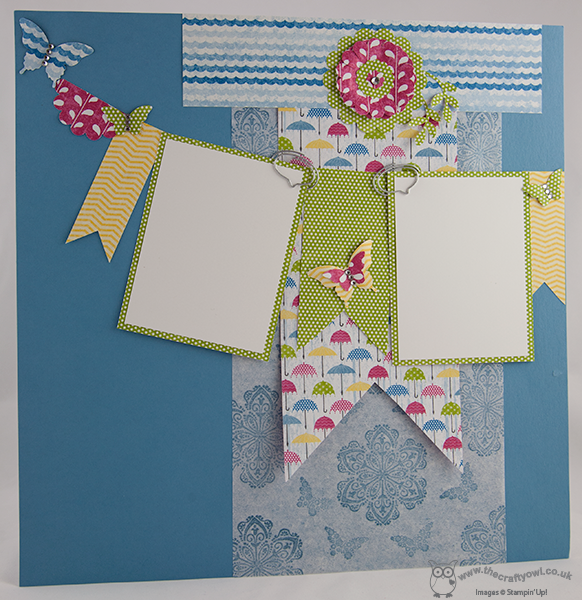
This page was designed by the lovely Bekka Prideaux and features one of my favourite current designer papers in the Spring Summer catalogue, Sunshine and Sprinkles. I also like the background stamped sheet - this is Marina Mist ink stamped straight on to filter paper.

Here's a close-up of the top section - there's so much going on here: 

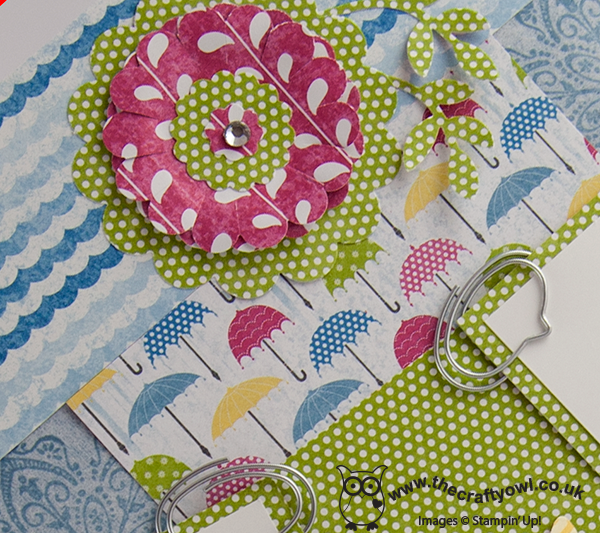
Did you notice the lovely speech bubble paper clips too - aren't they cute? You may have overlooked them in the catalogue (p.28, Spring Summer Cat.): there are 2 different packs - each with 8 of 3 different designs (there is an arrow and a coat hanger in this set too) and at £4.50 per pack they represent great value. One or two on a scrapbook page or card is enough to add just the right amount of detail. One more photo - a close-up of one of the butterflies:

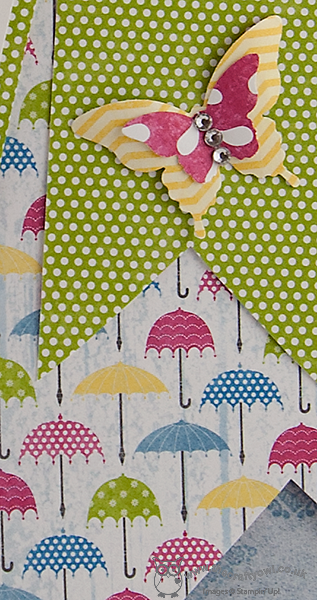
As Bekka herself would say, you can never have too many butterflies! I love the way the Bitty Butterfly punch is layered with the Elegant Butterfly punch to create a double one and the rhinestones add just enough 'bling' without overpowering the page. I really like this layout and there's even some space on the base page if you wanted to add some journalling or commentary. For those of you that enjoy journalling, I will have more great Stampin' Up! news coming soon - all 'top secret' currently, but watch this space - that's all I'm saying for now!

I hope you enjoyed the change in direction today; back with another card tomorrow. Unti then, happy stampin'!


Stampin' Up Supplies:

Stamps: Mixed Bunch, Papillon Potpourri

Cardstock: Marina Mist, Whisper White, Sunshine and Sprinkles DSP

Ink/Stampin' Write Markers: Marina Mist

Tools: Elegant Butterfly punch, Bitty Butterfly punch, 2-Step Bird punch, 1 3/4" Scallop Circle punch, 2 3/8" Scallop Circle punch, 7/8" Scallop Circle punch, Itty Bitty Shapes punch

Finishing Touches: Cute Clips, Basics Rhinestones

Mixed Bunch Card - Baby Wipe Re-inker Technique

by Joanne James18. April 2013 20:35

I enjoyed a pleasant card class yesterday evening with a lovely group of crafty ladies. We were using the 'Mixed Bunch' stamp set and the co-ordinating blossom punch and learning a few new techniques and tricks along the way. We made a number of different cards that can be used for different occasions and today I thought I would share with you my favourite of them all:

This four inch square card features the most detailed of the flower stamps in the Mixed Bunch set and the variagated colour effect was created by making our own ink pad using a baby wipe and three different coloured reinkers. We stamped and punched the first image, then without reinking the stamp, stamped off onto a square of white card to create a muted background paper. If you've never tried it, you should give it a go - it's great fun and the stamped images are really unique! We then layered the punched flower with a red punched blossom to add definition, finished with a basic rhinestone coloured red to match and layered the double flower using a dimensional to make it 'pop'. The addition of a sentiment in the bottom corner completed the card.

When I was making up the instruction sample before the class, I must confess to getting rather carried away with all the pretty stamped images I was producing, so printed a few extra to make into butterflies similar to the Easter egg butterfly I shared here, but this time to make into thank you cards to pop in with some customer orders and also to make this cute little magnetic note holder to stick on my fridge:


Cute, don't you think? The baker's twine antennae are the perfect finishing touch too. All in all, a fun class and with quite a few laughs along the way - what better way to spend a Wednesday evening. I'll share some of the other things I made for this class in future blog posts; meanwhile, I'm already looking forward to next month's class, when we will be using the owl punch and looking at both great owl cards and some of the many other things that can be made using this shape.

Back tomorrow with another project - until then, happy stampin'!


Stampin' Up Supplies:

Stamps: Mixed Bunch, Sassy Salutations

Cardstock: Real Red, Island Indigo, Whisper White

Ink/Stampin' Write Markers: Real Red, Island Indigo, Tempting Turquoise

Tools: Blossom Punch

Finishing Touches: Basics Rhinestones

Tags: , , , , , , ,

Cards | Classes | Stamping

Mixed Bunch Blue Quartet

by Joanne James11. April 2013 20:18

It's rained pretty much all day today, so I thought I'd share a blue card for a 'blue' mood, at least as far as the weather is concerned! This is a card I designed and made for a recent team 'Rainbow Swap'. Across my wider team, we all chose one of the colours of the rainbow, then made five cards with that colour as the basis for the colour scheme and sent them to the others in the same colour group. In return, we received a 'swap' of a different design but with the same colour scheme. I was in the Blue colour group; here is the card I made: 

I used one of the flower stamps from the Mixed Bunch stamp set and the co-ordinating Blossom Punch for my bold all-blue card. I used Pool Party as my base card, then layered flowers across the front in Island Indigo, Pool Party, Island Indigo and Midnight Muse. A simple greeting for any occasion and some ruffled ribbon and rhinestone detail on the uppermost flower added just enough sparkle to turn this card into something special. I got a lovely set of cards in return (but unfortunately haven't had the chance to photograph them - I will share them another time).

The Mixed Bunch stamp set and Blossom punch used to make this card is the stamp set that will feature in my card and technique class next week. The class will be held on Wednesday 17th April, 7.30-9.30pm. The class costs £10: we will be making four cards using the various stamps in this set and learning a number of new techniques along the way. All stamps, punches, cardstock and embellishments will be provided; all you need to bring is a basic toolkit (wet/dry adhesives, pencil, ruler, rubber, scissors, bone folder and cutter if you have one). If you would like to attend this class or any of the others currently planned, please contact me at [email protected] for more details.

I'll be back tomorrow with a 3D project made using the Blossom Punch. Until then, happy stampin'!


Stampin' Up Supplies:

Stamps: Mixed Bunch, Tea Shoppe

Cardstock: Whisper White, Pool Party

Ink/Stampin' Write Markers: Pool Party, Island Indigo, Midnight Muse

Tools: Blossom Punch

Finishing Touches: Ruffled Ribbon, basics Rhinestones

Tags: , , , , , , ,

Cards | Classes | Stamping | Swaps

Quick Butterfly Easter Egg Treat

by Joanne James30. March 2013 22:11

I haven't blogged for a couple of days, so two posts today to make up for it! The first one is a really quick last-minute Easter make by Sarah Willis that I saw on Pinterest; these cute butterflies are so quick and easy to do you could easily make a whole pile of them in ten minutes:


And we did! My 7 year old made all the butterflies in today's post - they were left over from a huge pile that she made as little end of term Easter gifts for the other children in her class at school. She simply stamped one of the flowers from the Mixed Bunch stamp set in four different colours, punched out with the co-ordinating punch, snipped out the top and bottom petals then used some sticky strip to attach some antenna and a mini egg to the centre of the wings and voila - one Easter egg butterfly, done. She managed to make a whole pile of these in no time at all: 

Another great way to use this stamp set, which is one of my personal favourites. I am running a card class featuring this stamp set and the co-ordinating punch on the 16th and 17th of April. There will be more details to follow shortly; if you live local to me and would like to know more, please contact me for further details.

That's all for now - another quick post from me shortly to share an Easter card I made today. Happy stampin'!


Stampin' Up Supplies:

Stamps: Mixed Bunch

Cardstock: Whisper White

Ink: Melon Mambo, Tempting Turquoise, Gumball Green, Perfect Plum

Tools: Blossom Punch

Tags: , , , , ,

3D Projects | Classes | Stamping

Mini Catalogue

BROWSE THE CATALOGUE

The mini catalogue is now live! Read and download your copy here.

Shop Online

Access my online shop 24 x 7, 365 days of the year:

Current March hostess code:

S9F2XJJW

Shop Online

Join My Team

It's always a great time to join Stampin’ Up! New team members can get £130 worth of products for only £99 + free business supplies + free shipping + all the fun being a part of Stampin’ Up! Stampin' Up! has something for everyone: join my growing team and benefit from my support to enjoy Stampin' Up! however you choose.

If you're interested, call me for a chat to understand how I can help you realise your goals. Alternatively, if you have already decided to sign up and you just can't wait, please click here for the link to the online form where you can sign up and order your starter kit right away! 

Latest Kit!

Stampin Cut and Emboss

The Rock Legend Kit has all you need to make 8 cards with coordinating envelopes. Along with the new Panda Friends Kit, both are available from January 4th for just £14 each - get yours here!

2023-24 Annual Catalogue

BROWSE THE CATALOGUE

Click on the catalogue for a full list of current SU! supplies - if you would like to order any of the items featured, please drop me a line at [email protected] or give me a call on 07773 421446 - I'd be happy to help.

New Online Exclusives

There will be new products available exclusively in the online store from 5 March - check them out here.

About Me

Hi I'm Joanne and live in Northampton and when I'm not looking after my husband and two beautiful children, am an avid crafter with a passion for all things Stampin' Up!

I must confess that I have never been a big rubber stamper - until I discovered Stampin' Up! that is. I love the fact that I can get such great results with co-ordinating stamps, inks, papers and punches - the possibilities are endless! Join me on my stamping journey as I share the things I love and be inspired to create amazing things yourself!

Follow Me

Monthly Newsletter

Box Builder

Click the button above to use Box Buster to create your custom box design using the Envelope Punch Board!

Kits Collection Now Available!

Stampin Cut and Emboss

The new Kits Collection from Stampin' Up! is now available!

Click here to see the current kits available and order yours online today.

I Design For


Stampin' Up Stuff

This is my personal blog and is not endorsed by Stampin’ Up! I hope you find it a plentiful source of ideas and personal inspiration but please don't copy my designs for contest submission or use for classes, publication or sale without express permission.