Frosted Foliage Single Branch One Layer Card

by Joanne James6. January 2020 07:00

Today I have a quick card for the current challenges over at Color Throwdown and CASology:


It's a Christmas card and uses a now retired stamp set, but these colours and the Color Throwdown badge inspired me to experiment with a clean and simple one layer technique that I've been wanting to try for some time - take a look:


I masked a corner frame then sponged Cherry Cobbler ink to create a graduated effect, then used the single branch from Frosted Foliage to over-stamp the edge. I stamped the branch in Early Espresso, then coloured the berries with my Cherry Cobbler Blends. I added some highlights with my chalk marker, but you can't really see these since I decided to add a liberal dose of Dazzling Diamonds to look like frost. I balanced my rectangle with my sentiment to complete my card.

Here is the visual summary of the key products used on today's project for you to pin for easy reference:


You can see all of my 'How To' summaries on my 'How To - Tips and Techniques' Pinterest board in case you've missed any. 

So what do you think? Does the same-colour sponging work to add interest to my one layer card? Do leave me a comment below - I'd love to hear your thoughts.

Enjoy your day and I'll be back tomorrow with another project. Until then, happy stampin'!


Stampin' Up! Supplies Used:

Table built using Product Table Builder by The Crafty Owl - Independent Stampin' Up! Demonstrator.

Bloom and Grow Clean and Simple One Layer Birthday Card

by Joanne James29. August 2019 14:00

Today I'm sharing a card for the current challenge over at Fusion where both the sketch and inspiration photo got my creative juices flowing this week, so much so that I made two cards! Today I'm sharing a clean and simple one layer card inspired by the photo that is also perfect for the current challenge over at Addicted to CAS and I will be back with a stepped up card that uses the sketch too tomorrow.


My card also fits the bill over at SUO Challenges and this month's Stampin' Up! #SimpleStamping challenge since it is a simple combination of stamps, ink and paper to make a birthday card - take a look:


This card really was super simple to make: I positioned my sentiment and stamped it in Memento Black ink onto extra thick whisper white cardstock, then took one of the boughs of flowers from the 'Bloom and Grow' stamp set and stamped it both above and below if along the fold of the card, stamping off the edge to add interest. I coloured them with my Stampin' Blends and added a graduated aqua border to make the flowers stand out and mimic the colour of the inspiration photo.

Here is the visual summary of the key products used on today's project for you to pin for easy reference:


You can see all of my 'How To' summaries on my 'How To - Tips and Techniques' Pinterest board in case you've missed any. 

Enjoy your day and I'll be back tomorrow with another project. Until then, happy stampin'!


Stampin' Up! Supplies Used:

Table built using Product Table Builder by The Crafty Owl - Independent Stampin' Up! Demonstrator.

Sorry For The Loss of Your Furry Friend - One Layer Pet Sympathy Cards

by Joanne James25. February 2019 08:00

The James Juniors are back to school today following the half term break and I am here with a nice early post for you! Today I'm sharing a card that combines a few challenges: the current challenge over at Less Is More where it is one layer with the focus on sentiment and the current CASology challenge. My card also fits the photo inspiration at Fusion:


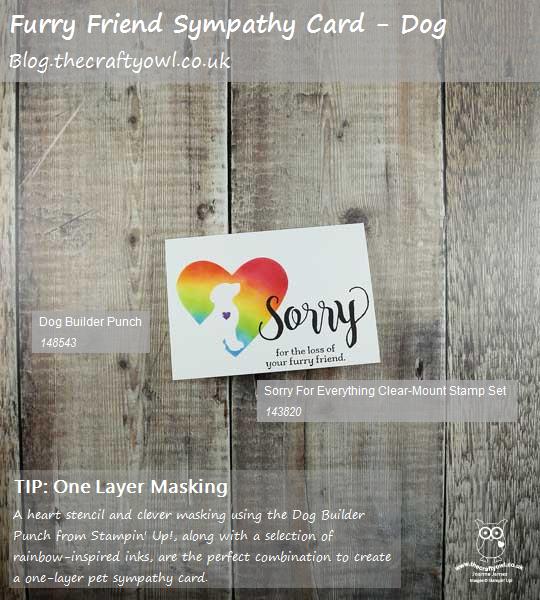
It's something of a happy accident that I am combining each of these in today's card - it just so happened that I had an idea that works for all three - and I have two cards for you! I decided to create a couple of pet sympathy cards; first up, a dog one:


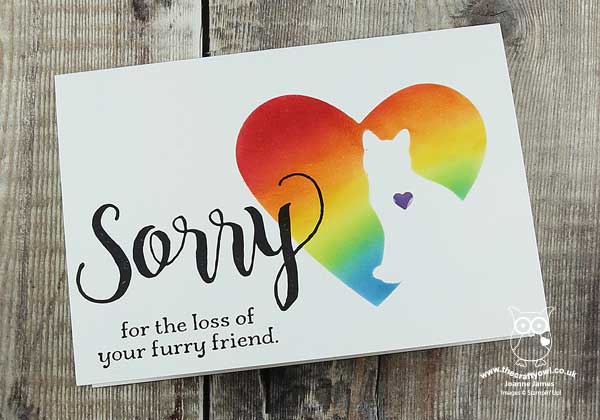
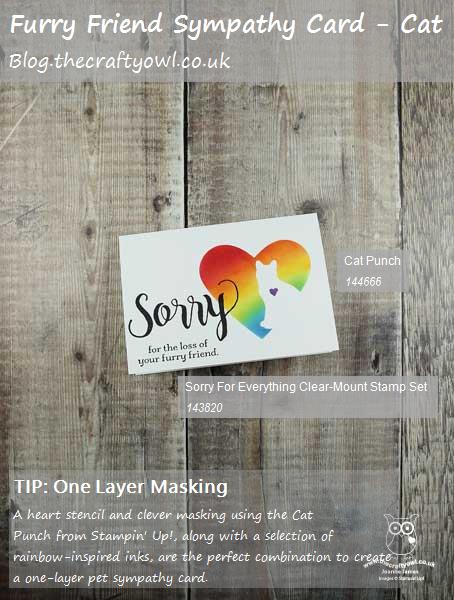
I also created one for a cat lover too that is exactly the same design, just mirrored:


Here's the low-down on today's cards:

Sorry For Your Loss - I recently spotted this card on Pinterest and loved the clean lines created by the fun punch art idea and monochromatic colour scheme. It inspired me to think about using a similar idea to create a one-layer card using the same 'Sorry For Everything' stamp set - such a great set where you need a sentiment to take centre stage and useful for lots of different circumstances, including the loss of a furry friend. 

Cats And Dogs - I used a retired Sweet and Sassy Framelit heart, along with a punched cat and dog respectively, to create a mask through which I could sponge my heart. By using a different colour to the sentiment, which I stamped in black, it gives the illusion of another layer and whilst I didn't use the punches directly on my card, the silhouette created by the negative space makes my furbabies easily identifiable. 

Crossing The Rainbow Bridge - My colourful heart whilst perfect for the Fusion rainbow photo was actually inspired by a blog post a couple of week's ago by my Paper Players teamie and committed dog lover Ann Schach. As any of you who follow my blog will know, I am relatively new to the idea of pets having never had one as a child. Ann made this card for a friend of hers that was going through a tough time and she mentioned one of the things her friend was having to deal with was the loss of a pet, which she described as having 'crossed over the Rainbow Bridge'. I thought this was a lovely idea and so tried to incorporate the idea of a rainbow by sponging one into my masked heart, with a little purple heart to accent each pet. I really love the effect - what do you think? I also carried the rainbow theme onto the inside of my card with a set of rainbow footprints around my sentiment, that is courtesy of the new 'Happy Tails' stamp set:


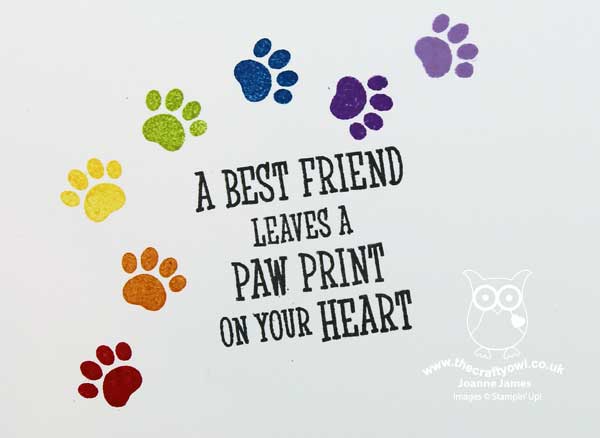
A fitting sentiment for this kind of card I think and the rainbow colours are really uplifting. So two cards inspired by others in lots of ways, yet unique to me. Do check out the respective challenges for lots more inspiration.

Here is the visual summary of the key products used on today's project for you to pin for easy reference:


You can see all of my 'How To' summaries on my 'How To - Tips and Techniques' Pinterest board in case you've missed any. 

Enjoy your day and I'll be back tomorrow with another project. Until then, happy stampin'!


Stampin' Up! Supplies Used:

Table built using Product Table Builder by The Crafty Owl - Independent Stampin' Up! Demonstrator.


Half Full Glasses of Red Friendship Card

by Joanne James18. September 2017 20:20

Happy Monday everyone! I've had a busy start to my week with some batch cooking but also managed some much-needed time in my craft room. I managed a few productive hours so I've lots to share with you this week! Today I'm sharing a quick card that I might just manage to squeeze in for this week's challenge over at CAS Colours and Sketches


I've not managed to play along with these ladies for a few weeks and this sketch almost had me foxed, when I had a flash of inspiration this afternoon and came up with this fun - and quick! - one-layer card:


Here's the low-down on today's card:

A Glass of Red (or 7!) - I decided to ink up my 'Half Full' stamp set for today's card. I loved this stamp set the moment I saw it and knew I would use it not only for Christmas cards but, as a wine drinker who enjoys a glass of red now and then, on lots of other occasions too. These stamps also make for easy tags to pretty up a bottle of wine for a party hostess - but more on that another day. 

A Touch Of Shine - To add a little shine to my wine glasses, I painted them with my fine tip glue pen so that they took on the appearance of glass. It's quite difficult to see on the photograph, but adds a lot to the finish in real life.

Can You See It? - Some may say I was a little loose in my interpretation of this week's sketch, but I can assure you it's there: three elements, getting wider as they extend down the card, with images above and below the central sentiment. I did exercise a little creative licence with the positioning of the first, larger glass, however I think it works well this way. What do you think - should sketches be interpreted literally or do they allow for a modicum of creative interpretation? Do leave me a comment below - I'd love to hear your thoughts. 

Here is the visual summary of the key products used on today's project for you to pin for easy reference:


You can see all of my 'How To' summaries on my 'How To - Tips and Techniques' Pinterest board in case you've missed any. 

That's me done for today; I'll be back tomorrow with another project. Until then, happy stampin'!


Stampin' Up! Supplies Used:

Table built using Product Table Builder by The Crafty Owl - Independent Stampin' Up! Demonstrator.

Night In Bethlehem One Layer Card

by Joanne James18. August 2017 20:16

 had a little crafty time today and was creating with more of my pre-order stash and decided I just about had time to squeeze in a card for the current challenge over at Less Is More (this was my starting point for today's card but I'm too late to link up unfortunately) which also fits the bill over at Stamp Ink Paper and ATCAS this week:


I went with a rather less obvious vehicle for my one layer card today - take a look:


Since the dictionary definition of 'vehicle' is 'a thing used for transporting people or goods, especially on land, such as a car, lorry, or cart' I think my donkey more than qualifies; not the most common mode of transport granted, but one that transported Mary on that momentous journey to Bethlehem so many years ago. 

I've used a combination of stamps from one of my favourite sets in the new Stampin' Up! Autumn-Winter catalogue called 'Night In Bethlehem' to create my card today. It has a set of co-ordinating framelits which I will share another day; today's card uses the stamp set alone, with some additional masking and brayering to create the illusion of depth and layers, finished with an embossed star. I also stamped the verse that comes with this set on the inside too (in my second colourway):


Little more than stamps, ink and paper today - and I love this card! In fact I liked it so much I made a second version in an alternative colour combination too:


Which one do you prefer? Leave me a comment below - I'd love to hear your thoughts.

Here is the visual summary of the key products used on today's project for you to pin for easy reference:


You can see all of my 'How To' summaries on my 'How To - Tips and Techniques' Pinterest board in case you've missed any. 

Enjoy your day and I'll be back tomorrow with another project. Until then, happy stampin'!


Stampin' Up! Supplies Used:

Table built using Product Table Builder by The Crafty Owl - Independent Stampin' Up! Demonstrator.


Among The Branches Spooky Halloween One Layer Card

by Joanne James11. August 2015 09:00

Today is Ben's 8th birthday and after my technique class this morning, we will be celebrating for the rest of the day. I will share Ben's birthday card with you tomorrow; I didn't have much time for crafting yesterday, but having received my seasonal pre-order goodies the urge to play with new toys was strong, so I did manage to squeeze in a quick card for this week's one layer challenge over at Less Is More where they have a fun theme of 'the eyes have it' - here's my card:

My 'white space' today is Crushed Curry yellow as I really wanted the negative space for the eyes on my 'spooky' Halloween stamp from the new 'Among The Branches' stamp set to look like something fearsome - did it work?! I stamped my image on the inside of the card in Memento Black ink, then used my circle framelits and Big Shot to cut a hole in the front of my card, which I also embossed with the new Woodland textured Impressions Embossing Folder. I just love this embossing folder - this is one of those versatile items that I'm going to get lots of use from. I resisted the urge to add some ribbon or twine - I know how those lovely LIM ladies like their space - less, is after all more!

My box of pre-order goodies is just fantastic and has so many fabulous sets, for Autumn, Halloween and Christmas - I can hardly wait to get creating so that I can share more with you! I will be packaging my catalogues to be sent out to my local and online customers before the end of the month; if you don't already have a demonstrator and would like me to send you a seasonal catalogue get in touch with your contact details and I will add you to my mailing list.

Back tomorrow with Ben's birthday card and a peek at his birthday cake; until then, happy stampin'!


Stampin' Up! Supplies Used:

*Among The Branches - available September 1st

*Woodland TIEF - available September 1st

Table built using Product Table Builder by The Crafty Owl - Independent Stampin' Up! Demonstrator.


One Layer Festival of Trees Starry Night Card

by Joanne James13. November 2014 20:10

Today I'm sharing my card for this week's challenge over at Less is More, where the focus for this week's one layer challenge is a 'starry, starry night'. I was aiming for an early LIM entry this week and this post was originally scheduled for Tuesday, but best laid plans and all that .... So two days later, here it is:

So how did I create today's card? Well, I've been wanting to create a sponged snowy scene for a while, so this card was the perfect opportunity. I masked off a horizontal panel, added a masked circle for my moon and then created a 'hill' mask to create my landscape itself. I sponged in my sky using Night of Navy ink and used the same colour to highlight the edges of the snow dunes and some subtle tree shadows (I did this bit after I stamped in the trees). Once I'd created my snowscape, I used the tip of the pine tree from the Festival of Tree stamp set to add in my trees. I stamped them in Memento Black ink, being careful to keep my mask in place each time so that the trees were behind the surface of the snow. To finish, I used some Encore silver ink to sponge in some tiny stars using a stencil I created with my Confetti Stars punch, along with a few dots added with my Silver marker. I also lightly sponged some Encore Silver onto some areas of the sky to add a subtle sheen. To finish, I stamped my sentiment from the 'Good Greetings' stamp set beneath my scene. Here's a closeup of the scene itself so that you can see it in more detail: 

For such a 'blue' card, this really is very pretty and for a one layer card has so much going on. I think I might have to make a few more like this!

Back tomorrow with another card; until then, happy stampin'!


Stampin' Up! Supplies Used:

Table built using Product Table Builder by The Crafty Owl - Independent Stampin' Up! Demonstrator.


A Pair of Festive Robins!

by Joanne James24. October 2014 20:53

Another busy day today but I managed to shop, clean the house and catch up on some work, so a nicely productive one. Today's card is my entry for this week's challenge over at 'Less Is More' where the theme this week is 'Little Creatures' - I'm squeezing this one in right under the wire this evening, but as this is one of my favourite challenge blogs and I haven't done any challenges this week, it was worth the effort.

I decided to make a Christmas card, although my 'little creatures' didn't come from a festive set - take a look:

I thought the little bird in the 'Hello Love' hostess set would make a cute robin, so I decided to stamp a pair under the little sprig of mistletoe that features in the Project Life Holiday Cheer stamp set and then coloured them with my Cherry Cobbler and skin tone Blendabilities, highlighting with my Colour Lifter, and adding a little red bow to the hair of one to make her into the 'Mrs'. I stamped the mistletoe in Garden Green and wiped away the bow and re-drew it in Real Red, and added a few tiny pearls to look like the mistletoe berries. For my sentiment, I chose 'I love us' from the 'Good Greetings' hostess set; this set is still available until the end of the month if you host a party and have qualifying sales of £200 or more. This sentiment just seemed to suit my robins perfectly!

A simple one layer card (even though one layer isn't part of the challenge criteria this week!) which shows a useful way to adapt the 'Hello Love' set for a Christmas card.

Back tomorrow with another Christmas card; until then, happy stampin'!


Stampin' Up! Supplies Used:

Table built using Product Table Builder by The Crafty Owl - Independent Stampin' Up! Demonstrator.


Tags: , , , , , , , ,

Cards | Stamping

Winter Hot Chocolate for Less Is More

by Joanne James18. September 2014 10:37

Well we're on the back end of the week already - yay! Thank you to all the new visitors to my blog yesterday who came to see my guest stamper card for The Color Throwdown and to those of you who left lovely comments on my blog - it's always nice to hear from my readers! I look forward to you becoming regular visitors.

Today's card is for this week's challenge over at 'Less is More' where the theme this week is 'beverages' and it's a one layer challenge. I pulled out one of my favourite Christmas retired sets, Scentsational Season, to make today's card; I thought a winter-warming hot chocolate should be the order of the day for my card, even if not outdoors as we are still enjoying a mild September (and long may it continue!). Here's my card:

I used a Crumb Cake base and stamped my mug in Real Red, colouring the hot chocolate section of the mug separately with my Chocolate Chip Stampin' Write marker. I added my two-tone sentiment from the 'Endless Wishes' set, then using my Chalk Marker, I carefully coloured in the snowflake on the mug and randomly doodled a flurry of snowflakes around the edge of my card. I'm a tea drinker myself (in large quantities, usually about 10 cups a day!) but there's something really appealing about hot chocolate in the Winter time - I think it's the smell of cocoa and sugar which just cuts through cold air like nothing else!

Check out the gallery for more beverage inspiration - there are lots of fun cards there this week, and a whole range of beverages are featured including some altogether more alcoholic tipples too!

Back tomorrow with another project; until then, happy stampin'!


Stampin' Up! Supplies Used:

Table built using Product Table Builder by The Crafty Owl - Independent Stampin' Up! Demonstrator.


Tags: , , , , , , , ,

Cards | Stamping

One Layer Wondrous Wreath Christmas Card

by Joanne James12. August 2014 08:00

Today I'm sharing a card that I made for this week's challenge over at Less is More that is full of sneak peeks from the new seasonal Autumn-Winter catalogue that is launching at the end of the month. This week it's a one layer challenge with the focus on foliage; the minute I saw the theme, I knew exactly what I wanted to create. Here is my card:

I have used the new Wondrous Wreath set for my card today. This set comprises layered elements to create a beautiful Christmas wreath and also comes with a set of co-ordinating framelits, that make light work or cutting out. It's a photopolymer set too, which makes for incredibly easy alignment of the images - no stamp-a-ma-jig required! For today's card though I used the stamps alone - they are also great for a one layer card. I stamped the base wreath in Pear Pizzazz, then stamped the second section in Old Olive. I then stamped the berries and bow in Versamark and heat embossed with Cherry Cobbler embossing powder to leave a lovely sheen. Lastly, I added the sentiment from the same set in Cherry Cobbler ink.

The seasonal catalogue is choc-full of amazing products, but I think this may turn out to be my favourite of the Christmas sets due to its sheer versatility. If you like the look of this set, you only have another 16 days to wait until the new catalogue launches.

Following yesterday's fun day of Lego building, a trip to the cinema and birthday cake, today I'm partying of a different kind - I'm demonstrating at a Stampin' Up! party this afternoon. Wish me luck! Back tomorrow with this week's Design Team card for the Colour Me...! card challenge. until then, happy stampin'!


Stampin' Up! Supplies Used:

*Wonderous Wreath - available 28th August

Table built using Product Table Builder by The Crafty Owl - Independent Stampin' Up! Demonstrator.


Tags: , , , , , ,

Cards | Stamping

Mini Catalogue

BROWSE THE CATALOGUE

The mini catalogue is now live! Read and download your copy here.

Shop Online

Access my online shop 24 x 7, 365 days of the year:

Current March hostess code:

S9F2XJJW

Shop Online

Join My Team

It's always a great time to join Stampin’ Up! New team members can get £130 worth of products for only £99 + free business supplies + free shipping + all the fun being a part of Stampin’ Up! Stampin' Up! has something for everyone: join my growing team and benefit from my support to enjoy Stampin' Up! however you choose.

If you're interested, call me for a chat to understand how I can help you realise your goals. Alternatively, if you have already decided to sign up and you just can't wait, please click here for the link to the online form where you can sign up and order your starter kit right away! 

Latest Kit!

Stampin Cut and Emboss

The Rock Legend Kit has all you need to make 8 cards with coordinating envelopes. Along with the new Panda Friends Kit, both are available from January 4th for just £14 each - get yours here!

2023-24 Annual Catalogue

BROWSE THE CATALOGUE

Click on the catalogue for a full list of current SU! supplies - if you would like to order any of the items featured, please drop me a line at [email protected] or give me a call on 07773 421446 - I'd be happy to help.

New Online Exclusives

There will be new products available exclusively in the online store from 5 March - check them out here.

About Me

Hi I'm Joanne and live in Northampton and when I'm not looking after my husband and two beautiful children, am an avid crafter with a passion for all things Stampin' Up!

I must confess that I have never been a big rubber stamper - until I discovered Stampin' Up! that is. I love the fact that I can get such great results with co-ordinating stamps, inks, papers and punches - the possibilities are endless! Join me on my stamping journey as I share the things I love and be inspired to create amazing things yourself!

Follow Me

Monthly Newsletter

Box Builder

Click the button above to use Box Buster to create your custom box design using the Envelope Punch Board!

Kits Collection Now Available!

Stampin Cut and Emboss

The new Kits Collection from Stampin' Up! is now available!

Click here to see the current kits available and order yours online today.

I Design For


Stampin' Up Stuff

This is my personal blog and is not endorsed by Stampin’ Up! I hope you find it a plentiful source of ideas and personal inspiration but please don't copy my designs for contest submission or use for classes, publication or sale without express permission.