If The Cape Fits ... My Hero GDP080

by Joanne James2. April 2017 21:00

This is my second post for today - you can see my regular Paper Players post here. This card is for this week's challenge over at The Global Design Project where this week they are casing one of their design team, Louise Sharp and this is her inspiration card:


I haven't made a tag card in a while and this one of Louise's is so pretty! Here's my take on it:


Here's the lowdown on today's card:

If The Cape Fits - I chose to feature the fun cape image from Everyday Hero on my tag as opposed to Louise's wheelbarrow and go with a fun card in bright primary colours that would make a great masculine card, for a would-be superhero. My image was also coloured, albeit in just one colour, Pacific Point - I also added a gold foil star and brushed my whole cape with my clear Wink of Stella brush for some caped-crusader sparkle. I also included the first part of my sentiment across my tag - the remainder I stamped on the inside:


Party Pattern - For my background I also chose to use a piece of designer series paper, taken from the Party Animal pack. The bold Pacific Point paper with subtle pattern was just what I needed for today's card.

Superstar Border - Instead of using a co-ordinating piece of DSP for my horizontal border, I decided to go with a punched border of confetti stars in red and gold, to add to my hero design. The fun thing about casing someone else's card is that you can take lots of basic elements that are the same - the layout, tag, coloured image - yet make them your own to produce something completely different.

My card is much less subtle than the challenge card, but similar in many other ways and it's clear to see where I did a 'Copy And Selectively Edit' of Louise's original. Thanks Louise for the inspiration this week!

Here is the visual summary of the key products used on today's project for you to pin for easy reference:


You can see all of my 'How To' summaries on my 'How To - Tips and Techniques' Pinterest board in case you've missed any. 

I'll be back tomorrow with another project (or two!) Until then, happy stampin'!


Stampin' Up! Supplies Used:

Table built using Product Table Builder by The Crafty Owl - Independent Stampin' Up! Demonstrator.

New Wednesday Weekly Deals Are Here!

by Joanne James18. February 2016 10:00

A day late as I was out all day and evening yesterday - here are this week's new Wednesday Weekly Deals! These offers are valid for one week only. As always, a new collection of deals will be announced next Wednesday.

If you want to take advantage of any of the deals on offer, you can support my business by placing your order online by clicking here or using the link to my store on the right hand side of my blog page where it says 'Shop Online' or with me in person. Don't forget to add the new Hostess Code for February UYGWGF4W if your order is under £150 and be sure to make sure that you don't check the 'no contact' box if you'd like to be kept updated with the progress of you order and receive a little thank you in the post from me. 

Here's a summary of this week's one-week only Wednesday deals - click on each item to go to the online store to purchase:

Table built using Product Table Builder by The Crafty Owl - Independent Stampin' Up! Demonstrator.

Some great offers on this week - the cute Bear Hugs framelits, as used by my good self to create the little Valentine's table favours at the weekend that I shared over on my Facebook page (you can see them here if you missed them - do give my page a 'like' if you'd like to keep up to date with all the fun over there too!) Very useful Tags and Labels framelits dies, along with the Petite Petals stamp set, as voted for by one of my customers last week as 'the best stamp set EVER!' (hello Jane!) and the product that always gets my vote for the top spot: The Envelope Punch Board. When used in conjunction with my Envelope Expert and Box Buster tools, a tool that offers limitless possibilities. Always a bargain in my view even at its full price of £18, but at £13.50 it's an absolute steal!!! If you haven't got one, what on earth are you waiting for???!!!

Don't forget that for every £45 you spend you are entitled to a free Sale-A-Bration item too - and this week there are three new ones added to the range too. In case you missed it, you can find full details here

Back later with today's creative project; until then, happy shopping!

Howl-o-ween Treat Halloween Card For The Paper Players

by Joanne James23. August 2015 10:00

It's Sunday and you know what that means: time for a new challenge over at The Paper Players! This week it is my turn to host and I have my very first sketch challenge for you:
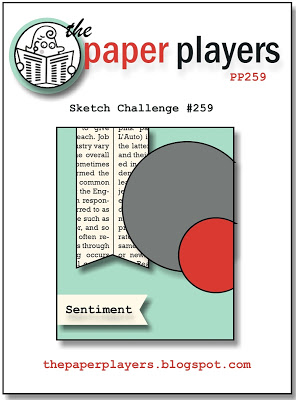
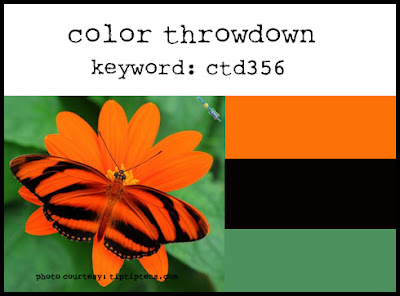
    

You know how much I love a sketch challenge - it's so exciting to have designed my first one for you to play along with this week! I am still pre-occupied with my pre-order goodies, so I decided to use this week's Color Throwdown colours to create not something floral as per the inspiration photo, rather a decidedly spooky Halloween treat for you. Here's my card:
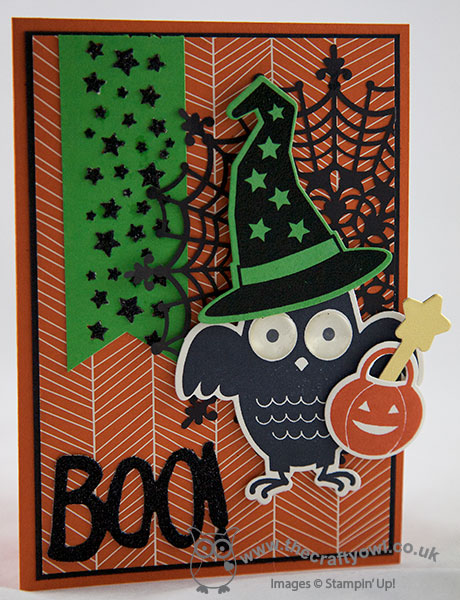
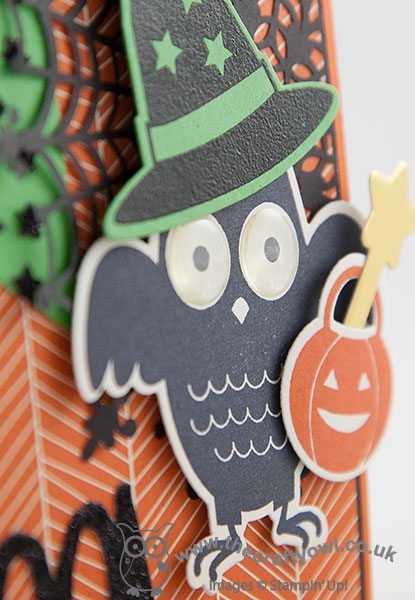
So many lovely things to share on my card this week! The background paper is a piece of the new Halloween DSP pack 'Happy Haunting' - there are some great patterns in this pack. For the large circle on my sketch, I used one of the new Spider Web doilies - I think these may be my actual most favourite Halloween product in the new catalogue! They are so dramatic and such great value, at just £4.25 for a pack of 24. I will be using these everywhere! for the smaller circle, I just had to use the owl from the Howl-o-ween Treat set - isn't he adorable?! The stamp set comes with a co-ordinating set of 'Boo To You' framelits dies and what's more they are available as a bundle too - great news! The framelits are a must as they make cutting out the shapes, such as the wand, the pumpkin basket and the hat, so easy. This card is choc full of texture too: I accented the eyes with a couple of round Itty Bitty Epoxy Sticker Accents and stamped the hat in Versamark and heat embossed it in black to add a lovely shine against the Cucumber Crush cardstock of the hat - you can see it better here in this close-up photo:
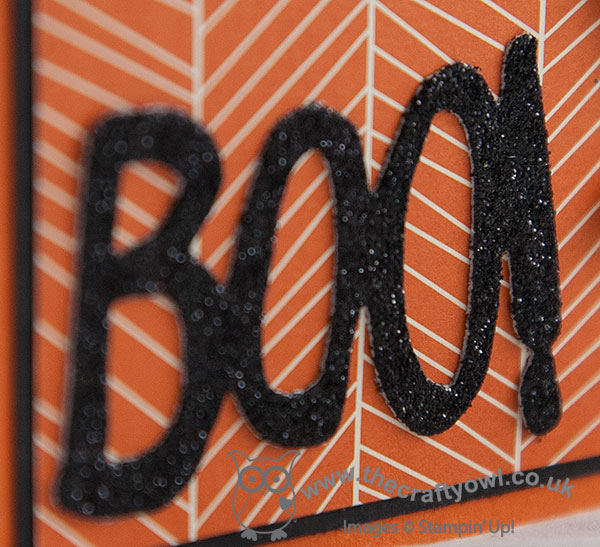
I also used the awesome new black glimmer paper for my sentiment, again cut out using my Big Shot and the 'Boo To You' framelits. Just look at how sparkly it is: 

Lastly, I added a Cucumber Crush banner punched with my Triple Banner Punch and the Confetti Stars Border Punch and I infilled the star shapes by paper-piecing with black glimmer paper stars for added sparkle. I also decorated the inside of my card and what's more, remembered to take a photo of it:
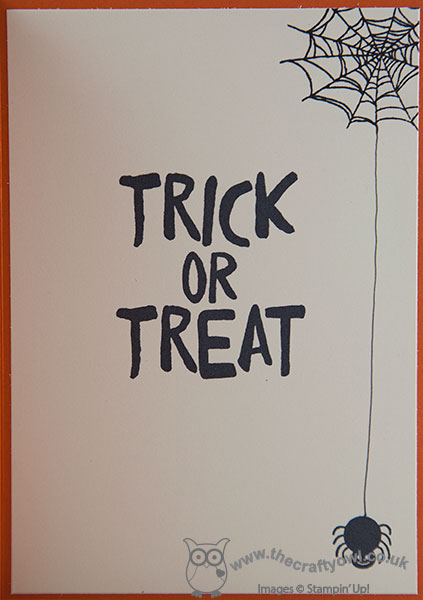
How cute is that?! I hope you like today's Halloween card and that it has you even more excited for the fun things still to come in the new seasonal catalogue. Before you reach for your ink and papers, check out what our amazing team has created to inspire you this week:

The Paper Players Design Team
Anne Marie Hile - on leave
 
 
Here's a quick recap of our challenge rules:
 
1.  Create a new paper project
2.  Upload your creation to your blog with a link back to us and provide a direct link to the post featuring your challenge submission.
3.  Please link your card to no more than three challenges, TOTAL.
4.  Have FUN! 


I look forward to seeing how you choose to interpret my sketch on your cards in the gallery this week. I'll be spending today in the garden; yesterday's BBQ and vegetarian menu was a huge success, so today we are following that with another lunch of vegetables from our garden - with sausages too though, of the meat variety! 

Back tomorrow with another project; until then, happy stampin'!


Stampin' Up! Supplies Used:

* Howl-o-ween treat - available September 1st

* Boo To You Framelits - available September 1st

* Spider Web Doilies - available September 1st

* Happy Haunting Designer Series Paper - available September 1st

* Black Glimmer Paper - available September 1st

Table built using Product Table Builder by The Crafty Owl - Independent Stampin' Up! Demonstrator.


Be The Star You Are Shaker Card

by Joanne James1. June 2015 11:49

Happy Monday everyone! I have a busy week ahead so I'm starting it with a quick post for this week's Freshly Made Sketches challenge that also features the current colours over at Fab Friday:


The FMS sketch has been designed by the super-talented Karren Johnson, currently guesting with us over at The Paper Players, so I just had to play along. I decided to make a little 'encouragement' card today - with a fun shaker twist too:

I used Marina Mist for the base of my card and created a frame of Night of Navy using my big Shot and Square Framelits, which I backed with a piece of acetate window sheet. I wanted a 'flat' shaker for this card, so having punched some stars in each of the challenge colours and some gold glimmer paper using my Confetti Stars Border Punch, I stamped my 'be the star' sentiment in navy onto Whisper White, laid the stars on top, then attached this to the back of the window. To finish, I added a trio of stars in Hello Honey, two stamped in Hello Honey and the larger one stamped in Night of Navy, from the 'Be The Star' stamp set, attaching the larger one with dimensionals for added lift and adding some gold glimmer stars to the star centres.

I chose to feature the blues primarily on my card, as Hello Honey is not a favourite of mine and is not a colour I am immediately drawn to, however I think the Fab Friday crew settled upon a great colour combo here as the yellow looks really quite nice with the blue; I may well use this colour combo again!

That's all from me today; I'm off to prepare more goodies for my Open House sessions later this week (you can read full details here). Back tomorrow with another project; until then, happy stampin'!


Stampin' Up! Supplies Used:

Table built using Product Table Builder by The Crafty Owl - Independent Stampin' Up! Demonstrator.


Tags: , , , , , , , ,

Cards | Stamping

Pictogram Punches Two Ways

by Joanne James26. May 2015 19:19

I've had a lovely day today; I spent the morning doing housework followed by a pleasant afternoon at the park enjoying the sunshine and catching up with friends. Following dinner I got the the bottom of the ironing basket so much has been accomplished! Added to which, today is another two-card day, this time both using the sketch over at As You See It this week: 


I'm also linking up again with the lovely Di over at Pixie's Snippets Playground as both of today's cards were made using offcuts lying around from other projects - always nice to use these up rather than store them for the sake of it! I thought this layout would work really well with some snippets of 'Stacked With Love' DSP and my Pictogram Punches stamp set and quickly set to work and came up with this:

I used a base of Basic Black and added my 'xoxo' DSP in a split vertical strip, then stamped the sentiment in White Kraft ink and heat embossed it in white, adding a little red glimmer paper heart popped up on a dimensional over the stamped one. A further snippet of DSP with a heart punched out and an offcut of red ribbon finished my card. This would make a nice CAS anniversary card for your nearest and dearest or a great Valentine's card - my I am getting organised early for 2016!

Having made this card in next to no time, I then decided to see if I could use the same layout with the other sentiment stamp in this set and create a congratulations card - here is my 'take two': 

A little more layering here and a greater expanse of DSP this time; I used a base of Night of Navy and a mat of Whisper White, then a piece of Maritime DSP with a star pattern. This time I used a piece of Night of Navy punched with the Confetti Stars Border Punch for my vertical strip, infilled randomly with some silver glimmer stars punched from a piece of silver glimmer paper. I stamped my sentiment in night of Navy on Whisper White and popped the whole thing up on dimensionals above the vertical strip, adding a larger silver glimmer star in place of the stamped one. A snippet of left over SAB Coastal Cabana ribbon and a flag of silver glimmer paper stapled to the top complete this card. 

Having made both cards, I think my favourite is the second one; I just love the colour combo and the combination of stars which is so perfect to congratulate someone on a job well done. Which one do you prefer? I'd love you to leave me a comment below and let me know which one gets your vote!

Back tomorrow with another project; until then, happy stampin'!


Stampin' Up! Supplies Used (Card 1):

Table built using Product Table Builder by The Crafty Owl - Independent Stampin' Up! Demonstrator.


Stampin' Up! Supplies Used (Card 2):

Table built using Product Table Builder by The Crafty Owl - Independent Stampin' Up! Demonstrator.


One Layer Festival of Trees Starry Night Card

by Joanne James13. November 2014 20:10

Today I'm sharing my card for this week's challenge over at Less is More, where the focus for this week's one layer challenge is a 'starry, starry night'. I was aiming for an early LIM entry this week and this post was originally scheduled for Tuesday, but best laid plans and all that .... So two days later, here it is:

So how did I create today's card? Well, I've been wanting to create a sponged snowy scene for a while, so this card was the perfect opportunity. I masked off a horizontal panel, added a masked circle for my moon and then created a 'hill' mask to create my landscape itself. I sponged in my sky using Night of Navy ink and used the same colour to highlight the edges of the snow dunes and some subtle tree shadows (I did this bit after I stamped in the trees). Once I'd created my snowscape, I used the tip of the pine tree from the Festival of Tree stamp set to add in my trees. I stamped them in Memento Black ink, being careful to keep my mask in place each time so that the trees were behind the surface of the snow. To finish, I used some Encore silver ink to sponge in some tiny stars using a stencil I created with my Confetti Stars punch, along with a few dots added with my Silver marker. I also lightly sponged some Encore Silver onto some areas of the sky to add a subtle sheen. To finish, I stamped my sentiment from the 'Good Greetings' stamp set beneath my scene. Here's a closeup of the scene itself so that you can see it in more detail: 

For such a 'blue' card, this really is very pretty and for a one layer card has so much going on. I think I might have to make a few more like this!

Back tomorrow with another card; until then, happy stampin'!


Stampin' Up! Supplies Used:

Table built using Product Table Builder by The Crafty Owl - Independent Stampin' Up! Demonstrator.


Sparkling Red and Gold Star Bauble Christmas Card

by Joanne James10. November 2014 21:46

It's Monday - yay! I've spent most of my day at the swimming pool watching both James juniors taking part in an inter-school gala. The school team didn't win, but there was some stiff competition and all of the children put in a sterling effort. I got home and managed to get a couple of cards made, so all in all a good day. Today's card is for the challenge over at CAS Colours and Sketches where this week its a colour challenge and a new (to me) challenge that I've come across called Addicted to Stamps where the inspiration photo caught my eye:


With these colours and that fabulous sparkly bauble, I just had to make a Christmas card; here it is:

I used Real Red for my card base and then matted a panel of Very Vanilla with Brushed Gold. I stamped a sentiment from the Bright and Beautiful sentiment in Real Red, then created two baubles, each made from a circle punched out of Real Red cardstock with a 1 3/4" circle punch and punched with the Confetti Stars punch to reveal the gold foil stars underneath (this is a second 1 3/4" gold foil circle adhered behind). One of my baubles is adhered directly to the card an one popped up on dimensionals. Each is finished with a ribbon bow of sparkly gold ribbon. I'm not sure the photo really does this card justice - the gold stars on the baubles do have more shine in real life.

That's me done for today. Back tomorrow with another Christmas card; until then, happy stampin'!


Stampin' Up! Supplies Used:

Table built using Product Table Builder by The Crafty Owl - Independent Stampin' Up! Demonstrator.


Tags: , , , , , , , ,

Cards | Stamping

You're a Star For Colour Me...!

by Joanne James10. September 2014 10:02

Here is today's card for this week's challenge over at Colour Me...! where we have a striking colour palette to work with:


I used this week's layout at CAS(E) This Sketch again for today's card, although interpreted it quite differently to the card I made using this sketch earlier in the week (you can see that card here). I played about with this week's colours for a bit before deciding on the final version of my card - I had lots more layers and DSP galore, but eventually decided that a less fussy layout was in order. Here is my card:

I used Hello Honey for my card base, and matted a piece of Coastal Cabana that I had first punched along the edge with the Confetti Star punch. I can't stop using this punch, the floor of my office is littered with tiny punched stars! I stamped the greeting from Pictogram Punches in Coastal Cabana ink onto a banner of Whisper White and flagged the end with my hexagon punch - so useful for perfectly even banner ends! I then stamped the moon and three stars in Hello Honey onto Hello Honey cardstock and fussy cut the moon and punched out the stars with the co-ordinating punch - easy peasy! I attached the falling stars to the moon using some vintage Pool Party baker's twine (a bit of a cheat, but it added a little more colour than Whisper White twine and against the Coastal Cabana it looks the same colour!) You could achieve the same look by using one of the Coastal Cabana Blendabilities markers to colour some white baker's twine. I attached the shapes to my card using dimensionals for lift, then stamped and punched another yellow star and attached it to the sentiment to tie this in to the rest of my card.

This card is heading for a member of my team who recently achieved a promotion - a fun congratulations card! Why not visit the other Colour Me...! designers and check out their takes on this week's colour combination:

And our talented guest designer for September - Holly Endress
 
We look forward to seeing your striking creations.

Back tomorrow with another project; until then, happy stampin'!


Stampin' Up! Supplies Used:

Table built using Product Table Builder by The Crafty Owl - Independent Stampin' Up! Demonstrator.


Holiday Home Happy Haunting Halloween Card

by Joanne James9. September 2014 12:00

Today my blog posts are a little like buses: nothing for ages then three come at once! Well, maybe not for ages, but this post was actually yesterday's scheduled post (apologies to those of you who were waiting for a post only to find it never arrived!) but it didn't publish as there were some server problems at my blog hosting site. All sorted today though, so here is Tuesday's post - soon to be followed by the Wednesday Weekly Deals and Wednesday's actual creative post - this week's Colour Me..! card!

Today I'm sharing another Halloween card, featuring lots of goodies from the current seasonal catalogue. I'm also using this week's colour palette over at CAS Colours and Sketches:

I haven't played along with these ladies for a little while and this week's colours were just perfect for my spooky Halloween card:

I used a Blackberry Bliss base for my card, to which I adhered a piece of Tangelo Twist, partially overlaid with a section of Basic Black cardstock, which I punched down one side with the Confetti Stars punch to allow the orange to peek through and then alongside this I stamped a house from the 'Holiday Home' photopolymer stamp set in Whisper White Kraft ink. I used the co-ordinating framelit to cut out the same shaped house out of a Lost Lagoon tag, made using the Scalloped Tag Topper Punch, and after decorating, adhered this to my card using dimensionals so that the house could be seen on the layer beneath. I punched a small moon using my 3/4" circle punch and decorated this and my tag with the bat and lamp images from the Holiday Home set. I also stamped a ghost from the same set onto Whisper White, fussy cut him and adhered him so that it looks as if he is floating out of the window of my haunted house.

The Holiday Home set is one of my favourites in the seasonal catalogue - it is so versatile, with options from new home to Christmas, Halloween and tons in between and it comes with lots of little stamps to enable you to make your cards unique, along with matching framelits to make for easiest ever cutting out. What's more, if you buy the bundle you save 15% so all in all lots of great reasons to put this in your Top 5! To finish, I added my sentiment from the 'Ghoulish Greetings' stamp set - perfect for my spooky house - and a piece of Tangelo Twist satin ribbon to my tag.

A fun Halloween-inspired card for this time of year; I think I might use mine as an RSVP to an invitation I received to a Halloween party this year. I often have fun with my kiddies at home at this time of year, but must confess to being quite excited at the prospect of a family Halloween party, with obligatory fancy dress (pictures to follow nearer the time!!)

That's all from me today; back tomorrow with this week's Wednesday Weekly Deals and my Design team card for Colour Me...! Until then, happy stampin'!


Stampin' Up! Supplies Used:

Table built using Product Table Builder by The Crafty Owl - Independent Stampin' Up! Demonstrator.


'It's a Birthday' Times Two!

by Joanne James6. September 2014 09:00

Today I'm sharing a birthday card I made for a dear friend of mine, who is celebrating her birthday tomorrow (I'm safe to share here, as she doesn't follow my blog although I will need to make sure I don't post it on Facebook until tomorrow, just in case!) I used this week's sketch over at the Paper Craft Crew for this card and this week's Colour Throwdown colours:


This is one of my favourite colour combinations,  so it was an obvious choice for this card. You see the recipient is not only a good friend of mine, but we are 'birthday buddies' - we both share the same birthday! So the card is send often the image of the card I would like to receive and features lots of my favourite things! Would you like to see my card? Here it is:

A simple card in bold colours, with a distinctly starry theme. I randomly sponged same-colour stars using my mask onto the Melon Mambo card base and edged this in a piece of Daffodil Delight that I had first embossed with the stars embossing folder. I then stamped my main birthday sentiment onto the central panel and mounted this onto a piece of Pumpkin Pie cardstock. I stamped and fussy cut two candles from the same 'Big News' stamp set and adhered these in place of the two squares on the sketch (a liberal interpretation, but it fitted with my theme!!) and replaced the flames with two stars punched from the new Confetti Stars punch and finished these with a couple of rhinestones, coloured to match with the corresponding colour of Blendabilties marker. I then added a flag with the second piece of my sentiment, stamped in white Stazon on Pumpkin Pie cardstock, using Dimensionals. To finish, I added three small punched stars to the upper right hand corner of the main sentiment panel.

Hope you like today's birthday card - it comes with a happy birthday to my friend Louise for tomorrow and a little happy birthday to me!

Rebecca and I are off to London today to see the musical 'Mama Mia' as part of the birthday celebrations of one of her school friends, so we are sure to have a fun day. Back tomorrow with this week's Design Team post for The Paper Players; until then, happy stampin'!


Stampin' Up! Supplies Used:

Table built using Product Table Builder by The Crafty Owl - Independent Stampin' Up! Demonstrator.


Tags: , , , , , , ,

Cards | Stamping

Mini Catalogue

BROWSE THE CATALOGUE

The mini catalogue is now live! Read and download your copy here.

Shop Online

Access my online shop 24 x 7, 365 days of the year:

Current April hostess code:

VDKNV7BH

Shop Online

Join My Team

It's always a great time to join Stampin’ Up! New team members can get £130 worth of products for only £99 + free business supplies + free shipping + all the fun being a part of Stampin’ Up! Stampin' Up! has something for everyone: join my growing team and benefit from my support to enjoy Stampin' Up! however you choose.

If you're interested, call me for a chat to understand how I can help you realise your goals. Alternatively, if you have already decided to sign up and you just can't wait, please click here for the link to the online form where you can sign up and order your starter kit right away! 

Latest Kit!

Stampin Cut and Emboss

The Rock Legend Kit has all you need to make 8 cards with coordinating envelopes. Along with the new Panda Friends Kit, both are available from January 4th for just £14 each - get yours here!

2023-24 Annual Catalogue

BROWSE THE CATALOGUE

Click on the catalogue for a full list of current SU! supplies - if you would like to order any of the items featured, please drop me a line at [email protected] or give me a call on 07773 421446 - I'd be happy to help.

New Online Exclusives

There are new products available exclusively in the online store from 5 March - check them out here.

About Me

Hi I'm Joanne and live in Northampton and when I'm not looking after my husband and two beautiful children, am an avid crafter with a passion for all things Stampin' Up!

I must confess that I have never been a big rubber stamper - until I discovered Stampin' Up! that is. I love the fact that I can get such great results with co-ordinating stamps, inks, papers and punches - the possibilities are endless! Join me on my stamping journey as I share the things I love and be inspired to create amazing things yourself!

Follow Me

Monthly Newsletter

Box Builder

Click the button above to use Box Buster to create your custom box design using the Envelope Punch Board!

Kits Collection Now Available!

Stampin Cut and Emboss

The new Kits Collection from Stampin' Up! is now available!

Click here to see the current kits available and order yours online today.

I Design For


Stampin' Up Stuff

This is my personal blog and is not endorsed by Stampin’ Up! I hope you find it a plentiful source of ideas and personal inspiration but please don't copy my designs for contest submission or use for classes, publication or sale without express permission.