by Joanne James25. January 2015 20:32I'm just popping in to share with you a card that I made for this week's Mojo Monday challenge; I was going to share this yesterday, but was so tired when I got in from taking the James Juniors to their swimming gala I just wasn't awake enough to type! So here is this week's challenge sketch:
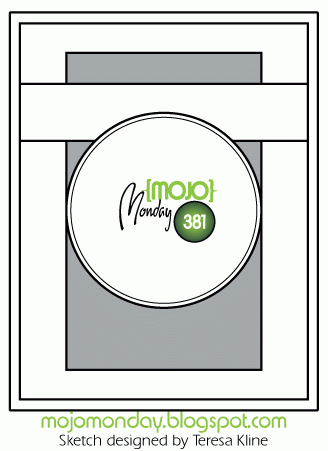
This is a great sketch for a feature sentiment; I built up my layers and took the opportunity to showcase not one but two of the great free gifts that you can earn with a £45 order during Sale-A-Bration: the stamp set 'Simply Wonderful', and the 'Irresistibly Yours' Speciality Designer Series Paper. Here is my card:
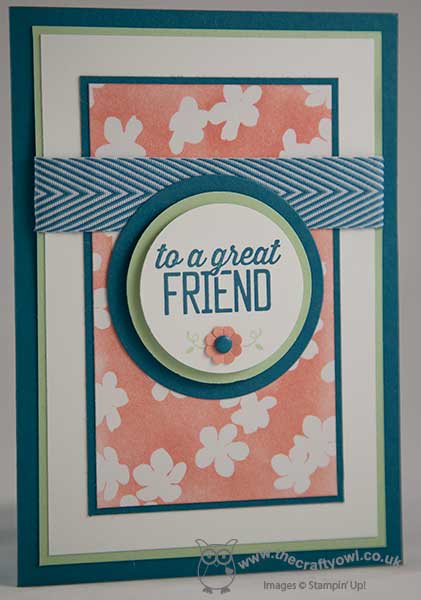
I stamped my sentiment in Island Indigo then added the flower stamp from the same set and a punched Itty Bitty flower finished with a candy dot centre. I layered this central circle to echo the colours and layers on the base of my card and used the central section of the base layer to feature the beautiful 'Irresistibly Yours' Specialty DSP. This white paper with its pre-embossed glossy white patterns could easily be overlooked in the Sale-A-Bration catalogue, yet when you colour it, it really brings it to life. For my card today, I chose to sponge mine with Crisp Cantaloupe ink to show the embossed flowers - isn't it pretty? the stamp set or the DSP could be yours with an order of £45 - or since you get to choose one free gift for each £45 spend, why not splash out and treat yourself to both? Sale-A-Bration runs until 31st March, so you have plenty of time to take advantage.
Back tomorrow with another project; until then, happy stampin'!
Stampin' Up! Supplies Used:
cb89cb02-bf4e-4f26-9e77-afef95e4f8a2|0|.0|96d5b379-7e1d-4dac-a6ba-1e50db561b04
Tags: Shop online, Simply Wonderful, Stampin' Up, Stampin' Up Card, Stampin' Up Card ideas, Stampin' Up Supplies, Sale-A-Bration 2015, Irresistibly Yours, circle punch, Circles Framelits, Big Shot
Cards | Sale-a-bration | Stamping
by Joanne James19. January 2015 11:26I have another card to share with you today - a double-post day, woohoo! You can see my earlier card here. This one is quite different!
It started out as my card for this week's challenge over at Less is More, where the challenge this week is 'friends'; I started out thinking of something cutesy or animal-themed, then remembered a stamp set I have that I've used only one stamp from (the #Ijustloveyou stamp I used a couple of times last week) and thought it was about time to ink up a couple more stamps in this set. This also resulted in a complete change in design direction! Since this definitely counts as 'NBUS' (never before used schtuff!), I'm also going to link up with CASology and the lovely Darnell with her third NBUS challenge (go Darnell! Thanks for encouraging us to actually use ALL of the stamps we buy!!). I also used this week's sketch over at The Paper Craft Crew as my inspiration (check out Justin's awesome card this week - you are definitely going to want to CASE it!!). Edited to add: At Sarah's suggestion over at LIM, I am also linking up with Uniko Studio's current challenge where the theme is 'love and friendship'. So five challenge links in total, which is something of a record and entirely unplanned, given that I already made today's card and this one was supposed to be for Thursday! So here are all the badges:
After all that - if you're still with me! - I'm guessing you might like to see my card!! Well, here it is:
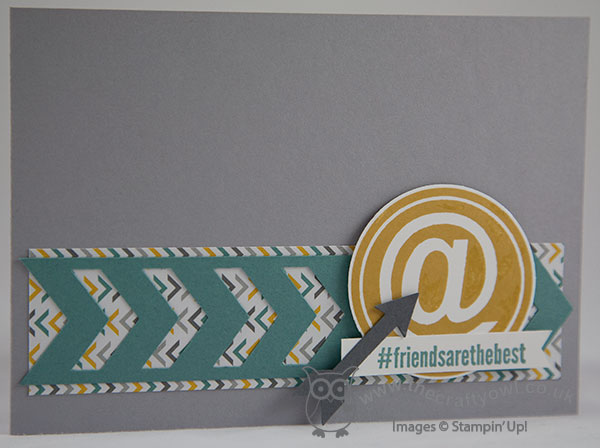
A very clean and simple card, with a slightly masculine feel to it I think due to the colour scheme, which I took from the Moonlight DSP which is peeking through under the Chevron border punched piece. I popped the ampersand up on dimensionals and layered with the hashtag sentiment and arrow to finish. Super simple - easy enough to recreate for a friend, male or female, just to let them know you care. Better still, both the chevron border punch and What's Up arrow punch are on this week's Wednesday Weekly Deals, so you can pick them up even more cheaply than usual!
That really is all from me today; back tomorrow with another project. until then, happy stampin'!
Stampin' Up! Supplies Used:
1336ab55-f27c-4208-8bfc-b1d289c29388|0|.0|96d5b379-7e1d-4dac-a6ba-1e50db561b04
Tags: #Hello, Chevron Border Punch, Moonlight, circle punch, What's Up Punch, Wednesday Weekly Deals, Stampin' Up, Stampin' Up Card, Stampin' Up Card ideas, Stampin' Up Supplies, Shop online, Promotions
Cards | Promotions | Stamping
by Joanne James3. January 2015 21:02I finally feel like I'm nearing the end of our Christmas celebrations today: we have enjoyed our annual visit to the pantomime with friends (and Granny!) and as much as I love the holiday season, I'm looking forward to taking our decorations down, which is I think a job for tomorrow. Today I'm sharing a card I made for Julee's sketch this week over at Mojo Monday:
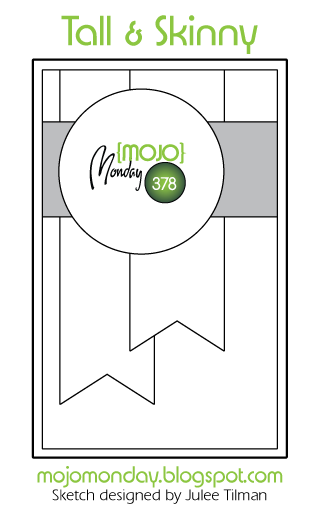
It is 'tall and skinny' week so I made my card to the dimensions 3.5" x 5.5" and since I'm having a complete run on 'Best Year Ever' Sale-A-Bration designer series paper, I just had to use it again on my card today:

I used the large polka dot embossing folder on my card base, then having first paper-pierced the edges of my strip of Crushed Curry, created a belly band to wrap around the front of my card to which I attached my focal point - the hello stamp from the '#hello' stamp set, stamped in Calypso Coral on Whisper White and mounted on two offset scalloped circles.
To finish, I even made a bespoke envelope to match my tall and skinny card, also using the Best Year Ever paper - so easy with the help of my Envelope Expert Tool, this makes any bespoke envelope size a breeze.
Back tomorrow with my first card of the year for The Paper Players, this time as a permanent member of the design team too - woohoo! We have a great challenge for you to start the year, so do come back and find out all about it tomorrow. Until then, happy stampin'!
Stampin' Up! Supplies Used:
*Best Year Ever Designer Series Paper - available 6th January - 31st March 2015 Sale-A-Bration.
185210d6-9720-463b-b5fd-ac4346f5e850|0|.0|96d5b379-7e1d-4dac-a6ba-1e50db561b04
Tags: Best year Ever, #Hello, Sale-A-Bration 2015, Large Polka Dot TIEF, scallop circle punch, Shop online, Stampin' Up, Stampin' Up Card, Stampin' Up Card ideas, Stampin' Up Supplies, circle punch, Paper Piercing
Cards | Stamping
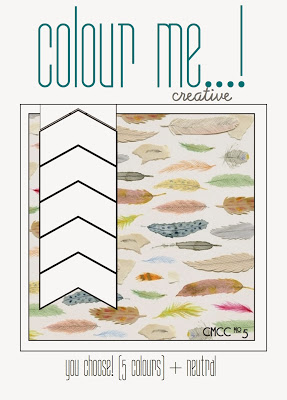
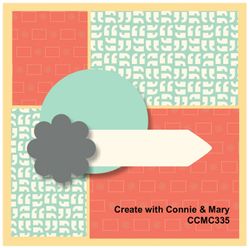
by Joanne James31. December 2014 10:00Today it's a special day: the Colour Me...! challenge is celebrating its first birthday and so the co-creators, the lovely Hayley and Tara, are hosting a party to celebrate! As one of the outgoing designers, I was invited to choose any previous challenge colour combination and create a card for this week's showcase. I decided to go with the creative choice from week 5, which enabled me to use some of the gorgeous new 'Best Year Ever' DSP from the 2015 Sale-A-Bration offering; I also used this week's sketch layout over at Create With Connie and Mary, as this layout was perfect for what I had in mind:
As much as I've enjoyed making Christmas cards these past few months, I am so ready for a change! The colours of the promotional designer series paper and co-ordinating embellishment packs are like a breath of spring air - take a look:
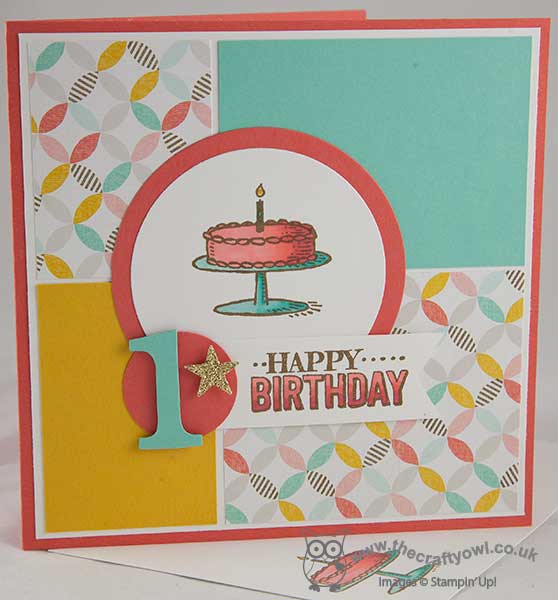
I based the colour scheme for my card on the feature colours of the Best Day Ever papers - Calypso Coral, Coastal Cabana, Crushed Curry, Soft Suede and Sahara Sand, with white as my neutral - isn't it a gorgeous colour combination for Spring? I used two pieces of the same paper for my card, paired with a couple of blocks of solid colour, as the background for my card, then used another Sale-A-Bration promotional item, the 'Big Day' stamp set to create my focal point. What better than a birthday cake with a single candle for a first birthday?! The sentiment is from the same set. I stamped them both in Soft Suede, before colouring with my Calypso Coral and Coastal Cabana Blendabilities. Did you know that Stampin' Up! Blendabilities work with many of the standard Stampin' Up! coloured ink pads, in addition to Memento Black? Sometimes an alternative colour outline works really well and can give a different effect. I decided to create a little 'badge' to anchor my sentiment, using a punched circle, a number 1 cut with my retired Typeset alphabet Bigz Die (you could use the Perfect Print Bigz Number Die as an alternative) and a punched gold glimmer star. I coloured the envelope to match and I even created a fancy sentiment inside my card:

Both the Best Day Ever DSP and the Big Day stamp set are items that could be yours free with a purchase of £45 or more during Sale-A-Bration; Slae-A-Bration starts early this year on 6th January, so not long to wait now! I made this card to congratulate Hayley and Tara on their first Colour Me...! anniversary, however it would work just as well for a child's first birthday I think in this colour scheme.
That's all from me today; do pop by the Colour Me...! challenge blog and see what other birthday delights are in store. I hope you have a fun New Year's Eve planned - mine will be a quiet one - and I'll be back tomorrow with another project; until then, happy stampin'!
Stampin' Up! Supplies Used:
* Best Day Ever Designer Series Paper and Big Day stamp set available 6th January.
40a68875-0514-40a3-a433-8a494767272f|0|.0|96d5b379-7e1d-4dac-a6ba-1e50db561b04
Tags: Blendabilities, Big Day, Best Day Ever, circle punch, Circles Framelits, Itty Bitty Accents Punch Pack, Typeset Alphabet, Big Shot, Sale-A-Bration 2015, Sale-a-bration, Shop online, Stampin' Up, Stampin' Up Card, Stampin' Up Card ideas, Stampin' Up Supplies
Cards | Sale-a-bration | Stamping
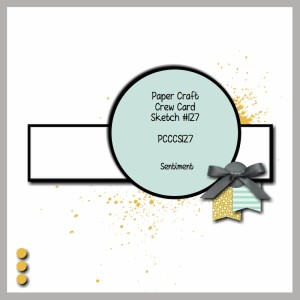
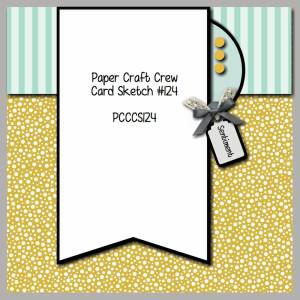
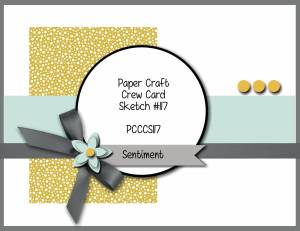
by Joanne James30. December 2014 21:15I've had a great work day today and managed to fit in some quality crafting time, so amongst other things I have a Happy new Year card to share with you today that was inspired by this week's sketch over at The Paper Craft Crew:
Here is the card I created:
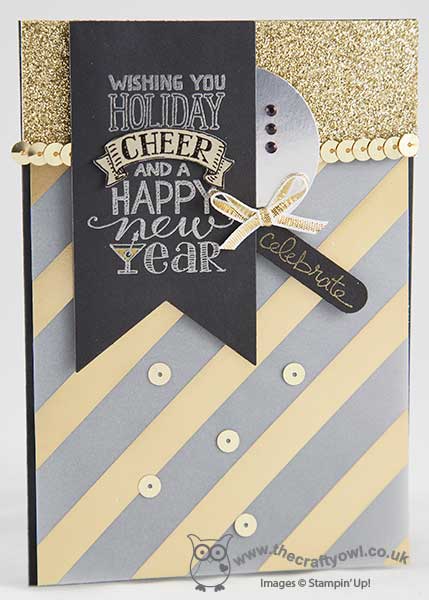
For a new year celebratory card some glitz and glamour were definitely the order of the day, so I layered a number of gold and sliver elements - glimmer paper, silver foil, sequins and gold vellum and topped with a silver embossed black pennant cut with my Banner framelits. The stamp I used is from the versatile 'Mingle All The Way' set from the Autumn-Winter Seasonal Catalogue; this set along with many others, is only available until January 5th when the catalogue ends, so if it's still on your wish list then don't leave it to late to order. I created a popped-up banner for the word 'cheers' having heat embossed this section in black on brushed gold cardstock, then cut it out and adhered with dimensionals. Some gold ribbon, a trio of rhinestones coloured with a black permanent marker and done!
We are having our traditional James family day on New Year's Day so I will be taking this card along with me for my mother-in-law; I'm hoping it will go some way to make up for the lack of Christmas card!
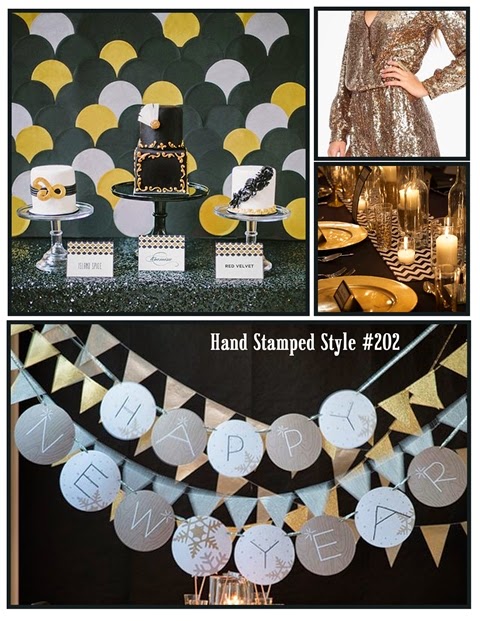
I'm also linking up to the new year challenge over at Hand Stamped Sentiments where this is the challenge inspiration photo:
Back tomorrow with a special 'extra' post for the lovely ladies over at Colour Me...! and a new set of weekly deals. Until then, happy stampin'!
Stampin' Up! Supplies Used:
d600dfff-3a81-4820-8707-902d51f6c8dd|0|.0|96d5b379-7e1d-4dac-a6ba-1e50db561b04
Tags: Banners Framelits, Big Shot, Mingle All The Way, New Year, Good Greetings, Shop online, Stampin' Up, Stampin' Up Card, Stampin' Up Card ideas, Stampin' Up Supplies, circle punch
Cards | Stamping
by Joanne James28. December 2014 10:00Today I wanted to share with you a fun punch art card that I made for a special little girl for Christmas featuring the adorable snowman Olaf from the Disney movie 'Frozen'. I've made a few of these but never blogged one - so here's the most recent one that I made:
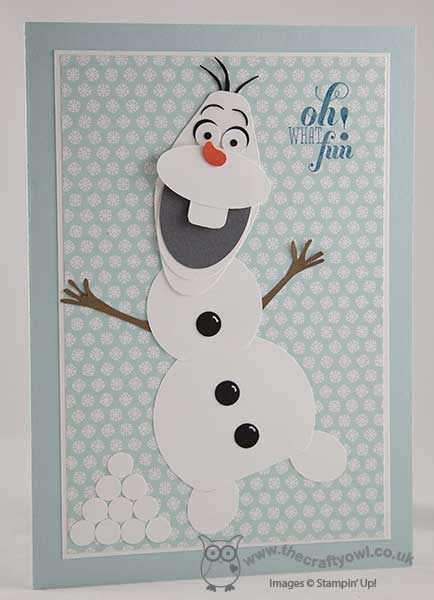
I most certainly can't take the credit for the Olaf punch art itself; to create mine, I always follow the excellent instructions by Michelle Suit - you can watch her video tutorial on how to create your own Olaf here. He is actually rather straight forward - the real key is using the Gift Bow Bigz die to get the right shape for his head. If you are a fan of Disney and like to create punch art every once in a while, I recommend you check out Michelle's blog Suitably Stamped - she really is a whizz!
On this occasion, I kept the design of my card really simple and used a piece of Nordic Noel DSP for the snowflake background and just added a pile of snowballs and a retired sentiment, which I stamped in Island Indigo directly onto the DSP. I have more of these to make this month, as I am the official party planner for a special birthday girl later this month who is having a Frozen-themed celebration; there is clearly no sign of the Frozen phenomena dying down any time soon!
And now to my special announcement! As my regular readers will know, I was asked to join the lovely ladies over at The Paper Players challenge blog back last July for a 3 month guest designer stint. This was then extended to a 6 month stay, which I completed with the last challenge of the year earlier this month. This has always been one of my favourite challenges to play along with and I was delighted to be asked to guest with this talented and creative bunch and equally sad to leave them. So imagine my delight when I got a call asking if I would like to return - as a permanent member of their design team!! Woohoo! I am thrilled that these ladies think so much of me that they would want me to join them on a permanent basis and I am so looking forward to creating with them through 2015 and beyond. Our first post of 2015 will be next Sunday, so do pop back then to join us for some fresh design inspiration!
As for me, I am hoping to be back with you tomorrow with another project; until then, happy stampin'!
Stampin' Up! Supplies Used:
5109cb95-113b-4260-bda9-a61674524f9b|0|.0|96d5b379-7e1d-4dac-a6ba-1e50db561b04
Tags: Christmas, Disney, Frozen, Punch Art, Gift Bow Bigz L Die, circle punch, Nordic Noel, Shop online, Stampin' Up, Stampin' Up Card, Stampin' Up Card ideas, Stampin' Up Supplies
Cards | Punch Art | Stamping
by Joanne James13. November 2014 20:10Today I'm sharing my card for this week's challenge over at Less is More, where the focus for this week's one layer challenge is a 'starry, starry night'. I was aiming for an early LIM entry this week and this post was originally scheduled for Tuesday, but best laid plans and all that .... So two days later, here it is:
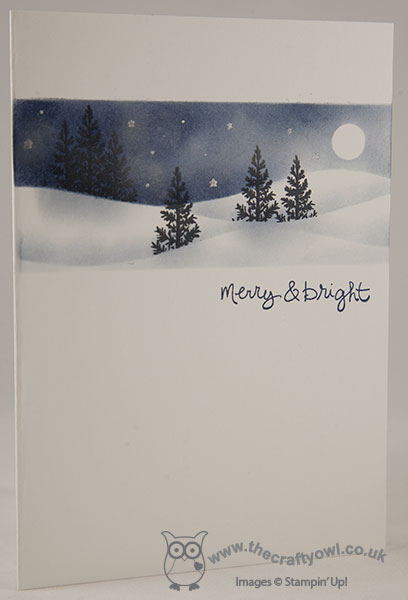
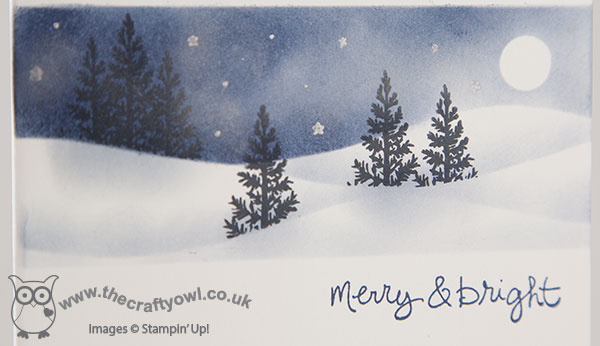
So how did I create today's card? Well, I've been wanting to create a sponged snowy scene for a while, so this card was the perfect opportunity. I masked off a horizontal panel, added a masked circle for my moon and then created a 'hill' mask to create my landscape itself. I sponged in my sky using Night of Navy ink and used the same colour to highlight the edges of the snow dunes and some subtle tree shadows (I did this bit after I stamped in the trees). Once I'd created my snowscape, I used the tip of the pine tree from the Festival of Tree stamp set to add in my trees. I stamped them in Memento Black ink, being careful to keep my mask in place each time so that the trees were behind the surface of the snow. To finish, I used some Encore silver ink to sponge in some tiny stars using a stencil I created with my Confetti Stars punch, along with a few dots added with my Silver marker. I also lightly sponged some Encore Silver onto some areas of the sky to add a subtle sheen. To finish, I stamped my sentiment from the 'Good Greetings' stamp set beneath my scene. Here's a closeup of the scene itself so that you can see it in more detail:
For such a 'blue' card, this really is very pretty and for a one layer card has so much going on. I think I might have to make a few more like this!
Back tomorrow with another card; until then, happy stampin'!
Stampin' Up! Supplies Used:
998fba23-8838-4f0a-a0f9-7baa554c0316|0|.0|96d5b379-7e1d-4dac-a6ba-1e50db561b04
Tags: Christmas, circle punch, Confetti Stars Punch, one layer cards, Festival of Trees, Good Greetings, Shop online, Sponging, Stampin' Up, Stampin' Up Card, Stampin' Up Card ideas, Stampin' Up Supplies
Cards | Stamping
by Joanne James10. November 2014 21:46It's Monday - yay! I've spent most of my day at the swimming pool watching both James juniors taking part in an inter-school gala. The school team didn't win, but there was some stiff competition and all of the children put in a sterling effort. I got home and managed to get a couple of cards made, so all in all a good day. Today's card is for the challenge over at CAS Colours and Sketches where this week its a colour challenge and a new (to me) challenge that I've come across called Addicted to Stamps where the inspiration photo caught my eye:
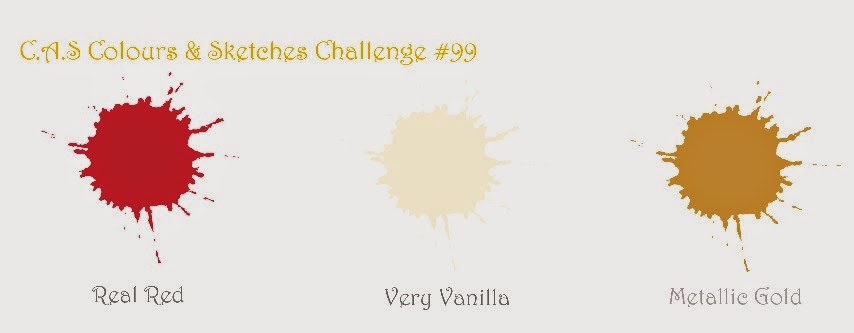
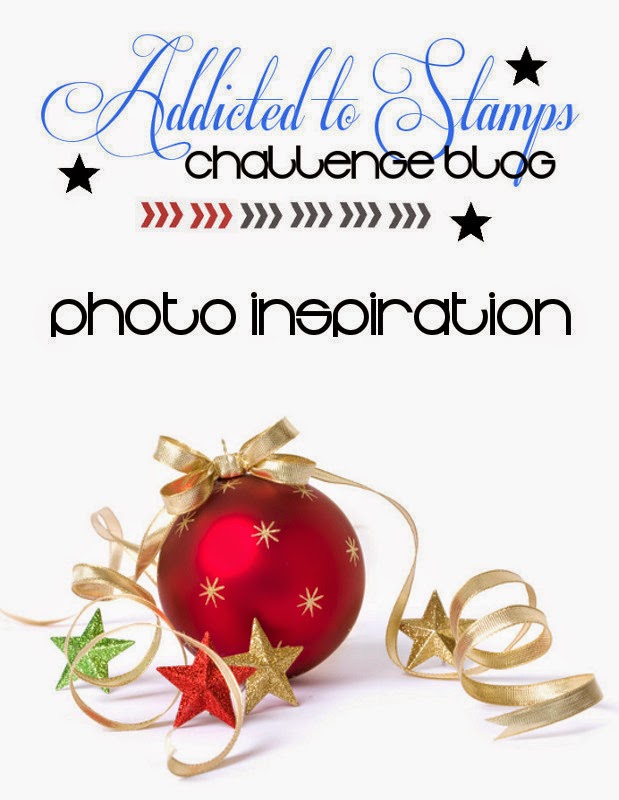
With these colours and that fabulous sparkly bauble, I just had to make a Christmas card; here it is:
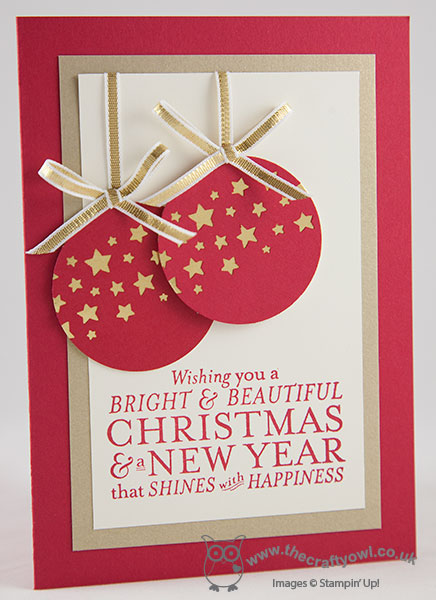
I used Real Red for my card base and then matted a panel of Very Vanilla with Brushed Gold. I stamped a sentiment from the Bright and Beautiful sentiment in Real Red, then created two baubles, each made from a circle punched out of Real Red cardstock with a 1 3/4" circle punch and punched with the Confetti Stars punch to reveal the gold foil stars underneath (this is a second 1 3/4" gold foil circle adhered behind). One of my baubles is adhered directly to the card an one popped up on dimensionals. Each is finished with a ribbon bow of sparkly gold ribbon. I'm not sure the photo really does this card justice - the gold stars on the baubles do have more shine in real life.
That's me done for today. Back tomorrow with another Christmas card; until then, happy stampin'!
Stampin' Up! Supplies Used:
by Joanne James9. November 2014 07:00It's Sunday and time for a new challenge over at The Paper Players and this week Sandy has a fantastic colour challenge for us:
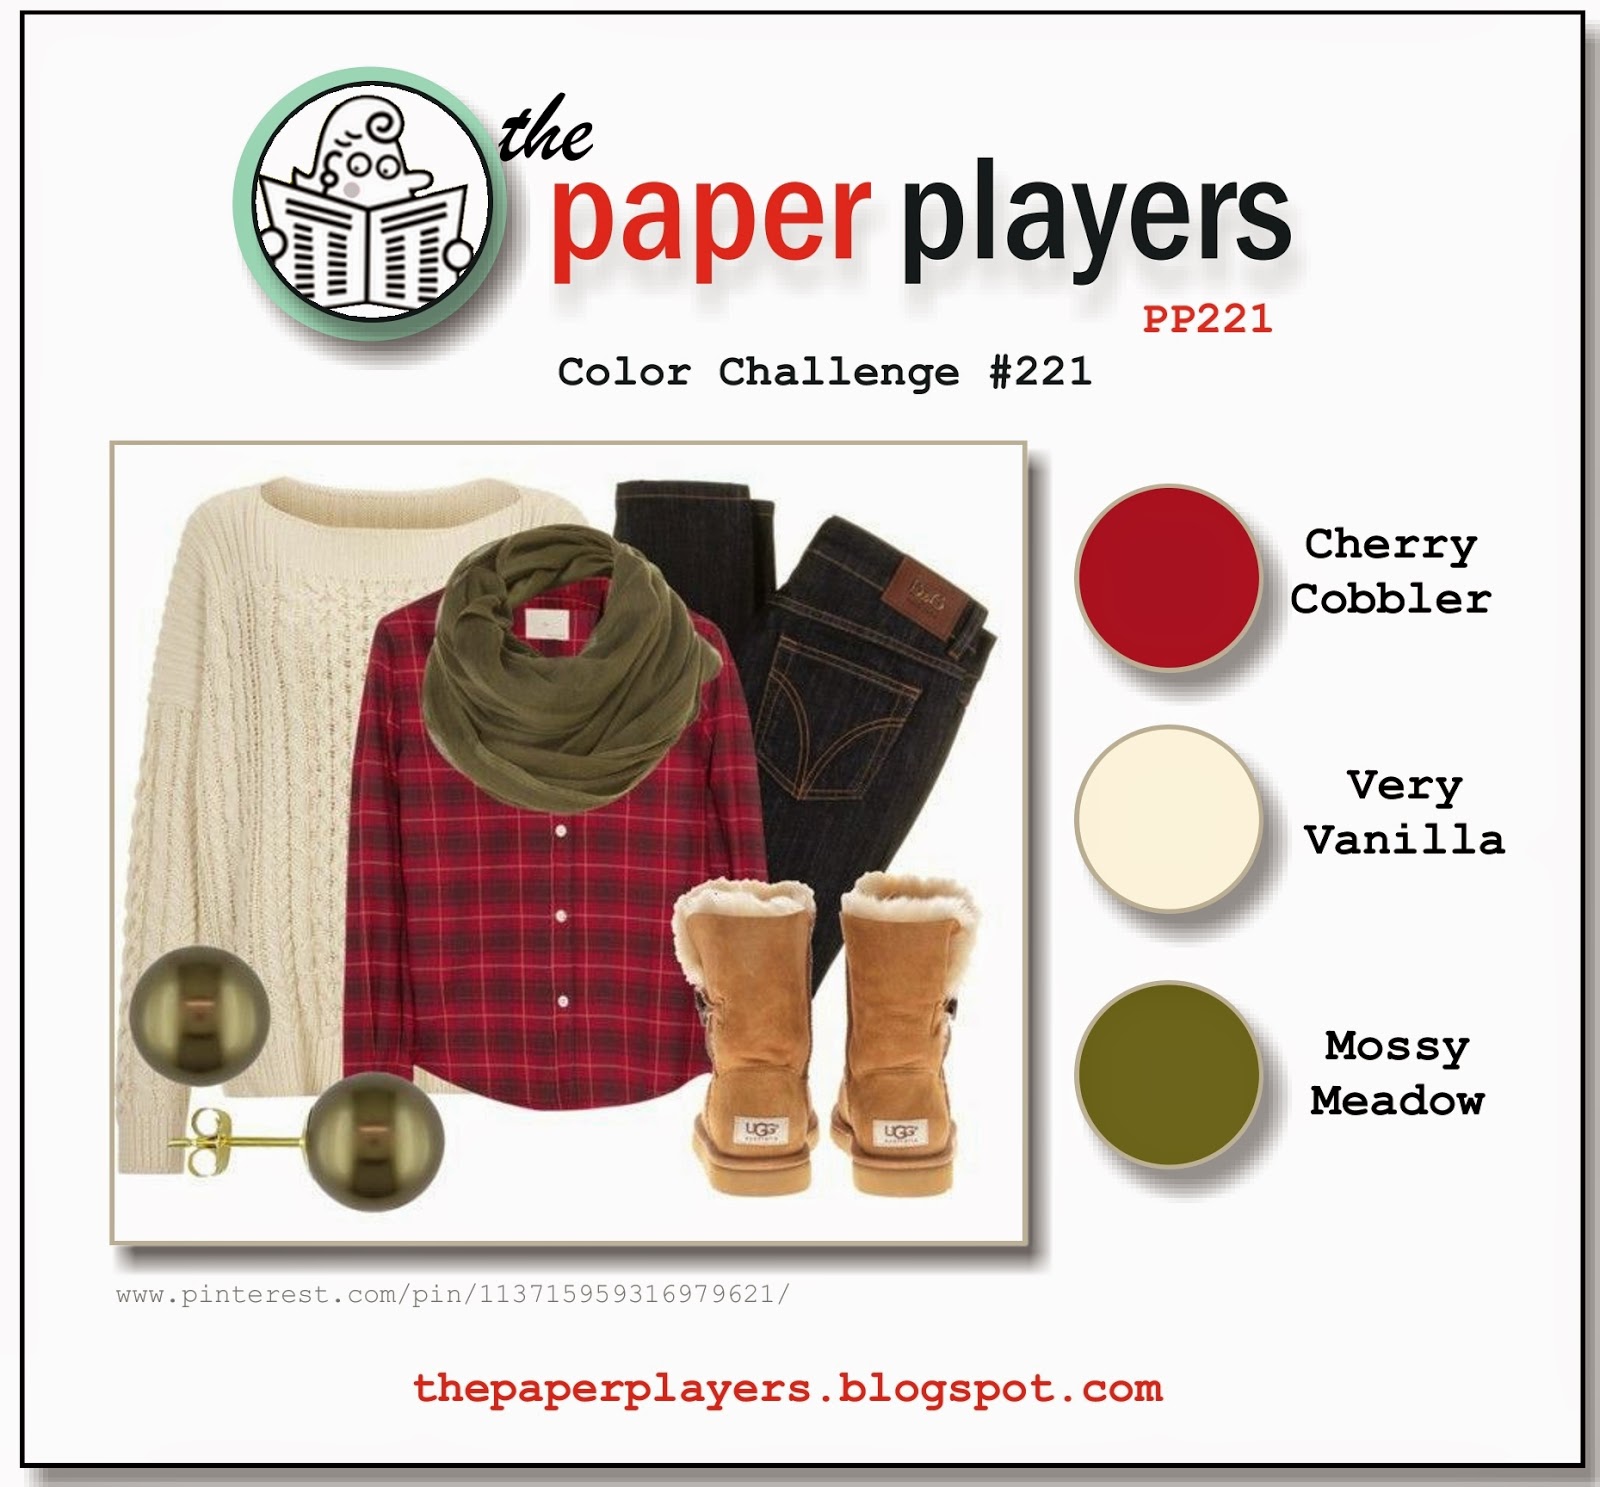
Aren't these colours so reminiscent of winter? I also used this week's sketch over at The Paper Craft Crew for the layout for today's card:
I used Cherry Cobbler for my card base and matted this with a piece of Very Vanilla cardstock. I created my own DSP for my background panel by stamping Mossy Meadow ink on Mossy Meadow cardstock and stamping a selection of the baubles from the Nordic Noel set. The focal image of my card is the main stamp in this set, which I coloured with my Mossy Meadow and Cherry Cobbler markers to achieve the two-colour pattern. A Stylish Stripes embossed panel added a little background texture and I finished with the gorgeous in-colour Mossy Meadow satin ribbon and an antique brad, along with a sentiment from Good Greetings. Lastly, there is a 'cheat' element to my card today - did you spot it? For all of you wondering where I managed to get my Mossy Meadow candy dots from, since they aren't in the catalogue, I'll let you into a secret - they're actually Always Artichoke! I'm hoping Sandy will forgive me, but as they aren't next to anything that is Mossy Meadow you cant see the subtle difference in colour so they do the job as far as my card is concerned. I won't tell if you don't ;-).
I hope you like today's card; do pop by The Paper Players gallery to see what the rest of the team have come up with - there are some great cards as always. There's even one by LeAnne that uses the exact same sketch layout as me, yet it looks completely different, so check it out for double inspiration!
Back tomorrow with another project; until then, happy stampin'!
Stampin' Up! Supplies Used:
9029a9f0-cd51-4a53-8d0f-9230cc557144|0|.0|96d5b379-7e1d-4dac-a6ba-1e50db561b04
Tags: Big Shot, Candy Dots, Christmas, circle punch, Circles Framelits, Nordic Noel, Shop online, Stampin' Up, Stampin' Up Card, Stampin' Up Card ideas, Stampin' Up Supplies, Stylish Stripes TIEF, The Paper Players
Cards | Stamping
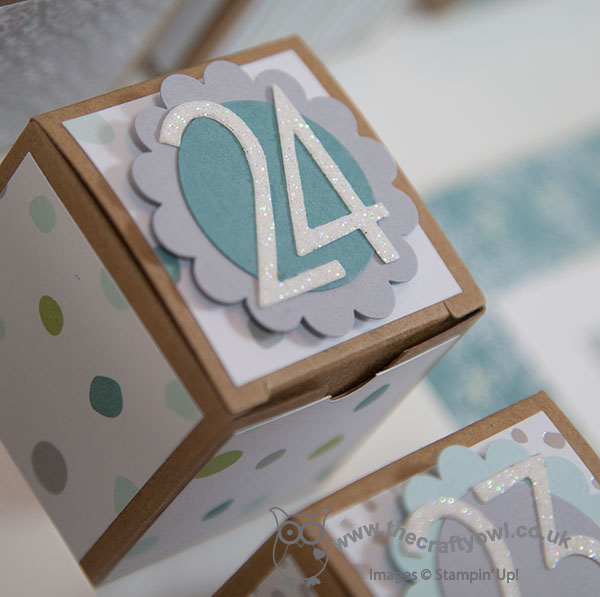
by Joanne James4. November 2014 23:00A late post from me today as I've spent a lovely day crafting with friends, followed by James family piano lessons this evening (3 out of 4 of us are learning!) so have only just got around to it. Our craft session was fun - we finished off some projects we started a little while ago, which always gives a good sense of achievement. With Christmas creeping ever closer, today I thought I would share with you the advent calendar I made for the James juniors, which is a case of a project by the lovely Julie Kettlewell. I love the Tiny Treat Boxes in this year's Stampin' Up! seasonal catalogue, which are of course perfect for making advent calendars. The sample in the catalogue shows just how easy it is to make something to a basic design, however having seen Julie's project a little while ago - you can see her original project here - I knew I wanted to create something similar. So without further ado, here is my framed advent calendar in all its glory:
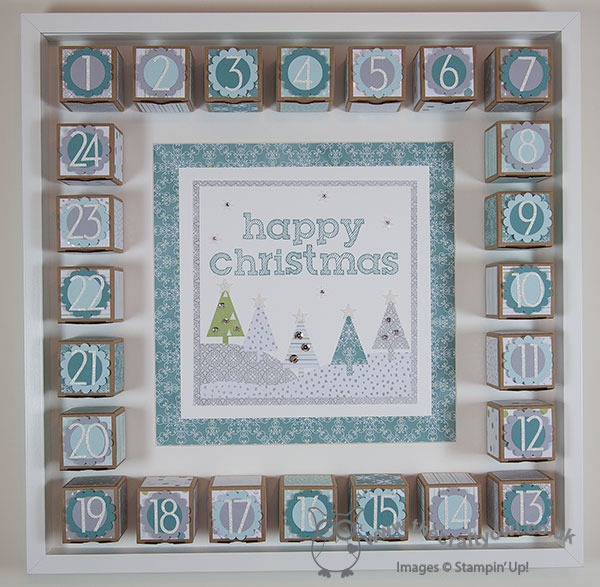
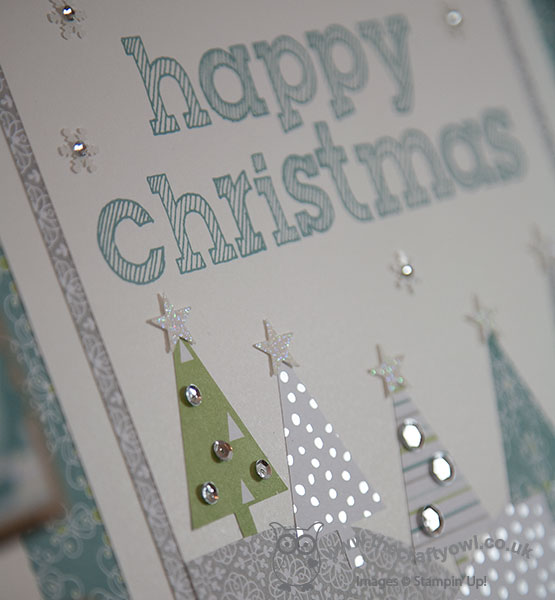
Isn't it beautiful?! It is framed in a 20" frame/50cm, so is a substantial piece in terms of size and it makes a real statement. I chose to make mine using the All is Calm Speciality Designer Series Paper, here are some close ups:
This is the central panel, with a sentiment stamped using the Epic Alphabet and some trees punched using the Tree Punch and decorated with some frosted sequins.
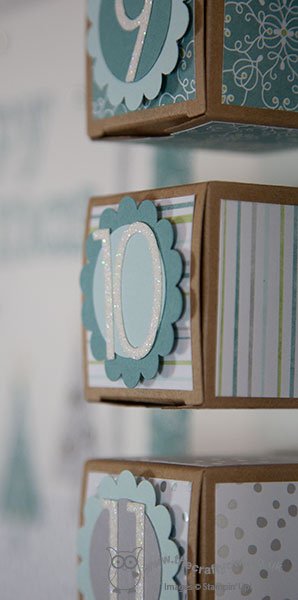
Each of the boxes is covered on 5 sides using the All is calm DSP, then a number label made from a layered section using a 1 3/4" scalloped circle punch and a 1 3/8" circle punch, and numbers cut out of Dazzling Diamonds Glimmer Paper using the Perfect Print Numbers Bigz Die and the Big Shot.
This is a great project to showcase all of the lovely papers within the All is Calm DSP stack.
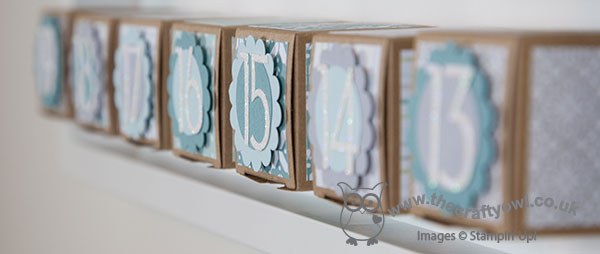
I adhered my boxes so that the flaps would open upwards and put my numbers in order from one through twenty four, however you could 'mix and match' if that's more your style. Each pack of treat boxes contains 25 boxes, so you have one spare to package an extra special treat for Christmas Day if that's your thing. I'm really pleased with how my calendar turned out and am busy acquiring lots of little treats to fill my boxes for the month of December. I can see this project becoming a real heirloom piece that we bring out year after year.
Hope you like today's project; back tomorrow with the new Wednesday Weekly Deals and my Design Team post for this week's challenge over at Colour Me...! Until then, happy stampin'!
Stampin' Up! Supplies Used:
a14d12e4-8a84-47d3-b508-66ff0abbf41e|0|.0|96d5b379-7e1d-4dac-a6ba-1e50db561b04
Tags: 3D Projects, All Is Calm, Big Shot, Christmas, Advent Calendar, Stampin' Up, Stampin' Up Supplies, Stampin' Up Card, Stampin' Up Card ideas, Shop online, Perfect Print Numbers Bigz, Tiny Treat Boxes, scallop circle punch, circle punch, Frosted Sequins, Tree Punch
3D Projects | Stamping