by Joanne James29. May 2019 20:00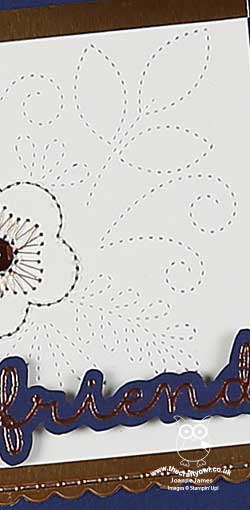
I'm later posting today - it's been a busy day! I had a class last month featuring the Needlepoint Nook Suite and made a few additional cards featuring these products whilst everything was out on my desk that I've still to share. This suite is retiring with the new catalogue so time to get to it! One of the cards I made focuses on paper piercing (not to be mistaken with paper piecing!). The dies from the Needlepoint Elements Framelits that are just perfect for this - take a look:

Here's the low-down on today's card:
Paper Piercing - No need for a paper-piercing tool and stencil for this card: The detail of the largest of the Needlepoint Elements Framelits provides easy paper-piercing detail with one roll through the Big Shot.
A Stitch In Time - I decided to highlight some of the detail on the paper-pierced panel by adding some stitching to the design. I used some copper metallic thread and a needle from my sewing box to outline the main flower and add detail to the centre. When I started out, I had intended to stitch the whole design; the small portion I did achieve took a lot longer than I expected though, so in the end I decided to stop at the flower. I do like the effect; a project for another time, perhaps!
All About Copper - Navy, white and copper is one of my favourite metallic colour combinations. Today's card features a few different copper elements: a copper foil stitched border, copper embossed sentiment, copper metallic thread and a copper sequin to finish my flower. Most of these are carrying over, with the exception of the copper metallic thread - I will miss it!
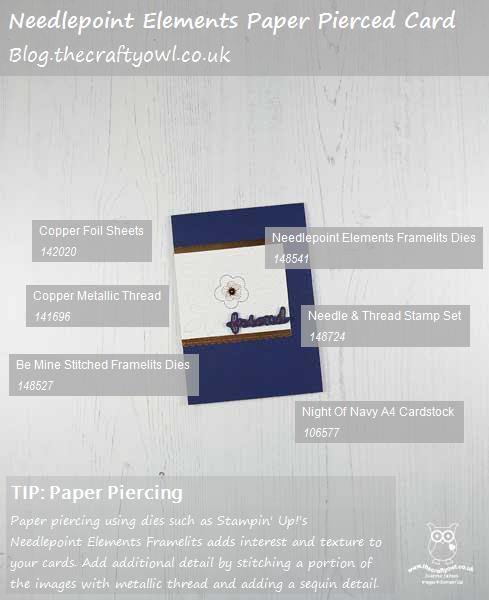
Here is the visual summary of the key products used on today's project for you to pin for easy reference:
You can see all of my 'How To' summaries on my 'How To - Tips and Techniques' Pinterest board in case you've missed any.
Enjoy your evening and I'll be back tomorrow with another project. Until then, happy stampin'!
Stampin' Up! Supplies Used:
3fa5c983-3fd7-47ab-93e5-3db6a9f5c370|0|.0|96d5b379-7e1d-4dac-a6ba-1e50db561b04
Tags: Needle and Thread, Needlepoint Elements Framelits, Be Mine Stitched Framelits, Paper Piercing, Shop online, Shop Stampin' Up online, Shop Stampin' Up! Online, Stampin' Up Supplies, Stampin' Up Card ideas, Stampin' Up, Stampin' Up Card
Cards | Shop Online | Shop Stampin' Up! Online | Stamping
by Joanne James25. April 2016 21:05
Another Monday, another week! I had the second of this month's technique classes this morning and thought today I would share one of my class cards with you. Today's class featured the Grateful Bunch stamp set and co-ordinating Blossom Bunch Punch and looked at the technique of paper-piercing.

This card was inspired by a similar one that was featured in our recent demonstrator magazine, Stampin' Success, a really useful resource for Stampin' Up! demonstrators. The key features of my card today are as follows:
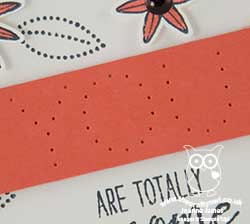
Paper Piercing - The pointelist style of the leaves in the 'Grateful Bunch' stamp set really compliment the paper-piecing on this card. I used my Updated Essentials paper piercing templates to pierce both a border on my Crumb Cake base layer and also the word 'you' onto my Calypso Coral banner. I then finished my sentiment with a partial stamp of one of the sentiments in the stamp set (omitting the 'you').
Ways With Washi - Washi tape can be used in oh so many ways! Here I added a strip of Everyday Chic Designer Washi Tape to the edge of my white layer for added visual interest.
Black Perfect Accents - I stamped my trio of flowers in Memento Black ink on Whisper White cardstock, coloured them in with my Calypso Coral marker and finished them with a trio of Perfect Accents, coloured black with my Sharpie for the perfect shiny centre.
I just love the clean, modern feel of these stamps and the co-ordinating punch makes cutting out these flowers a cinch. Even better, this is one of the great value bundles in the current seasonal catalogue - a saving of 15% if you buy both items together. The good news is that both of these products is carrying over to the new annual catalogue - the bad news is that they will not be available as a bundle, so buy now to take advantage of this saving. The ladies in my class today love this card, although found their first foray into paper piercing more challenging than they had first thought.
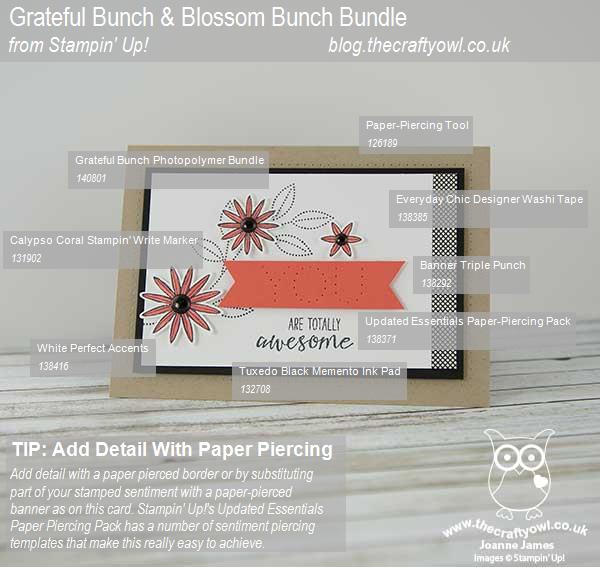
Here is the visual summary of the key products used on today's project for you to pin for easy reference:
You can see all of my 'How To' summaries on my 'How To - Tips and Techniques' Pinterest board in case you've missed any.
Back tomorrow with another project; until then, happy stampin'!
Stampin' Up! Supplies Used:
by Joanne James6. January 2016 09:00It's Wednesday and you know what that means: a new collection of Wednesday Weekly Deals! These offers are valid for one week only. As always, a new collection of deals will be announced next Wednesday.
If you want to take advantage of any of the deals on offer, you can support my business by placing your order online by clicking here or using the link to my store on the right hand side of my blog page where it says 'Shop Online' or with me in person. Don't forget to add the new Hostess Code for January W2ZHBH2D if your order is under £150 and be sure to make sure that you don't check the 'no contact' box if you'd like to be kept updated with the progress of you order and receive a little thank you in the post from me.
Here's a summary of this week's one-week only Wednesday deals - click on each item to go to the online store to purchase:
Some goodies in there, especially the magnetic platform if you don't already have one.
Back later with today's creative project; until then, happy shopping!
00d755b7-ce10-4a5a-83af-cf1aa835544c|0|.0|96d5b379-7e1d-4dac-a6ba-1e50db561b04
Tags: Promotions, Shop online, Shop Stampin' Up online, Stampin' Up, Stampin' Up Card, Stampin' Up Card ideas, Stampin' Up Supplies, Wednesday Weekly Deals, Paper Piercing, Magnetic Platform, Tin Triangles TIEF
Promotions | Shop Online | Stamping
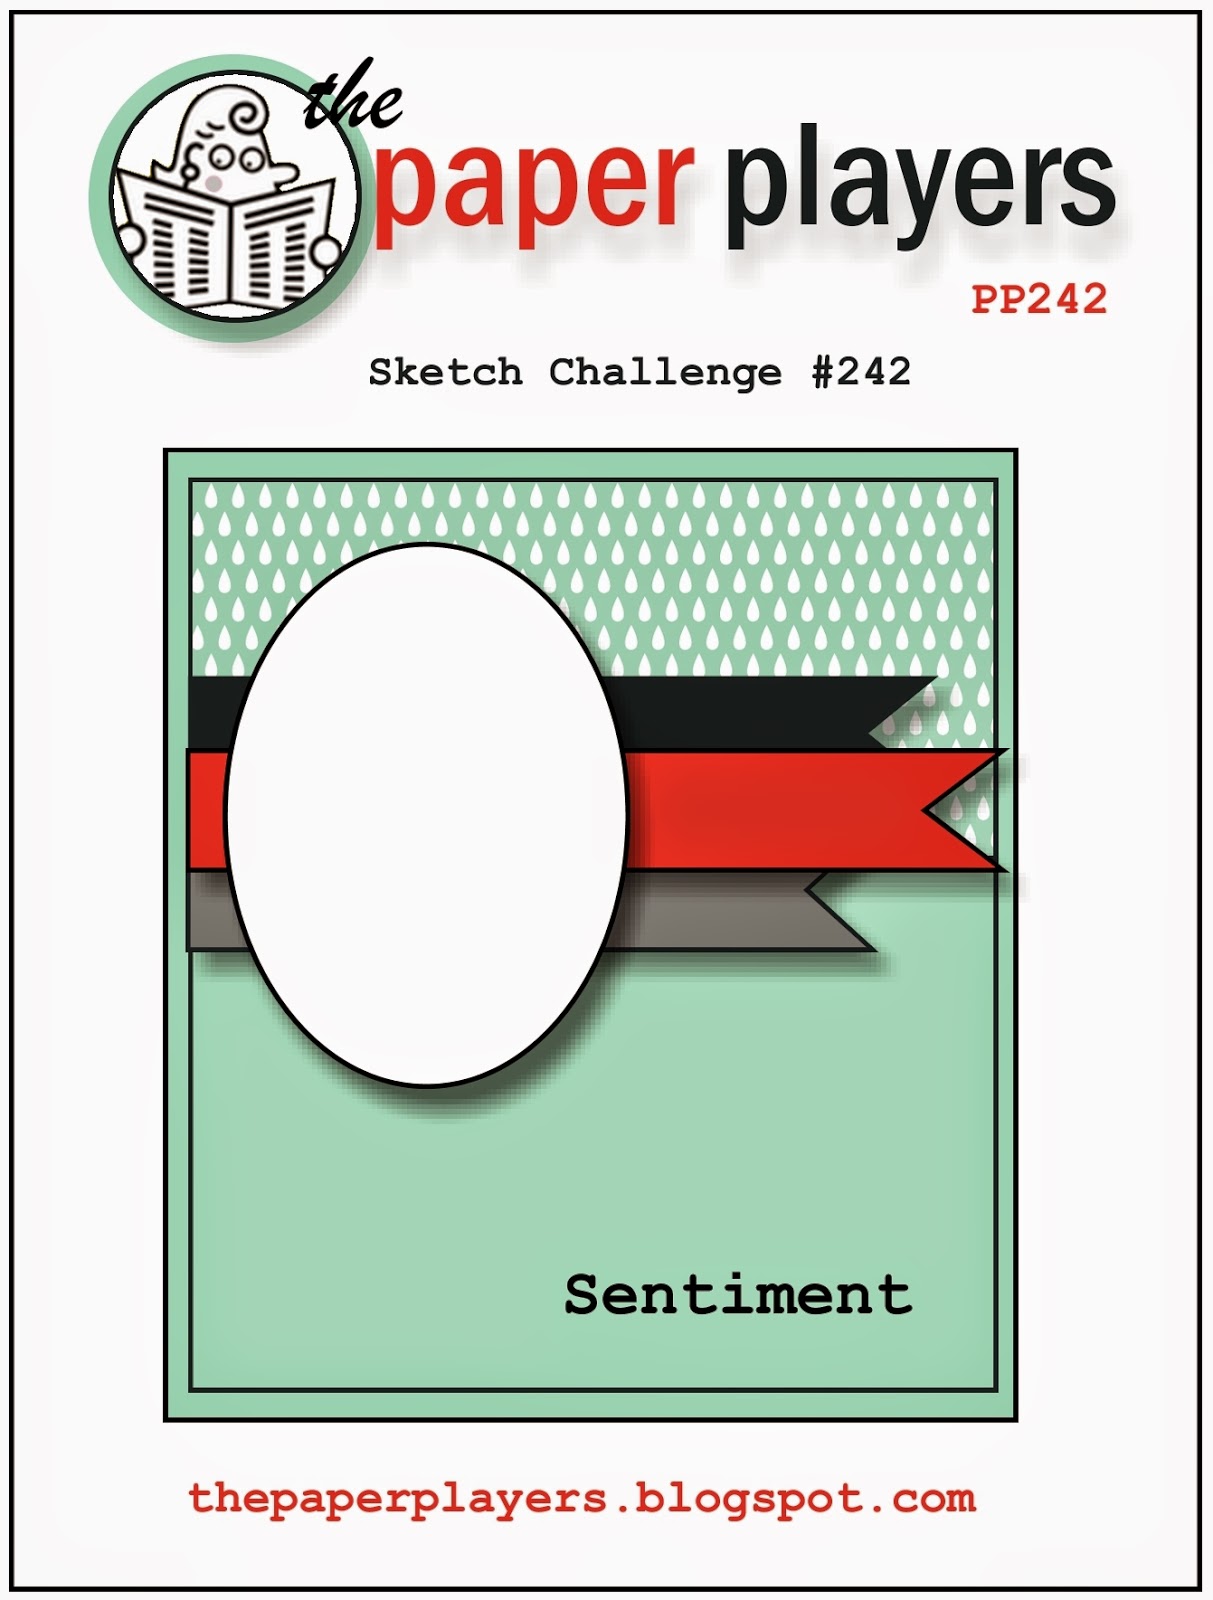
by Joanne James26. April 2015 10:00Yay! It's Sunday and time for a new challenge over at The Paper Players. We loved your watercoloured creations last week; today the lovely Ann is hosting and she has a sketch challenge for us - and you know how I love a good sketch! This is the sketch layout:
So many possibilities for this great sketch, but I decided that today I had to go with a birthday card for 2 reasons: I have lots of birthdays coming up in the next month, so I need to get into a birthday groove, but more importantly, today the lovely Ann is also celebrating her birthday, so it seemed entirely appropriate. I have sent a card (not this one!) in the post, but I'm not sure she will have received it in time for the big day so I'm playing safe with a virtual one too! I decided to use a piece of Birthday Bash paper as the inspiration for my colour scheme, and paired this with a retiring stamp set, Well Worded:
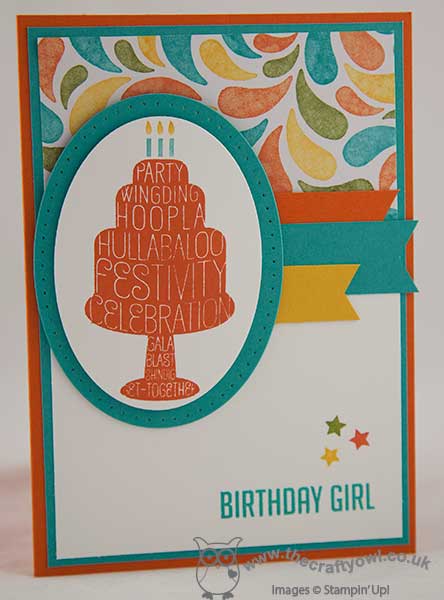
I used Tangelo Twist for my base and a mat of Bermuda Bay, then used a split layer with Birthday Bash DSP across the top and Whisper White along the bottom. I covered the join with pennants in co-ordinating colours, then stamped my birthday cake in Tangelo Twist with Bermuda Bay candles and cut this out with my Big Shot and Oval framelits, matting it onto a slightly larger oval that I paper pierced using my piercing template. To finish, I added a final sentiment to the bottom corner using the 'birthday girl' stamp from the 'Hooray It's Your Day' set - this set co-ordinates with the project kit of the same name, but is useful for lots of cards and can be used for some fun personalisation - this card could equally be tailored to a 'birthday boy' and you wouldn't even need to change the colours. I stamped a trio of stars from the same set in co-ordinating colours to finish my fun birthday card.
So before you reach for your paper and inks, check out what our amazing team has created to inspire you this week:
The Paper Players Design Team
Here's a quick recap of our challenge rules:
1. Create a new paper project
2. Upload your creation to your blog with a link back to us and provide a direct link to the post featuring your challenge submission.
3. Please link your card to no more than three challenges, TOTAL.
4. Have FUN!
I hope my birthday card puts you in a celebratory mood today - best wishes to Ann for a super day and I look forward to seeing what you make with our sketch this week.
Back tomorrow with another project; until then, happy stampin'!
Stampin' Up! Supplies Used:
bf4956a9-4319-4767-854f-17cb7d539b92|0|.0|96d5b379-7e1d-4dac-a6ba-1e50db561b04
Tags: Birthday Bash, Well Worded, Hooray It's Your Day, Ovals Framelits, Big Shot, Paper Piercing, Shop online, Stampin' Up, Stampin' Up Card, Stampin' Up Card ideas, Stampin' Up Supplies, The Paper Players
Cards | Stamping
by Joanne James14. March 2015 21:10It's the weekend but no signs of my week slowing down yet! I had a great Stampin' Up! party hosted by the lovely Lucy yesterday and today we visited a science fair and Ben played basketball on his school team at the county quarter finals this evening. So just time for a quick post with a card I made for this week's Mojo Monday challenge:
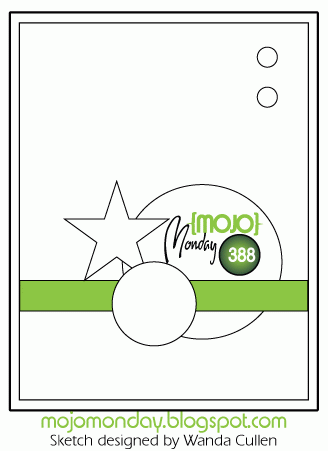
This is the first sketch designed by Wanda Cullen and I think it's great (go Wanda!) I decided it was the perfect layout for me to cut into one of my favourite pieces of paper in my Painted Blooms DSP pack - here is my card:
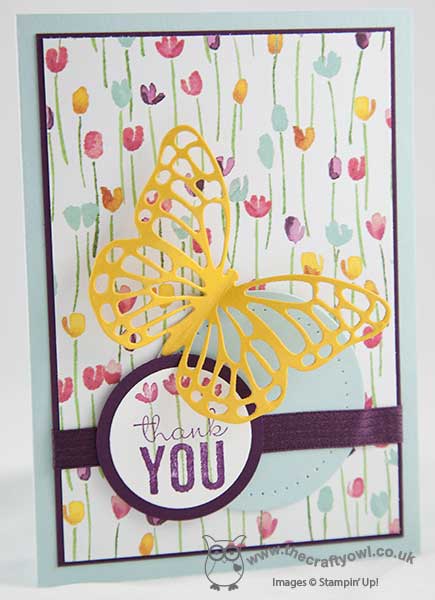
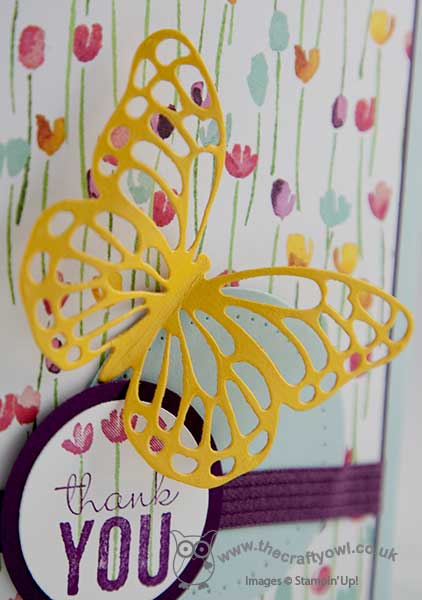
I used Soft Sky for my base and matted my paper on a piece of Blackberry Bliss to give a thin border, then layered a paper pierced circle, a piece of Blackberry Bliss satin ribbon and my layered sentiment circle, where I over-stamped the tulips with my thank you, before finally adding my Crushed Curry thinlit butterfly. I just love the detail of the sentiment and the dramatic bright yellow butterfly on this card - here's a close up:
Love it! That's all from me today; back tomorrow with this week's card for our new challenge over at The Paper Players. Until then, happy stampin'!
Stampin' Up! Supplies Used:
421f25bd-a649-4dc9-a3f6-f3f8488735e3|0|.0|96d5b379-7e1d-4dac-a6ba-1e50db561b04
Tags: Painted Blooms, Painted Petals, Big Shot, Butterfly Thinlits Dies, circle punch, Circles Framelits, Paper Piercing, Shop online, Stampin' Up, Stampin' Up Card, Stampin' Up Card ideas, Stampin' Up Supplies
Cards | Stamping
by Joanne James9. March 2015 10:44Happy Monday everyone! This is the start of the busiest week for me - classes, parties and a number of family commitments - so I'll do my best to keep up with my blogging schedule. Today I'm sharing one of the cards that I'm making with my ladies in my technique class this week - an oval shaped card, using an interesting vellum technique. Here's my card:
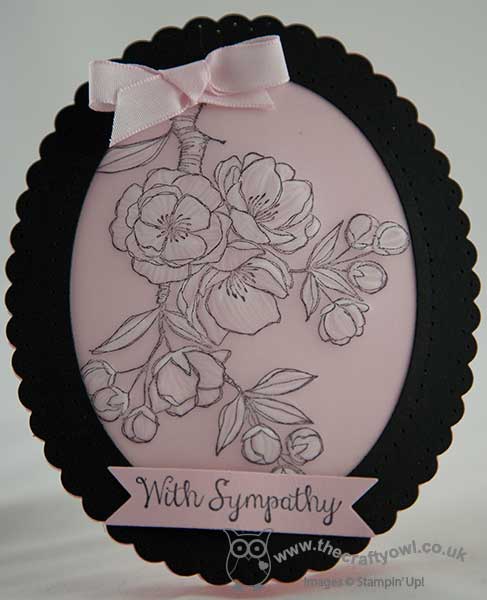
I saw this neat technique where you stamp your image on vellum then rub the back of the image with a round ended stylus to 'colour' it in a video tutorial by Deb Valder here. I used Pink Pirouette for my background, then layered the vellum before adding my black border, cut with the largest shaped oval framelit which I paper-pierced around the edge. I needed a sympathy card for my box, so used a sentiment from the 'Bloom With Hope' set, which I cut out with the Banners framelits, and a little bow to soften the card front. I really like the effect of the vellum - it looks slightly 'raised' following the rubbing and adds a feeling of texture to the card.
I'm looking forward to making this card with my ladies this afternoon and then this evening I'm off to craft with a group of Brownies and then Girl Guides - I'll share these projects later in the week.
Back tomorrow with another project; until then, happy stampin'!
Stampin' Up! Supplies Used:
by Joanne James4. March 2015 20:05Finally time for today's creative post! I was fortunate enough to be selected as the 'Top Pick' over at the As You See It Challenge last week - thank you ladies! - for this card here. Today I'm entering a card for this week's challenge which is another sketch-based one - you know how I love a good sketch:

I was keen to interpret the ring in the sketch as a wreath in some way and since I had some leftover burlap on my desk from another project that I am currently working on, I knew which direction I wanted to go. My thoughts are definitely on Spring this week - here is my interpretation of the sketch:
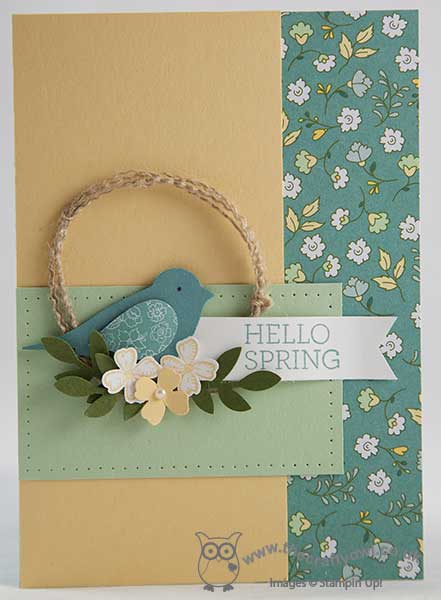
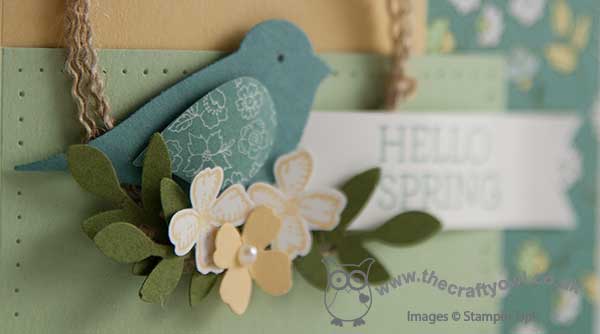
I started with a base of Lost Lagoon then added a piece of All Abloom DSP down the side. I overlapped this with a piece of So Saffron and added a Pistachio Pudding panel across the horizontal, that I pierced around the edge to add interest. To create my spring wreath, I used a few strands of burlap that I stripped from a length and tied it together at three points around the edge to hold everything together. To decorate, I added a few springs of leaves in Mossy Meadow punched from my bird punch, then punched my bird itself in Lost Lagoon. I added an eye with a Basic Grey marker and I punched his wing out of a snippet of All Abloom paper in a different stack design. I added a sentiment banner that I stamped using the Crazy About You' stamp set and to finish a trio of flowers, one in So Saffron with a pearl centre, and two that I stamped in So Saffron on Whisper White with the flower stamp from the 'Something to Say' stamp set and punched out with the co-ordinating Itty Bitty Accents punch.
I love the look and feel of this card - it's so fresh and says that Spring is on the way. I haven't used my bird punch in ages but this little fella looks quite at home sat on his burlap wreath. This would also make a nice Easter or Birthday card, with a change of sentiment.
Back tomorrow with another double-post day and some exciting news too! Until then, happy stampin'!
Stampin' Up! Supplies Used:
d85e6154-0322-4e9a-80ce-64ebefb6d975|1|5.0|96d5b379-7e1d-4dac-a6ba-1e50db561b04
Tags: 2-step bird punch, All Abloom, Itty Bitty Accents Punch Pack, Crazy About You, Shop online, Something To Say, Stampin' Up, Stampin' Up Card, Stampin' Up Card ideas, Stampin' Up Supplies, Paper Piercing
Cards | Punch Art | Stamping
by Joanne James9. February 2015 09:00Today is a busy day for me: I have my monthly technique class this morning and this afternoon I'm heading to Ikea to stock up on picture frames for a party at the weekend. This month's technique class features the 'Butterfly Basics' stamp set and co-ordinating Butterfly Thinlit Dies, so I have been using them to make lots of samples recently. Today's card is one of the ones I made to show the ladies that are attending my class and works wonderfully with the palette over at Colour Q this week:
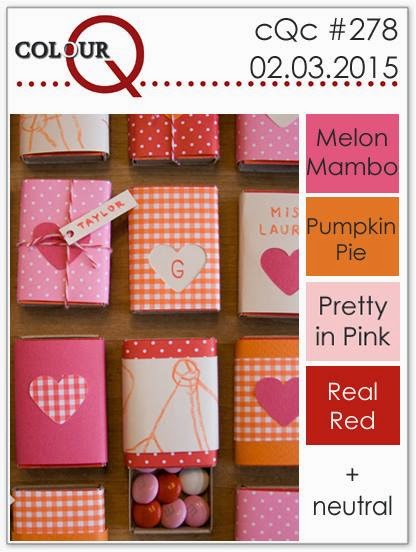
The butterflies can be used in a number of ways to incorporate colour into them - having seen some interesting samples using vellum and also colouring with Blendabilites, I decided to have a go at paper-piecing a solid butterfly image. Here is my card:
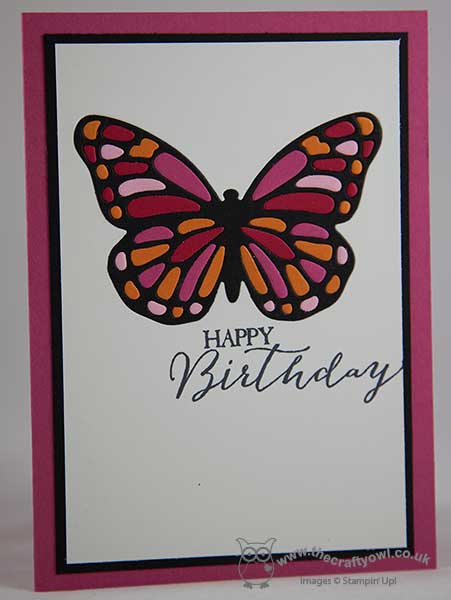
Whilst this card looks deceptively simple, with its inlaid black butterfly outline and coloured wings, I can assure you it isn't altogether quick to put together! Keeping track of all the tiny pieces from the insides of the four coloured butterflies I cut was something of a challenge, but was well worth it - I love the effect of the solid, brightly coloured paper-pieced butterfly. Here's a close up of the detail:
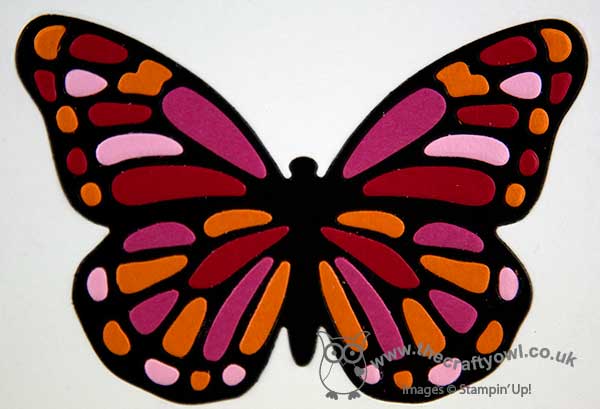
In addition, I also have the four coloured butterflies to use for other projects - bonus!
That's all from me today. check out my Facebook page if you would like to see the fun that the ladies are getting up to in my class and what this week's cakes look like! Better still, get in touch with me and join me for next month's technique class on 9th March, when we will be using Blendabilities and the lovely Easter stamp set, 'Indescribable Gift'. You can find more details on my class schedule here. Back tomorrow with another project; until then happy stampin'!
Stampin' Up! Supplies Used:
* Pretty In Pink cardstock - retired
by Joanne James3. January 2015 21:02I finally feel like I'm nearing the end of our Christmas celebrations today: we have enjoyed our annual visit to the pantomime with friends (and Granny!) and as much as I love the holiday season, I'm looking forward to taking our decorations down, which is I think a job for tomorrow. Today I'm sharing a card I made for Julee's sketch this week over at Mojo Monday:
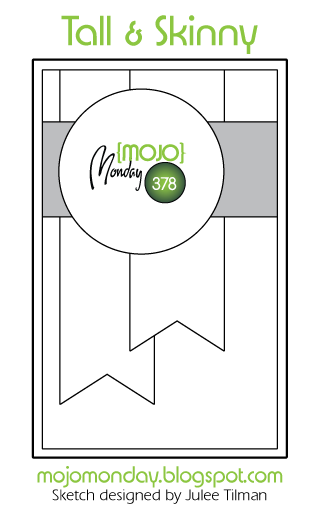
It is 'tall and skinny' week so I made my card to the dimensions 3.5" x 5.5" and since I'm having a complete run on 'Best Year Ever' Sale-A-Bration designer series paper, I just had to use it again on my card today:

I used the large polka dot embossing folder on my card base, then having first paper-pierced the edges of my strip of Crushed Curry, created a belly band to wrap around the front of my card to which I attached my focal point - the hello stamp from the '#hello' stamp set, stamped in Calypso Coral on Whisper White and mounted on two offset scalloped circles.
To finish, I even made a bespoke envelope to match my tall and skinny card, also using the Best Year Ever paper - so easy with the help of my Envelope Expert Tool, this makes any bespoke envelope size a breeze.
Back tomorrow with my first card of the year for The Paper Players, this time as a permanent member of the design team too - woohoo! We have a great challenge for you to start the year, so do come back and find out all about it tomorrow. Until then, happy stampin'!
Stampin' Up! Supplies Used:
*Best Year Ever Designer Series Paper - available 6th January - 31st March 2015 Sale-A-Bration.
185210d6-9720-463b-b5fd-ac4346f5e850|0|.0|96d5b379-7e1d-4dac-a6ba-1e50db561b04
Tags: Best year Ever, #Hello, Sale-A-Bration 2015, Large Polka Dot TIEF, scallop circle punch, Shop online, Stampin' Up, Stampin' Up Card, Stampin' Up Card ideas, Stampin' Up Supplies, circle punch, Paper Piercing
Cards | Stamping
by Joanne James18. April 2014 10:00Yay, it's Friday - where did that week go?! Today I'm sharing my entry for this week's challenge over at The Paper Players, where Ann has laid down the following colour challenge:
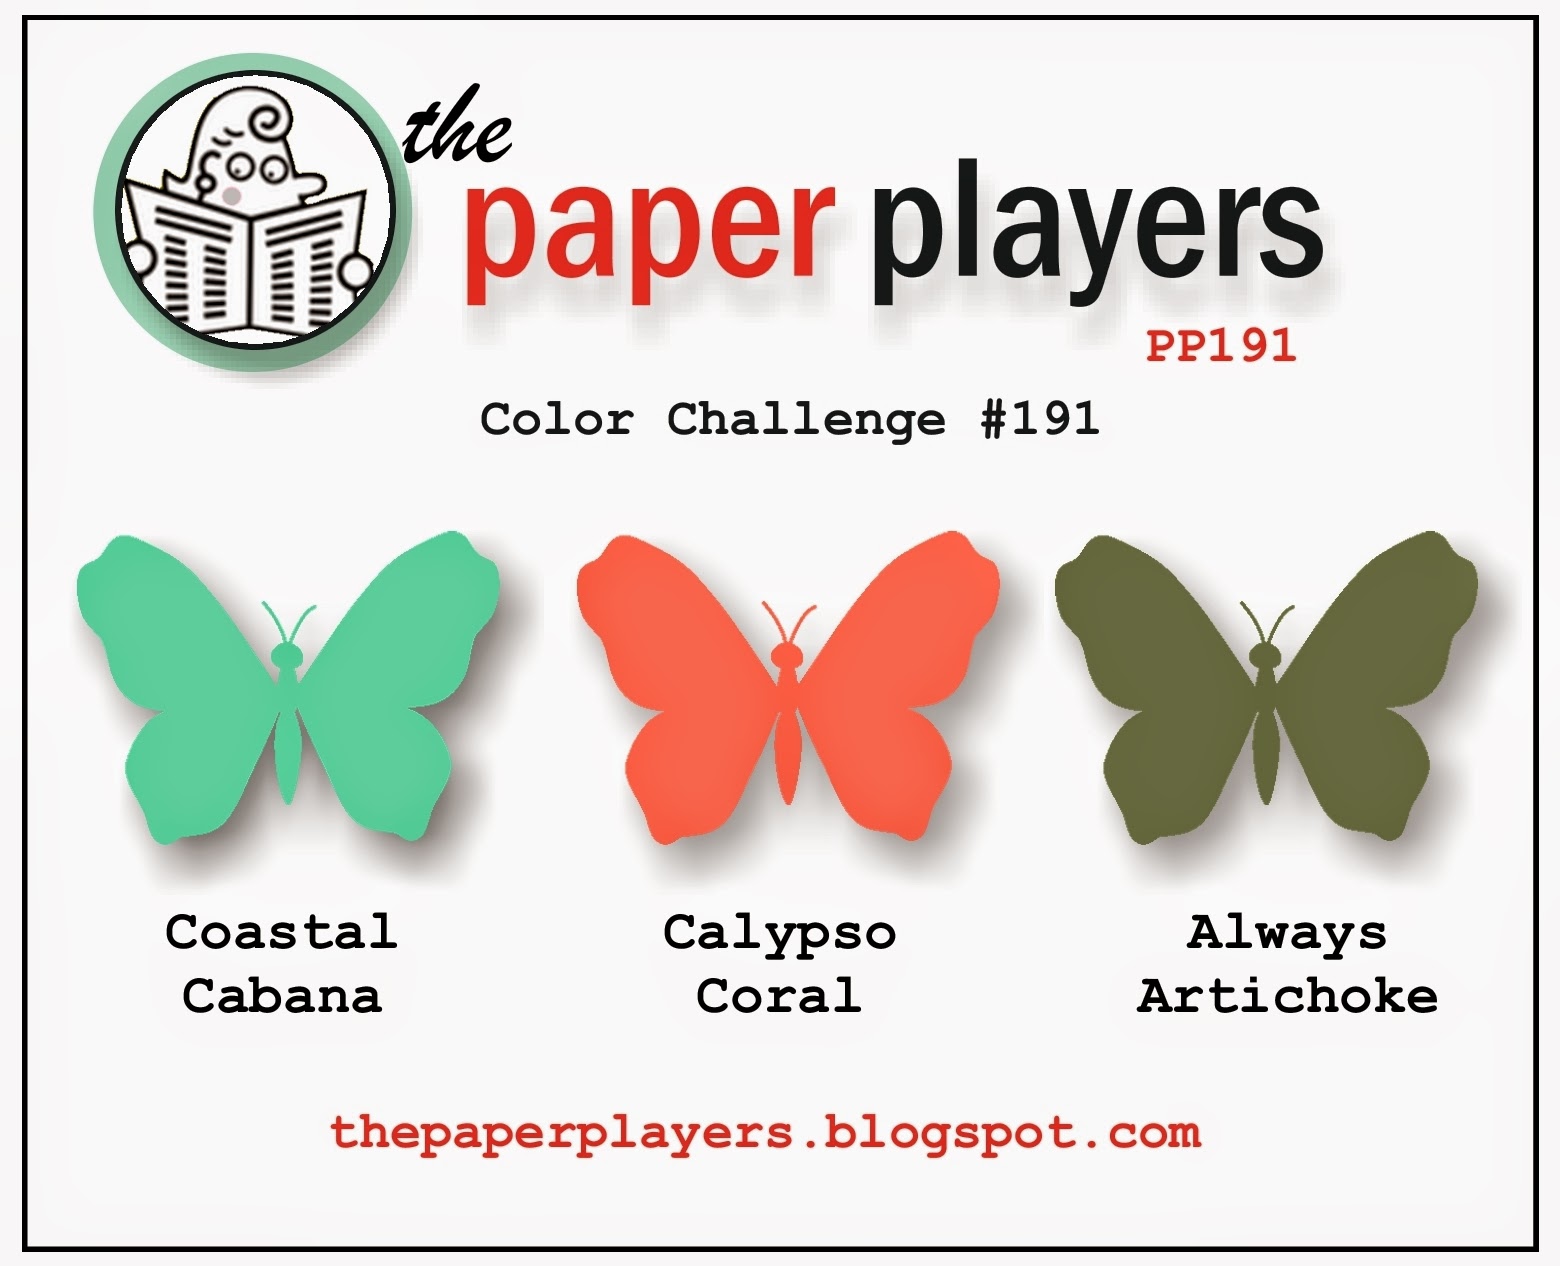
I really wanted to enter this week's challenge as I missed last week's, however this colour combination filled me with some dread: I use Coastal Cabana a lot, I use Calypso Coral less so; as for Always Artichoke - I've only used this colour ONCE before - EVER!! The design team provided such great and varied inspiration this week though that I thought I should endeavour to rise to the challenge and have a go. It took a long while, but eventually this is what I came up with - that I'm prepared to share with the world, anyway :-):
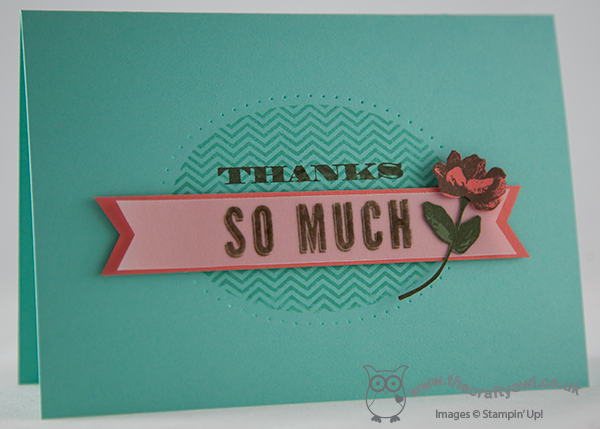
After much (unsuccessful) experimentation with a variety of designer series paper, I decided that simple was the way to go and I reached for my 'Oh, Hello' stamp set which I haven't used in a while. I stamped the oval chevron background in Coastal Cabana on the same colour base and paper pierced the outline for added interest. Then I split the sentiment, stamping part of it directly onto the card base and part of it onto a layered vellum banner that I popped up on some dimensionals. I then decorated this with a flower that I stamped twice, once on Calypso Coral Cardstock and once onto Always Artichoke, then carefully cut both out with my paper snips and paper-pieced them together.
Not an overly complicated card, but one of those that took way longer to execute than anticipated! Always nice to move outside of one's comfort zone though, and I like the result even though this is a colour combination I would never ordinarily choose.
Right - I'm off for some serious painting today - the preparation has been done, so today the nursery walls of Ben's bedroom will be officially transformed into a Lego-lovers paradise!
Back tomorrow with another project; until then, happy stampin'!
Stampin' Up! Supplies Used: