Bring On The Sunshine #GDP135

by Joanne James28. April 2018 19:30

Well, the brief visit of warm weather here in the UK last week was short-lived; we are back to the cold and wet, with it having rained pretty much for two days straight! If this continues I think I'm going to have to issue my poor chickens with arm bands (aka water wings for my American readers!) In the hopes of willing a change in the forecast, I thought I'd play along today with the challenge over at Global Design Project, using the layout over at CAS Colours and Sketches too:


My card also fits the middle column of the board over at TicTacToe Challenge: metallic, free, stripes. I went bold, with a nice bright yellow and some crisp white for my clean and simple card - take a look:


Here's the low-down on today's card:

Bring Me Sunshine - This cute little 'button' from the A Good Day stamp set works perfectly for a 'Show Me The Sunshine' theme. I stamped it in Tuxedo Memento Black on Whisper White and again on Smoky Slate cardstock, then fussy cut and paper-pieced the clouds back in place. This gives a little detail without too much dimension and provides contrast to my ombre yellow sun behind, which I coloured with my Stampin' Blends.  

Deckchair Stripes - This yellow and white striped paper is from the Tutti Frutti designer series paper stack, which I bought primarily for the non-fruity designs. It works perfectly for my bright, sunny card - it reminds me of stripy deckchairs on the beach!

Raindrop Sparkles - To finish my card, I added some of the teardrop-shaped clear epoxy shapes to my raindrops; they are bigger than the stamped raindrops, but I like the added interest this gives to my focal point.

Here is the visual summary of the key products used on today's project for you to pin for easy reference:


You can see all of my 'How To' summaries on my 'How To - Tips and Techniques' Pinterest board in case you've missed any. 

Here's hoping today's card brings back Spring here, even if we have to wait a while for summer - I'm not sure it will be enough to do the trick though, the weatherman was prediciting icy temperatures again with an outside chance of snow again early next week - yuk!

Enjoy your evening and I'll be back tomorrow with another project. Until then, happy stampin'!


Stampin' Up! Supplies Used:

Table built using Product Table Builder by The Crafty Owl - Independent Stampin' Up! Demonstrator.

Sweet Soiree Silver Mini Gable Gift Box

by Joanne James12. March 2018 21:00

Another Monday, another week! Today I'm sharing a cute packaging option that is perfect as a wedding favour or thank you gift and takes minutes to put together - take a look:


Here's the low-down on today's project:

Gifts And Goodies - Have you spotted these lovely silver mini gable boxes on page 13 of the current seasonal catalogue? I'm all for making my own boxes, but sometimes you just need the speed and convenience of something off-the-shelf - and the silver gable box is the answer. Whether used as they are, or dry embossed (perhaps with the new Petal Pair embossing folders) or decorated with some designer series paper to dress them up a little, these sturdy little boxes are easy to turn from their flat-packed state into something robust enough to carry a small gift: perhaps some truffles, nail polish, or a few reinkers or embellishment sets ... and lots more besides! You can even turn them inside out so that you have a white outer that can then also be coloured as you choose.

Sweet Soiree - I've added a wrap with a piece of Sweet Soiree Specialty Designer Series Paper to my container. These gorgeous silver foiled designs give the hand-painted appearance of these papers a textured look all of their own and co-ordinate perfectly with the silver box - minimum effort, maximum impact!

Finishing Touches - I've added some Berry Burst metallic-edge ribbon and a small circle-punched tag, stamped with the Cake Soiree stamp set, to my box as a finishing touch. So pretty, I almost don't want to give it away!

Here is the visual summary of the key products used on today's project for you to pin for easy reference:


You can see all of my 'How To' summaries on my 'How To - Tips and Techniques' Pinterest board in case you've missed any. 

I'll be back tomorrow with another project. Until then, happy stampin'!


Stampin' Up! Supplies Used:

Table built using Product Table Builder by The Crafty Owl - Independent Stampin' Up! Demonstrator.

Hedgehugs For The Paper Players PP375

by Joanne James7. January 2018 09:00

It's Sunday and time for this week's new challenge over at The Paper Players! I hope you have all enjoyed a restful Christmas and are ready to join us for some crafty fun. The super-talented Sandy is kicking off a new year of Paper Player challenges for us with a seasonal theme with a little humour too:


Now I love a good pun, yet I initially had a little panic when I saw Sandy's theme this week as I couldn't find a single 'punny Valentine' stamp on my shelf. I thought I was going to have to get really creative and 'think outside the box' when I was saved by my lovely downline Helen, who was coming over for a 'planning and play' session and brought with her the perfect stamp set for this week's theme  - take a look:


Hedgehugs - how cute is that?! I grabbed the current Freshly Made Sketches sketch and set to work. I inked up my prickly pair with my Stampin' Write markers, colouring the hedgehogs in Early Espresso (I added a little Crumb Cake with a blender pen afterwards) and the flower in a combination of Sweet Sugarplum and Old Olive, to compliment the florals of the strip of Petal Garden designer series paper that I used behind. I stamped my punny sentiment along with another flower and popped it up on a circle between my hedgehogs - this is one of those cards where if you can't see the sentiment, it kind-of doesn't make sense! A little floral tone-on-tone stamping on the bottom half of my card was added for extra interest. I'm also linking my card up with the team over at Inspired By All The Little Things, where this week's inspiration is all about wild animals. My inspiration was the hedgehog but I might have to have another go over there this week as there are so many little woodland cuties to choose from!

Here is the visual summary of the key products used on today's project for you to pin for easy reference:


You can see all of my Product and 'How To' summaries on my 'How To - Tips and Techniques' Pinterest board in case you've missed any. 

I love a punny sentiment and this little hedgehog pair is super cute - thanks to Helen for helping me out too! If you'd like to see what else we got up to, check out this post on Helen's blog this week. As one of a special team of demonstrators at Stampin' Up!, I was fortunate to receive my much-anticipated Stamparatus this week and having shared a video with my team already, Helen was keen to have a play. I videoed Helen in action - you can see the full version and the card we made, along with lots of her other creations, over on her blog, Love-A-Duckie

Back to today's challenge! Before you reach for your ink and papers, check out what our amazing team has created to inspire you this week, including the lovely Eliz Stewart of My Paper Sweetness who is joining our team of guest designers for the next six months for the first time today. Some of the team have created some truly inspiring and inspired cards with their stamps this week, so do check them out:

The Paper Players Design Team
  
Here's a quick recap of our challenge rules:
 
1.  Create a new paper project
2.  Upload your creation to your blog with a link back to us and provide a direct link to the post featuring your challenge submission.
3.  Please link your card to no more than four challenges, TOTAL.
4.  Have FUN! 


I look forward to seeing what you create with this week's theme. Enjoy the rest of your weekend as it will be over all too quickly; I'll be back tomorrow with another project; until then, happy stampin'!


Stampin' Up! Supplies Used: 

Table built using Product Table Builder by The Crafty Owl - Independent Stampin' Up! Demonstrator.

Label Me Pretty 2017-19 In-Colour Thank You Card

by Joanne James21. November 2017 21:30

I'm finally back with a post today! With my American friends celebrating Thanksgiving tomorrow, I thought today a card that expresses gratitude was in order. Today's card also fits for a few challenges that are happening at the moment too (click on the badges to go to the respective blogs):


My card uses an incredibly useful bundle from the annual catalogue - take a look:


Here's the low-down on today's card:

Be Thankful - I am thankful for many things and I love that the Label Me Pretty set has this wonderful sentiment that is perfect for giving thanks and showing appreciation to others - finished with a teeny, tiny heart - adorable! This is such a great set for layering, with so many options. I created a crib sheet for my open house ages ago which I've been sharing with my face-to-face customers in classes; it has been so well received I thought I would share it here so that you could all save it too:


Details, Details - In addition to my layered label, my card has some other neat details: the tiny scalloped edge on the left is courtesy of the Decorative Ribbon Border Punch and the scalloped edge was cut with the scallop thinlit in the Seasonal Layers Thinlits set; the curved flower detail from the 'Label Me Pretty' stamp set fits it perfectly, how convenient! 

Don't Forget The Pretty - My card has a very feminine feel to it, with the Powder Pink and Fresh Fig in-colours balancing beautifully against the white, along with the tiny florals and pretty detailing, all finished off with a tied Powder Pink ribbon. Not my usual style, yet nice to ring the changes once in a while.

Here is the visual summary of the key products used on today's project for you to pin for easy reference:


You can see all of my 'How To' summaries on my 'How To - Tips and Techniques' Pinterest board in case you've missed any. 

I'll be back tomorrow with another project. Until then, happy stampin'!


Stampin' Up! Supplies Used:

Table built using Product Table Builder by The Crafty Owl - Independent Stampin' Up! Demonstrator.

Large Letters and Numbers Brother Football Birthday Card #GDP103

by Joanne James7. September 2017 20:30

Good evening lovely readers! I was tempted to share a Christmas card today but as it's my birthday I thought a birthday card was in order. Not one to me though - instead one that I made for Ben from Rebecca for his birthday recently - another masculine card to fit with the theme over at the Global Design Project this week which also happens to use this week's Color Throwdown colour palette too:


I decided to make another slightly larger card than usual as I wanted to be able to personalise it - take a look:


Here's the lowdown on today's card:

Recipe For Success - Every time I make a card with someone in particular in mind, I try to choose something personal or meaningful to that individual; after all, that has to be the biggest benefit of crafting your own. That is no more so than when it's a card for your nearest and dearest, and Rebecca was clear this card needed some key things: the number 10, the word 'brother', some form of birthday greeting and both a football and the colour red - the colour of Ben's beloved Manchester United football team. Armed with such clear requirements, it made the job of designing this card super easy.

Numbers and Letters - I used both my large letters and numbers today. My letters were stamped using 'Letters For You' again like yesterday's card and cut out with the Large Letters Framelits. I used my numbers to create a tone-on-tone repeating background pattern of the number 10; a good way to include it without having it front and centre. I also used the banner die from the Large Numbers Framelits for my happy birthday banner.

Retro Rubber - I substituted the 'O' in 'BROTHER' with a football, courtesy of a little 'retro rubber' from the long-retired stamp set, 'Great Sport'. I'm so glad I held on to this set - I have used the football and basketball in this set sooo many times!! A true blast from the past - so one for a link up with SUO Challenges too this week as this is their theme, how appropriate!

Here is the visual summary of the key products used on today's project for you to pin for easy reference:


You can see all of my 'How To' summaries on my 'How To - Tips and Techniques' Pinterest board in case you've missed any. 

What kinds of stamps have you held on to and would never part with? Do leave me a comment below - Id love to know!

I hope you enjoyed today's post; I'll be back tomorrow with another project - definitely for Christmas and with a little more retro rubber thrown in! Until then, happy stampin'!


Stampin' Up! Supplies Used:

Table built using Product Table Builder by The Crafty Owl - Independent Stampin' Up! Demonstrator.

Beautiful Bouquet Three Ways From Simple to Stepped Up

by Joanne James4. August 2017 08:00

Happy Friday everyone! School holidays have got the better of me this week and with an all-day technique class too and pre-order of my seasonal goodies from the new Autumn-Winter catalogue, I've just not had the opportunity for blogging. I've plenty of makes to share with you though and today to thank you for your patience this week I thought I would show you not one, not two but three cards - another trio from simple to stepped up, this time featuring the Beautiful Bouquet Bundle that you can find on pages 92-93 of the 2017 Annual Stampin' Up! catalogue.

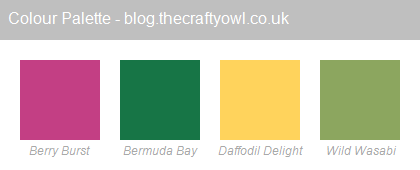
The Beautiful Bouquet stamp set has a wonderful collection of both florals and sentiments that are suitable for a wide variety of occasions and when paired with the co-ordinating Bouquet Bunch Framelits Dies can be used to make the most amazing 3D floral bouquets. The set really does offer something for every kind of crafter; I started out with the following basic colour combination and set to work:
 

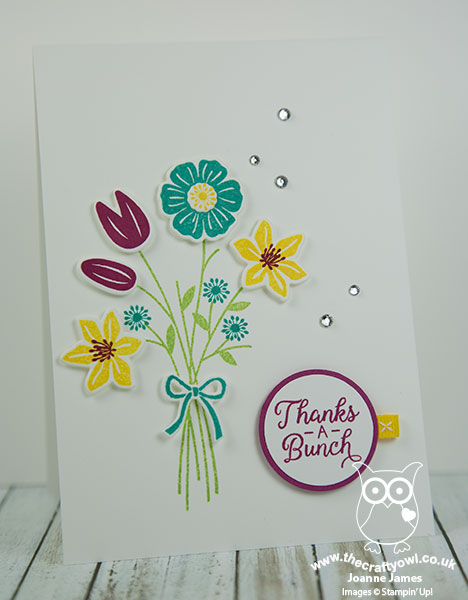
Clean and Simple - Quick And Easy - If you're short on time or new to crafting, this set is great for a simple one layer card like this one:
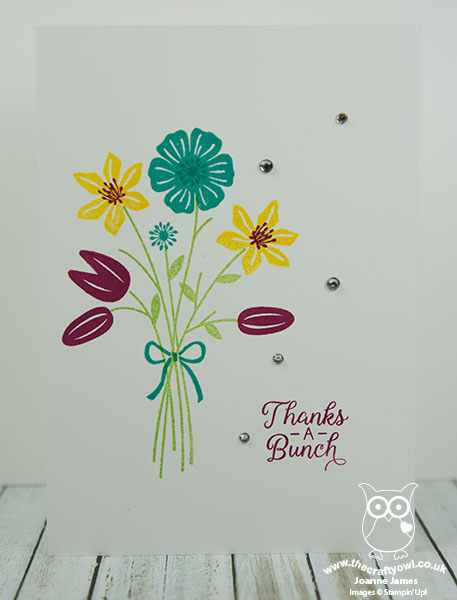
 

All you need to do is take a sheet of Extra Thick Whisper White for your card base, stamp your stems and a few carefully chosen blooms directly onto the card front along with a sentiment of your choice, add a few rhinestones and your card is done. Bright colours that compliment each other and some contrasting flower centres really help this simple card to have a big impact.

Step It Up - If you have a bit more time and are feeling more adventurous, using a few extra tools and embellishments will allow you to 'step up' your card and create something with a little more depth and detail, whilst still relatively easy to make:
 

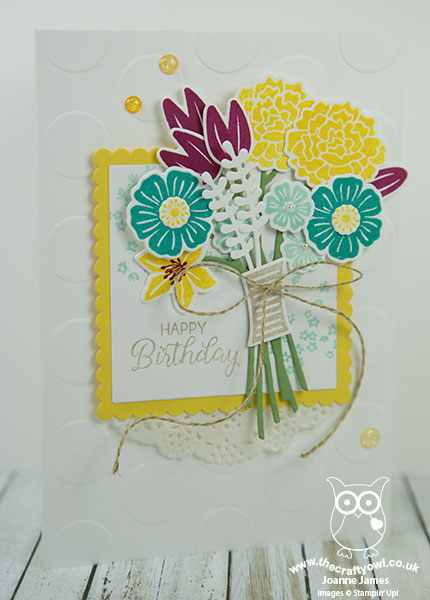
My second card follows the same basic layout as the first, however this time I've used the framelits to cut out the bow and the flower heads and popped them up on dimensionals, and some circle punches to punch out my sentiment and layer it onto some Berry Burst cardstock for extra pop. In addition to the rhinestones, I've added a little tab of Daffodil Delight Double-Stitched Ribbon to my sentiment circle for an extra touch.

Going For Gold - Stepped Up To The Max - If you have the time and want to really explore a wide range of techniques, tools and embellishments, it's possible to use the Beautiful Bouquet Bundle to create something really special:
 

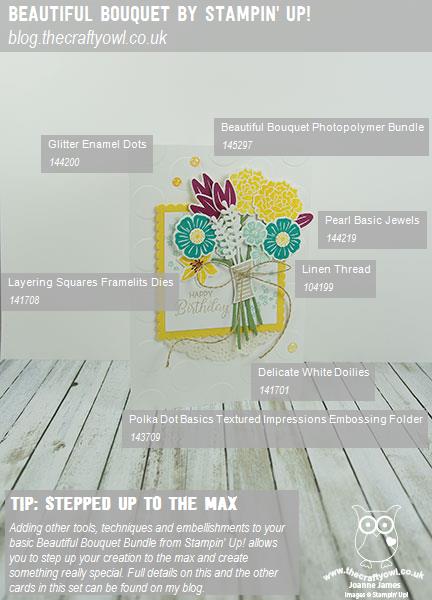
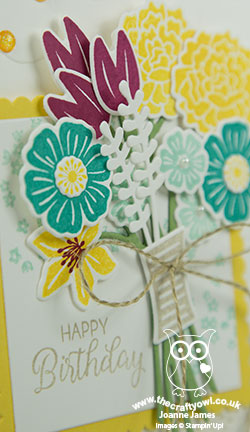
My third card is a CASE of the card on page 93 of the Stampin' Up! catalogue and really goes to town: the framelits have been used to diecut the entire bouquet, having stamped the flower heads first, and layered onto some background-stamped squares cut with the Layering Squares Framelits and an embossed background (my card uses the retired Large Polka Dot TIEF but you could of course use the current Polka Dot Basics Textured Impressions Embossing Folder as per the catalogue sample). There are some additional colours, doilies, linen thread and a sprinkling of the gorgeous glitter enamel dots that really help to make this card something special.

Here are the visual summaries of the key products used on today's projects for you to pin for easy reference:
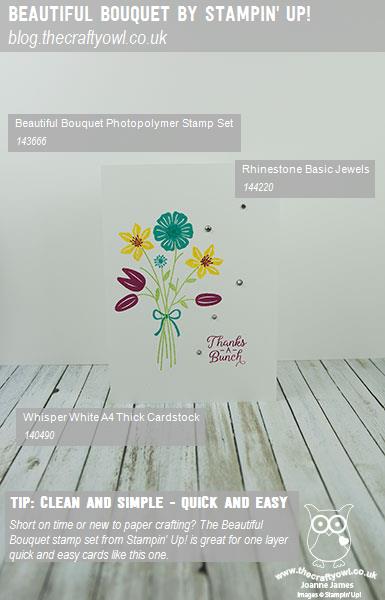
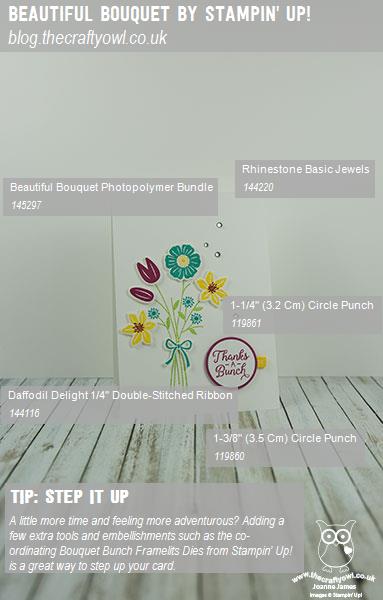


You can see all of my 'How To' summaries on my 'How To - Tips and Techniques' Pinterest board in case you've missed any. 

So which of the above cards is your favourite? Do leave me a comment below, I'd love to hear your thoughts. I love them all and as I have the bundle, like the fact that I can choose my style depending on how the mood - or in my case time available - takes me! I have a few more cards to share using this set, so stay tuned next week if florals are your thing.

Enjoy your day and I'll be back tomorrow with another project, quite possibly with something of a more seasonal nature. Until then, happy stampin'!


Stampin' Up! Supplies Used:

Table built using Product Table Builder by The Crafty Owl - Independent Stampin' Up! Demonstrator.

Label Me Pretty In-Colour Card Set

by Joanne James28. July 2017 06:00

Today I'm sharing a set of cards I made a while back to showcase the new in-colours at my Annual Catalogue launch event but just haven't got around to blogging. I also used this design as the basis for the cards that I sent out to my customers and anyone who had requested a catalogue from me with their copy of the new catalogue. Here's the first one:


 Here's the low-down on today's card:

Label Me Pretty - Label Me Pretty is one of the new bundles in the annual catalogue featured on page 27, comprising the 'Label Me Pretty' stamp set and the Pretty Label Punch. Just like the new daisy punch, the introduction of this punch to the Stampin' Up! punch collection has proved incredibly popular with demonstrators and customers alike, and it's easy to see why: this versatile label is great to use on cards or packaging alike, and the layering options that the stamp set and addition of a few circle punches gives allows for lots of creative possibilities.

In-Colour Quintet - As I mentioned above, I created the same card using each of the new in-colours. Having worked with them for some months now, my favourites are still Berry Burst and Lemon Lime Twist, the latter especially when combined with other colours such as Night of Navy - I just love it! Here's a shot showing glimpses of each of the cards in the collection:


Background Tip - The construction of my card is simple and the photograph fairly self-expanatory - well, it needs to be an easy make when mass-production is called for! I did just want to point out how I stamped the background flowers on the card base. If you look closely, you will see that they are the flowers from the 'Happy Birthday' stamp in the Label Me Pretty set, yet the wording isn't visible. I actually stamped the image, then turned it through 180 degrees so that the bottom of each image overlapped (you can't see this as it's covered by the label) to provide some extra florals to frame my label. This was a tip I picked up at Onstage in Amsterdam earlier this year from Donna Morgan at the Home Office I think, if my memory serves me correctly - so thank you Donna!

Here is the visual summary of the key products used on today's project for you to pin for easy reference:


You can see all of my 'How To' summaries on my 'How To - Tips and Techniques' Pinterest board in case you've missed any. 

So which of the in-colours is your favourite, or is there any one you find a real challenge to work with? Do leave me a comment below - I'd love to hear your thoughts!

Enjoy your day and I'll be back soon with another project. Until then, happy stampin'!


Stampin' Up! Supplies Used:

Table built using Product Table Builder by The Crafty Owl - Independent Stampin' Up! Demonstrator.

Two Ways To Create Clean and Simple Cards Using Stampin' Up's Daisy Punch

by Joanne James6. June 2017 20:00

I've been busy preparing samples for my forthcoming open house using one of my favourite suites from the new catalogue: the Delightful Daisies Suite. Today I'm sharing two clean and simple cards featuring the new Daisy Punch and just two of the ways it can be used.

My first card was inspired by one made recently by Mary Fish - you can see her original card here - a simple trio of punched daisies with banner sentiment greeting from the Happy Birthday Gorgeous stamp set:


I chose to use Night of Navy for my accent colour - I love how the simple yellow middles of the daisies - punched with a 1/2" circle punch - really pop with this crisp, fresh colour combination. My second card uses the daisy punch to make a feature of the negative space:


Here the daisies still take centre stage, however this time instead of punching out the flowers and attaching them to the cardfront, I punched the flowers out of my topmost navy card layer to 'reveal' the white daisies in the negative space below, then I added my yellow flower centres to each negative flower. I am a big fan of using negative space to make your punches and framelits work harder for you and I love the contrast that using the negative space provides with this classic colour combination. 

Here is the visual summary of the key products used on today's project for you to pin for easy reference:


You can see all of my 'How To' summaries on my 'How To - Tips and Techniques' Pinterest board in case you've missed any. 

Enjoy your evening and I'll be back tomorrow with another project. Until then, happy stampin'!


Stampin' Up! Supplies Used:

Table built using Product Table Builder by The Crafty Owl - Independent Stampin' Up! Demonstrator.

Label Me Pretty Navy Pattern Thank You

by Joanne James23. May 2017 06:00

Today I'm sharing a card for the current challenge over at Fusion:

I went with both the sketch and photo inspiration for my card today - I loved the navy and white colour combination and the strong pattern influence in the inspiration photo:


Here's the low-down on today's card:

Label Me Pretty - The focal point for my card is a layered label from the new Label Me Pretty set. I featured one of the other labels in this set in my Saturday post (if you missed it you can see it here); for today's card I punched out my main label using the new Pretty Label Punch and added some additional layering to the circles in the centre. 

Floral Boutique - I love the patterns in the Floral Boutique designer series paper pack and will be sorry to see this paper retire. Fear not though, there is a silver lining: 4 of the patterns in this pack are returning in the new In-Colour Fresh Florals Designer Series Paper Pack, including the one I've used on my card today. Hooray - now I can re-create my card in the new in-colours too!

An Added Detail - In addition to some retired Sale-A-Bration metallic ribbon, I added one final detail to my card today; well actually, to the envelope! I took a co-ordinating piece of paper from the Floral Boutique stack and added it to my envelope flap for some pretty additional detail. This is a nice way to add a touch of colour to an otherwise plain envelope - after all, envelopes should never be naked!

Here is the visual summary of the key products used on today's project for you to pin for easy reference:


You can see all of my 'How To' summaries on my 'How To - Tips and Techniques' Pinterest board in case you've missed any. 

Enjoy your day and I'll be back tomorrow with another project. Until then, happy stampin'!


Stampin' Up! Supplies Used:

Table built using Product Table Builder by The Crafty Owl - Independent Stampin' Up! Demonstrator.

Bees and Honeycomb To A Wonderful Friend

by Joanne James11. March 2017 14:12

I've a busy day today - out for a netball match this morning, then school Spring fair and a swimming gala for both James Juniors this evening, so I'm squeezing in my blog post whilst everyone else is doing homework before heading out the front door again for the next activity of the day!

Today I'm sharing a card that I made whilst preparing for this month's technique class featuring the Dragonfly Dreams bundle. In addition to featuring a particular technique in these classes, I also try and use each of the stamps in the set. My technique classes are product-based and always feature one particular stamp set or product bundle and I like to give my class attendees as many ideas as possible for how they can continue to create with their sets long after the class has finished. The techniques in this month's class are all around sponging in various forms and as this card doesn't have any sponging, it didn't make the class cut. I still love it though and since I'm always encouraging my ladies to check out my blog for additional ideas, it's right and proper that I share it with you today - take a look:


 Here's the low-down on today's card:

Dragonfly Dreams of Bees - I chose to use the bee stamp from the Dragonfly Dreams stamp set for my card today, stamping and fussy cutting two of them to frame my circle of honeycomb. I could have just as easily cut these bees out with their coordinating thinlit, however I didn't want to loose the detail on the wings for my card. I left the bee bodies matt black with just a little yellow coloured in, but their wings in real life are so pretty: I brushed each liberally with clear Wink of Stella then when dry covered that with a further layer of fine tip glue and left it to dry. The result is some beautifully glossy, shimmery wings - just like the real thing.

Hexagonal Honeycomb - I placed my bees either side of a 1 3/4" punched circle, with a layer of Daffodil Delight behind that I had embossed with my Hexagons Dynamic Textured Impressions Embossing Folder (TIEF). This is one of the new embossing folders that gives a deep, dimensional embossed impression - just like real honeycomb!

Pollen Border - To finish, I added a border of dots using the border stamp in the Dragonfly Dreams stamp set, along the bottom of my card. This is one of those really useful stamps that will work both with the stamps in the same set and others; here it reminded me of pollen, given that my bees were not too far away! It's also perfect for the new challenge over at As You See It - check out their 'seeing spots' sketch inspiration this week:

Here is the visual summary of the key products used on today's project for you to pin for easy reference:


You can see all of my 'How To' summaries on my 'How To - Tips and Techniques' Pinterest board in case you've missed any. 

If you like this card and would be interested in my Technique Class featuring the Dragonfly Dreams Bundle, do get in touch. I will be offering this as a 'Class to Go' free with a purchase of the Dragonfly Dreams Bundle from my online store and will be featuring further cards from this set later this week, so stay tuned.

Enjoy the rest of your day and I'll be back tomorrow with another project for this week's new colour challenge over at The Paper Players. Until then, happy stampin'!


Stampin' Up! Supplies Used:

Table built using Product Table Builder by The Crafty Owl - Independent Stampin' Up! Demonstrator.

Current Promotions

Stampin Cut and Emboss

Save up to 30% off on all your favourite kits from 1 to 31 October! 

Click here to see the current kits available and order yours online today.

Join My Team

It's always a great time to join Stampin’ Up! During October you can get even more in your starter kit! New team members can get £160 worth of products for only £99 + free business supplies + free shipping + all the fun being a part of Stampin’ Up! Stampin' Up! has something for everyone: join my growing team and benefit from my support to enjoy Stampin' Up! however you choose.

If you're interested, call me for a chat to understand how I can help you realise your goals. Alternatively, if you have already decided to sign up and you just can't wait, please click here for the link to the online form where you can sign up and order your starter kit right away! 

Shop Online

Access my online shop 24 x 7, 365 days of the year:

Current October hostess code:

4XPEYCB9

Shop Online

Scrapbooking

Stampin' Up! has introduced a new range of 12x12" scrapbooking product and kit - the full range is now available to purchase online. To download a copy of the new digital Scrapbooking Catalogue click here.

Mini Catalogue

BROWSE THE CATALOGUE

'Tis The Season - the new Stampin' Up! Mini Catalogue is here! For more details and to download your copy click here

2024-25 Annual Catalogue

BROWSE THE CATALOGUE

Click on the image to download your copy of the 2024-25 annual catalogue. For a full list of current SU! supplies, go to my online store. If you would like any help or advice, please drop me a line at joanne@thecraftyowl.co.uk or give me a call on 07773 421446 - I'd be happy to help.

Latest Kits!

Stampin Cut and Emboss

The Christmas Ornaments Kit and Card Keeper Kit are the latest kits in the online store - get yours here!

New Online Exclusives

There are new products available exclusively in the online store from 5 November - check them out here.

About Me

Hi I'm Joanne and live in Northampton and when I'm not looking after my husband and two beautiful children, am an avid crafter with a passion for all things Stampin' Up!

I must confess that I have never been a big rubber stamper - until I discovered Stampin' Up! that is. I love the fact that I can get such great results with co-ordinating stamps, inks, papers and punches - the possibilities are endless! Join me on my stamping journey as I share the things I love and be inspired to create amazing things yourself!

Follow Me

Monthly Newsletter

Box Builder

Click the button above to use Box Buster to create your custom box design using the Envelope Punch Board!

Kits Collection Now Available!

Stampin Cut and Emboss

The new Kits Collection from Stampin' Up! is now available!

Click here to see the current kits available and order yours online today.

I Design For


Stampin' Up Stuff

This is my personal blog and is not endorsed by Stampin’ Up! I hope you find it a plentiful source of ideas and personal inspiration but please don't copy my designs for contest submission or use for classes, publication or sale without express permission.