Bike Ride Apple Basket Thank You Cards PP415

by Joanne James21. October 2018 09:00

Today it's Sunday and time for this week's new challenge over at The Paper Players - yay! It's my turn to host this week and I have a clean and simple challenge for you to work with:


Remember in addition to including an apple on your card, this week is a Clean-and-Simple (CAS) challenge!  What do we mean by CAS?

  • Minimal layers and embellishments
  • Plenty of open space, aka "white" space
  • Simple and uncluttered

I decided that for my card this week I was going to pair a little of something old with something new and create a bunch of thank you cards - take a look:


Here's the low-down on today's card:

A Basket Of Apples - My little basket of apples comes from the Bike Ride set and is cut out with the Build A Bike framelits. This little image works in its own right - not a bike in sight on today's card! It is super quick and easy to stamp as the leaves and apples and basket all have solid images to be stamped to fill in the colour quickly and easily - great for clean and simple cards.

Thanks A Bunch - I layered my basket on a set of layered ovals, with a sentiment from the Beautiful Bouquet stamp set. Ok, so this stamp was designed to work with flowers, but I think it works for apples too!

Buffalo Check Background Made Easy - I know I'm using it again this week, but can you tell I'm loving the new Buffalo Check background stamp? I went with a straightforward single colour stamped image in Granny Apple Green to contrast with the apples - it reminds me of a picnic table cloth!

Here is the visual summary of the key products used on today's project for you to pin for easy reference:


Having completed my full-size card for today, I decided to run off a whole bunch of these using the same design, in both a red and green colourway, to use as my customer thank you cards this month - here are two of my finished cards:


I actually think I prefer the balance of the size/shape of the oval on the lightly smaller card - what do you think? Either way, I like this design so much I think I'll run off a set of co-ordinating bag tags too! 

Here is the visual summary of the key products used on today's project for you to pin for easy reference:


You can see all of my Product and 'How To' summaries on my 'How To - Tips and Techniques' Pinterest board in case you've missed any. 

Before you reach for your ink and papers, check out what our amazing team has created to inspire you this week:

Here's a quick recap of our challenge rules:
 
1.  Create a new paper project
2.  Upload your creation to your blog with a link back to us and provide a direct link to the post featuring your challenge submission.
3.  Please link your card to no more than four challenges, TOTAL.
4.  Have FUN!

You can see all of my 'How To' summaries on my 'How To - Tips and Techniques' Pinterest board in case you've missed any. 

Enjoy your day; I will be spending mine with a lovely group of ladies on the second day of our weekend residential craft retreat - more about that in tomorrow's post! Until then, happy stampin'!


Stampin' Up! Supplies Used: 

Table built using Product Table Builder by The Crafty Owl - Independent Stampin' Up! Demonstrator.

Beautiful Bouquet Goes Bananas For Customer Thank You Cards

by Joanne James28. May 2018 21:30

Happy Memorial Day to all my US readers! Today has been a Bank Holiday here in the UK too and despite the severe flash flooding of yesterday evening (I haven't sen rain like it!!), today the sun managed to come out again and this afternoon was warm once more, so I've been otherwise occupied today. I've just time for a quick share of some humorous 3"x3" customer thank you cards that I made recently using up some of my Tutti-Frutti designer series papers and a punny sentiment from Beautiful Bouquet:

I wasn't sure how I was going to use that banana patterned paper then suddenly thought of this sentiment from Beautiful Bouquet and thought  - well, why not?! I'm not sure I would thank someone with a bunch of bananas as opposed to a bunch of flowers, but it made me giggle - maybe I'll have to give it a try! 

Here's a selection of my cards together:


They all fit perfectly into a 3"x3" envelope and are just the right size for adding to the bagged orders for my face-to-face customers.

Here is the visual summary of the key products used on today's project for you to pin for easy reference:


You can see all of my 'How To' summaries on my 'How To - Tips and Techniques' Pinterest board in case you've missed any. 

I'll be back tomorrow with another project. Until then, happy stampin'!


Stampin' Up! Supplies Used:

Table built using Product Table Builder by The Crafty Owl - Independent Stampin' Up! Demonstrator.

Wedding Invites Made Easy - All It Takes Is A Little Planning!

by Joanne James19. May 2018 18:00


Good evening everyone! Well, today has been a special day here in the UK - we celebrated the royal wedding of HRH Prince Harry and Meghan Markle. Whilst I'm not a devoted Royal watcher, I do think the Monarchy has an important role to play and one thing's for sure: I love a wedding, royal or otherwise! I enjoyed watching the wedding from my office as I was crafting this morning and ooh'ed and ahh'ed at the flowers, the dresses and those adorable and so well-behaved bridesmaids and page boys. Such a glorious day for it too and the bride was truly stunning.

Since weddings are the order of the day, I thought it would make a great topic for today's blog post too so I'm sharing with you the invites I designed recently for a bride who was keen to create her own stationery for the big day.

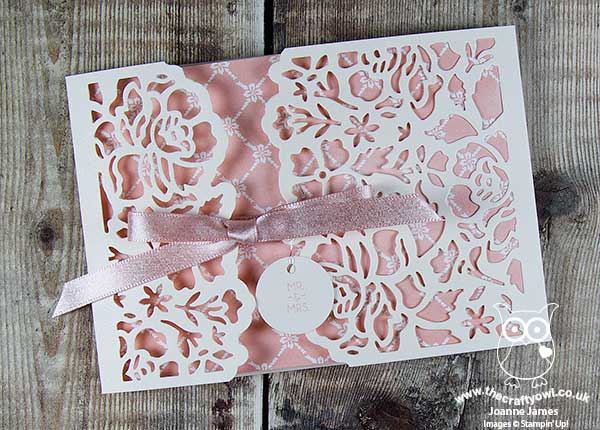
Making your own wedding stationery is a great way to create something individual and personal to you - take a look at the design we agreed upon:


The key things to remember when designing your own wedding stationery are as follows:

Make It Your Own - When you make your own wedding stationery, you are able to create something unique and personal to you in a way that off-the-shelf invitations will never be able to deliver. You can choose colours that co-ordinate with your scheme for the day and flowers or emblems that tie in with your chosen theme. For this wedding, the bride was keen to incorporate pale pink, but otherwise had no fixed views on design. This is one of the things I love about being a Stampin' Up! demonstrator - I love to design cards and projects, so working to a bride-to-be's brief is always an exciting prospect. It's great for the bride too - often they are keen to make their own stationery but have never done this (or sometimes any papercrafting) before, so they are keen to work with someone who can take their ideas and make them into a workable, reproductable, design. 

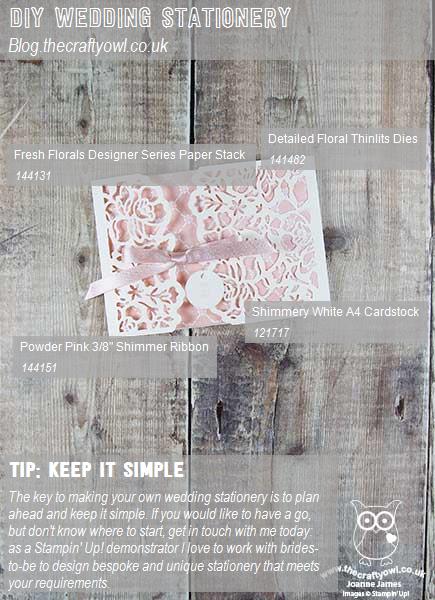
Keep It Simple - The key to good wedding stationery design is to keep it simple. Sometimes you may only have to make 20 invitations, but sometimes it is 120! For any kind of mass production, it's important to have a design that can be easily reproduced many times, each time as good as the last, so keeping it simple is key. For this invitation, we used the Detailed Floral Thinlits to create a gatefold-style card, with a Powder Pink Fresh Florals Designer Series Paper insert that was adhered on one side. When opened, the invitation wording was then on the inside.

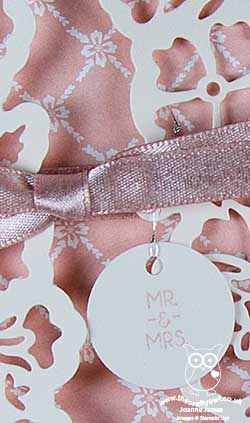
Finishing Touches - Whilst the design is simple and easy to reproduce, the finishing touches are all-important to add that of luxury: the outer gatefold was cut from Shimmery White cardstock, with the addition of Powder Pink Shimmer Ribbon to create the tied closure that co-ordinates with the DSP lining. We also added a small round punched tag, with the words 'Mr & Mrs' from the 'Beautiful Bouquet' set stamped on it in pink, using a length of silver thread.  

These invitations were really not too tricky at all to make, armed with the right tools and a few pairs of hands. The most important thing to consider when making your own wedding stationery is to plan ahead - don't underestimate the time it takes to mass produce invitations and other stationery items and be sure to allow enough time to actually put it all together. This is the perfect activity to involve friends and bridesmaids in - after all, many hands make light work!

Here is the visual summary of the key products used on today's project for you to pin for easy reference:


You can see all of my 'How To' summaries on my 'How To - Tips and Techniques' Pinterest board in case you've missed any. 

If you are reading this and thinking you would like some help in designing your own wedding invitations, please don't hesitate to get in touch - I'd love to discuss your requirements and help you create the unique, bespoke stationery of your dreams.

Enjoy your day and I'll be back tomorrow with another project. Until then, happy stampin'!


Stampin' Up! Supplies Used:


Table built using Product Table Builder by The Crafty Owl - Independent Stampin' Up! Demonstrator.

A Little Wild Elephant Baby Boy Congratulations Card

by Joanne James24. April 2018 17:00

With the birth of a Royal baby yesterday, a second son and third child for the Duke and Duchess of Cambridge, it seemed only fitting today to share a card to welcome the arrival of a baby boy to the world that fits perfectly for the following challenges: 


I used both the sketch and photo inspiration over at Fusion and coloured my sweet baby elephant with my Smoky Slate Stampin' Blends for the challenge over at StampInkPaper - take a look:


 Here's the low-down on today's card:

A Little Wild Elephant - The little animals in the 'A Little Wild' stamp set are just the cutest and so perfect for a card to welcome a new arrival. Today's card just had to feature the elephant, given the Fusion photo inspiration; I also used a strip of retired designer series paper (from the A Little Foxy DSP stack) for my horizontal strip as it was perfect to tie my colours in together. 

It's All In The Curve - I decided to curve my sentiment to follow the line of my layered circle, so chose to use the 'congratulations' stamp from the Beautiful Bouquet set. It's photopolymer which means that even though it is a straight stamp, it is flexible enough to be moulded to an alternative shape.  

Fun On The Inside - One of the cute features of the 'A Little Wild' animal stamps is that as they are designed to work as a gift tag, they include both front and back of the animals. This doesn't preclude them from being used on cards - in fact, it's a fun way to decorate both the front and back of your envelope and the inside of your card. I added a sentiment from the same stamp set, a strip of left over DSP and a cute enamel heart  - and for once, I remembered to take a photograph to share it with you! Here it is:

How sweet is that?! The blues could easily be switched out for pinks to make a girl card with the same details - an idea for another day, perhaps!

Here is the visual summary of the key products used on today's project for you to pin for easy reference:


You can see all of my 'How To' summaries on my 'How To - Tips and Techniques' Pinterest board in case you've missed any. 

Enjoy your evening and I'll be back tomorrow with another project. Until then, happy stampin'!


Stampin' Up! Supplies Used:

Table built using Product Table Builder by The Crafty Owl - Independent Stampin' Up! Demonstrator.

Beautiful Bouquet One Sheet Wonder

by Joanne James11. August 2017 20:00

Friday already - where did the week go?! I've been having fun with my not-so-little ones - and today my youngest James Junior turned 10 years old so now I have two children in double digits - I really don't know where the time goes! We have had a fun day of games, football, dinner out and a trip to the cinema so all in all a lovely end to the week. Following a few absent days, I thought it was time for a quick post to share more of my makes with the Beautiful Bouquet stamp set. I actually used the set to create a one sheet wonder, that I turned into eight cards that I then duplicated for my thank you cards to go out with my customer orders this month. Here's one of the cards in the set:


Here's the low-down on today's card:

Bright Colour Combo - I chose a bright colour combination of hot pink, orange and red with a contrasting touch of blue for my set of cards - the Marina Mist blue is definitely the wild card here, however I think it breaks up the other colours in a good way. Here's the colour combination if you'd like to save it for future use:


Step It Up - I could have simply added my one sheet wonder panels to my card bases, along with a sentiment stamped on a basic square or punched circle, to complete my cards in record time. I decided to step them up slightly with the aid of my Stitched Shape Framelits, Layered Squares and Circles Framelits and some additional stamped flowers that I then diecut with the co-ordinating Bouquet Bunch Framelits. Completion took a little more time for sure, however I think it was worth it - sometimes it's the details that count and really make the difference.

The Wonder Of One Sheet - A one sheet wonder is a fun way to create your own patterned paper and can be a quick solution if you want to create a bunch of cards. I made up my own cut template for this one, with a set of easy cuts to make the most out of my single sheet of A4 cardstock. Here's a shot showing all the cards I made just to give you a flavour off the set:


I used a variety of base and mat colours - the tiny flowers make Beautiful Bouquet a great set to use for a one sheet wonder. Why not give it a try with some of your favourite colour combinations?

Here is the visual summary of the key products used on today's project for you to pin for easy reference:


You can see all of my 'How To' summaries on my 'How To - Tips and Techniques' Pinterest board in case you've missed any. 

I'll be back on Sunday with another project. Until then, happy stampin'!


Stampin' Up! Supplies Used:

Table built using Product Table Builder by The Crafty Owl - Independent Stampin' Up! Demonstrator.

Beautiful Bouquet Watercolour Stampin' Up! Annual Catalogue CASE

by Joanne James8. August 2017 15:10

Well, you can tell the children must be on their school summer holiday here in the UK as it's pouring with rain with no signs of let up! We have had an aborted trip to the zoo today and had to make do with indoor swimming and trampolining instead, which the James Juniors seem to have enjoyed despite the constant drizzle. It also means we are home slightly earlier than planned leaving me time to share a quick project with you and the lovely ladies over at As You See It who have a fun challenge theme this week:

It made me smile as this is definitely something I can identify with! I usually lose my mojo when I get delivery of a large new box of goodies during the pre-order period of a new Stampin' Up! catalogue; I have all these wonderful new sets and papers to play with and suddenly don't know where to start! When I get like this, I often turn to my Stampin' Up! catalogue for inspiration and CASE (Copy And Selectively Edit) a card from within. This is usually enough to get me back on track and get the ideas flowing. Here is one such card:


The eagle-eyed amongst you will recognise my card as a CASE of the card on page 93 of the 2017-18 Stampin' Up! Annual Catalogue that features the Beautiful Bouquet stamp set. I've changed a few things: I used a different palette of colours, layered my sentiment on a stitched circle and added some Powder Pink ribbon as opposed to linen thread along with a couple of sparkly faceted gems for good measure, but the basic layout and the loose spritzed watercolour technique is the same. 

Here is the visual summary of the key products used on today's project for you to pin for easy reference:


You can see all of my 'How To' summaries on my 'How To - Tips and Techniques' Pinterest board in case you've missed any. 

'CASE-ing the catalogue' is also a great way to try something different - this sample encouraged me to think about using the Beautiful Bouquet set in different ways, rather than simply stamping and die cutting. I am expecting delivery of my Autumn-Winter catalogue pre-order tomorrow, so I give it about 24 hours before the loss of crafting mojo kicks in and you can guess where I will be headed - yes, the pages of my new seasonal catalogue for inspiration!

Enjoy your day and I'll be back soon with another project. Until then, happy stampin'!


Stampin' Up! Supplies Used:

Table built using Product Table Builder by The Crafty Owl - Independent Stampin' Up! Demonstrator.

Beautiful Bouquet Three Ways From Simple to Stepped Up

by Joanne James4. August 2017 08:00

Happy Friday everyone! School holidays have got the better of me this week and with an all-day technique class too and pre-order of my seasonal goodies from the new Autumn-Winter catalogue, I've just not had the opportunity for blogging. I've plenty of makes to share with you though and today to thank you for your patience this week I thought I would show you not one, not two but three cards - another trio from simple to stepped up, this time featuring the Beautiful Bouquet Bundle that you can find on pages 92-93 of the 2017 Annual Stampin' Up! catalogue.

The Beautiful Bouquet stamp set has a wonderful collection of both florals and sentiments that are suitable for a wide variety of occasions and when paired with the co-ordinating Bouquet Bunch Framelits Dies can be used to make the most amazing 3D floral bouquets. The set really does offer something for every kind of crafter; I started out with the following basic colour combination and set to work:


Clean and Simple - Quick And Easy - If you're short on time or new to crafting, this set is great for a simple one layer card like this one:


All you need to do is take a sheet of Extra Thick Whisper White for your card base, stamp your stems and a few carefully chosen blooms directly onto the card front along with a sentiment of your choice, add a few rhinestones and your card is done. Bright colours that compliment each other and some contrasting flower centres really help this simple card to have a big impact.

Step It Up - If you have a bit more time and are feeling more adventurous, using a few extra tools and embellishments will allow you to 'step up' your card and create something with a little more depth and detail, whilst still relatively easy to make:


My second card follows the same basic layout as the first, however this time I've used the framelits to cut out the bow and the flower heads and popped them up on dimensionals, and some circle punches to punch out my sentiment and layer it onto some Berry Burst cardstock for extra pop. In addition to the rhinestones, I've added a little tab of Daffodil Delight Double-Stitched Ribbon to my sentiment circle for an extra touch.

Going For Gold - Stepped Up To The Max - If you have the time and want to really explore a wide range of techniques, tools and embellishments, it's possible to use the Beautiful Bouquet Bundle to create something really special:


My third card is a CASE of the card on page 93 of the Stampin' Up! catalogue and really goes to town: the framelits have been used to diecut the entire bouquet, having stamped the flower heads first, and layered onto some background-stamped squares cut with the Layering Squares Framelits and an embossed background (my card uses the retired Large Polka Dot TIEF but you could of course use the current Polka Dot Basics Textured Impressions Embossing Folder as per the catalogue sample). There are some additional colours, doilies, linen thread and a sprinkling of the gorgeous glitter enamel dots that really help to make this card something special.

Here are the visual summaries of the key products used on today's projects for you to pin for easy reference:


You can see all of my 'How To' summaries on my 'How To - Tips and Techniques' Pinterest board in case you've missed any. 

So which of the above cards is your favourite? Do leave me a comment below, I'd love to hear your thoughts. I love them all and as I have the bundle, like the fact that I can choose my style depending on how the mood - or in my case time available - takes me! I have a few more cards to share using this set, so stay tuned next week if florals are your thing.

Enjoy your day and I'll be back tomorrow with another project, quite possibly with something of a more seasonal nature. Until then, happy stampin'!


Stampin' Up! Supplies Used:

Table built using Product Table Builder by The Crafty Owl - Independent Stampin' Up! Demonstrator.

Monochromatic Purple Beautiful Bouquet PP352

by Joanne James9. July 2017 09:00

It's Sunday and time for this week's new challenge over at The Paper Players! It's my wonderful friend LeAnne's turn to host this week and she has a fun colour challenge for us to work with:


Ok, time for confessions first! I saw the colours on the badge and had such a clear idea of what I wanted to make when I was preparing my card that I pulled the colours from my ink caddy and set to work. It wasn't until I started to write this post that whilst I had used monochromatic purples, I hadn't used the three on LeAnne's swatch! I actually used Sweet Sugarplum, Rich Razzleberry and Fresh Fig for my three colours and I didn't have time to remake. So I'm hoping for forgiveness from LeAnne for choosing Fresh Fig instead of Berry Burst and that you can all use your imagination!

I took the opportunity to create a big bunch of flowers using the Beautiful Bouquet bundle - take a look:


Here's the low-down on today's card:

Pick A Bunch - Like most of the team this week, I was drawn to use flowers with this monochromatic colour scheme and decide to ink up my Beautiful Bouquet stamp set and create a bunch of flowers. The thing I love most about this set is the co-ordinating framelits: the Bouquet Bunch Framelit Dies make cutting out the flower heads and stems really easy and enable you to create layered florals with ease. 

A Beautiful Bouquet - In addition to the flower pieces, the stamp set also contains a great selection of sentiments in a lovely combined block and scripted font. I chose one of my favourites for my card today - the perfect greeting for a friend who means a lot that lets them know how you feel. 

The Importance of White - I often talk about the importance of white on cards, usually in the context of 'white space' or clear and uncluttered space, a key feature of clean and simple cards. On today's card white plays an important role as a colour to break up the monochromatic colours and add definition to the flowers themselves. 

I really like this card, even if the colours are not quite what LeAnne had in mind when she set us the challenge!  

Here is the visual summary of the key products used on today's project for you to pin for easy reference:


You can see all of my Product and 'How To' summaries on my 'How To - Tips and Techniques' Pinterest board in case you've missed any. 

Before you reach for your ink and papers, check out what our amazing team has created to inspire you this week:

The Paper Players Design Team
 
 
Here's a quick recap of our challenge rules:
 
1.  Create a new paper project
2.  Upload your creation to your blog with a link back to us and provide a direct link to the post featuring your challenge submission.
3.  Please link your card to no more than four challenges, TOTAL.
4.  Have FUN! 

I look forward to seeing what you create with this week's colour palette. Enjoy the rest of your weekend as it will be over all too quickly; I'll be back tomorrow with another project; until then, happy stampin'!


Stampin' Up! Supplies Used: 

Table built using Product Table Builder by The Crafty Owl - Independent Stampin' Up! Demonstrator.

Mini Catalogue

BROWSE THE CATALOGUE

The mini catalogue is now live! Read and download your copy here.

Shop Online

Access my online shop 24 x 7, 365 days of the year:

Current March hostess code:

S9F2XJJW

Shop Online

Join My Team

It's always a great time to join Stampin’ Up! New team members can get £130 worth of products for only £99 + free business supplies + free shipping + all the fun being a part of Stampin’ Up! Stampin' Up! has something for everyone: join my growing team and benefit from my support to enjoy Stampin' Up! however you choose.

If you're interested, call me for a chat to understand how I can help you realise your goals. Alternatively, if you have already decided to sign up and you just can't wait, please click here for the link to the online form where you can sign up and order your starter kit right away! 

Latest Kit!

Stampin Cut and Emboss

The Rock Legend Kit has all you need to make 8 cards with coordinating envelopes. Along with the new Panda Friends Kit, both are available from January 4th for just £14 each - get yours here!

2023-24 Annual Catalogue

BROWSE THE CATALOGUE

Click on the catalogue for a full list of current SU! supplies - if you would like to order any of the items featured, please drop me a line at [email protected] or give me a call on 07773 421446 - I'd be happy to help.

New Online Exclusives

There will be new products available exclusively in the online store from 5 March - check them out here.

About Me

Hi I'm Joanne and live in Northampton and when I'm not looking after my husband and two beautiful children, am an avid crafter with a passion for all things Stampin' Up!

I must confess that I have never been a big rubber stamper - until I discovered Stampin' Up! that is. I love the fact that I can get such great results with co-ordinating stamps, inks, papers and punches - the possibilities are endless! Join me on my stamping journey as I share the things I love and be inspired to create amazing things yourself!

Follow Me

Monthly Newsletter

Box Builder

Click the button above to use Box Buster to create your custom box design using the Envelope Punch Board!

Kits Collection Now Available!

Stampin Cut and Emboss

The new Kits Collection from Stampin' Up! is now available!

Click here to see the current kits available and order yours online today.

I Design For


Stampin' Up Stuff

This is my personal blog and is not endorsed by Stampin’ Up! I hope you find it a plentiful source of ideas and personal inspiration but please don't copy my designs for contest submission or use for classes, publication or sale without express permission.