Rooted In Nature - Simply Stamps, Ink And Paper

by Joanne James27. August 2018 20:00

Well, the last of the summer Bank Holiday Mondays here in the UK today and as is often the way, it has been wet, grey and gloomy here and decidedly chilly too! So lots of cooking, board games and even a little crafting here in the James household today as a result.

I have a quick card for you this evening that uses this week's colours over at The Color Throwdown:

I was inspired not only by the colours, but by the duvet cover in the inspiration photo too - take a look:


I used the largest veined leaf in the Rooted In Nature set to stamp a leaf in each of the challenge colours onto an extra thick Whisper White card base, slightly overlapping each other, and added a simple sentiment beneath it. That's it - nothing more than stamps, ink and paper - an absolute 'back to basics' card, easy to execute with minimal supplies needed. 

I actually created two additional cards at the same time, a stepped-up version and a 'bells and whistles' version for the avid crafter and will share both of these with you in another post - of all three though, I think the simplicity of this one makes it my favourite.

Here is the visual summary of the key products used on today's project for you to pin for easy reference:


You can see all of my 'How To' summaries on my 'How To - Tips and Techniques' Pinterest board in case you've missed any. 

That's all from me today; I'll be back tomorrow with another project. Until then, happy stampin'!


Stampin' Up! Supplies Used:

Table built using Product Table Builder by The Crafty Owl - Independent Stampin' Up! Demonstrator.

Labels To Love Quick and Easy Christmas Cards Two Ways

by Joanne James25. October 2017 20:19

I've been busy hosting a few Stampin' Up! parties this month - the current hostess promotion to earn the Merry Patterns stamp set means that it's a great time to gather with friends for an evening of creative fun. Today I'm sharing a couple of the cards that my hostesses and friends have had the opportunity to make:


Here's the low-down on today's cards:

Labels To Love - The Merry Little Labels stamp set and Everyday Punch bundle have been very popular with my customers and I wanted to share the other stamp set in the catalogue that also co-ordinates with the Everyday Label Punch: Labels To Love. There are sentiments for a variety of occasions in this set, not just Christmas, and each of them fits the Everyday Label Punch - that makes for a winner in my book! We used a couple of the Christmas sentiments and paired it with the festive Quilted Christmas papers. I even decorated the envelope flaps with a piece of co-ordinating paper in the alternating colourway. Here's one of them - you can see the second one at the bottom of this post:


Add Sparkle With Tinsel - The Mini Tinsel Trim is great for decorating your Christmas packages but is also great for adding a touch of sparkle to your cards. here we tied knots in each end and created a loop behind the label for a quick touch of glitz. 

A Quick Card Solution - These cards are a slightly smaller than a standard card size, measuring 12.7cm x 8.9cm, as we used Stampin' Up!'s white notecards and envelopes for speed. They arrive pre-scored and with envelopes included and are great if you are mass-producing or want to make some quick and easy cards, for Christmas or any time. They are also great for children's cards - both the James Juniors go through a pack of these when making up their Christmas cards for classmates.

Here is the visual summary of the key products used on today's project for you to pin for easy reference:


You can see all of my 'How To' summaries on my 'How To - Tips and Techniques' Pinterest board in case you've missed any. 

I've had lots of fun making these cards with some of my party groups; check out my Facebook page if you'd like to see some of the action. Equally if you would like to get together with friends for an evening of crafty fun in the run up to Christmas, do get in touch - I would love to share Stampin' Up! with you.

I'll be back tomorrow with another project. Until then, happy stampin'!


Stampin' Up! Supplies Used:

Table built using Product Table Builder by The Crafty Owl - Independent Stampin' Up! Demonstrator.

Beautiful Bouquet Three Ways From Simple to Stepped Up

by Joanne James4. August 2017 08:00

Happy Friday everyone! School holidays have got the better of me this week and with an all-day technique class too and pre-order of my seasonal goodies from the new Autumn-Winter catalogue, I've just not had the opportunity for blogging. I've plenty of makes to share with you though and today to thank you for your patience this week I thought I would show you not one, not two but three cards - another trio from simple to stepped up, this time featuring the Beautiful Bouquet Bundle that you can find on pages 92-93 of the 2017 Annual Stampin' Up! catalogue.

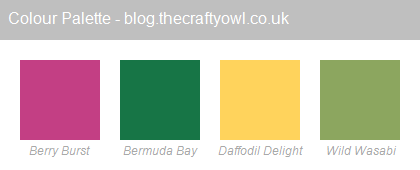
The Beautiful Bouquet stamp set has a wonderful collection of both florals and sentiments that are suitable for a wide variety of occasions and when paired with the co-ordinating Bouquet Bunch Framelits Dies can be used to make the most amazing 3D floral bouquets. The set really does offer something for every kind of crafter; I started out with the following basic colour combination and set to work:


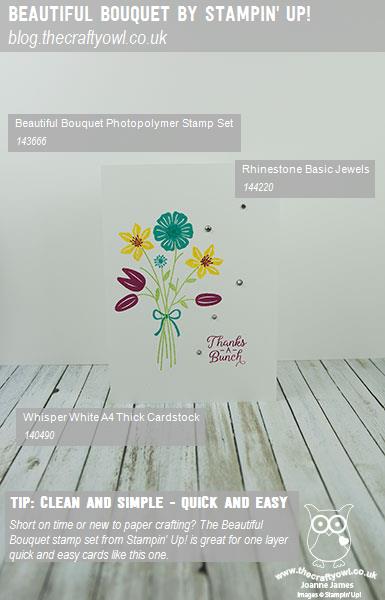
Clean and Simple - Quick And Easy - If you're short on time or new to crafting, this set is great for a simple one layer card like this one:


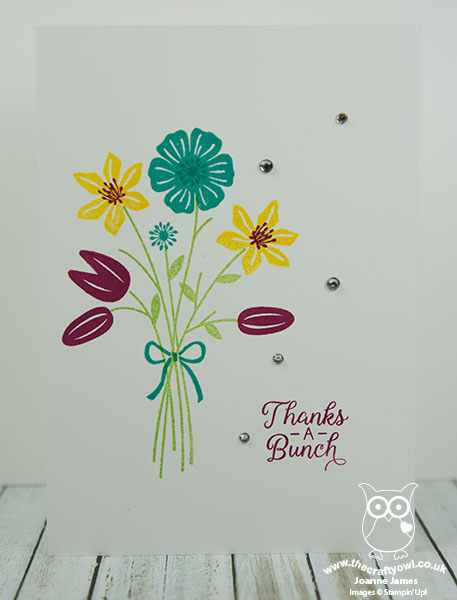
All you need to do is take a sheet of Extra Thick Whisper White for your card base, stamp your stems and a few carefully chosen blooms directly onto the card front along with a sentiment of your choice, add a few rhinestones and your card is done. Bright colours that compliment each other and some contrasting flower centres really help this simple card to have a big impact.

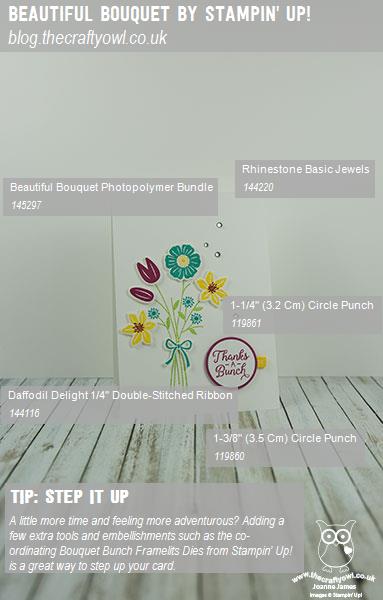
Step It Up - If you have a bit more time and are feeling more adventurous, using a few extra tools and embellishments will allow you to 'step up' your card and create something with a little more depth and detail, whilst still relatively easy to make:


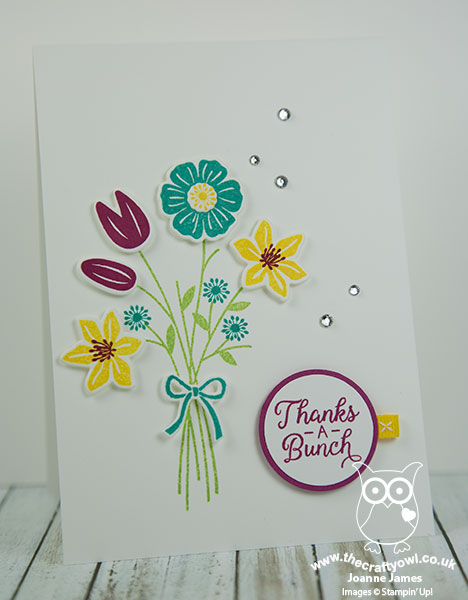
My second card follows the same basic layout as the first, however this time I've used the framelits to cut out the bow and the flower heads and popped them up on dimensionals, and some circle punches to punch out my sentiment and layer it onto some Berry Burst cardstock for extra pop. In addition to the rhinestones, I've added a little tab of Daffodil Delight Double-Stitched Ribbon to my sentiment circle for an extra touch.

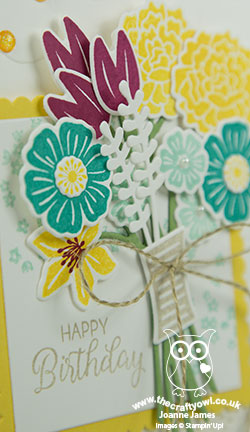
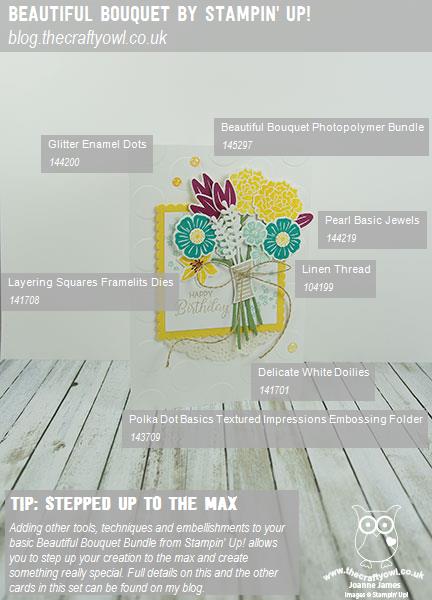
Going For Gold - Stepped Up To The Max - If you have the time and want to really explore a wide range of techniques, tools and embellishments, it's possible to use the Beautiful Bouquet Bundle to create something really special:


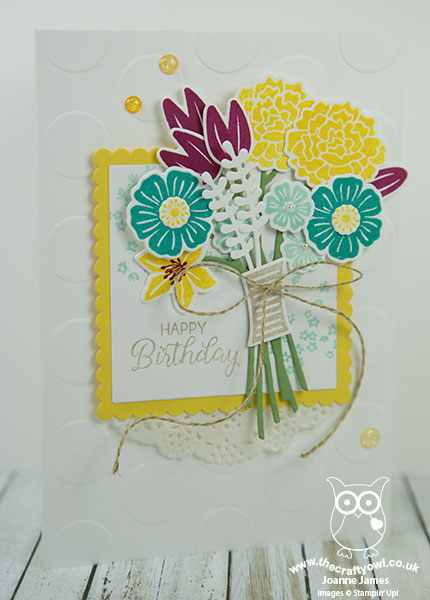
My third card is a CASE of the card on page 93 of the Stampin' Up! catalogue and really goes to town: the framelits have been used to diecut the entire bouquet, having stamped the flower heads first, and layered onto some background-stamped squares cut with the Layering Squares Framelits and an embossed background (my card uses the retired Large Polka Dot TIEF but you could of course use the current Polka Dot Basics Textured Impressions Embossing Folder as per the catalogue sample). There are some additional colours, doilies, linen thread and a sprinkling of the gorgeous glitter enamel dots that really help to make this card something special.

Here are the visual summaries of the key products used on today's projects for you to pin for easy reference:


You can see all of my 'How To' summaries on my 'How To - Tips and Techniques' Pinterest board in case you've missed any. 

So which of the above cards is your favourite? Do leave me a comment below, I'd love to hear your thoughts. I love them all and as I have the bundle, like the fact that I can choose my style depending on how the mood - or in my case time available - takes me! I have a few more cards to share using this set, so stay tuned next week if florals are your thing.

Enjoy your day and I'll be back tomorrow with another project, quite possibly with something of a more seasonal nature. Until then, happy stampin'!


Stampin' Up! Supplies Used:

Table built using Product Table Builder by The Crafty Owl - Independent Stampin' Up! Demonstrator.

Mini Catalogue

BROWSE THE CATALOGUE

The mini catalogue is now live! Read and download your copy here.

Shop Online

Access my online shop 24 x 7, 365 days of the year:

Current March hostess code:

S9F2XJJW

Shop Online

Join My Team

It's always a great time to join Stampin’ Up! New team members can get £130 worth of products for only £99 + free business supplies + free shipping + all the fun being a part of Stampin’ Up! Stampin' Up! has something for everyone: join my growing team and benefit from my support to enjoy Stampin' Up! however you choose.

If you're interested, call me for a chat to understand how I can help you realise your goals. Alternatively, if you have already decided to sign up and you just can't wait, please click here for the link to the online form where you can sign up and order your starter kit right away! 

Latest Kit!

Stampin Cut and Emboss

The Rock Legend Kit has all you need to make 8 cards with coordinating envelopes. Along with the new Panda Friends Kit, both are available from January 4th for just £14 each - get yours here!

2023-24 Annual Catalogue

BROWSE THE CATALOGUE

Click on the catalogue for a full list of current SU! supplies - if you would like to order any of the items featured, please drop me a line at [email protected] or give me a call on 07773 421446 - I'd be happy to help.

New Online Exclusives

There will be new products available exclusively in the online store from 5 March - check them out here.

About Me

Hi I'm Joanne and live in Northampton and when I'm not looking after my husband and two beautiful children, am an avid crafter with a passion for all things Stampin' Up!

I must confess that I have never been a big rubber stamper - until I discovered Stampin' Up! that is. I love the fact that I can get such great results with co-ordinating stamps, inks, papers and punches - the possibilities are endless! Join me on my stamping journey as I share the things I love and be inspired to create amazing things yourself!

Follow Me

Monthly Newsletter

Box Builder

Click the button above to use Box Buster to create your custom box design using the Envelope Punch Board!

Kits Collection Now Available!

Stampin Cut and Emboss

The new Kits Collection from Stampin' Up! is now available!

Click here to see the current kits available and order yours online today.

I Design For


Stampin' Up Stuff

This is my personal blog and is not endorsed by Stampin’ Up! I hope you find it a plentiful source of ideas and personal inspiration but please don't copy my designs for contest submission or use for classes, publication or sale without express permission.