The Power of Hope For PP477

by Joanne James9. February 2020 10:00

Today it's Sunday and time for this week's new challenge over at The Paper Players! It's the turn of the fabulous Ann to host this week and she has a fun colour challenge for you to work with:


Ann's colours this week are perfect for Valentine's however armed with the 'blank slate' over at InspireCreate this week I decided to use a little of something old with a little of something new to create my card today - take a look:


Here's the low-down on today's card:

Power of Hope - So first to my something new! The pagoda and sentiment on today's card are from one of the free Sale-A-Bration stamp sets, called 'Power of Hope'. This set has some lovely oriental images, including a chinese lantern and geisha girl. I used the pagoda and one of the uplifting sentiments in the set.

Embossed Stone - The Power of Hope stamp set is combined with the Stone 3D embossing folder as one of the bundles of items that you can receive free with a £90 (as opposed to £45) Sale-A-Bration purchase. I used it emboss my card base and create a textured frame for my stamped area although I think it will prove useful on other projects too.

Seasonal Layers - For my 'something old', I used my perennial favourite, the Seasonal Layers Thinlits to add a diecut cherry blossom branch to the front of my card. I added colour to the centres of the flowers using my Stampin' Blends markers and the co-ordinating Colourful Seasons stamp set, which I also used to add a touch of decoration to the inside of my card:


Whilst I haven't used them for a while, this stamp set and dies are one of the most used bundles in my collection. They really are so useful on so many projects, whatever the season. As for the Japan-influenced Power of Hope bundle, whilst I wouldn't ordinarily choose this style of stamp set, it's different to anything else I own and will I'm sure have its uses. Bottom line is it was free, so I'm most certainly not complaining! 

Here is the visual summary of the key products used on today's project for you to pin for easy reference:


You can see all of my Product and 'How To' summaries on my 'How To - Tips and Techniques' Pinterest board in case you've missed any. 

Before you reach for your ink and papers, check out what our amazing team has created to inspire you this week:

Here's a quick recap of our challenge rules:
 
1.  Create a new paper project
2.  Upload your creation to your blog with a link back to us and provide a direct link to the post featuring your challenge submission.
3.  Please link your card to no more than four challenges, TOTAL.
4.  Have FUN!

You can see all of my 'How To' summaries on my 'How To - Tips and Techniques' Pinterest board in case you've missed any. 

Enjoy your day; one of the James Juniors is off to a paintballing party today (rather him than me!). The rest of us will be battoning down the hatches and staying indoors away from the stormy winds that are expected in the UK today. I'll be back tomorrow with another project (or two!). Until then, happy stampin'!


Stampin' Up! Supplies Used: 

Table built using Product Table Builder by The Crafty Owl - Independent Stampin' Up! Demonstrator.

A Retro Snowman Season Double for CC&S345

by Joanne James4. November 2019 20:00

Today marks the start of a busy week with the first of my monthly classes, so I've a quick post to share a couple of cards inspired by the CAS Colours and Sketches challenge this week where it's a double featuring both a sketch and colours:

This is a great sketch and it just so happens that I still have two of these three retired colours, so substituting the current Balmy Blue for Bashful Blue I set to work and came up with a couple of cards using my favourite 'Snowman Season' stamp set. Here's the first one that I created for the challenge:


A little bit of snowflake tone-on-tone background stamping and a stamped image, coloured with a combination of Blends and Stampin' Write markers and a blender pen, along with a sentiment banner all from the same stamp set and anchored with a couple of snowflakes cut using the Seasonal Layers dies to finish my card. I liked this card so much I created a slightly stepped-up version that flipped the base and mat colours around and included a swirly embossed layer to my card base, along with a retired snowflake embellishment:


Honestly, I'm not sure which one I prefer - here's a photo of them both together, do feel free to leave me a comment below with which one gets your top vote!


Here is the visual summary of the key current products used on today's project for you to pin for easy reference:


You can see all of my 'How To' summaries on my 'How To - Tips and Techniques' Pinterest board in case you've missed any. 

Right that's all from me today - I still have a few things to do before I rest up for the evening so must dash! Enjoy your evening and I'll be back tomorrow with more news and another project. Until then, happy stampin'!


Stampin' Up! Supplies Used:

Table built using Product Table Builder by The Crafty Owl - Independent Stampin' Up! Demonstrator.

Seasonal Leaves And Autumn Plaid For PP458

by Joanne James8. September 2019 09:00

Today it's Sunday and time for this week's new challenge over at The Paper Players! It's the turn of the fabulous Ann to host this week and she has a rather seasonal colour challenge for you to work with:


It has turned unseasonably cold here in the UK this week and the falling temperatures, combined with Ann's warm colour palette immediately turned my thoughts to Autumn leaves and warm and cozy check blankets, both of which inspired my card today - take a look:


Here's the low-down on today's card:

Autumn Plaid - I chose Crumb Cake as my neutral of choice (I didn't count the Very Vanilla since I took white or vanilla as a given!) and used it as the base to create a cosy strip of plaid to tie together the main colours on my card. I used the plaid stamp from the new 'Tiny Keepsakes' stamp set for my plaid; I could have used the 'Buffalo Check' background stamp but the plaid stamp in the 'Tiny keepsakes' set has a smaller check that worked better for my design. I stamped it in Merry Merlot, then added plaid lines with my Cajun Craze and Pretty Peacock Stampin' Write markers.

Seasonal Skeletal Leaves - For the focal decoration of my card, I cut three skeleton leaves using the Seasonal Layers Framelits in each of the main challenge colours, and tucked them in loosely behind my sentiment and swirl of burlap on a stitched rectangle of Very Vanilla. This die set is another perennial favourite of mine and I'm so glad it stayed in the annual catalogue this year - these framelits, along with the co-ordinating 'Colourful Seasons' stamp set, has served me well and I have used both many times, for all sorts of projects. 

Harvest Thanks - I took one of my favourite sentiments for this type of card, from the'Painted Harvest' stamp set, stamped it in Merry Merlot onto Very Vanilla and added this to a banner cut using the Lakeside Framelits, along with a couple of Pretty Peacock faceted dots to anchor it to my finished card.

Here is the visual summary of the key products used on today's project for you to pin for easy reference:


You can see all of my Product and 'How To' summaries on my 'How To - Tips and Techniques' Pinterest board in case you've missed any. 

Before you reach for your ink and papers, check out what our amazing team has created to inspire you this week:

Here's a quick recap of our challenge rules:
 
1.  Create a new paper project
2.  Upload your creation to your blog with a link back to us and provide a direct link to the post featuring your challenge submission.
3.  Please link your card to no more than four challenges, TOTAL.
4.  Have FUN!

You can see all of my 'How To' summaries on my 'How To - Tips and Techniques' Pinterest board in case you've missed any. 

Enjoy your day; I have no big plans today and am looking forward to continuing to enjoy my birthday weekend! I'll be back tomorrow with another project. Until then, happy stampin'!


Stampin' Up! Supplies Used: 

Table built using Product Table Builder by The Crafty Owl - Independent Stampin' Up! Demonstrator.

Colourful Seasons Tropical Summer Drinks Trio PP446

by Joanne James16. June 2019 09:00

Today it's Sunday and time for this week's new challenge over at The Paper Players! It's the turn of the fabulous Claire to host this week and she has a clean and simple challenge for you to work with:
 

Remember: this is clean and simple week. What do we mean by 'clean and simple' ? Create a card that has:

  • Minimal layers and embellishments
  • Plenty of open space, also known as 'white space'
  • Is simple and uncluttered

Having had a clear out of retired stampsets, I had a minor panic when I realised that today's challenge was all about summer beverages; when I went through my collection, I realised I had only one set that had anything even remotely drink-related. In the end this made things easier - less choice can be liberating! Last week's CAS(E) This Sketch layout was just what I needed to bring my card to life - take a look:
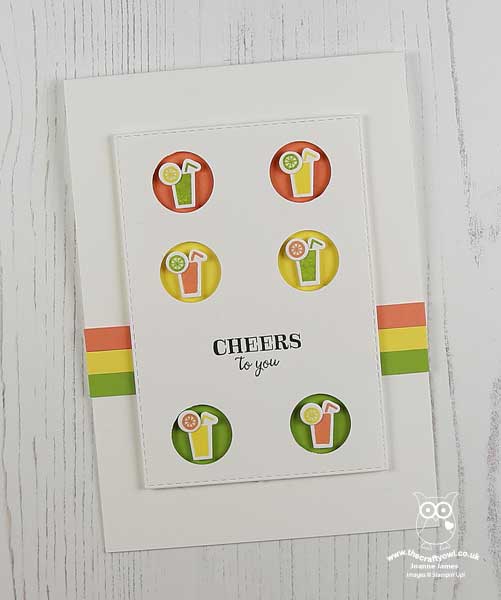
 

Here's the low-down on today's card:

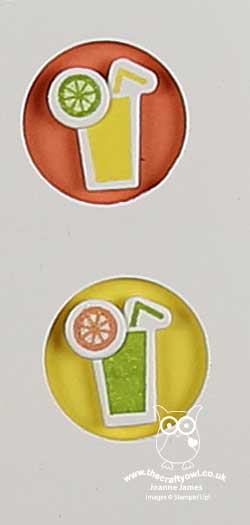
Colourful Seasons Summer Drinks - Yes, the little drink in the Colourful Seasons stamp set was the only one in my crafting arsenal, but it was perfect for a long, cool summer beverage - complete with a slice! Easy to stamp and then cut out with the co-ordinating Seasonal Layers Thinlits, this little glass was this week's saving grace. Phew!

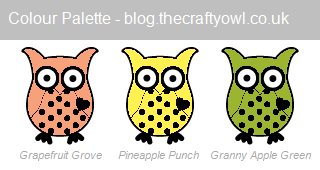
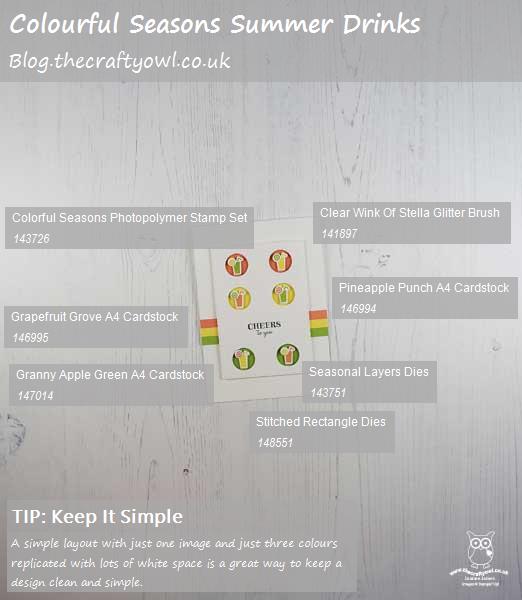
Tropical Colour Trio - I decided to balance the white of my CAS card with a trio of tropical colours: Grapefruit Grove, Pineapple Punch and Granny Apple Green. Each of my little circles features all three colours, interchanging the background colour, juice glass and slice of oange, lemon or lime respectively, each of which I coated with a liberal dose of Wink of Stella for a lovely sparkle. I added a strip of each colour to the base behind the greeting, to tie in with the circles above and below. This is a great fresh and zingy colour combo; here it is for you if you would like to save to use on future projects:
 

An Itty Bitty Birthday Greeting - Lastly, follwig another hunt through my depleted stamp sets, I found a suitable sentiment from the 'Itty Bitty Birthdays' set that was a perfect match for my colourful glasses and added to my card using Memento black ink.

Here is the visual summary of the key products used on today's project for you to pin for easy reference:
 

You can see all of my Product and 'How To' summaries on my 'How To - Tips and Techniques' Pinterest board in case you've missed any. 

Before you reach for your ink and papers, check out what our amazing team has created to inspire you this week:

Here's a quick recap of our challenge rules:
 
1.  Create a new paper project
2.  Upload your creation to your blog with a link back to us and provide a direct link to the post featuring your challenge submission.
3.  Please link your card to no more than four challenges, TOTAL.
4.  Have FUN!

You can see all of my 'How To' summaries on my 'How To - Tips and Techniques' Pinterest board in case you've missed any. 

Enjoy your day; we are celebrating Father's Day here in the UK and yesterday it was also one of the James Junior's birthdays, so we will be rounding off a busy week with a few more celebrations before Rebecca heads off to the Lake District for a week of outward bound activities with her school mates tomorrow. I'll be back tomorrow with another project. Until then, happy stampin'!


Stampin' Up! Supplies Used: 

Table built using Product Table Builder by The Crafty Owl - Independent Stampin' Up! Demonstrator.

First Steps New Baby Boy Welcome Card for AYSI197

by Joanne James9. April 2019 14:00

Today I'm sharing a card for the current challenge over at As You See It where the ladies have a great sketch to play with:

This is one of those versatile sketches that is a 'keeper' and can be used in so many ways. I still had my gingham papers out on my desk following Sunday's cards and decided it was perfect for a baby card - take a look:


Here's the low-down on today's card:

First Steps - My focal point sentiment comes from the 'First Steps' stamp set, an adorable collection of sweet baby images that are perfect for cards, invites, showers, samplers and more. I stamped my sentiment using my Stamparatus so that I could ink it several times and get a really solid image, then having stamped off first stamped the tiny footprints behind it in the same colour.  

Subtle Textures - I embossed my top panel with the Subtles embossing folder to add a little texture without detracting from the sentiment. I added a little more detail with the soft organdy ribbon and used my layers and scalloped border/mat detail to add a little more interest and to tie in my panel of Balmy Blue gingham check across the bottom. 

Monochromatic Blue - I kept my card simple with a monochromatic Balmy Blue and Whisper White colour combination however this design could be easily replicated in pink for a girl or any of the other colours in the Gingham Gala designer series paper stack for a more gender-neutral design.

Here is the visual summary of the key products used on today's project for you to pin for easy reference:


You can see all of my 'How To' summaries on my 'How To - Tips and Techniques' Pinterest board in case you've missed any. 

Enjoy your day and I'll be back tomorrow with another project. Until then, happy stampin'!


Stampin' Up! Supplies Used:

Table built using Product Table Builder by The Crafty Owl - Independent Stampin' Up! Demonstrator.

Tropical Climbing Orchids TGIF197

by Joanne James6. February 2019 19:00

I've had a busy week with preparations for classes and my forthcoming weekend craft retreat, so I've had to take a short blogging break. Today I'm sharing a card that was totally inspired by the vibrant colour palette over at TGIF Challenges this week:


This colour palette is so bright I just couldn't resist! I decided that these colours would be perfect for a tropical orchid and set to work - take a look:


Here's the low-down on today's card:

Climbing Orchid - I must confess this is the first time I've used this stamp; I bought it having seen the fabulous creations my wonderful Paper Players friend Nance Leedy created with it and following the stunning birthday card she sent me with it last year (you can see her card here but if you search for 'Climbing Orchid' on Nance's blog you will see lots of fabulous samples using this set). As I was musing what to do with these colours, another of my Paper Players teamies, the lovely LeAnne Pugliese of WeeInklings, posted a photo on her blog of a fabulous real-life orchid that has just bloomed having nurtured it for a whole year (apparently an ice cube a day is the secret!) and as I mused that I have never managed to keep a houseplant going for that long, it dawned on me that an orchid would be perfect for this colour combo. I stamped my orchids in Berry Burst directly onto Pineapple Punch cardstock as I didn't want to see white borders on my flowers, then I also added a little sponged Berry Burst ink to the petals. 

More Stitched Frames - I mounted my orchid on a tone-on-tone stitched rectangle frame and card base and stamped my sentiment on the inner panel. What can I say - these frames are a winner and I love them!

A Post-Friendly Version - I used the co-ordinating Orchid Builder framelits to cut out the layered petals and shaped them with my bone folder for a dimensional effect on the card above, which is headed to someone special who has a birthday coming up who I know will appreciate the effort involved. I am also able to hand-deliver, as this card is not particularly post-friendly. I did however create a second, slightly less involved and more post-friendly version using one of the other sentiments in the set which will be heading overseas that I thought I would also share with you for comparison:


And here's a picture of the two cards together:


I love these cards - why ever did I wait so long to use this set?! I think I'm going to make one of these 3D versions in a pot to keep on my windowsill - I'm sure this is the only houseplant likely to survive in the James household for a year or more! I'm also linking today's card up with the ladies over at SUO Challenges where the theme is 'flowers'.

Here is the visual summary of the key products used on today's project for you to pin for easy reference:


You can see all of my 'How To' summaries on my 'How To - Tips and Techniques' Pinterest board in case you've missed any. 

Enjoy your day and I'll be back tomorrow with another project. Until then, happy stampin'!


Stampin' Up! Supplies Used:

Table built using Product Table Builder by The Crafty Owl - Independent Stampin' Up! Demonstrator.

Wishing You Well Thanksgiving Wreath PP417

by Joanne James4. November 2018 09:00

Today it's Sunday and time for this week's new challenge over at The Paper Players - yay! It's the turn of my wonderful friend Claire to host this week and she has a timely theme challenge for you to work with that I know she would love you to play along with:


I know that Claire loves Thanksgiving and whilst it isn't something we celebrate here in the UK, the underlying theme of being grateful and thankfulness is one we should all celebrate. I used both the sketch layout and photo inspiration over at Fusion and CASual Fridays as starting points for today's card: warm autumn leaves and wood textures feature heavily on my card this week - take a look:


Here's the low-down on today's card:

Textured Layers -  I wanted to create texture on my card and did something quite unusual for me: used not one, but two embossing folders on my background panels. To recreate the grey weatherboard effect, I used my Simple Stripes embossing folder on a panel of Smoky Slate. For my feature panel, I used a piece of Wood Textures Designer Series Paper and added further texture by running this through my Pinewood Planks embossing folder. I love the effect this gives - it adds so much interest and detail.

A Wreath of Twigs and Leaves - I stamped the wreath from the Wishing You Well stamp set in Early Espresso onto a stitched circle of Very Vanilla and punched out the middle using my 1 1/4"  circle punch, so that more of the textured wood panel could be seen. I coloured a selection of pearls in various sizes with my Pumpkin Pie, Daffodil Delight and Cajun Craze Blends markers to suggest leaves and then added a trio of actual leaves cut with my Seasonal Layers Thinlits to frame my sentiment (I sponged the edges of the leaves to add depth).

Something For The Thanksgiving Table - When I started my card, I wanted to create a wreath like the one in the Fusion inspiration photo. I made a wreath in autumnal colours using my sprig punch that I really loved, but when it came to adding it to my card, it was a little too bulky so I went back to the drawing board. I didn't want my punched wreath to go to waste though, so instead I attached it to a band of Very Vanilla stamped with my Buffalo Check stamp in Crushed Curry, added a banner sentiment and a braided linen twine bow and made a napkin ring - perfect for the Thanksgiving table. Here's a photo of my finished napkin ring:


I'm linking my napkin ring up with the ladies over at SUO Challenges where they are looking for home decor items for the Thanksgiving table. This was so easy to make yet really effective - you could make a while bunch of these to decorate the Thanksgiving table in a relatively short space of time. 

Here is the visual summary of the key products used on today's project for you to pin for easy reference:


You can see all of my Product and 'How To' summaries on my 'How To - Tips and Techniques' Pinterest board in case you've missed any. 

Before you reach for your ink and papers, check out what our amazing team has created to inspire you this week:

Here's a quick recap of our challenge rules:
 
1.  Create a new paper project
2.  Upload your creation to your blog with a link back to us and provide a direct link to the post featuring your challenge submission.
3.  Please link your card to no more than four challenges, TOTAL.
4.  Have FUN!

You can see all of my 'How To' summaries on my 'How To - Tips and Techniques' Pinterest board in case you've missed any. 

Enjoy your day; it is the last day of the James Juniors' half term and there is hockey to be played along with a little down time before the return to school tomorrow. I'll be back here tomorrow with another project. Until then, happy stampin'!


Stampin' Up! Supplies Used - For the card: 

Table built using Product Table Builder by The Crafty Owl - Independent Stampin' Up! Demonstrator.
 

Stampin' Up! Supplies Used - For the napkin ring: 

Table built using Product Table Builder by The Crafty Owl - Independent Stampin' Up! Demonstrator.

Label Me Pretty 2017-19 In-Colour Thank You Card

by Joanne James21. November 2017 21:30

I'm finally back with a post today! With my American friends celebrating Thanksgiving tomorrow, I thought today a card that expresses gratitude was in order. Today's card also fits for a few challenges that are happening at the moment too (click on the badges to go to the respective blogs):


My card uses an incredibly useful bundle from the annual catalogue - take a look:


Here's the low-down on today's card:

Be Thankful - I am thankful for many things and I love that the Label Me Pretty set has this wonderful sentiment that is perfect for giving thanks and showing appreciation to others - finished with a teeny, tiny heart - adorable! This is such a great set for layering, with so many options. I created a crib sheet for my open house ages ago which I've been sharing with my face-to-face customers in classes; it has been so well received I thought I would share it here so that you could all save it too:


Details, Details - In addition to my layered label, my card has some other neat details: the tiny scalloped edge on the left is courtesy of the Decorative Ribbon Border Punch and the scalloped edge was cut with the scallop thinlit in the Seasonal Layers Thinlits set; the curved flower detail from the 'Label Me Pretty' stamp set fits it perfectly, how convenient! 

Don't Forget The Pretty - My card has a very feminine feel to it, with the Powder Pink and Fresh Fig in-colours balancing beautifully against the white, along with the tiny florals and pretty detailing, all finished off with a tied Powder Pink ribbon. Not my usual style, yet nice to ring the changes once in a while.

Here is the visual summary of the key products used on today's project for you to pin for easy reference:


You can see all of my 'How To' summaries on my 'How To - Tips and Techniques' Pinterest board in case you've missed any. 

I'll be back tomorrow with another project. Until then, happy stampin'!


Stampin' Up! Supplies Used:

Table built using Product Table Builder by The Crafty Owl - Independent Stampin' Up! Demonstrator.

Seasonal Layers Autumn Leaves For The Color Throwdown #CTD461

by Joanne James20. September 2017 17:00

Today I have something a little different for you! Do you remember this card from a couple of week's ago? Well, it won me the honour of being Featured Stamper for Challenge #459 over at The Color Throwdown and resulted in me being invited to be their Guest Star Stamper this week - woo hoo!

Here is the colour palette that has been chosen for this week's challenge:


I love these colours but wasn't sure I could make them work with anything other than a Halloween card and I haven't bought any new Halloween stamp sets this year (shock horror!); it's more about treat packaging and home decor here in the UK rather than cards, however I loved that gorgeous inspiration photo with its colourful autumn leaves and decided to use that as my starting point instead. This is what I came up with:


Here's the low-down on today's card:

Colour Blocked Leaves - I decided to meet these colours head-on and go with bold blocks of colour to really make a statement. Using my Seasonal Layers thinlits I cut a whole bunch of brightly coloured leaves to create my repeat pattern and glued them to my purple card base. It's almost like faux-embossing, only with each of the leaves a different colour.

Touches of Copper - I knew I wanted a sentiment for this card, so decided to use one of my current favourites from the 'Painted Harvest' stamp set; so perfect for fall/autumn and the season of Thanksgiving. I heat embossed it in copper and backed my sentiment panel with gold foil too, so that along with my single detailed leaf outline it would add a little definition to my card and stand out against the bright colours.

A Watercolour Accent - I needed something else to accompany my sentiment that would work with my bold colours and patterns, so decided to create a layered leaf accent using the larger leaf dies from the Seasonal Layers Thinlits set. I used my green, yellow and orange re-inkers to watercolour a piece of watercolour paper using my aquapainter, then layered it with the skeleton leaf diecut out of copper foil. I love the contrast with the background blocks of colour and the interest and dimension this adds to my card.  

I'm also linking today's card up with the gals over at SUO Challenges where the theme is Autumn colours - my second one this week, it must be the season! Here is the visual summary of the key products used on today's project for you to pin for easy reference:


You can see all of my 'How To' summaries on my 'How To - Tips and Techniques' Pinterest board in case you've missed any. 

Thank you to all the ladies at The Color Throwdown for inviting me to guest with them this week - do check out their blogs to see how they interpreted this colour combination, there is lots of great inspiration there!

Enjoy your evening and I'll be back tomorrow with another project. Until then, happy stampin'!


Stampin' Up! Supplies Used:

Table built using Product Table Builder by The Crafty Owl - Independent Stampin' Up! Demonstrator.

Colorful Seasons Winter Snowflakes Triple Stamping Babywipe Reinker Card

by Joanne James30. August 2017 05:00

The Bank Holiday is over and we are back to normality. I'm sharing another card from my recent technique class featuring the Colorful Seasons stamp set using the baby wipe technique, this time with a winter theme - take a look:


Here's the low-down on today's card:

Triple Stamping Technique - Today's card uses the same babywipe reinker technique that I shared with you yesterday, this time using the snowflake outline images and also incorporates another fun technique: triple stamping. This is where you stamp over several layers to create a dimensional image, or alternatively stamp over a single layer then cut your sheet into a central piece with two surrounding frames using your trimmer. Each stamped section is then layered with a solid coloured mat in between to add dimension to the image.

Seasonal Layers Snowflake - The co-ordinating Seasonal Layers Thinlits have a number of fun dies and today's card features one of the snowflakes, so incredibly detailed - check it out in the close up at the start of today's post. It makes a great focal point, this time with a glitter enamel dot as its centrepiece.

A Frosty Colour Combo - Today's colour combination is all about frosty, cold wintry days - here it is for you if you'd like to save it to use on your winter and Christmas projects:

Here is the visual summary of the key products used on today's project for you to pin for easy reference:


You can see all of my 'How To' summaries on my 'How To - Tips and Techniques' Pinterest board in case you've missed any. 

Enjoy your day and I'll be back tomorrow with another project from my class that also uses the baby wipe reinker technique. Until then, happy stampin'!


Stampin' Up! Supplies Used:

Table built using Product Table Builder by The Crafty Owl - Independent Stampin' Up! Demonstrator.

Mini Catalogue

BROWSE THE CATALOGUE

The mini catalogue is now live! Read and download your copy here.

Shop Online

Access my online shop 24 x 7, 365 days of the year:

Current March hostess code:

S9F2XJJW

Shop Online

Join My Team

It's always a great time to join Stampin’ Up! New team members can get £130 worth of products for only £99 + free business supplies + free shipping + all the fun being a part of Stampin’ Up! Stampin' Up! has something for everyone: join my growing team and benefit from my support to enjoy Stampin' Up! however you choose.

If you're interested, call me for a chat to understand how I can help you realise your goals. Alternatively, if you have already decided to sign up and you just can't wait, please click here for the link to the online form where you can sign up and order your starter kit right away! 

Latest Kit!

Stampin Cut and Emboss

The Rock Legend Kit has all you need to make 8 cards with coordinating envelopes. Along with the new Panda Friends Kit, both are available from January 4th for just £14 each - get yours here!

2023-24 Annual Catalogue

BROWSE THE CATALOGUE

Click on the catalogue for a full list of current SU! supplies - if you would like to order any of the items featured, please drop me a line at [email protected] or give me a call on 07773 421446 - I'd be happy to help.

New Online Exclusives

There will be new products available exclusively in the online store from 5 March - check them out here.

About Me

Hi I'm Joanne and live in Northampton and when I'm not looking after my husband and two beautiful children, am an avid crafter with a passion for all things Stampin' Up!

I must confess that I have never been a big rubber stamper - until I discovered Stampin' Up! that is. I love the fact that I can get such great results with co-ordinating stamps, inks, papers and punches - the possibilities are endless! Join me on my stamping journey as I share the things I love and be inspired to create amazing things yourself!

Follow Me

Monthly Newsletter

Box Builder

Click the button above to use Box Buster to create your custom box design using the Envelope Punch Board!

Kits Collection Now Available!

Stampin Cut and Emboss

The new Kits Collection from Stampin' Up! is now available!

Click here to see the current kits available and order yours online today.

I Design For


Stampin' Up Stuff

This is my personal blog and is not endorsed by Stampin’ Up! I hope you find it a plentiful source of ideas and personal inspiration but please don't copy my designs for contest submission or use for classes, publication or sale without express permission.