Happy First Birthday Colour Me...! and 2015 Sale-A-Bration Sneak Peeks!

by Joanne James31. December 2014 10:00

Today it's a special day: the Colour Me...! challenge is celebrating its first birthday and so the co-creators, the lovely Hayley and Tara, are hosting a party to celebrate! As one of the outgoing designers, I was invited to choose any previous challenge colour combination and create a card for this week's showcase. I decided to go with the creative choice from week 5, which enabled me to use some of the gorgeous new 'Best Year Ever' DSP from the 2015 Sale-A-Bration offering; I also used this week's sketch layout over at Create With Connie and Mary, as this layout was perfect for what I had in mind: 


As much as I've enjoyed making Christmas cards these past few months, I am so ready for a change! The colours of the promotional designer series paper and co-ordinating embellishment packs are like a breath of spring air - take a look:

I based the colour scheme for my card on the feature colours of the Best Day Ever papers - Calypso Coral, Coastal Cabana, Crushed Curry, Soft Suede and Sahara Sand, with white as my neutral - isn't it a gorgeous colour combination for Spring? I used two pieces of the same paper for my card, paired with a couple of blocks of solid colour, as the background for my card, then used another Sale-A-Bration promotional item, the 'Big Day' stamp set to create my focal point. What better than a birthday cake with a single candle for a first birthday?! The sentiment is from the same set. I stamped them both in Soft Suede, before colouring with my Calypso Coral and Coastal Cabana Blendabilities. Did you know that Stampin' Up! Blendabilities work with many of the standard Stampin' Up! coloured ink pads, in addition to Memento Black? Sometimes an alternative colour outline works really well and can give a different effect. I decided to create a little 'badge' to anchor my sentiment, using a punched circle, a number 1 cut with my retired Typeset alphabet Bigz Die (you could use the Perfect Print Bigz Number Die as an alternative) and a punched gold glimmer star. I coloured the envelope to match and I even created a fancy sentiment inside my card:

Both the Best Day Ever DSP and the Big Day stamp set are items that could be yours free with a purchase of £45 or more during Sale-A-Bration; Slae-A-Bration starts early this year on 6th January, so not long to wait now! I made this card to congratulate Hayley and Tara on their first Colour Me...! anniversary, however it would work just as well for a child's first birthday I think in this colour scheme.

That's all from me today; do pop by the Colour Me...! challenge blog and see what other birthday delights are in store. I hope you have a fun New Year's Eve planned - mine will be a quiet one - and I'll be back tomorrow with another project; until then, happy stampin'!


Stampin' Up! Supplies Used:

* Best Day Ever Designer Series Paper and Big Day stamp set available 6th January.

Table built using Product Table Builder by The Crafty Owl - Independent Stampin' Up! Demonstrator.


Video Tutorial: Scalloped Tag Topper Punch Concertina Card

by Joanne James8. May 2014 14:54

Hello everyone - my second video in a week! I'm cheating slightly, as I actually shot this video weeks ago but haven't got around to editing it until now. I made a lovely concertina fold Mother's Day card a while ago using the Scalloped Tag Topper Punch - you can see my original card here - which was based on a similar card made by Julie Kettlewell (you can see Julie's original card here). Having just gone to update my original post with the link to today's video, I realise I didn't mention her in my original post, which was very remiss of me and a complete oversight on my part, as I even mentioned her in today's video. Needless to say, I have now updated the original post!

I love this concertina fold card style - it's great if you need a card that's just a little different. I made another card based on my original one, this time adapting it to a birthday card for a friend of mine who always puts so much thought into cards for others, I thought she deserved something special for her birthday too; here's my latest scalloped tag topper punch concertina fold card:

The dimensions are exactly the same as my original card - there is still enough space to stamp 'happy' on one panel, with 'birthday' spelled out on the subsequent panels leaving the last panel blank for your message (I also stamped a little 'to you!' on this panel, just to complete my message). I also decorated one of the Stampin' Up! Kraft gift boxes with some co-ordinating Gingham Garden DSP to make some pretty packaging for my accompanying gift - finished with a tag made with the Scalloped Tag Topper Punch - well, what else?! Here's a picture of both pieces together:

So, if you would like to make a Scalloped Tag Topper Concertina Fold Card - either for the forthcoming international Mother's Day or a birthday card, here's my video tutorial showing you everything you need to know:


If you would like to purchase any of the Stampin' Up! supplies featured in today's project, just contact me or click on the links in the table below to go straight to my online store.

Back tomorrow with another project; until then, happy stampin'!


Stampin' Up! Supplies Used:

Table built using Product Table Builder by The Crafty Owl - Independent Stampin' Up! Demonstrator.


Scalloped Tag Top Punch Concertina Card - Mother's Day

by Joanne James19. March 2014 20:33

Today I want to share with you another use for one of my new favourite punches - the scalloped tag top punch. This really is such a versatile punch that can be used in so many ways. There are lots of variations on how it can be used to make an unusual card closure - today's card is a fun, concertina style Mother's Day card, where the scalloped tag top punch is used to add detail to the closure. I saw a similar card to this on Julie Kettlewell's blog here and liked it so much I decided to create one. This is what the card looks like 'closed':

Ribbon is threaded through the punch out hole and around the card and tied in a bow to keep it shut, then when you undo the ribbon and open the card out, you see the message inside:

These cards are such fun to make and so easy. All you need is one sheet of 12" x 12" for the basic card. I used a sheet of the Gingham Garden DSP for my card, and layered the inside panels with Whisper White matted on Daffodil Delight. I cut the letters for 'Mothers' with my Typeset Alphabet die, but you could easily use an alphabet stamp set such as Morning Post or Notable Alphabet if you have one instead. I took the word 'Happy' from one of the 'See Ya Later' Sale-A-Bration stamp sets and the letters for 'Day' from my Sketched Alphabet individual stamps before punching out and layering on a mini banner. I then decorated with flowers stamped and punched from the Petite Petals bundle and the Itty Bitty Punches set in colours that co-ordinated with my chosen DSP. The last panel is left blank for you to write your personalised Mother's Day message.

I had intended to shoot a video tutorial on how to make one of these cards to accompany my series of Scalloped Tag Top Punch video tutorials, but time has not been on my side so I haven't managed it yet; I will look to complete one in the next week or so and when I do will update my blog with the link. Updated 8/5/14 - here is my video tutorial on how to make this card:


The best bits about this card: it's one of those projects where you don't have to deliberate over which side of your DSP to use, as you see both sides (dilemma avoided, for once) and also because of the closure, you don't need an envelope - this is a card and envelope in one! This style of card would work for lots of other occasions too - why not have a go and see what you come up with.

Back tomorrow with another project; until then, happy stampin'!


Stampin' Up! Supplies Used:

Table built using Product Table Builder by The Crafty Owl - Independent Stampin' Up! Demonstrator.


Scalloped Tag Top Punch Concertina Card - Mother's Day

by Joanne James19. March 2014 20:33

Today I want to share with you another use for one of my new favourite punches - the scalloped tag top punch. This really is such a versatile punch that can be used in so many ways. There are lots of variations on how it can be used to make an unusual card closure - today's card is a fun, concertina style Mother's Day card, where the scalloped tag top punch is used to add detail to the closure. This is what the card looks like 'closed':

Ribbon is threaded through the punch out hole and around the card and tied in a bow to keep it shut, then when you undo the ribbon and open the card out, you see the message inside:

These cards are such fun to make and so easy. All you need is one sheet of 12" x 12" for the basic card. I used a sheet of the Gingham Garden DSP for my card, and layered the inside panels with Whisper White matted on Daffodil Delight. I cut the letters for 'Mothers' with my Typeset Alphabet die, but you could easily use an alphabet stamp set such as Morning Post or Notable Alphabet if you have one instead. I took the word 'Happy' from one of the 'See Ya Later' Sale-A-Bration stamp sets and the letters for 'Day' from my Sketched Alphabet individual stamps before punching out and layering on a mini banner. I then decorated with flowers stamped and punched from the Petite Petals bundle and the Itty Bitty Punches set in colours that co-ordinated with my chosen DSP. The last panel is left blank for you to write your personalised Mother's Day message.

I had intended to shoot a video tutorial on how to make one of these cards to accompany my series of Scalloped Tag Top Punch video tutorials, but time has not been on my side so I haven't managed it yet; I will look to complete one in the next week or so and when I do will update my blog with the link.

The best bits about this card: it's one of those projects where you don't have to deliberate over which side of your DSP to use, as you see both sides (dilemma avoided, for once) and also because of the closure, you don't need an envelope - this is a card and envelope in one! This style of card would work for lots of other occasions too - why not have a go and see what you come up with.

Back tomorrow with another project; until then, happy stampin'!


Stampin' Up! Supplies Used:

Table built using Product Table Builder by The Crafty Owl - Independent Stampin' Up! Demonstrator.


Love Is In The Air .... Already?!

by Joanne James1. December 2013 10:49

Good morning lovely readers - no blog post yesterday as I had some very important last-minute work to finish, but do not fear - today there will be (at least) two blog posts to make up for it!

So today we're having a short break from Christmas projects as it's the first of December and the launch of Stampin' Up's 'Whole Lot of Love' promotion - stamps and products designed with Valentine's Day in mind, but can be used for lots more besides. You may have noticed that Valentine's-themed projects didn't feature in the current seasonal catalogue, hence this special promotion to enable you to be prepared in good time for the big day. There are some great products in this set, ranging from cute (Monster Hugs - adorable! - available from 9th December) to practical (pre-cut card and envelope sets) and romantic (check out that Eiffel Tower!) to beautiful (the Flowerfull Heart - a keeper that would look just as beautiful on a birthday card for someone special). Here are the images for each set:

Aren't they great? I'll have some samples to share using a selection of these products in the not-too-distant future, but meanwhile in keeping with the theme I thought I would share this card with you that I made using the 'love' Thinlits die: 

If you're a fellow Stampin' Up! demonstrator and you attended our recent European Convention in Manchester, you may well have seen this card already. It was one of the projects I entered for the Convention Design Competition and whilst it didn't win, it was on the display boards for everyone to enjoy. My other project was 3D, but I chose this card as my second project as it's very clean and simple and typical of my papercrafting style. I am in love with these thinlits and also like how they can be used not only with the word itself, but you can use the relief too - no need to throw away this piece, a real two for one! I created an ombre background in the relief - I love this technique and think it looks great when done in inks with a brayer or sponged, but also like the clean look it gives with this kind of project. A few extra pieces and a small diamante just finish it off.

One of the funniest things that happened at Convention was that I attended an early Friday evening workshop and left my two downline team members who were attending Convention with me to browse the display boards. When I met up with them later, they both said to me 'You should come and see this card on the board - we love it and think you will too.' And the card? Without them knowing it was mine, they led me to this card! What can I say? Great minds clearly think alike! It did give me a lovely warm feeling inside though - love you, my little Crafty Owls!

Check out the product links below if you would like to have a go at either recreating my card or purchase any of the lovely new Valentine's products.

Back tomorrow with another creative project; check out today's other post though if you're a Stampin' Up! demonstrator - your life is just about to get a whole lot easier ....

Until then, happy stampin'!


Stampin' Up! Supplies Used (for love card):

Table built using Stampin' Up! Product Table Builder from The Crafty Owl.


Stampin' Up! Whole Lot of Love Products (Monster Hugs available from 9th December):

Table built using Stampin' Up! Product Table Builder from The Crafty Owl.


Birthday Clowns!

by Joanne James20. September 2013 20:48

If you're local to Northampton, you will probably have heard about the Northampton Clown - he has been big news here in the last week or so, even reaching the dizzy heights of the national press. He's been trending on Twitter, has his own hashtag and social media page - and he is the inspiration for this birthday card that I made for my Dad, who celebrates his birthday today:

I've had the idea of an abstract face with a moustache ever since I bought my Petite Curly Label Punch and decided to create a clown face, complete with red nose, specs and candy-dot topped party hat. This little trio bear absolutely no resemblance to the Northampton Clown, but were fun to create nonetheless!

Here's a close-up of one of them, showing the piercing I used to give the face shape:

Back tomorrow with the card I made for Grampa from James Juniors; until then many happy returns of the day Dad and to everyone else, happy stampin'!


Stampin' Up! Supplies Used:

 Petite Curly Label PunchPunch Pack - by Stampin' Up!Brights Candy DotsOccasions Paper-Piercing PackPaper-Piercing ToolTypeset Alphabet Bigz Die

Look Who's Turning 40!

by Joanne James18. August 2013 20:08

Another 40th birthday card today, this one showcasing lots of new products. This was the birthday card from my children to their uncle, so I wanted it to fauna fun design; this is what I came up with:

I used the Birthday Basics Designer Series Paper as the inspiration for the colour scheme for this card - that and the fact that I already had Bermuda Bay out on my desk (I love this new colour!) I built the sentiment from my Simply Sketched Alphabet stamps and added a fun element by replacing the 'OO' with a pair of spectacles and googly eyes. I stamped the spectacles by inking up one pair on my 'Spectacular' single stamp - I have been having lots of fun with this stamp (as a specs wearer it really appealed to me!); this, and the other single stamps, are still available to purchase until the end of the month. See the box on the right of my blog page for more details and make sure you contact me before the end of the month if you'd like to order one.

My children thought this card was really funny, although I'm not sure that I would have got away with it as far as my specs-wearing brother-in-law is concerned, were I not a specs wearer myself!

Back soon with another project; until then, happy stampin'!


Stampin' Up Supplies:

Stamps: ABC-123 Sketch Alphabet and Numbers, Spectacular

Cardstock: Summer Starfruit, Bermuda Bay, Raspberry Ripple, Very Vanilla, Birthday Basics Designer Series Paper (SAB - retired)

Ink/Stampin' Write Markers: Bermuda Bay, Raspberry Ripple

Tools: Simply Scored, Big Shot, Typeset Alphabet Die, Stamp-a-ma-jig

Finishing Touches: Googly eyes (non SU)


Happy 40th Birthday Brother

by Joanne James15. August 2013 16:43

Another brother Birthday card today, but this time for my brother-in-law, who celebrated his 40th birthday recently. I took this card by LeeAnn Greff as my inspiration, changing the colours to use up some of my retired papers and incorporating the necessary changes of sentiment to produce the following card:

A great masculine card, with some Tangerine Tango and Bermuda Bay for pops of colour. Back in a couple of days with the card I made from the children for their uncle; I'll be posting every other day for the next couple of weeks, as I'm having a couple of weeks of dedicated family time before the children go back to school. 

Until then, happy stampin'!


Stampin' Up Supplies:

Stamps: Banner Greetings (hostess)

Cardstock: Basic Grey, Bermuda Bay, Coastal Cabana, Whisper White, Twitterpated DSP (retired), Sycamore Street Designer Series Paper (SAB - retired)

Ink/Stampin' Write Markers: Basic Grey, Tangerine Tango

Tools: Simply Scored, Big Shot, Chevron Textured Impressions Embossing Folder, Typeset Alphabet Die, Paper Piercing Essentials Pack

Finishing Touches: Sycamore Street Ribbon (SAB - retired)


Brother Birthday Basketball Card

by Joanne James12. August 2013 21:35

As promised, today I'm back with the other of Ben's birthday cards, this time from his big sister. Ben's biggest birthday surprise was his very own basketball hoop. He has been mad keen on ball bouncing for a while and he was thrilled to receive a basketball from one of his little school friends at his party. he wasn't at all expecting a hoop and his little face positively lit up when he opened up the box. So I used the new much loved basketball for the inspiration for his card:

A simple design of a jumble of bright orange basketballs, with a special one popped up on a couple of dimensionals to replace the 'O' in 'Brother'. I must confess this card was somewhat bourn out of being rather short on time too, but once I had the idea it didn't take long to execute at all (which was definitely a good thing!) That said, I'm really pleased with how it turned out.

Back tomorrow with another card; until then, happy stampin'!


Stampin' Up Supplies:

Stamps: Great Sport

Cardstock: Pumpkin Pie, Basic Black, Whisper White

Ink: Pumpkin Pie, Basic Black

Tools: Typeset Alphabet Die, 1 1/4" Circle Punch, Simply Scored

Tags: , , , , , ,

Cards | Stamping

Angry Birds Spiral Pop-Up Birthday Card

by Joanne James27. July 2013 20:23

Today I have a very special card to share with you. As my regular blog followers are aware, my soon-to-be six year old son and his friends are Angry Bird mad; I swear if we didn't ration access to all touch devices in our house he would turn into one of those little feathered creatures!! Anyway, a friend of his celebrates his birthday today and in addition to the card I made from us, which I will share with you another time, his Mum also asked me if I would make him a special birthday card. I saw a very simple Angry Bird pop up card by Julie Davidson a while ago which I loved (you can see Julie's card that was the inspiration for mine here), but I must confess I had something much more 'explosive' in mind. So this was the front of my card:


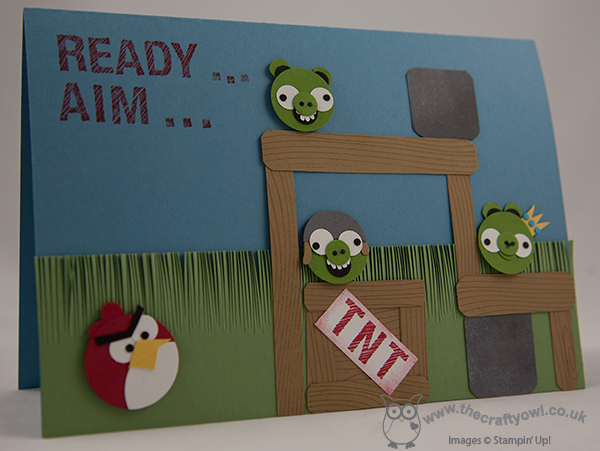
Lots of little pigs hiding amidst the wood and boulders, along with a box of TNT for good measure and a red Angry Bird ready for action. Open the card to reveal what happens once there's been a hit:


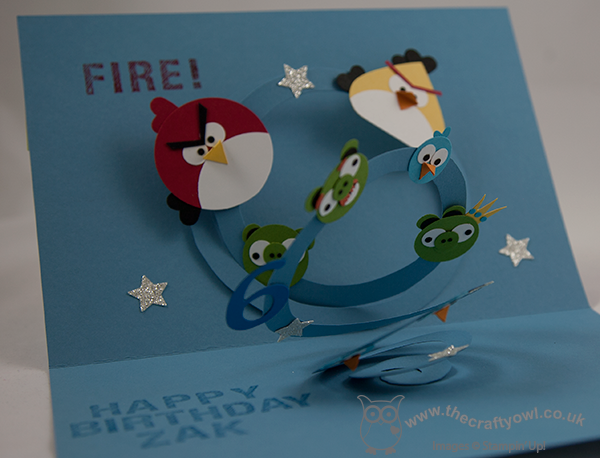
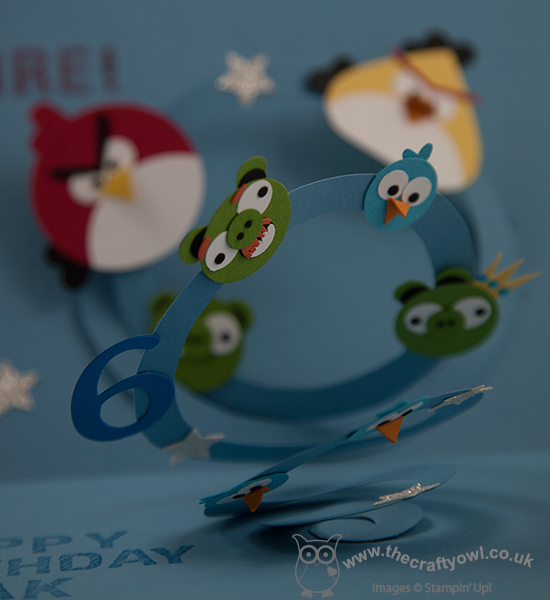
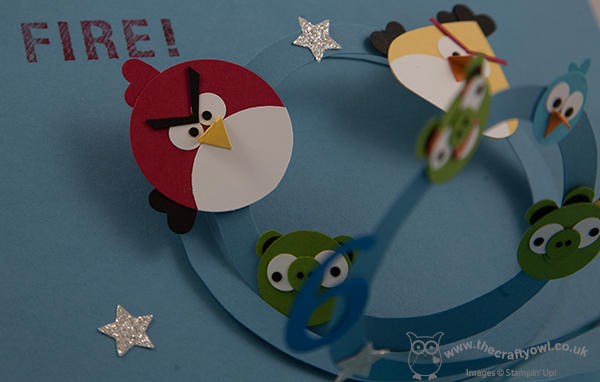
Birds, pigs and stars literally 'explode' out of the card. The decoration is all attached to a spiral pop-up, which is simply a large circle cut into a spiral with one end attached to each side of the card. Its really easy to do and if you made the spiral the same colour as the base card, it blends into the background and allows the birds to really 'fly'. Here's a close up of the pigs so that you can see what I mean:

I added a number 6 and some glimmer stars and used the new Simply Sketched alphabet stamps to add the 'Ready, Aim ... Fire!' and a personalised message for the recipient. It has to be said, this card was something of a 'labour of love' - creating all the birds and pigs takes an absolute age, but it was so worth it for the impact of the resulting card, which I am reliably informed was well received!

It sounds like our very own TNT explosion in the garden at the moment; the thunder and lightening is flashing and crashing as I write and whilst lawns and gardens everywhere are I'm sure benefiting from the downpour, I'm personally hoping it is just a brief interlude in the glorious weather we've been having of late.

Back tomorrow with another project; until then, happy stampin'!


Stampin' Up Supplies:

Stamps: ABC-123 Sketch Alphabet & Numbers, Woodgrain

Cardstock: Real Red, Daffodil Delight, Basic Black, Whisper White, Crumb Cake, Gumball Green, Pumpkin Pie, Basic Grey, Marina Mist, Pacific Point, Tempting Turquoise

Inks: Real Red, Pacific Point, Chocolate Chip, Basic Grey, Whisper White

Tools: 1 3/4" Circle Punch, 1 1/4" Circle Punch, 3/4" Circle Punch, Handheld Circle Punch (retired), Small Heart Punch, Full Heart Punch, Owl Punch, Itty Bitty Shapes Punch (circle), Corner Punch, Merry Minis Punch (star), Sponge Dauber, Stamp-a-ma-jig

Finishing Touches: Silver Glimmer Paper


Mini Catalogue

BROWSE THE CATALOGUE

The mini catalogue is now live! Read and download your copy here.

Shop Online

Access my online shop 24 x 7, 365 days of the year:

Current March hostess code:

S9F2XJJW

Shop Online

Join My Team

It's always a great time to join Stampin’ Up! New team members can get £130 worth of products for only £99 + free business supplies + free shipping + all the fun being a part of Stampin’ Up! Stampin' Up! has something for everyone: join my growing team and benefit from my support to enjoy Stampin' Up! however you choose.

If you're interested, call me for a chat to understand how I can help you realise your goals. Alternatively, if you have already decided to sign up and you just can't wait, please click here for the link to the online form where you can sign up and order your starter kit right away! 

Latest Kit!

Stampin Cut and Emboss

The Rock Legend Kit has all you need to make 8 cards with coordinating envelopes. Along with the new Panda Friends Kit, both are available from January 4th for just £14 each - get yours here!

2023-24 Annual Catalogue

BROWSE THE CATALOGUE

Click on the catalogue for a full list of current SU! supplies - if you would like to order any of the items featured, please drop me a line at [email protected] or give me a call on 07773 421446 - I'd be happy to help.

New Online Exclusives

There will be new products available exclusively in the online store from 5 March - check them out here.

About Me

Hi I'm Joanne and live in Northampton and when I'm not looking after my husband and two beautiful children, am an avid crafter with a passion for all things Stampin' Up!

I must confess that I have never been a big rubber stamper - until I discovered Stampin' Up! that is. I love the fact that I can get such great results with co-ordinating stamps, inks, papers and punches - the possibilities are endless! Join me on my stamping journey as I share the things I love and be inspired to create amazing things yourself!

Follow Me

Monthly Newsletter

Box Builder

Click the button above to use Box Buster to create your custom box design using the Envelope Punch Board!

Kits Collection Now Available!

Stampin Cut and Emboss

The new Kits Collection from Stampin' Up! is now available!

Click here to see the current kits available and order yours online today.

I Design For


Stampin' Up Stuff

This is my personal blog and is not endorsed by Stampin’ Up! I hope you find it a plentiful source of ideas and personal inspiration but please don't copy my designs for contest submission or use for classes, publication or sale without express permission.