You Are Tea-riffic Teapot Card

by Joanne James24. January 2016 09:00

It's Sunday and time for a new challenge over at The Paper PlayersThis week it is the turn of the lovely Nance to host and she has my favourite type of challenge, a sketch, for you to play along with:

For my card this week I was inspired to use my Cups and Kettle Framelits Dies and co-ordinating 'Have A Cuppa' Designer Series Paper Stack for a fun card:


My colour scheme was taken directly from the paper stack and my card is otherwise really quite self explanatory. I added a White Perfect Accent to my teapot lid and some clear Wink of Stella to the steam heart above the spout for added shimmer. I love the bright colours in these papers and the many little elements in the framelit set - endless creative possibilities! 

Before you reach for your ink and papers, check out what our amazing team has created to inspire you this week:

The Paper Players Design Team
 
 
Here's a quick recap of our challenge rules:
 
1.  Create a new paper project
2.  Upload your creation to your blog with a link back to us and provide a direct link to the post featuring your challenge submission.
3.  Please link your card to no more than four challenges, TOTAL.
4.  Have FUN! 


I look forward to seeing what you create with this week's theme. We have a an important day of sport today: Ben is playing basketball this morning and no hockey this week as Rebecca has an afternoon of swimming with County trials today - wish us luck!

Back tomorrow with another project; until then, happy stampin'!


Stampin' Up! Supplies Used: 

Table built using Product Table Builder by The Crafty Owl - Independent Stampin' Up! Demonstrator.


You Send Me Soaring Valentine's Card and Technique Video Tutorial

by Joanne James17. January 2016 09:00

It's Sunday and time for a new challenge over at The Paper PlayersThis week it is the turn of the lovely Sandy to host and she has a timely clean and simple theme for you to play along with:

For my card this week I was inspired to use the Sale-A-Bration set ''Sky is The Limit' to create my clean and simple Valentine's card - I was so keen to make a card with a red bi-plane! Here it is:


I used a base of Soft Sky and a piece  of diagonal striped black and white paper from the neutrals paper stack for a mat, then took a piece of watercolour paper that I washed with my aqua painter and some Soft Sky and Pool Party inks for a hint of colour. Once my sky panel was thoroughly dry, I stamped the clouds and smoke trail in Versamark and heat embossed them in white, the stamped the sentiment and heat embossed that in black. I then went back to my clouds and smoke trail and used the effect I shared with you previously on this card here, where I filled in the space with Tombo, covered in White embossing powder and then heat embossed until the powder set and the glue bubbled. This effect not only works for snow as on my previous card but for clouds and smoke trails too!

I also added a touch of Melon Mambo within the heart to make it stand out a little. Finally, I stamped my bi-plane in Real Red onto a piece of Whisper White cardstock and fussy cut it out, adding a small piece of window sheet cut using my flower builder punch (the stamen) and a silver mini-brad to accentuate the propeller, before popping it on a couple of dimensionals and adding to my card - here's a close up:


Isn't that fun? I hope you like today's card - this is a set with so many uses, not just Valentines. It's a limited time Sale-A-Bration offer and is only available until 15th February. Plenty of time to get it in order to make a love-themed card for a special person though, so don't forget to add it to your next £45 order for free!

I've edited today's post to include a little video tutorial that I filmed this afternoon that shows exactly how I created the effect I described above:


I hope you enjoyed that - I haven't made a video in ages but there have to be some advantages to waking up to snow on the ground - more time to craft!

Before you reach for your ink and papers, check out what our amazing team has created to inspire you this week:

The Paper Players Design Team
 
 
Here's a quick recap of our challenge rules:
 
1.  Create a new paper project
2.  Upload your creation to your blog with a link back to us and provide a direct link to the post featuring your challenge submission.
3.  Please link your card to no more than four challenges, TOTAL.
4.  Have FUN! 


I look forward to seeing what you create with this week's theme. We have no hockey due to the freezing weather here in the UK and a frozen pitch; in fact, snow on the ground meant that snowball fights even won out over basketball today. As for me - the results of my endeavours are included above!!

Back tomorrow with another project; until then, happy stampin'!


Stampin' Up! Supplies Used: 

Table built using Product Table Builder by The Crafty Owl - Independent Stampin' Up! Demonstrator.

Follow Your Dreams Caravan Card

by Joanne James10. January 2016 09:00

It's Sunday and time for a new challenge over at The Paper PlayersThis week it is the turn of my sweet friend Claire to host and she has a great colour palette for you to play along with:


I love this bold and bright colour palette and actually created a couple of cards with it. One is very 'me' so I saved that for another day; today's card uses this week's sketch over at Mojo Monday and has a rather different feel to it - I think it's the marbled paper! - take a look:


I paired a piece of the Tempting Turquoise Perfectly Artistic marbled patterned paper with some retired heart-patterned DSP, as a backdrop for my colourful little caravan from 'You're Sublime', which I coloured with my inks and an aquapainter (the body is paper-pieced with a piece of the marbled paper on the reverse). A punched heart, some ribbon, sequins and another pink heart topped with an epoxy sticker for added dimension finish my card. 

I love the rather subtle colouring that the marbled paper adds; I am looking forward to experimenting with this paper further. It's available free with a £45 spend until £15th February as one of the Sale-A-Bration 'limited time' offers, so if it's on your list it's one to get sooner rather than later. As for that little caravan - how cute! This card is destined for Gail, one of my team, who is often holidaying to interesting destinations in her caravan. She is about to become an official warden for The Caravan Club so this image is so appropriate and the sentiment perfect.

Before you reach for your ink and papers, check out what our amazing team has created to inspire you this week:

The Paper Players Design Team
 
 
Here's a quick recap of our challenge rules:
 
1.  Create a new paper project
2.  Upload your creation to your blog with a link back to us and provide a direct link to the post featuring your challenge submission.
3.  Please link your card to no more than four challenges, TOTAL.
4.  Have FUN! 


I look forward to seeing what you create with this week's colours. We have a day of sport today, with basketball and hockey in store as we fully get back into the new season. I'm hoping to squeeze in a little craft time too.

Back tomorrow with another project; until then, happy stampin'!


Stampin' Up! Supplies Used: 

Table built using Product Table Builder by The Crafty Owl - Independent Stampin' Up! Demonstrator.

It's My Party Balloon Birthday Shaker Card

by Joanne James3. January 2016 10:00

It's Sunday and time for a new challenge over at The Paper Players! It's our first challenge of the new year and the first thing to do is welcome our three new guest designers that are joining us from today: Linda Callaghan, Hannelie Bester and Colleen Begley, we are so happy you are joining us and sharing your collective talents over the next 6 months.

This week it is my turn to host the first challenge of the new year and I have a fun theme for you to play along with:


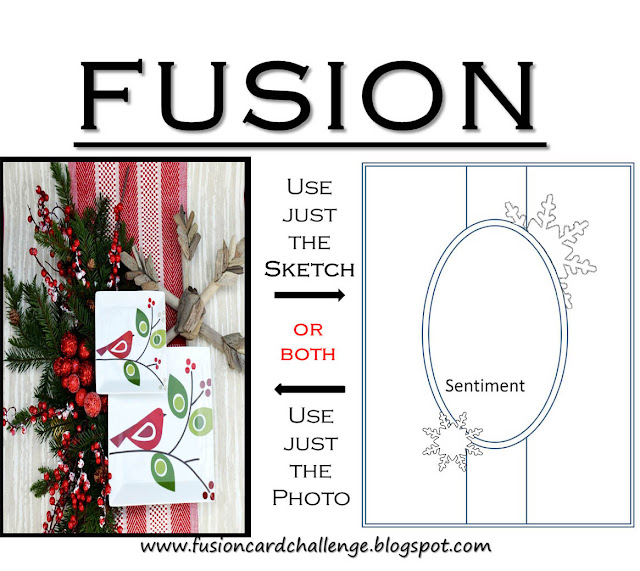
It's all about numbers! You can use them in any way on your cards and can make a card with any theme - as long as it features at least one number. For my card this week I was inspired to use the layout over at Fusion and my new Large Numbers Framelits Dies to create a fun shaker card: 


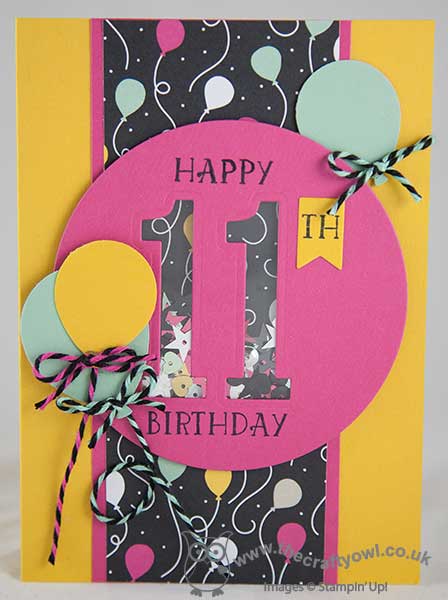
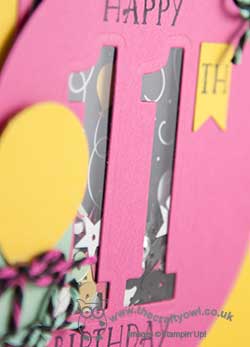
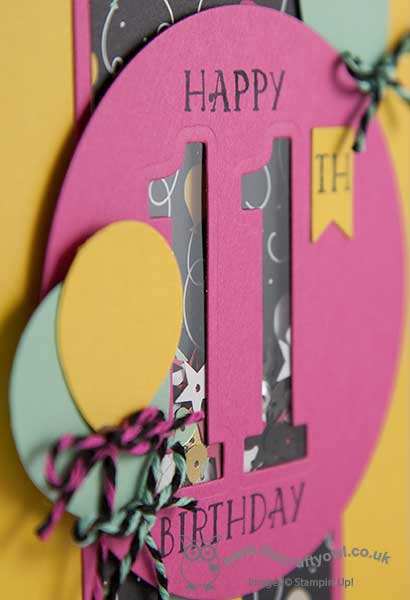
I used my numbers to create a shaker card by backing them with a piece of window sheet in the negative space, through which you can see both the fun It's My Party balloon-festooned designer series paper behind and also the mix of metallics and brights sequins inside. My greeting is stamped from the co-ordinating 'Number of Years' set and a trio of balloons punched with my new Balloon Bouquet Punch and tied with two-tone baker's twine finish my card.

Here's a close up view of the shaker:

Rebecca and many of her friends will be turning 11 this year, hence my choice of number - her Christmas shaker cards proved very popular and now they are requesting birthday equivalents! I am loving the bright colours and patterns of the new It's My Party suite - only two more days to go until the Spring-Summer catalogue launches and I just know you are going to love it too!

Before you reach for your ink and papers, check out what our amazing team has created to inspire you this week:

The Paper Players Design Team
 
 
Here's a quick recap of our challenge rules:
 
1.  Create a new paper project
2.  Upload your creation to your blog with a link back to us and provide a direct link to the post featuring your challenge submission.
3.  Please link your card to no more than three challenges, TOTAL.
4.  Have FUN! 


I look forward to seeing what you create with this week's theme. We are off to basketball today but no hockey for another week yet; then we are going to start taking the Christmas decorations down this afternoon and if we get everything finished we may even fit in a visit to the cinema - watch this space!

Back tomorrow with another project; until then, happy stampin'!


Stampin' Up! Supplies Used:

Available 5th January:

140811 - Number of Years & Large Numbers Framelits Dies Bundle

140609 - Balloon Punch

140552 - It's My Party Designer Series Paper Stack

140718 - It's My Party Cardstock Pack

140555 - Baker's Twine Combo Pack 

Table built using Product Table Builder by The Crafty Owl - Independent Stampin' Up! Demonstrator.

Tags: , , , , , ,

Cards | Shop Online | Stamping

Tis The Season To Be Holly

by Joanne James13. December 2015 10:00

It's Sunday and time for a new challenge over at The Paper Players! This week it is the turn of my good friend LeAnne to host and she has the following colour palette to get our creative juices flowing this week:


This is a special week for us as we say goodbye to our guest designers Jodi, Amy and Lisa. We are grateful that these lovely ladies have shared their considerable talent and creativity with us for the last 6 months and we wish them well on their respective journeys. We will miss you!

For my card this week I was inspired to use yet more of the lovely Home For Christmas paper and designed my card all around the holly. I also used the sketch over at The Global Design Project for my layout:


Really simple, allowing the holly patterned paper to do all the hard work on this one. The sentiment is from 'Oh What Fun' and the sentiment piece cut using the Tags and Labels Framelits. I added some Cherry Cobbler seam binding ribbon and highlighted the berries on my holly with pearls coloured with my retired Cherry Cobbler Blendabilities. I also created a second version of this card whilst I had everything out on my desk, using the same sketch but this time using the similar but slightly different colour palette over at Paper Pals Arts this week:

   12-10 PPA279

I used gold foil to make my sentiment banner stand out and fussy cut some holly from the dsp in place of the stamped sentiment and also added a flatter, more post-friendly bow with a scrap of ribbon I found in my stash:


Here's a close up of the label detail:

I really like how the gold gives a different effect.

Before you reach for your ink and papers, check out what our amazing team has created to inspire you this week:

The Paper Players Design Team
Anne Marie Hile - on leave
 
 
Here's a quick recap of our challenge rules:
 
1.  Create a new paper project
2.  Upload your creation to your blog with a link back to us and provide a direct link to the post featuring your challenge submission.
3.  Please link your card to no more than three challenges, TOTAL.
4.  Have FUN! 


I look forward to seeing what you create with this colour combination this week. We are hoping to put our Christmas tree up today - it's time to really get our Christmas preparations underway!

Back tomorrow with another project; until then, happy stampin'!


Stampin' Up! Supplies Used:

Table built using Product Table Builder by The Crafty Owl - Independent Stampin' Up! Demonstrator.


Let It Snow Snowflakes Card

by Joanne James6. December 2015 10:00

It's Sunday and time for a new challenge over at The Paper Players! This week it is the turn of my good friend Claire to host and she has a fun theme to get our creative juices flowing this week:


I had an idea brewing in my mind all week for this challenge, but I had rather less time to craft this week than I would have liked so ended up in the end going with something altogether more clean and simple! I was intrigued by this week's sketch over at CAS(E) This Sketch and was sad to see that Hayley and Tara are winding up the Colour Me...! blog after this week's challenge. I had such a lovely time when I did my DT stint over there I just had to play along for this their final challenge (although I did take a little liberty by adding in silver to my monochromatic colour scheme - well ladies, it is Christmas!) I'm also linking with CAS-UAL Fridays, since my card today features snowflakes - take a look:


I used a base of Soft Sky then added some strips of silver glimmer paper, before adding my Whisper White panel. On this panel, I stamped the small snowflake from the Project Life Hello December set in Versamark and heat embossed it in silber. I then cut a stencil with my 1 1/4" circle punch and sponged around the snowflakes in Soft Sky ink. I then took my 'let it snow' sentiment from the Sparkly Season stamp set and having  curved it on my block, I stamped just the first two words in Versamark and heat embossed that in silver too. For my 'snow' to finish the sentiment, I used the coordinating die cut from the same set and cut three in extra-thick Whisper White and one in silver glimmer paper and layered them together to create my stacked sentiment. In retrospect I would change the placement of the 'let it' (it should be above the 'snow' rather than below it) but I was against the clock and didn't have time to make a second panel. That aside, I like the card -there is something soothing about the soft blue colour and the pattern is an interesting one. Oh and it's got silver glimmer paper, which I seem to be using everywhere lately!

Before you reach for your ink and papers, check out what our amazing team has created to inspire you this week:

The Paper Players Design Team
Anne Marie Hile - on leave
 
 
Here's a quick recap of our challenge rules:
 
1.  Create a new paper project
2.  Upload your creation to your blog with a link back to us and provide a direct link to the post featuring your challenge submission.
3.  Please link your card to no more than three challenges, TOTAL.
4.  Have FUN! 


I look forward to seeing your snowy creations this week. I'm off for a morning of basketball and then I've some final preparations for the last of my Christmas card classes tomorrow, hopefully time for a spot of crafting, then Ben is attending a birthday party in the afternoon. Oh and we are going to attempt to put the Christmas tree up - not much to be going on with then!

Back tomorrow with another project; until then, happy stampin'!


Stampin' Up! Supplies Used:

Table built using Product Table Builder by The Crafty Owl - Independent Stampin' Up! Demonstrator.


Pink Perfect Pines Silhouette Card

by Joanne James29. November 2015 10:00

It's Sunday and time for a new challenge over at The Paper Players! This week it is the turn of the talented Sandy to host and she has a tic tac toe board to get our creative juices flowing this week:


There were so many ways I could have gone with Sandy's board this week - the creative possibilities are endless! - but in the end I decided to go with the far-right column: white, embossing and punch or die cut. I used this week's colours over at Colour Me and the Friday Mashup sketch for today's card:


I used a base of Melon Mambo for my card then on a piece of Whisper White I stamped the silhouette from the 'To You and Yours' stamp set in Memento Black then sponged in my sky using each of the Colour Me challenge colours and masking off a small moon with a small circle of post-it note. I also added a few tiny white stars using my chalk pen. I then took a piece of Basic Black cardstock and diecut the tree using the medium-sized Perfect Pines framelit, wrapping some silver thread around the base of the card and securing behind. The top layer is a piece of Shimmery White cardstock - you can't really see the sparkle of this card in the photo, which is a shame as it's lovely! I embossed this piece with the Softly Falling embossing folder to add texture then used the largest Christmas tree framelit to cut an aperture in my card to frame the tree in the black layer. Finally I added my sentiment; I added the silver glimmer 'peace' from the Christmas Greetings thinlits (I trimmed down the ends) and heat embossed the 'on earth' in silver onto the black layer. 

I've been wanting to use this silhouette stamp for ages and I like the idea of framing it with the diecut. Quite unconventional for a Christmas card, but I just love the colours of the pretty sunset too. 

Before you reach for your ink and papers, check out what our amazing team has created to inspire you this week:

The Paper Players Design Team
Anne Marie Hile - on leave
 
 
Here's a quick recap of our challenge rules:
 
1.  Create a new paper project
2.  Upload your creation to your blog with a link back to us and provide a direct link to the post featuring your challenge submission.
3.  Please link your card to no more than three challenges, TOTAL.
4.  Have FUN! 


I look forward to seeing how many tic tac toe combinations you can come up with this week. I'm off for a morning of basketball and then a quiet day for the James juniors, given that Rebecca has an awful cold and needs some R&R to prepare for the busy month ahead in the run up to Christmas. I'm hoping to work on a few projects and get a few jobs done - wish me luck!

Back tomorrow with another project; until then, happy stampin'!


Stampin' Up! Supplies Used:

Table built using Product Table Builder by The Crafty Owl - Independent Stampin' Up! Demonstrator.


Cozy Christmas Tag Card

by Joanne James22. November 2015 10:00

It's Sunday and time for a new challenge over at The Paper Players! This week it is the turn of the lovely Laurie to host and she has a great sketch to get our creative juices flowing this week:


I decided to showcase some of the lovely Home For Christmas designer series paper on my card today along with one of the Cozy Christmas stamps on today's card:


I love this winter village scene paper so I paired it with a sentiment and the little house from the 'Cozy Christmas' stamp set. I stamped the scene in Mint Macaron and then cropped out the tree on the left and paper-pieced the house, which I stamped in Real Red. I added dimension with some puffy snow on the roof and trees and a wooden snowflake embellishment. I created my layered tag using the Tags and Labels framelits and to finish added a twirly bow using some retired in-colour ribbon in Mossy Meadow. Having had a busy week of classes and most of my day yesterday taken up with school projects I struggled to get into the groove with this card, but time was against me so in the end I had to stop fiddling with it and finish up!

Before you reach for your ink and papers, check out what our amazing team has created to inspire you this week:

The Paper Players Design Team
Anne Marie Hile - on leave
 
 
Here's a quick recap of our challenge rules:
 
1.  Create a new paper project
2.  Upload your creation to your blog with a link back to us and provide a direct link to the post featuring your challenge submission.
3.  Please link your card to no more than three challenges, TOTAL.
4.  Have FUN! 
 

I look forward to seeing what you make with Laurie's sketch this week. I'm off for a morning of sport and then both James Juniors are taking part in a basketball tournament this afternoon. Another busy Sunday!

Back tomorrow with another project; until then, happy stampin'!


Stampin' Up! Supplies Used:

Table built using Product Table Builder by The Crafty Owl - Independent Stampin' Up! Demonstrator.
 

All is Calm, All is Bright Wonderland Card

by Joanne James15. November 2015 09:00

It's Sunday and time for a new challenge over at The Paper Players! This week it is the turn of the lovely Jaydee to host and she has a clean and simple challenge to get our creative juices flowing this week:


I decided to get to work with my brayer and create a starry night sky over a forest created with my Wonderland stamp set for my card today:


I went for a long, thin card and brayered my background in Night of Navy, masking the moon with a circle of post-it note, then stamped the trees from 'Wonderland' and the santa and reindeer from 'Cozy Christmas'. I added a few stars with my white signo gel pen and a little white kraft ink. I stamped the sentiment in Versamark and heat embossed this in silver on vellum, wrapping it around my card front and finishing with an iced rhinestone embellishment. 

So I have something of a confession! I saw the brief for our challenge today and the word 'Wonderland' and immediately reached for my stamp set of the same name to create my card. As I sat back to admire my handywork, I  realised that a true 'Winter Wonderland' would surely have snow on the ground and mine didn't have a single flake in sight - oops! With Onstage Live and a trip to Brussels around the corner and 

Before you reach for your ink and papers, check out what our amazing team has created to inspire you this week:

The Paper Players Design Team
Anne Marie Hile - on leave
 
 
Here's a quick recap of our challenge rules:
 
1.  Create a new paper project
2.  Upload your creation to your blog with a link back to us and provide a direct link to the post featuring your challenge submission.
3.  Please link your card to no more than three challenges, TOTAL.
4.  Have FUN! 


I look forward to seeing your CAS creations this week. I'm travelling home from Onstage Live today having had an amazing time with some of my team in Brussels. I've written this post in advance, so I'm sure I'll have lots more to report this coming week.

Back tomorrow with another project; until then, happy stampin'!


Stampin' Up! Supplies Used:

Table built using Product Table Builder by The Crafty Owl - Independent Stampin' Up! Demonstrator.


Hearth and Home Winter Snow Christmas Shaker Card

by Joanne James8. November 2015 09:00

It's Sunday and time for a new challenge over at The Paper Players! This week it's my turn to host and I have a festive colour scheme to get your creative juices flowing this week:


I'm not generally a big fan of black and white, but I am fascinated by the idea of black and white with pops of colour and a little sparkle - I find this can completely change the look and feel of a card. I've been spending lots of time this week playing with my Hearth and Home framelits and co-ordinating Happy Scenes stamp set, as this is what my November technique classes will be using. We are also learning how to make shaker cards so I couldn't resist making one to share with you today:


For my card base and window frame, I used extra thick Whisper White and covered the front with a piece of striking black and white patterned paper from the Winter Wonderland Specialty Designer Series Paper - this paper has a lovely sheen to it and looks really luxurious so was the perfect choice for my 'wallpaper'. I stamped my insert using the winter image from the 'Happy Scenes' stamp set in Memento Black on Whisper White, and I used some Tombo Glue, Dazzling Diamonds and White embossing powder to create some dimensional snow on my trees in the same way as I did on my card last Thursday. I also stamped the corner snowflakes on my window in Versamark and heat embossed in silver before adding my foam tape and filling my window with a combination of white and silver sequins and some Dazzling Diamonds. I stamped my sentiment on a simple banner beneath my window and anchored it to my card with a red poinsetta button from the Home For Christmas Designer Button set threaded with silver cord trim. The button is the only spot of additional colour on my card - and I love it! 

There's something so special about a shaker card - I guarantee if you give someone a card you can shake it will make them smile!

Before you reach for your ink and papers, check out what our amazing team has created to inspire you this week:

The Paper Players Design Team
Anne Marie Hile - on leave
 
 
Here's a quick recap of our challenge rules:
 
1.  Create a new paper project
2.  Upload your creation to your blog with a link back to us and provide a direct link to the post featuring your challenge submission.
3.  Please link your card to no more than three challenges, TOTAL.
4.  Have FUN! 


I look forward to seeing what you make with my colour palette this week. I'm off for a morning of basketball and then lunch and something fun with the children in the afternoon - we might make a start on their Christmas cards for their classmates, who knows?

Back tomorrow with another project; until then, happy stampin'!


Stampin' Up! Supplies Used:

Table built using Product Table Builder by The Crafty Owl - Independent Stampin' Up! Demonstrator.


Mini Catalogue

BROWSE THE CATALOGUE

The mini catalogue is now live! Read and download your copy here.

Shop Online

Access my online shop 24 x 7, 365 days of the year:

Current April hostess code:

VDKNV7BH

Shop Online

Join My Team

It's always a great time to join Stampin’ Up! New team members can get £130 worth of products for only £99 + free business supplies + free shipping + all the fun being a part of Stampin’ Up! Stampin' Up! has something for everyone: join my growing team and benefit from my support to enjoy Stampin' Up! however you choose.

If you're interested, call me for a chat to understand how I can help you realise your goals. Alternatively, if you have already decided to sign up and you just can't wait, please click here for the link to the online form where you can sign up and order your starter kit right away! 

Latest Kit!

Stampin Cut and Emboss

The Rock Legend Kit has all you need to make 8 cards with coordinating envelopes. Along with the new Panda Friends Kit, both are available from January 4th for just £14 each - get yours here!

2023-24 Annual Catalogue

BROWSE THE CATALOGUE

Click on the catalogue for a full list of current SU! supplies - if you would like to order any of the items featured, please drop me a line at [email protected] or give me a call on 07773 421446 - I'd be happy to help.

New Online Exclusives

There are new products available exclusively in the online store from 5 March - check them out here.

About Me

Hi I'm Joanne and live in Northampton and when I'm not looking after my husband and two beautiful children, am an avid crafter with a passion for all things Stampin' Up!

I must confess that I have never been a big rubber stamper - until I discovered Stampin' Up! that is. I love the fact that I can get such great results with co-ordinating stamps, inks, papers and punches - the possibilities are endless! Join me on my stamping journey as I share the things I love and be inspired to create amazing things yourself!

Follow Me

Monthly Newsletter

Box Builder

Click the button above to use Box Buster to create your custom box design using the Envelope Punch Board!

Kits Collection Now Available!

Stampin Cut and Emboss

The new Kits Collection from Stampin' Up! is now available!

Click here to see the current kits available and order yours online today.

I Design For


Stampin' Up Stuff

This is my personal blog and is not endorsed by Stampin’ Up! I hope you find it a plentiful source of ideas and personal inspiration but please don't copy my designs for contest submission or use for classes, publication or sale without express permission.