Clean and Simple Candy Cane Christmas Card - Sweet Treats PP419

by Joanne James18. November 2018 09:00

Today it's Sunday and time for this week's new challenge over at The Paper Players - yay! It's the turn of my awesome friend LeAnne to host this week and she has a clean and simple challenge for you to work with:


Remember in addition to the theme of "sweet treats", this week is a Clean-and-Simple (CAS) challenge!  What do we mean by CAS?

  • Minimal layers and embellishments
  • Plenty of open space, aka "white" space
  • Simple and uncluttered

I was totally inspired by the red and white stripes and the candy cane in our wonderful inspiration photo for my card this week - take a look:


Here's the low-down on today's card:

Sweet Candy Canes - My card is all about candy canes - when it comes to sweet treats at this time of year, is there really anything sweeter? I reached for my favourite Santa's Workshop designer series papers again and paired them with a glittery candy cane embellishment from my Memories and More pack for a striped candy feast. 

Keep It Simple - My card really is super simple: a couple of well-chosen papers used sparingly, with a simple stitched circle and heat-embossed Christmas sentiment complete my card. Even the inside has a well-chosen but super simple sentiment detail:


A Delight in Red and White - Using just one colour with my white card base adds to the clean and simple feel of today's card. If you like this card, you might also want to check out this card that I posted earlier this week that used the same colour combination and products - and can also be made in under 10 minutes. Both of these cards are simple to create and would be great for mass production. Gotta love #SimpleStamping

Here is the visual summary of the key products used on today's project for you to pin for easy reference:


You can see all of my Product and 'How To' summaries on my 'How To - Tips and Techniques' Pinterest board in case you've missed any. 

Before you reach for your ink and papers, check out what our amazing team has created to inspire you this week:

Here's a quick recap of our challenge rules:
 
1.  Create a new paper project
2.  Upload your creation to your blog with a link back to us and provide a direct link to the post featuring your challenge submission.
3.  Please link your card to no more than four challenges, TOTAL.
4.  Have FUN!

You can see all of my 'How To' summaries on my 'How To - Tips and Techniques' Pinterest board in case you've missed any. 

Enjoy your day. We had a busy day yesterday with a scrapbooking class and a swimming gala so today is officially homework day in the James household with hopefully a movie afternoon thrown in. I'll be back tomorrow with another project. Until then, happy stampin'!


Stampin' Up! Supplies Used: 

Table built using Product Table Builder by The Crafty Owl - Independent Stampin' Up! Demonstrator.


New Stitched Shapes Framelits and 25% Off Stamp Sets

by Joanne James1. November 2016 07:00

I'm back today with some great news for the start of November: from today we have the early release of a new product from the 2017-18 annual catalogue, Stitched Shapes Framelits, and a product promotion!

StitchFramelit_DemoHeader_SPUK

A Great New Product

Let’s start with the Framelits: the Stitched Shapes Framelits Dies are a set of 12 dies that include four circles, four ovals and four squares that coordinate with our Layering Circles, Ovals and Squares.  Brilliant!

These new dies are available for purchase beginning November 1 – that’s today!

So, what makes these Framelits a necessity?  When run through the Big Shot, these dies leave a detailed stitch around the edge of the Framelit.  The stitched look is so on-trend right now and will add a great extra touch to your stamped projects. Here’s a video with details about the new dies and some great project ideas:


Aren't they great? You are definitely going to want to add these to your framelit collection.

Here are the measurements for these new shapes:

Circles:  1-3/8″, 1-7/8″, 2-3/8″, 2-7/8″

Squares: 1-3/16″, 1-5/8″, 2-1/8″, 2-5/8″

Ovals: 1-3/4″ x 13/16″, 2-1/4″ x 1-5/16″, 2-3/4″ x 1-13/16″, 3-1/4″ x 2-5/16″


25% Off Selected Stamp Sets

What's more, there's a promotion to run alongside the launch of these new framelits too! As if the new Stitched Shapes Dies weren’t great enough…there is also a long list of stamp sets from the Autumn-Winter Catalogue and Annual Catalogue are available for 25% off during November.  Yes, you heard it - 25% OFF! here's the complete list:


Right - I'm off to put in my order for these fabulous new framelits and then get on with my busy day of back-to-back classes. I will be back later with today's project blog post; until then, happy shopping! Oh and don't forget to use this month's hostess code SQN297RD when placing your order online to get a little thank you in the post from me!

Table built using Product Table Builder by The Crafty Owl - Independent Stampin' Up! Demonstrator.


Oh What Fun Meets Warmth and Cheer

by Joanne James23. October 2016 09:00

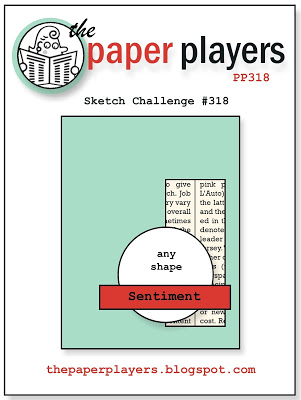
It's Sunday and time for a new challenge over at The Paper Players! It's the turn of the lovely Jaydee to host this week and she has a great sketch for you to work with:


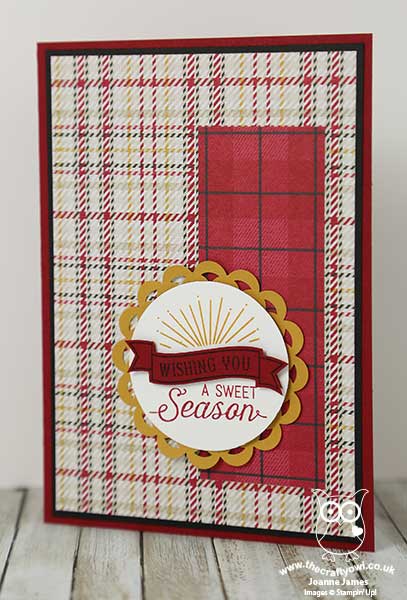
I decided to combine my card with the challenge over at Merry Monday and use some of the lovely plaids featured in the Warmth and Cheer designer series paper stack. I actually made two cards for today's challenge and couldn't decide which one I liked best, so thought I'd share them both! Here's my first card:


Here's the low-down on today's card:

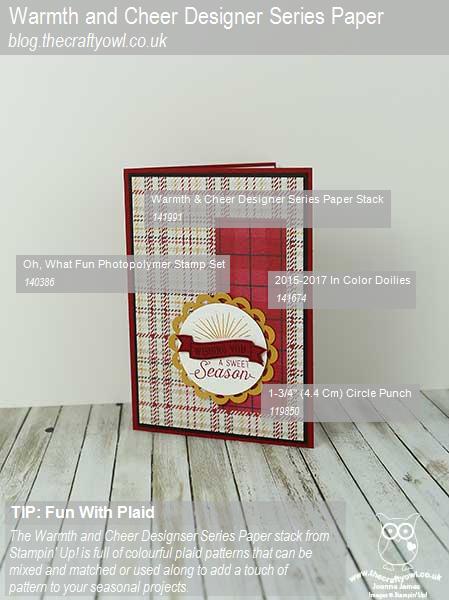
Warmth and Cheer - Both of my warm plaids are from the Warmth and Cheer designer series paper pack, which is choc full of great plaid patterns that work for both autumnal and Christmas cards. Here I've combined two of the plaid patterns, each featuring Cherry Cobbler, for my vertical panel and mat. 

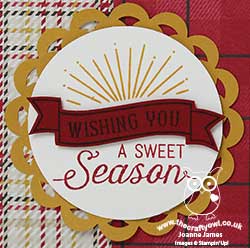
Oh What Fun - I was prompted to use this sentiment from the 'Oh What Fun' set following a conversation with one of my team members this week. This set is choc-full of great sentiments and having featured in last year's seasonal catalogue this year has made the transition to the annual catalogue. It was perfect for my card today, allowing me to ink up each half with Delightful Dijon and Cherry Cobbler markers on a 1 3/4" punched circle and separated by a fussy cut Cherry Cobbler banner. 

Dijon Doily - To finish I added a 2015-17 In-Color Doily in Delightful Dijon behind my circle sentiment. I often forget to use doilies yet I like the added detail it adds to my circle here without being overly fussy, clean and simple person that I am! 

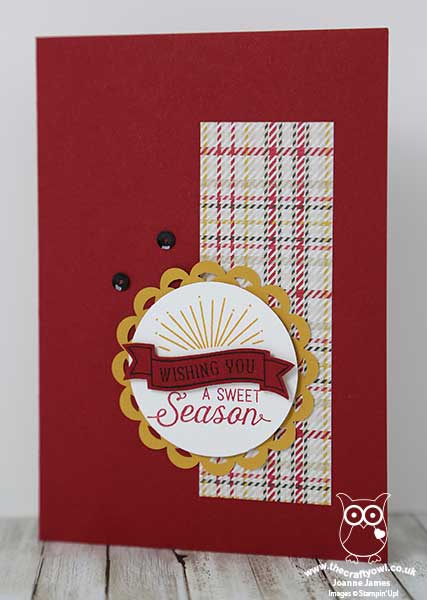
Here's the second card that I made - this one has a few less layers and features only one piece of plaid, along with a couple of metallic sequins:


Lastly, here is the visual summary of the key products used on today's project for you to pin for easy reference:


You can see all of my 'How To' summaries on my 'How To - Tips and Techniques' Pinterest board in case you've missed any. 

So which one of today's cards do you prefer? Do leave me a comment below with your thoughts - I love reading them!

Before you reach for your ink and papers, check out what our amazing team has created to inspire you this week:

The Paper Players Design Team
 
 
Here's a quick recap of our challenge rules:
 
1.  Create a new paper project
2.  Upload your creation to your blog with a link back to us and provide a direct link to the post featuring your challenge submission.
3.  Please link your card to no more than four challenges, TOTAL.
4.  Have FUN! 


I look forward to seeing what you create with this week's sketch.

Back tomorrow with another project; until then, happy stampin'!


Stampin' Up! Supplies Used:

Table built using Product Table Builder by The Crafty Owl - Independent Stampin' Up! Demonstrator.

It's All About The Reindeer!

by Joanne James17. December 2015 08:05

I've had a few blog-free days this week - so much going on with the end of the school term and Christmas preparations, blogging has had to take a bit of a back seat - however today it's time for a new challenge over at Create With Connie and Mary so I'm back with it and this week we have a great colour combination for you:


My card this week is all about the reindeer - take a look:


I decided to make a feature of the reindeer antler paper and vellum from the Winter Wonderland designer series paper, with a little gold glimmer paper, a few gold sequins, corded trim and one of my favourite reindeer paper clips to finish off my little layered tag. A little bit of layering but still easy enough to make for those last minute Christmas cards and a great way to use up that rather tricky heavily patterned paper.

Do visit the other Design Team members to see what they did with this week's colours; there's lots of inspiration over on their blogs too! Due to the Christmas festivities, this challenge will run for two weeks instead of one, so lots of time for to squeeze in an entry!

Enjoy your day and I'll be back tomorrow with another project; until then, happy stampin'!


Stampin' Up! Supplies Used:

  • Winter Wonderland Specialty Designer Series Paper
  • Winter Wonderland Designer Vellum Stack
  • Gold Cording Trim
  • Reindeer Paper Clips Embellishments
  • Tags & Labels Framelits Dies
  • Gold Glimmer Paper
  • Metallics Sequin Assortment
  • Basic Black A4 Cardstock
  • Whisper White A4 Cardstock
  • Big Shot
  • Fine-Tip Glue Pen


Tis The Season To Be Holly

by Joanne James13. December 2015 10:00

It's Sunday and time for a new challenge over at The Paper Players! This week it is the turn of my good friend LeAnne to host and she has the following colour palette to get our creative juices flowing this week:


This is a special week for us as we say goodbye to our guest designers Jodi, Amy and Lisa. We are grateful that these lovely ladies have shared their considerable talent and creativity with us for the last 6 months and we wish them well on their respective journeys. We will miss you!

For my card this week I was inspired to use yet more of the lovely Home For Christmas paper and designed my card all around the holly. I also used the sketch over at The Global Design Project for my layout:


Really simple, allowing the holly patterned paper to do all the hard work on this one. The sentiment is from 'Oh What Fun' and the sentiment piece cut using the Tags and Labels Framelits. I added some Cherry Cobbler seam binding ribbon and highlighted the berries on my holly with pearls coloured with my retired Cherry Cobbler Blendabilities. I also created a second version of this card whilst I had everything out on my desk, using the same sketch but this time using the similar but slightly different colour palette over at Paper Pals Arts this week:

   12-10 PPA279

I used gold foil to make my sentiment banner stand out and fussy cut some holly from the dsp in place of the stamped sentiment and also added a flatter, more post-friendly bow with a scrap of ribbon I found in my stash:


Here's a close up of the label detail:

I really like how the gold gives a different effect.

Before you reach for your ink and papers, check out what our amazing team has created to inspire you this week:

The Paper Players Design Team
Anne Marie Hile - on leave
 
 
Here's a quick recap of our challenge rules:
 
1.  Create a new paper project
2.  Upload your creation to your blog with a link back to us and provide a direct link to the post featuring your challenge submission.
3.  Please link your card to no more than three challenges, TOTAL.
4.  Have FUN! 


I look forward to seeing what you create with this colour combination this week. We are hoping to put our Christmas tree up today - it's time to really get our Christmas preparations underway!

Back tomorrow with another project; until then, happy stampin'!


Stampin' Up! Supplies Used:

Table built using Product Table Builder by The Crafty Owl - Independent Stampin' Up! Demonstrator.


Mini Catalogue

BROWSE THE CATALOGUE

The mini catalogue is now live! Read and download your copy here.

Shop Online

Access my online shop 24 x 7, 365 days of the year:

Current March hostess code:

S9F2XJJW

Shop Online

Join My Team

It's always a great time to join Stampin’ Up! New team members can get £130 worth of products for only £99 + free business supplies + free shipping + all the fun being a part of Stampin’ Up! Stampin' Up! has something for everyone: join my growing team and benefit from my support to enjoy Stampin' Up! however you choose.

If you're interested, call me for a chat to understand how I can help you realise your goals. Alternatively, if you have already decided to sign up and you just can't wait, please click here for the link to the online form where you can sign up and order your starter kit right away! 

Latest Kit!

Stampin Cut and Emboss

The Rock Legend Kit has all you need to make 8 cards with coordinating envelopes. Along with the new Panda Friends Kit, both are available from January 4th for just £14 each - get yours here!

2023-24 Annual Catalogue

BROWSE THE CATALOGUE

Click on the catalogue for a full list of current SU! supplies - if you would like to order any of the items featured, please drop me a line at [email protected] or give me a call on 07773 421446 - I'd be happy to help.

New Online Exclusives

There will be new products available exclusively in the online store from 5 March - check them out here.

About Me

Hi I'm Joanne and live in Northampton and when I'm not looking after my husband and two beautiful children, am an avid crafter with a passion for all things Stampin' Up!

I must confess that I have never been a big rubber stamper - until I discovered Stampin' Up! that is. I love the fact that I can get such great results with co-ordinating stamps, inks, papers and punches - the possibilities are endless! Join me on my stamping journey as I share the things I love and be inspired to create amazing things yourself!

Follow Me

Monthly Newsletter

Box Builder

Click the button above to use Box Buster to create your custom box design using the Envelope Punch Board!

Kits Collection Now Available!

Stampin Cut and Emboss

The new Kits Collection from Stampin' Up! is now available!

Click here to see the current kits available and order yours online today.

I Design For


Stampin' Up Stuff

This is my personal blog and is not endorsed by Stampin’ Up! I hope you find it a plentiful source of ideas and personal inspiration but please don't copy my designs for contest submission or use for classes, publication or sale without express permission.