It's All About The Reindeer!

by Joanne James17. December 2015 08:05

I've had a few blog-free days this week - so much going on with the end of the school term and Christmas preparations, blogging has had to take a bit of a back seat - however today it's time for a new challenge over at Create With Connie and Mary so I'm back with it and this week we have a great colour combination for you:


My card this week is all about the reindeer - take a look:


I decided to make a feature of the reindeer antler paper and vellum from the Winter Wonderland designer series paper, with a little gold glimmer paper, a few gold sequins, corded trim and one of my favourite reindeer paper clips to finish off my little layered tag. A little bit of layering but still easy enough to make for those last minute Christmas cards and a great way to use up that rather tricky heavily patterned paper.

Do visit the other Design Team members to see what they did with this week's colours; there's lots of inspiration over on their blogs too! Due to the Christmas festivities, this challenge will run for two weeks instead of one, so lots of time for to squeeze in an entry!

Enjoy your day and I'll be back tomorrow with another project; until then, happy stampin'!


Stampin' Up! Supplies Used:

  • Winter Wonderland Specialty Designer Series Paper
  • Winter Wonderland Designer Vellum Stack
  • Gold Cording Trim
  • Reindeer Paper Clips Embellishments
  • Tags & Labels Framelits Dies
  • Gold Glimmer Paper
  • Metallics Sequin Assortment
  • Basic Black A4 Cardstock
  • Whisper White A4 Cardstock
  • Big Shot
  • Fine-Tip Glue Pen


Hearth and Home Winter Snow Christmas Shaker Card

by Joanne James8. November 2015 09:00

It's Sunday and time for a new challenge over at The Paper Players! This week it's my turn to host and I have a festive colour scheme to get your creative juices flowing this week:


I'm not generally a big fan of black and white, but I am fascinated by the idea of black and white with pops of colour and a little sparkle - I find this can completely change the look and feel of a card. I've been spending lots of time this week playing with my Hearth and Home framelits and co-ordinating Happy Scenes stamp set, as this is what my November technique classes will be using. We are also learning how to make shaker cards so I couldn't resist making one to share with you today:


For my card base and window frame, I used extra thick Whisper White and covered the front with a piece of striking black and white patterned paper from the Winter Wonderland Specialty Designer Series Paper - this paper has a lovely sheen to it and looks really luxurious so was the perfect choice for my 'wallpaper'. I stamped my insert using the winter image from the 'Happy Scenes' stamp set in Memento Black on Whisper White, and I used some Tombo Glue, Dazzling Diamonds and White embossing powder to create some dimensional snow on my trees in the same way as I did on my card last Thursday. I also stamped the corner snowflakes on my window in Versamark and heat embossed in silver before adding my foam tape and filling my window with a combination of white and silver sequins and some Dazzling Diamonds. I stamped my sentiment on a simple banner beneath my window and anchored it to my card with a red poinsetta button from the Home For Christmas Designer Button set threaded with silver cord trim. The button is the only spot of additional colour on my card - and I love it! 

There's something so special about a shaker card - I guarantee if you give someone a card you can shake it will make them smile!

Before you reach for your ink and papers, check out what our amazing team has created to inspire you this week:

The Paper Players Design Team
Anne Marie Hile - on leave
 
 
Here's a quick recap of our challenge rules:
 
1.  Create a new paper project
2.  Upload your creation to your blog with a link back to us and provide a direct link to the post featuring your challenge submission.
3.  Please link your card to no more than three challenges, TOTAL.
4.  Have FUN! 


I look forward to seeing what you make with my colour palette this week. I'm off for a morning of basketball and then lunch and something fun with the children in the afternoon - we might make a start on their Christmas cards for their classmates, who knows?

Back tomorrow with another project; until then, happy stampin'!


Stampin' Up! Supplies Used:

Table built using Product Table Builder by The Crafty Owl - Independent Stampin' Up! Demonstrator.


Flurry of Wishes Holidays Fancy Foil Vellum Snowflake Christmas Card

by Joanne James25. October 2015 11:00

It's Sunday and time for a new challenge over at The Paper Players! This week it is the turn of my wonderful friend LeAnne to host and she has my favourite type of challenge, a sketch, for us to work with this week:


This is a sketch with lots of possibilities; I eventually settled on a silver and white snowflake-themed card - here it is:


I used a piece of extra-thick Whisper White cardstock for my base and for the three vertical panels, used three pieces of the silver snowflake Holidays Fancy Foil vellum, adhered to three pieces of Whisper White on to three mats of silver foil cardstock. I stamped my sentiment from the 'Flurry of Wishes' stamp set in Versamark onto Whisper White and heat embossed it in silver and matted this onto a piece of silver foil too, having flagged both ends with my Triple Banner Punch. For the circle element of the sketch, I took a bit of a liberty and stamped the medium sized snowflake from 'Flurry of Wishes' in Versamark and heat embossed in silver and punched it out using the Flower Medallion Punch. I adhered this to my card using dimensionals, with some loops of silver cord trim underneath it. For the final element of the sketch, I added one of the Winter Wonderland Embellishments to the point of my snowflake. 

I adore this card - it is so wonderfully sparkly and shimmery in real life, although it is so white it was quite difficult to photograph and the picture definitely doesn't do it justice! The Holidays Fancy Foil Vellum is just gorgeous and a little definitely goes a long way.

Before you reach for your ink and papers, check out what our amazing team has created to inspire you this week:

The Paper Players Design Team
Anne Marie Hile - on leave
 
 
Here's a quick recap of our challenge rules:
 
1.  Create a new paper project
2.  Upload your creation to your blog with a link back to us and provide a direct link to the post featuring your challenge submission.
3.  Please link your card to no more than three challenges, TOTAL.
4.  Have FUN! 


I look forward to seeing how you interpret our sketch this week. The children are back this morning so I will be collecting Ben from basketball and then we are having Granny over for lunch. In the afternoon we are going to start looking at Rebecca's music assignment - half term homework, boo hoo!

Back tomorrow with another project; until then, happy stampin'!


Stampin' Up! Supplies Used:

Table built using Product Table Builder by The Crafty Owl - Independent Stampin' Up! Demonstrator.


Black Glimmer Sleigh Ride Edgelits Card

by Joanne James15. October 2015 08:05

Today it's time for a new challenge over at Create With Connie and Mary and this week we have a great sketch challenge for you:


Having contemplated the use of washi tape on today's card, I decided to take a more liberal interpretation and used my much loved Sleigh Ride Edgelits to create the layers on today's card:


I decided to use a piece of the rather dramatic black Winter Wonderland Specialty Designer Series Paper as the main feature paper for my card, layering this on a piece of gold foil and a base of Whisper White extra thick cardstock. This DSP is gorgeous - very glossy and with a beautiful sheen to it. I then layered my edgelits, cutting the trees out of gold glimmer paper and the houses out of Whisper White extra thick cardstock, but reversing both so that my sweeping lines went in the right direction according to the sketch! I stamped my sentiment from the co-ordinating stamp set 'Jingle All The Way' in Memento Black onto the white layer, just above the sweep of my final layer - Santa and his sleigh cut out of black glimmer paper and tied with a gold corded trim bow.  

I wasn't sure that black glimmer paper would work on a Christmas card, but I'm so glad I gave it a try; it really compliments the dsp on my card and just goes to prove that black glimmer paper has a life beyond Halloween! 

Do visit the other Design Team members to see how they used this week's challenge sketch; there's lots of inspiration over on their blogs too!

Enjoy your day and I'll be back tomorrow with another project; until then, happy stampin'!


Stampin' Up! Supplies Used:

  • Winter Wonderland Specialty Designer Series Paper
  • Whisper White A4 Thick Cardstock
  • Big Shot
  • Magnetic Platform
  • Jingle All The Way Wood-Mount Bundle
  • Gold Cording Trim
  • Gold Foil Sheets
  • Gold Glimmer Paper
  • Black Glimmer Paper
  • Tuxedo Black Memento Ink Pad


White and Gold Christmas Poinsettia Card

by Joanne James15. September 2015 21:02

Good evening blog readers! I had a lovely time with the ladies - and gent! - that attend my card class at a local residential care home this morning. As always, the lovely Sheila and Brenda were wonderful hostesses and today we were joined a new resident, Peggy, for the first time. We enjoyed a pleasant few hours making Christmas cards and this afternoon I caught up with one of my team over a quick coffee and got some jobs done before collecting the children and embarking on the usual Tuesday round of homework, piano lessons and dinner. Anyway, enough about my day! No time to make a card today, so I thought I'd share with you another of the cards we made at my Technique class this month. Another using the 'Reason For The Season' stamp set, but this time in white and gold:

I used extra thick Whisper White cardstock for my base, then created a layered central panel using a piece of gold foil cardstock and a piece of Whisper White covered with a piece of the gorgeous gold foil Winter Wonderland Designer Vellum Stack. I stamped the sentiment and flower onto a piece of Whisper White in Versamark and heat embossed in gold, then fussy cut the flower and punched the sentiment out using a 2" circle punch. To put together, I created a few loops of gold corded trim and adhered these to my card, followed by the sentiment then lastly the flower, overlapping each slightly. A sprinkling of gold sequins from the Metallics Sequin Assortment completes my card.

This is my favourite of all the cards we made in this month's technique class - I love the modern, crisp gold and white finish. That's all from me today; back tomorrow with a new collection of weekly deals. until then, happy stampin'!


Stampin' Up! Supplies Used:

Table built using Product Table Builder by The Crafty Owl - Independent Stampin' Up! Demonstrator.


Tags: , , , , , ,

Cards | Classes | Shop Online | Stamping

O Come All Ye Faithful Winter Wonderland Christmas Card

by Joanne James20. August 2015 08:05

Today it's time for a new challenge over at Create With Connie and Mary and this week we have a great sketch challenge for you:


As I'm still excited to be working may way through my box of seasonal preorder goodies, I have another Christmas card to share with you today using the All Ye Faithful stamp set and Winter Wonderland Specialty Designer Sseries Paper and washi tape. Here's my card: 

My colour scheme today was inspired by the Winter Wonderland product suite - a mix of black, white and gold, with foil accents and real sparkle. Using Basic Black for my base with a mat of gold foil, then used a piece of Winter Wonderland DSP with a crackle-glaze pattern for the front of my card. I edged a piece of Whisper White with gold striped washi tape, then stamped my sentiment in Memento Black on the right hand edge. This sentiment does actually come on one line, so in order to make it work for my card and the sketch I carefully masked off parts of it to enable me to stamp it in three separate sections. For the oval, I stamped Mary and Joseph in Versamark onto Basic Black card and heat embossed it in gold. I backed this with an oval that was cut to the same size using my Big Shot and Ovals Framelits, then cut in half vertically; this then creates a frame that enables the oval to stand out, but isn't too wide, as it would have been if I'd used the next size framelit up. To finish, I added a trio of flags punched using my Tripe Banner Punch, featuring more of the patterns in the Winter Wonderland DSP suite. 

Whilst this isn't a colourway I would necessarily have been drawn to of my own accord, it is very on-trend and I do love the way the entire suite of products make co-ordination so easy - good old Stampin' Up! I love the All Ye Faithful stamp set too - one of my favourite religious sets in the new catalogue, it comes with two other feature stamps and a verse sentiment too that I used on the inside of my card:


I hope you like today's card. Do visit the other Design Team members to see how they used this week's challenge sketch; there's lots of inspiration over on their blogs too!

Enjoy your day and I'll be back tomorrow with another sneak-peek project, one for Halloween this time. Until then, happy stampin'!


Stampin' Up! Supplies Used:

 * All Ye Faithful - available September 1st

* Winter Wonderland Specialty Designer Series Paper - available September 1st

*Winter Wonderland Washi Tape - available September 1st

  • Big Shot
  • Magnetic Platform
  • Ovals Collection Framelits Dies
  • Banner Triple Punch
  • Gold Foil Sheets
  • Whisper White A4 Cardstock
  • Embossing Buddy
  • Versamark Pad
  • Gold Stampin' Emboss Powder
  • Heat Tool (Uk)
  • Basic Black A4 Cardstock
  • Tuxedo Black Memento Ink Pad


Making Spirits Bright Sleigh Ride Edgelits Christmas Card

by Joanne James18. August 2015 08:00

Today I'm sharing the second card I made this week using the sketch over at Mojo Monday. You can see the other card here and as I mentioned in my original blog post, I didn't enter this one which was the first one I created as when I went to upload and perused the gallery there was another card that was very similar - you can see the card in question, designed by Lisa Pretto, here. That hasn't happened to me before when entering a challenge, but what can I say other than great creative minds think alike! Here is my card using probably my most favourite product from the new seasonal catalogue, the Sleigh Ride Edgelits:
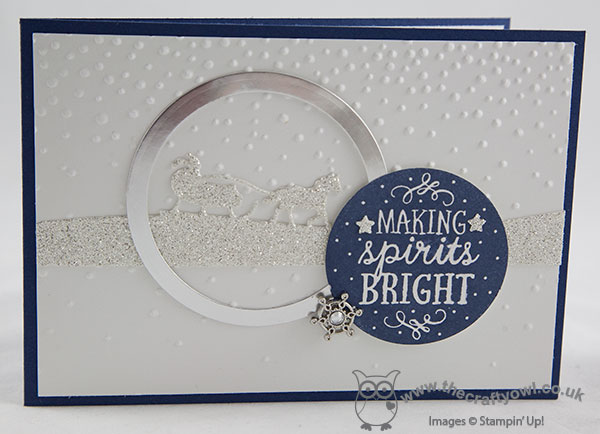
Oh there is so much I love about this card! It uses probably my favourite festive colour combo - navy, white and silver - but check out the fab new products that are coming your way on September 1st:

The Sleigh Ride Edgelits - these come as a set of three, featuring a sleigh, houses and trees, and co-ordinate with a stamp stamp called 'Jingle all the Way'. These can be used in so many ways to create beautiful cards; in fact I have another card for you tomorrow using one of the other Edgelits in the set and the co-ordinating stamp set, so stay tuned!

Making Spirits Bright - this is from a versatile set called 'Among The Branches'. I used the spooky Halloween stamp from this set on my LIM card last week (see it here) and it also includes an Autumn set, along with lots of fun embellishments that co-ordinate with the new Woodland TIEF. I love a set that transcends the seasons and this is definitely that kind of set.

Softly Falling Textured Impressions Embossing Folder - there are some great new embossing folders in the new seasonal catalogue, but I think the Softly Falling TIEF will be my favourite; proper falling snow adding a delightful delicate texture to cards.

Winter Wonderland Embellishments - Did you spot the cute little snowflake embellishment? Big enough to add some sparkle (sometimes foil and glimmer paper is just not enough!) yet small enough to not add too much bulk, these adorable little embellishments come in a pot of 20 - plenty for all your festive card making, but wouldn't look out of place on something less festive either.

I hope you like today's card; quite different to my earlier interpretation of this sketch and very 'me'. Which one do you prefer? Do let me know in the comments section below - I love hearing what you think!

Right, I'm back to squeeze in some more work before the James Juniors return exhilerated from this morning's basketball camp exertions. Back tomorrow with another festive sneak-peek and news of this week's Wednesday Deals - don't miss it! Until then, happy stampin'!
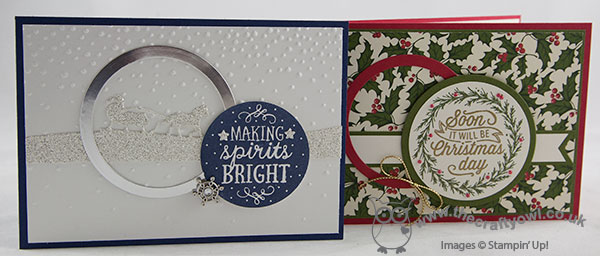
 

Stampin' Up! Supplies Used:

* Sleigh Ride Edgelits - available September 1st

* Among The Branches - available September 1st

* Softly Falling TIEF - available September 1st

* Winter Wonderland Snowflake Embellishments -  available September 1st

Table built using Product Table Builder by The Crafty Owl - Independent Stampin' Up! Demonstrator.


Mini Catalogue

BROWSE THE CATALOGUE

The mini catalogue is now live! Read and download your copy here.

Shop Online

Access my online shop 24 x 7, 365 days of the year:

Current March hostess code:

S9F2XJJW

Shop Online

Join My Team

It's always a great time to join Stampin’ Up! New team members can get £130 worth of products for only £99 + free business supplies + free shipping + all the fun being a part of Stampin’ Up! Stampin' Up! has something for everyone: join my growing team and benefit from my support to enjoy Stampin' Up! however you choose.

If you're interested, call me for a chat to understand how I can help you realise your goals. Alternatively, if you have already decided to sign up and you just can't wait, please click here for the link to the online form where you can sign up and order your starter kit right away! 

Latest Kit!

Stampin Cut and Emboss

The Rock Legend Kit has all you need to make 8 cards with coordinating envelopes. Along with the new Panda Friends Kit, both are available from January 4th for just £14 each - get yours here!

2023-24 Annual Catalogue

BROWSE THE CATALOGUE

Click on the catalogue for a full list of current SU! supplies - if you would like to order any of the items featured, please drop me a line at [email protected] or give me a call on 07773 421446 - I'd be happy to help.

New Online Exclusives

There will be new products available exclusively in the online store from 5 March - check them out here.

About Me

Hi I'm Joanne and live in Northampton and when I'm not looking after my husband and two beautiful children, am an avid crafter with a passion for all things Stampin' Up!

I must confess that I have never been a big rubber stamper - until I discovered Stampin' Up! that is. I love the fact that I can get such great results with co-ordinating stamps, inks, papers and punches - the possibilities are endless! Join me on my stamping journey as I share the things I love and be inspired to create amazing things yourself!

Follow Me

Monthly Newsletter

Box Builder

Click the button above to use Box Buster to create your custom box design using the Envelope Punch Board!

Kits Collection Now Available!

Stampin Cut and Emboss

The new Kits Collection from Stampin' Up! is now available!

Click here to see the current kits available and order yours online today.

I Design For


Stampin' Up Stuff

This is my personal blog and is not endorsed by Stampin’ Up! I hope you find it a plentiful source of ideas and personal inspiration but please don't copy my designs for contest submission or use for classes, publication or sale without express permission.