by Joanne James6. December 2015 10:00
It's Sunday and time for a new challenge over at The Paper Players! This week it is the turn of my good friend Claire to host and she has a fun theme to get our creative juices flowing this week:
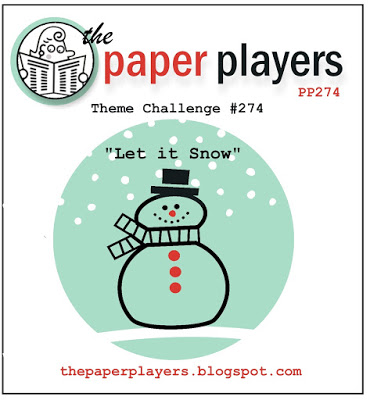
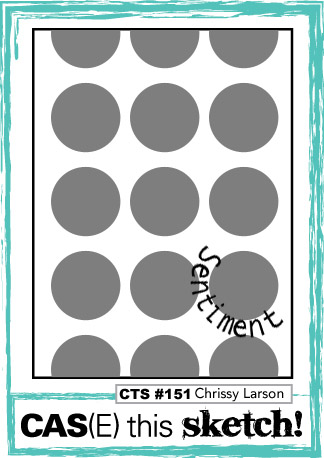
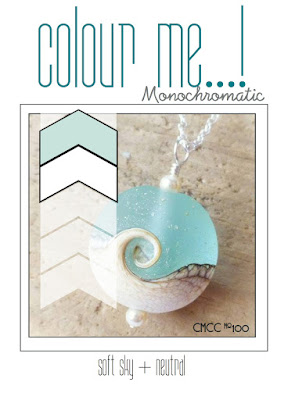

I had an idea brewing in my mind all week for this challenge, but I had rather less time to craft this week than I would have liked so ended up in the end going with something altogether more clean and simple! I was intrigued by this week's sketch over at CAS(E) This Sketch and was sad to see that Hayley and Tara are winding up the Colour Me...! blog after this week's challenge. I had such a lovely time when I did my DT stint over there I just had to play along for this their final challenge (although I did take a little liberty by adding in silver to my monochromatic colour scheme - well ladies, it is Christmas!) I'm also linking with CAS-UAL Fridays, since my card today features snowflakes - take a look:
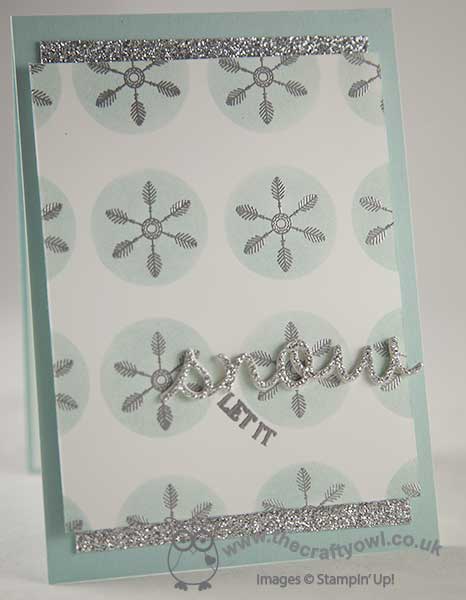
I used a base of Soft Sky then added some strips of silver glimmer paper, before adding my Whisper White panel. On this panel, I stamped the small snowflake from the Project Life Hello December set in Versamark and heat embossed it in silber. I then cut a stencil with my 1 1/4" circle punch and sponged around the snowflakes in Soft Sky ink. I then took my 'let it snow' sentiment from the Sparkly Season stamp set and having curved it on my block, I stamped just the first two words in Versamark and heat embossed that in silver too. For my 'snow' to finish the sentiment, I used the coordinating die cut from the same set and cut three in extra-thick Whisper White and one in silver glimmer paper and layered them together to create my stacked sentiment. In retrospect I would change the placement of the 'let it' (it should be above the 'snow' rather than below it) but I was against the clock and didn't have time to make a second panel. That aside, I like the card -there is something soothing about the soft blue colour and the pattern is an interesting one. Oh and it's got silver glimmer paper, which I seem to be using everywhere lately!
Before you reach for your ink and papers, check out what our amazing team has created to inspire you this week:
The Paper Players Design Team
Here's a quick recap of our challenge rules:
1. Create a new paper project
2. Upload your creation to your blog with a link back to us and provide a direct link to the post featuring your challenge submission.
3. Please link your card to no more than three challenges, TOTAL.
4. Have FUN!
I look forward to seeing your snowy creations this week. I'm off for a morning of basketball and then I've some final preparations for the last of my Christmas card classes tomorrow, hopefully time for a spot of crafting, then Ben is attending a birthday party in the afternoon. Oh and we are going to attempt to put the Christmas tree up - not much to be going on with then!
Back tomorrow with another project; until then, happy stampin'!
Stampin' Up! Supplies Used:
ff2dbafd-aed3-402b-9816-5444187b4067|0|.0|96d5b379-7e1d-4dac-a6ba-1e50db561b04
Tags: Stampin' Up, Stampin' Up Card, Stampin' Up Card ideas, Stampin' Up Supplies, The Paper Players, Shop online, Shop Stampin' Up online, Christmas, Project Life, Hello December 2015, circle punch, Seasonal Frame Thinlits Dies, Sparkly Season
Cards | Shop Online | Stamping
by Joanne James30. November 2015 12:48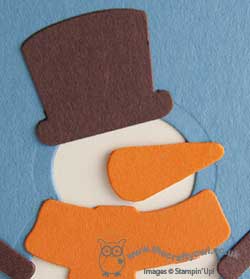
As promised - here is my second card of the day, this time for this week's challenge over at The Color Throwdown:

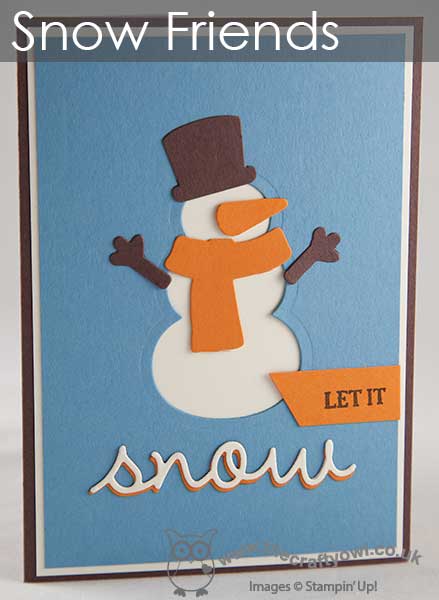
I saw the colours and those adorable snowman treats and knew that I had the perfect idea for a card to play along! The feedback on this card last Thursday where I used my Snow Friends framelits to create a 'negative space' graphic snowman was well received with lots of positive comments, so today I went one step further - and added in a carrot nose! Take a look:
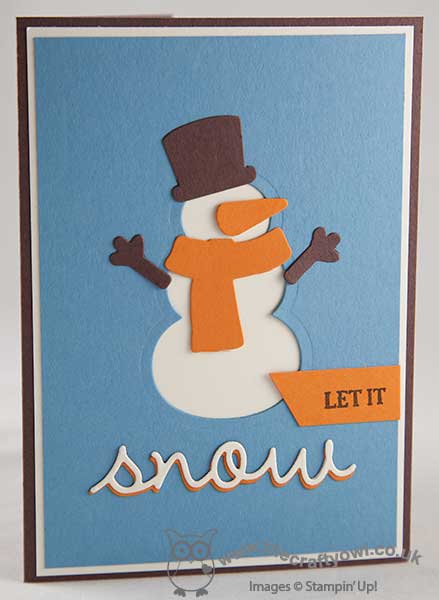
The best thing of all - I used one of my Snow Friends framelits to create it! Are you wondering which one? Yes, it was the ice cream cone - I simply trimmed away the icecream and it left a perfect carrot nose shape. I love it when you can multi-purpose things!! I also added in some twig arms on this card, because the colours worked so well. I think everything else is pretty self-explanatory - check out the layered die cut 'snow' too, cut using the die in the Seasonal Frame Thinlits set and adhered with ease using the fine tip glue pen - perfect for narrow elements like this! Any other questions, leave me a comment below - I read then all and will be sure to post you an answer if you have any queries on this or any of my cards!
Right, off to nurse the poorly one and hopefully fit in an hour or two at my desk before doing the school run. Back tomorrow with another project; until then, happy stampin'!
Stampin' Up! Supplies Used:
d38ac196-d6d7-4da0-8914-f80088104ca2|0|.0|96d5b379-7e1d-4dac-a6ba-1e50db561b04
Tags: Big Shot, Christmas, Shop online, Shop Stampin' Up online, Snow Friends Framelits, Seasonal Frame Thinlits Dies, Sparkly Season, Stampin' Up, Stampin' Up Card, Stampin' Up Card ideas, Stampin' Up Supplies
Cards | Shop Online | Stamping
by Joanne James30. November 2015 11:56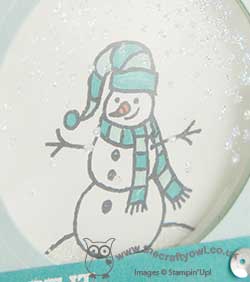
Happy Monday everyone! Happier for some than others - I'm working from home with one James Junior off school today fighting the seasonal lurgy - but for everyone reading this, your day is about to get better! I have a double post for you today (to make up for Saturday's lack of post!) with cards for a couple of challenges. The first is my card for this week's challenge over at Freshly Made Sketches where they have a great sketch - I combined with the theme inspiration of 'Blue Christmas' over at Fusion:

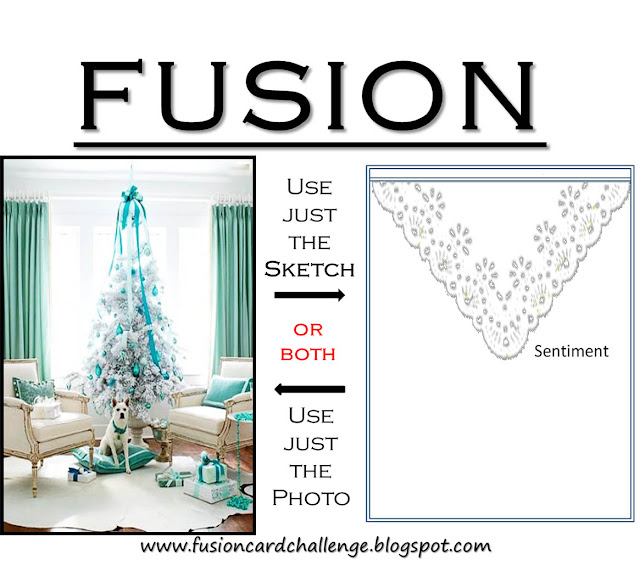
I love the simplicity of Jen T's sketch this week, although by the time I finished my card I wondered if I'd got just a little bit carried away - take a look:
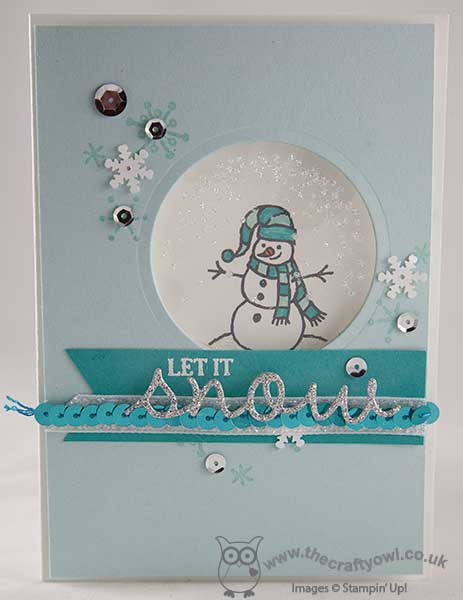
I made a cute 'faux shaker' card using the snowman image from the 'Sparkly Season' stamp set, stamping him in Memento Black and colouring him in with my Pool Party and Bermuda Bay markers, with Pumpkin Pie for his nose, then used my two-way glue pen to adhere some Dazzling Diamonds to the snow mound that the snowman is sat on. I then stamped the snowfall stamp in Versamark to my window sheet and applied Heat & Stick and Iridescent Ice to give it a lovely sparkle, before adhering behind the hole that I'd cut in my Pool Party top layer. On this layer I stamped a few clusters of snowflakes in Pool Party using the snowflake stamp in the Snow Place stamp set and highlighted these with some silver sequins along with a few retired snowflake sequins from last year's stash. To finish, I added a layered banner that contains a little of everything: white glitter ribbon, Bermuda Bay sequins and a dash of silver glimmer paper to boot! I just love the sparkle and shine of this card and the shades of blue - so very pretty!
Back shortly with another quick and easy card for today; I must be on a roll! Until then, happy stampin'!
Stampin' Up! Supplies Used:

7198e06d-39ee-451a-8225-93ee239c6905|0|.0|96d5b379-7e1d-4dac-a6ba-1e50db561b04
Tags: Big Shot, Christmas, Shop online, Shop Stampin' Up online, Stampin' Up, Stampin' Up Supplies, Stampin' Up Card ideas, Stampin' Up Card, Sparkly Season, Snow Place, Seasonal Frame Thinlits Dies, Shaker cards
Cards | Shop Online | Stamping