It's (Another) Girl!

by Joanne James24. January 2014 20:12

So today I'm sharing a card I made to welcome the latest addition to the family for some friends of mine - their fourth daughter (hence the title of my blog post today!) I decided to steer clear of the pastel pinks that are traditional for baby girl cards and go brighter; after all, when it's your fourth baby girl it's nice to ring the changes, right?! So here's my card:

I used the 'Zoo Babies' stamp set to create my montage of animals and based my colour scheme on the checked DSP from the 'Birthday Basics' set. I used paper piecing to highlight some of the animals' features, as opposed to colouring with marker, so that they would stand out against the bold patterned paper. I smiled to myself as Rebecca came to give my card her seal of approval and said "Are you going to add 'another' with your Raspberry Ripple marker Mum?" As you can see, I resisted the temptation!!

I'm linking today's card up with Less is More where the challenge this week is 'New Baby', the sketch challenge over at CAS(E) this Sketch! and Addicted to CAS, where the challenge is 'New' - well, this card is for a new baby and was created with a new (to me!) stamp set, so I think that qualifies!


Back tomorrow with another project; until then, happy stampin'!


Stampin' Up! Supplies Used:

Table built using Stampin' Up! Product Table Builder from The Crafty Owl.


I Dig You! One Layer Card

by Joanne James23. January 2014 20:07

I have another one layer card to share with you today; I sat down at my desk yesterday with the intention of making something completely different, but having finished the card that I blogged yesterday my head was still in the 'one layer' zone and I suddenly remembered an idea I had had a while ago, but not committed to paper. So I raided my Stampin' Write marker box and came up with the following quick, fun card:

This fun little shovel is from the 'Tag It' stamp set, a great stamp set with a mix of images suitable for a variety of occasions, and for which Stampin' Up! donates £2 from every set sold to Ronald McDonald House Charities. I started with the stamp on the right, which is the complete stamp including the 'I Dig You' sentiment, then worked back from right to left using my stamp-a-ma-jig to ensure perfect placement to create my rainbow of trowels. I wanted my red trowel to be the focal point, so in addition to including the sentiment, I inset it in a read dotted outline heart using the fine tip of my Real Red marker pen and my paper piercing template.

Another cute one layer card with a Valentine's theme - I think I'll link this one up with the challenge over at The Paper Players this week too. Back tomorrow with another project; until then, happy stampin'!


Stampin' Up! Supplies Used:

Table built using Stampin' Up! Product Table Builder from The Crafty Owl.


Tags: , , , , , , , ,

Cards | Stamping

True Love - Pals Paper Arts #187

by Joanne James13. January 2014 21:13

A busy day today: key highlights were getting to the bottom of the ironing basket (always worth celebrating!), finding Ben's mislaid PE training shoes at school and completing my card for this week's Pals Paper Arts Challenge. This week it's a colour challenge to incorporate the following colours:


I decided to stick with the Valentine's theme and use the contrasting colours to work up a card design that I've been wanting to have a go at for a while - here's my card:

I'm not sure what the term is for this angular layered design (or even if there is one!) but it's the perfect simple layout to highlight both the Eiffel Tower and 'True Love' sentiment from the 'Follow Your Heart' stamp set; I used my Stamp-a-ma-jig to ensure perfect placement. Lastly, I added a small punched red heart with a rhinestone on a dimensional for added interest. I love the simplicity of this card and the statement that the bold red colour makes against the white and soft sky.

I hope you like my card - there's lots more inspiration from the Design Team over at Paper Pal Arts using this colour combination if you fancy having a go.

Back tomorrow with another card; until then, happy stampin'!


Stampin' Up! Supplies Used:

Table built using Stampin' Up! Product Table Builder from The Crafty Owl.

Afternoon Picnic Birthday Card PP169

by Joanne James31. October 2013 23:15

A late post from me today and it was supposed to be all about Halloween, but as I'm behind this week and the current Paper Players challenge ends tomorrow, I need to have a switch around so that I can link up today's card. This week's challenge over at The Paper Players is a sketch by the lovely Ann Marie - here it is:

I love sketch challenges as you know and I've actually used this layout for several card designs this week (still in the making and not blogged yet, in case you're thinking you haven't seen them!) The card that I'm going to link up though is the one that is most 'true to sketch' and is actually the birthday card I designed for my Mum - here it is:

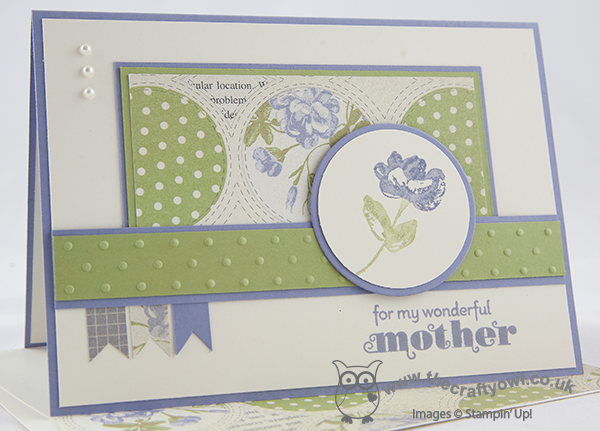
Now it's not my Mum's birthday until Saturday, so I'm taking a chance here, but as she rarely looks at my blog I think I'm safe! I took the inspiration for my colour scheme from some of the papers in the Afternoon Picnic DSP stack and it was an opportunity to use a colour that I rarely do: Wisteria Wonder. I actually had some out on my desk as I've been using it for another project recently, but must confess it's a colour I don't find myself drawn to. I love the idea of lilac, but I find too much Wisteria Wonder rather overpowering. Here I've tried to temper that by using a Very Vanilla background and making good use of Pear Pizzazz, the other main colour in the patterned paper. I used my Stampin' Write markers to colour the flower from the 'Oh Hello' stamp set, which so looks like the flowers that you see in this paper stack and I used an embossed strip across the centre of my card because whilst I think it would have looked nice with a strip of chevron ribbon, I wanted it to be post-friendly and I like the way the embossed dots again echo the pattern of the paper.

So that's my card. I may well share some of today's Halloween makes with you tomorrow (call it early planning for next year!) Whilst I don't tend to go in for Halloween cards and as my regular readers will know, I haven't featured a single Halloween project, one of the things that is really big in the James household is pumpkin carving. Each year we try to grow our own pumpkins in the garden and this year we managed to grow four, two of which were the biggest ever! Our record breaking pumpkin was 1.38m in circumference and weighed 17.9kg - only 2kg lighter than my 6 year old son!!! The children and I spent the happiest of days today carving all four of our pumpkins, so I thought I should share some pictures with you:

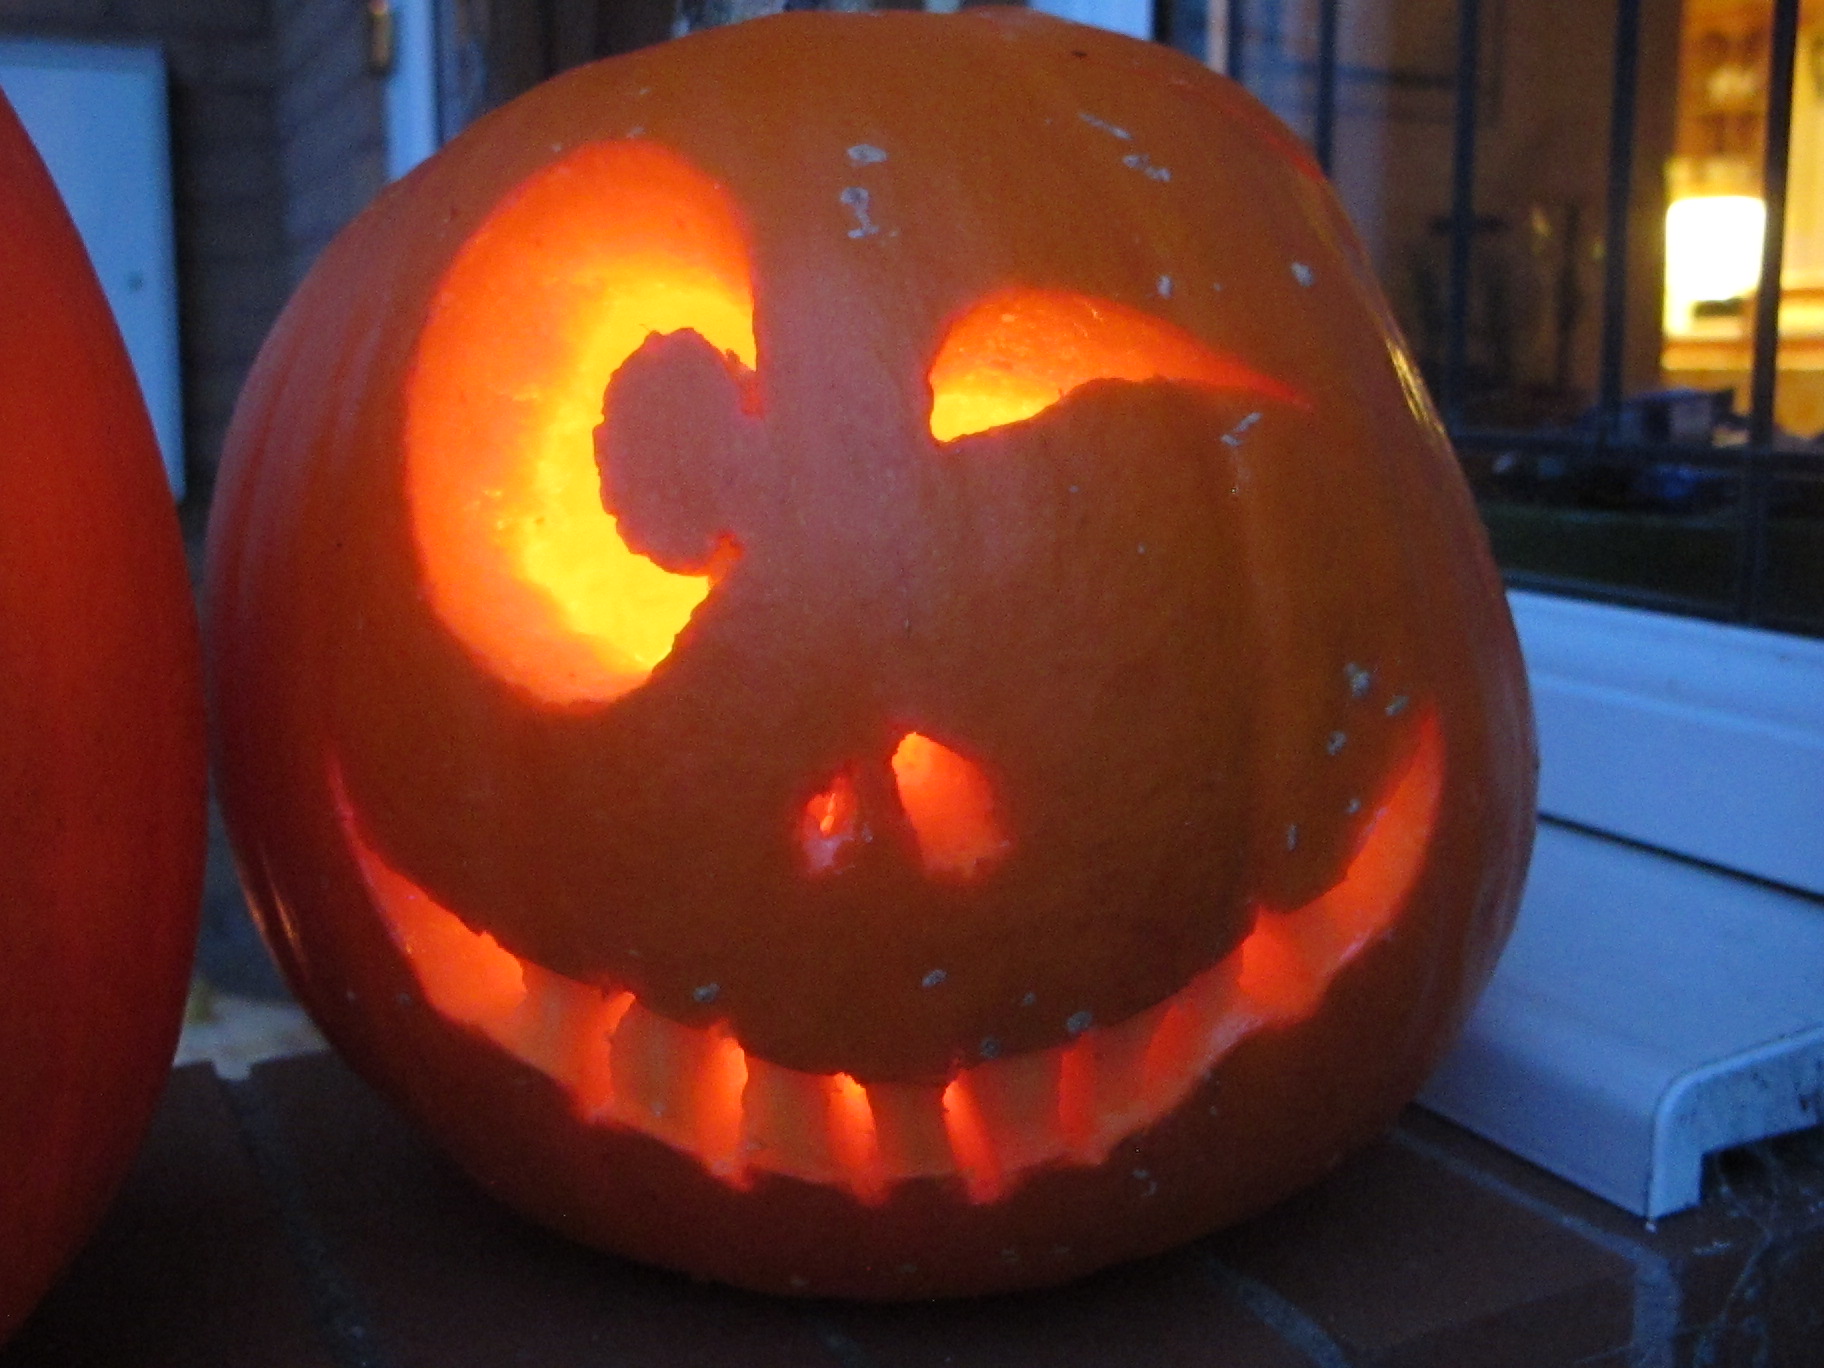
 This is Rebecca's pumpkin, that she carved herself:

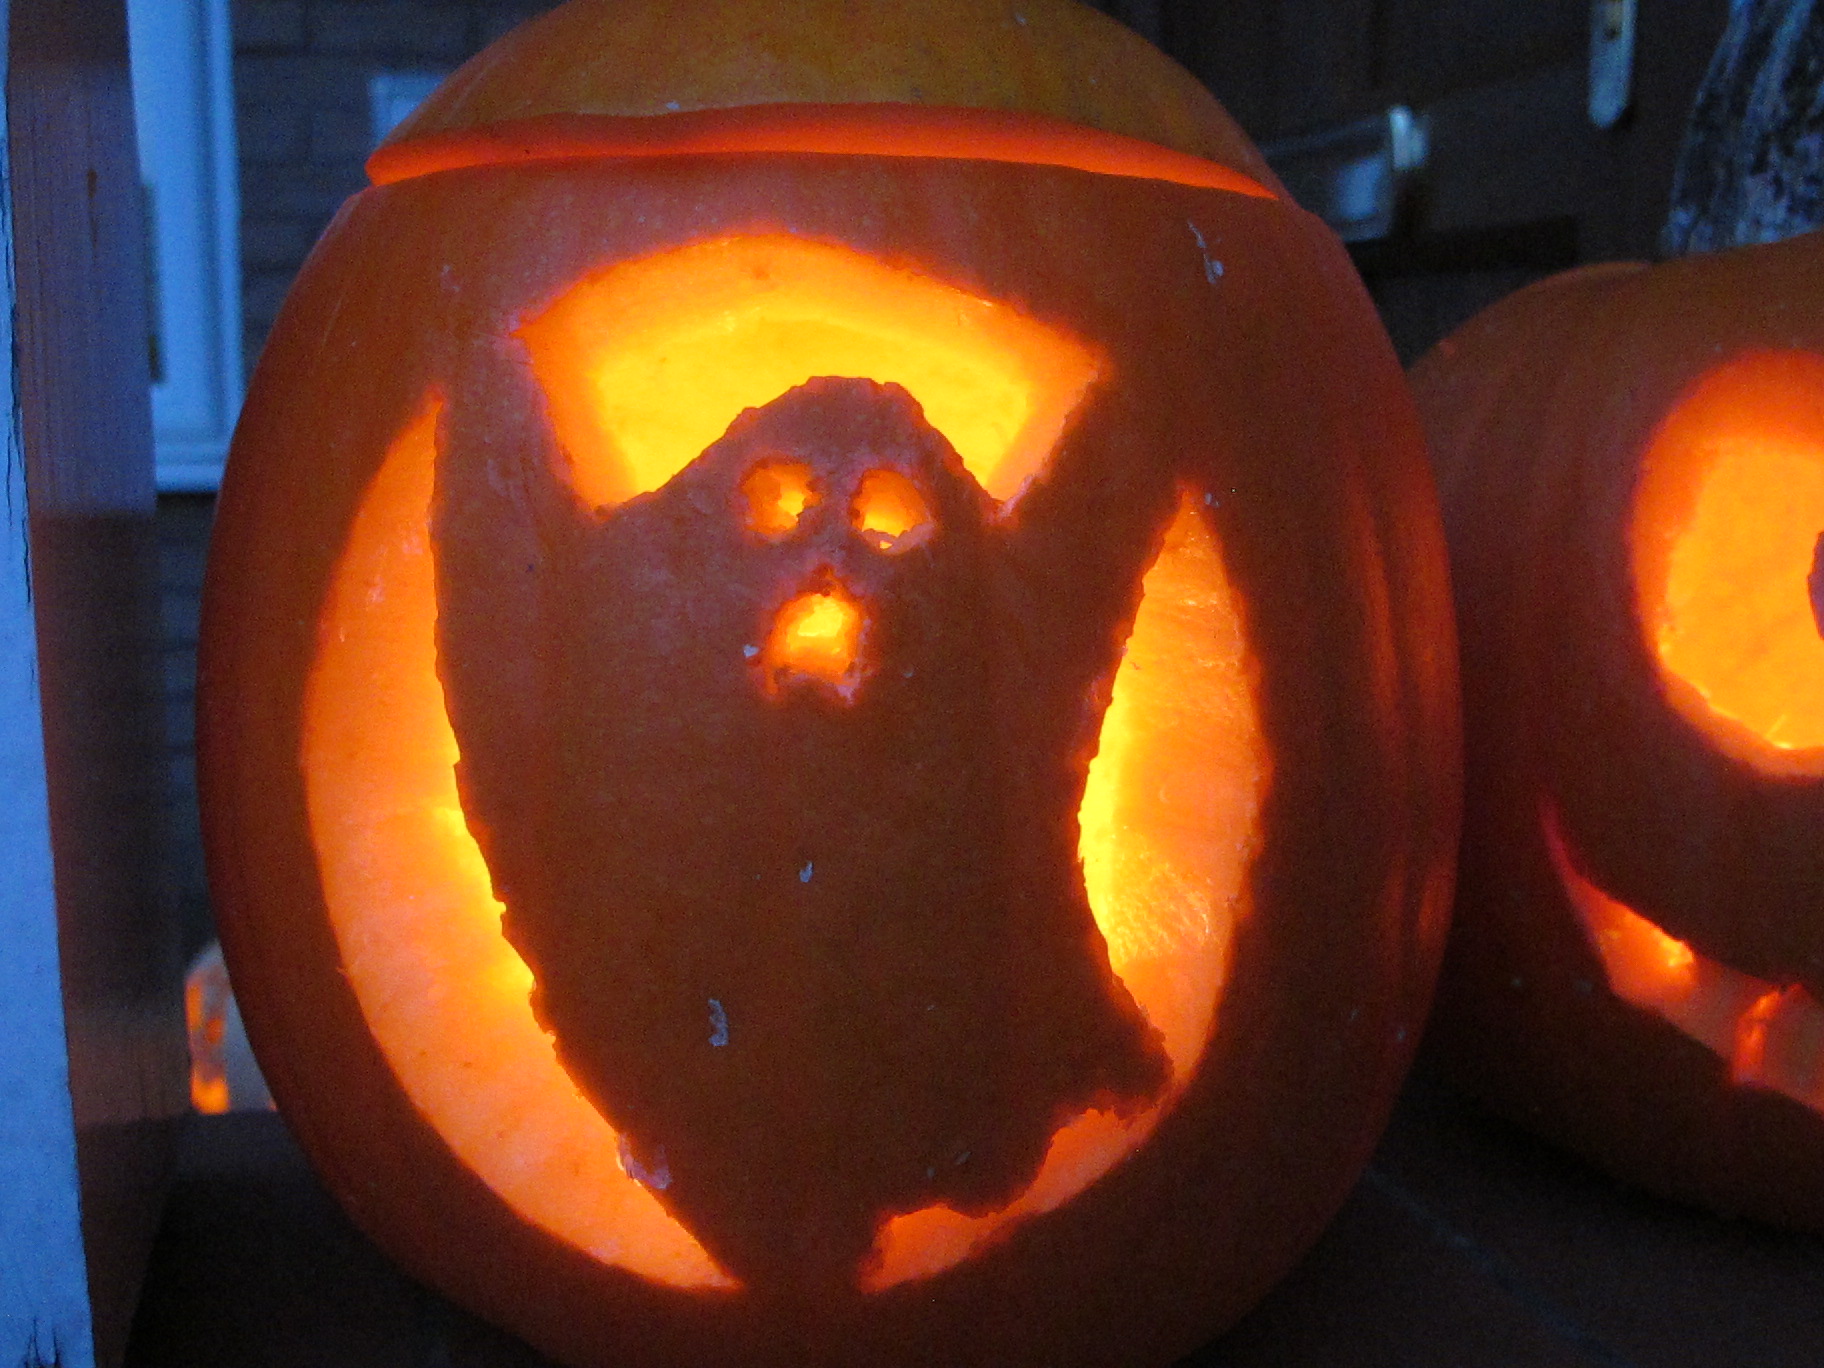
This is Ben's pumpkin, that he too managed himself for the first time this year:


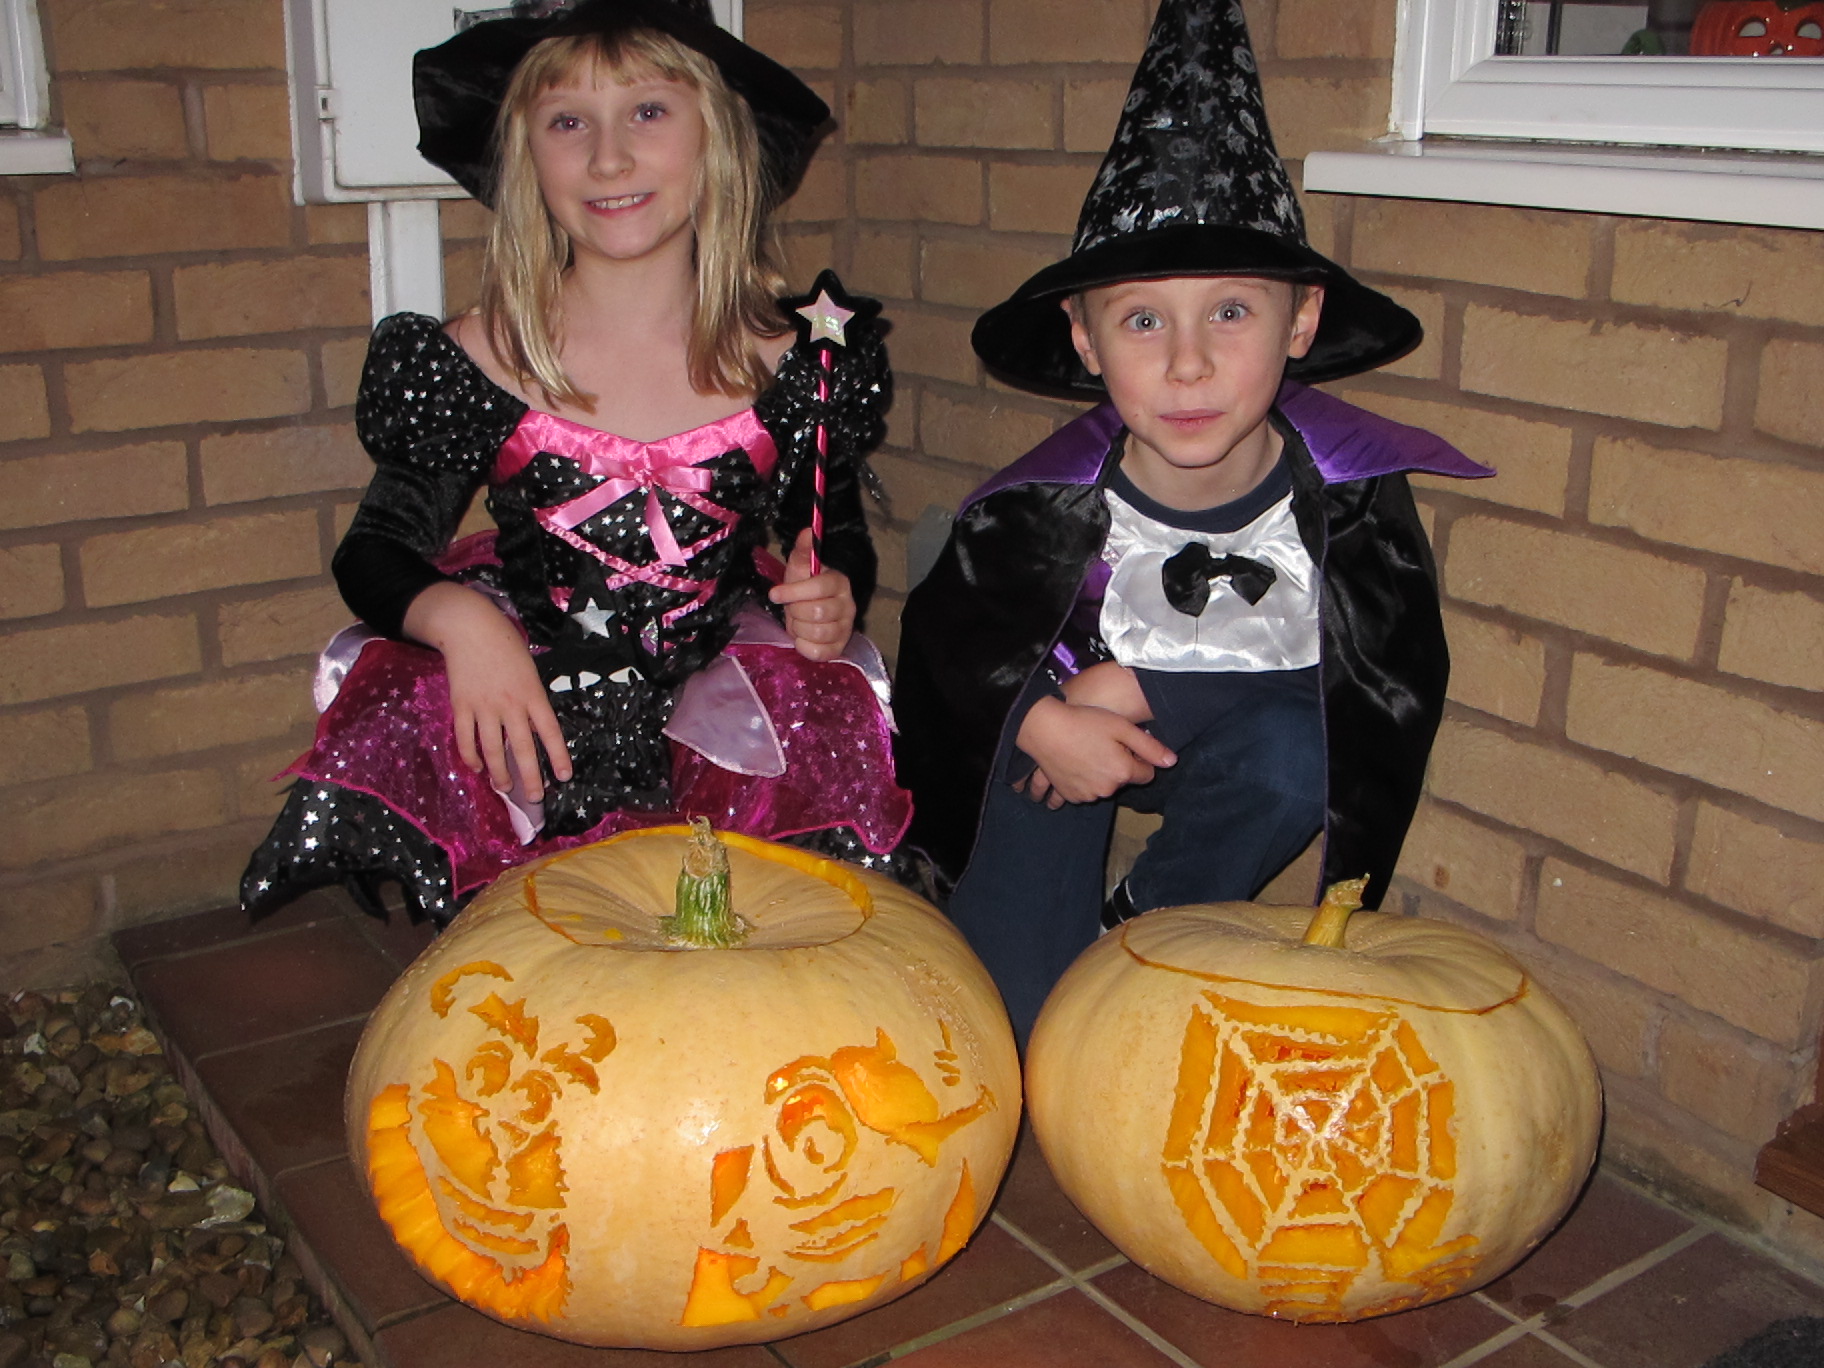
And lastly here are both Ben and Rebecca, with our two 'monster' pumpkins, the largest of which was big enough for a double Monsters University-inspired carving:


Not a piece of cardstock in sight, but very creative, nonetheless! I'll be back tomorrow with another project, meanwhile why not pop over to The Paper Players and see what the designers and other participants have done with the above sketch? Until tomorrow, happy stampin'!


Stampin' Up Supplies Used:

Birthday Netballs!

by Joanne James29. October 2013 23:12

Today's blog post is a late one as I've been out this evening and had a reasonably hectic day and didn't get a chance to do it beforehand. I used sketch #64 over at Paper Craft Crew Challenges as the basis for this card and I'm just in time to sneak in a link up, so thought I'd better get typing! I had a commission card request for a female birthday card that featured netball. Whilst I knew the basketball stamp in 'Great Sport' would make the perfect netball, I was wondering how I was going to pull it all together. I decided to use the PPCC sketch this week as the basis for my design layout. Here's the sketch inspiration:

Stampin Up challenge blog card sketch

So, sunglasses at the ready - here is my interpretation:

The card is very orange, but having played around with various other colour combinations this really did seem to work best (and luckily, the recipient loves the colour orange!) Any of the colours I would ordinarily have paired with Tangerine Tango made the card look too masculine and really didn't work. I did use some Real Red as an accent colour and a little Basic Grey. Wondering how I created the netball hoop and net? I simply used my large oval punch to cut some thin strips of cardstock and adhered them to each other in a weave pattern.

And the moral of the story? Orange is for all cards, not just Halloween ones! Pop over to the Paper Craft Crew Challenge page and see how the designers and other participants have interpreted this week's sketch.

Back tomorrow with news of more great offers from Stampin' Up; until then, happy stampin'!


Stampin' Up Supplies Used:

Tags: , , , , , , , ,

Cards | Punch Art | Stamping

Have Yourself a Merry Christmas - Spots

by Joanne James12. October 2013 20:27

It's the weekend and today I have the last of the cards from this week's class to share with you. This time another Merry Little Christmas, but with spots instead of stripes:


This time I used two of the stamps in the Merry Little Christmas set, and stamped the 'Merry' part of the main stamp again in Gumball Green and cut out with paper snips into a little banner to add some dimension. I also embossed the background piece of Cherry Cobbler with the Stylish Stripes embossing folder to add texture. Another simple yet effective design.

All the ladies at this month's classes were very pleased with their makes and we are already looking forward to next month when we will be adding to our Christmas card collection. If you would like to join us, please contact me for more details.

Back tomorrow with a birthday card; until then, happy stampin'!


Stampin' Up Supplies Used:

 Stylish Stripes Textured Impressions Embossing FolderBig Shot Die-Cut Machine - by Stampin' Up!Season Of Style Designer Series Paper StackGumball Green Classic Stampin' PadStamp-A-Ma-Jig - by Stampin' Up!

Cherry Cobbler Classic Stampin' Pad

Have Yourself a Merry Christmas - Stripes

by Joanne James10. October 2013 20:29

Today I'm sharing another of this week's class Christmas cards. This one uses the 'Merry Little Christmas' stamp and some of the papers in the Season of Style paper stack:

I love that the designer series paper stacks in the seasonal catalogue enable you to make some great cards with minimal stamping as the paper does a lot of the work for you in terms of colour and pattern; at £6.25 a stack they are great value for cardmakers too, and each stack has 4 different paper designs to choose from. For this card we stamped a simple flag and layered on some DSP edged with Chocolate Chip and created a couple of smaller flags made from offcuts from other projects. Did you notice the little button beneath the twine bow on the card? We were aiming to keep all of our cards post-friendly and largely flat in design, so instead of adding a real button we instead used a cardstock button made with the Sweet Buttons Embosslits to allow for added detail but without the bulk.

I had my second class of the week last night with a great bunch of ladies, who made me laugh so much my eyes watered! I was also delighted to see some of the great cards they've been making with My Digital Studio having downloaded their 30 day free trial. Unfortunately I didn't have my camera with me, so couldn't take any pictures but will be sure to get some next time to share with you. I was particularly pleased to hear them say how easy they found it to use, with no prior knowledge or experience. If you haven't downloaded your copy yet, I urge you to go to my online store and download your free trial version today. Equally, if you would like to join one of my monthly card classes, do get in touch for more details.

Back tomorrow with another project; until then, happy stampin'!


Stampin' Up Supplies Used:

Stamps: Merry Little Christmas

Cardstock: Whisper White, Chocolate Chip, Cherry Cobbler, Season of Style DSP

Ink/Stampin' Write Markers: Cherry Cobbler

Tools: Sweet Buttons Embosslits, Big Shot, Stamp-a-ma-jig

Finishing Touches: Cherry Cobbler Baker's Twine

Festive Flurry Card and New MDS Downloads

by Joanne James8. October 2013 15:40

A quick post from me today as I'm out again this evening preparing for our school annual bonfire and fireworks display. I promised to share a card with you today, so thought I'd share this lovely festive flurry card that we made in my card class yesterday:

This is a case of a Mary Fish card (you can see her original card here) minus the frosted finish embellishment. Whilst I love the embellishment and you will see them on future blog cards, our class cards are all intended to be post-friendly, so the frosted embellishment on this card had to go! We replaced with a large rhinestone instead to give a little sparkle but not add too much bulk. I love the Winter Frost colours of this card - they have a real fresh and modern feel.

Lastly, it's Tuesday, also known as Digital Download Day. Click on the link below to see all of the new digital downloads available in the online store this week:

October 8, 2013 - Digital Downloads

There are some great new downloads this week, including calendar and photobook templates that would make lovely Christmas presents. Why not have a click and take a look?

Back tomorrow with another card; until then, happy stampin'!


Stampin' Up Supplies Used:

Festive Flurry Clear-Mount BundleWinter Frost Designer Series Paper StackSilver 1/8 RibbonStylish Stripes Textured Impressions Embossing Folder

Bermuda Bay Classic Stampin' PadBasic Rhinestones Jewel Accents - by Stampin' Up!Magnetic PlatformBig Shot Die-Cut Machine - by Stampin' Up!

You Did It Congratulations Card

by Joanne James3. October 2013 21:36

Today I'm sharing a card that I made for a friend of mine who had a very special day today. She is beginning a new chapter in her life and today marked a key milestone - the opening of her new beauty salon. I wanted to make her a card to wish her luck and encourage her look forward and not back. This is the card I made for her:

It's a simple card using the two-stepped stamping of the Too Kind stamp set in Crisp Cantaloupe and Calypso Coral, on a white background that I cut out with a Circle Framelit and part-pierced to add a little interest and draw the eye to the flagged sentiment. The flag is finished with one of the in-colour embellishments. I used the week 139 #10 sketch at Less is More as my inspiration for this card:

As for me, I hand-delivered this card to the recipient today as I was booked in to have a manicure at the same time - too good an opportunity to pass up I think! If you're local to Northampton, I would recommend you check out Pamper Me Beauty - you can link to their Facebook page here and find out more about the services on offer. My nails look lovely; I might have to shoot a video tutorial for you so that I can show them off - any preferences on what you would like to see?

Back tomorrow with another project; until then, happy stampin'!


Stampin' Up! Supplies Used:

 Too KindExpress YourselfEssentials Paper-Piercing PackPaper-Piercing ToolIn Color Boutique DetailsCrisp Cantaloupe Classic Stampin' Pad


 Calypso Coral Classic Stampin' PadSmoky Slate Classic Stampin' PadPear Pizzazz Classic Stampin' Pad

Golfer's Punch Art

by Joanne James22. September 2013 20:09

Today I've a quick post to share the second of the cards I made for my Dad's birthday. This one was from the grandchildren - a classic punch art card, which is fitting as he's a keen golfer:

This card took no time at all to make - the most complicated thing was creating the dimples on the golf ball with my Simply Scored stylus, hardly time-consuming!

In between playing golf, my Dad is also a keen gardener and has kept an allotment for many years. For some time now, he and his fellow allotmenteers have been plagued by a once tame pet rabbit gone wild, which is eating large quantities of their carefully tended crops. Ben thinks the whole thing is fascinating and spends much of his time hatching plans to catch the rabbit and discussing their merits with Grampa. Ben is utterly convinced that he is going to be the one to catch the rabbit; if he ever succeeds, I'll let you know!

Back tomorrow with another project; until then, happy stampin'!


Stampin' Up! Supplies Used:

Small Oval Punch, Simply Scored, Stamp-ma-jig, For my Family (retired), Brights DSP (retired)


Tags: , , , , , , , ,

Cards | Punch Art

Mini Catalogue

BROWSE THE CATALOGUE

The mini catalogue is now live! Read and download your copy here.

Shop Online

Access my online shop 24 x 7, 365 days of the year:

Current March hostess code:

S9F2XJJW

Shop Online

Join My Team

It's always a great time to join Stampin’ Up! New team members can get £130 worth of products for only £99 + free business supplies + free shipping + all the fun being a part of Stampin’ Up! Stampin' Up! has something for everyone: join my growing team and benefit from my support to enjoy Stampin' Up! however you choose.

If you're interested, call me for a chat to understand how I can help you realise your goals. Alternatively, if you have already decided to sign up and you just can't wait, please click here for the link to the online form where you can sign up and order your starter kit right away! 

Latest Kit!

Stampin Cut and Emboss

The Rock Legend Kit has all you need to make 8 cards with coordinating envelopes. Along with the new Panda Friends Kit, both are available from January 4th for just £14 each - get yours here!

2023-24 Annual Catalogue

BROWSE THE CATALOGUE

Click on the catalogue for a full list of current SU! supplies - if you would like to order any of the items featured, please drop me a line at [email protected] or give me a call on 07773 421446 - I'd be happy to help.

New Online Exclusives

There will be new products available exclusively in the online store from 5 March - check them out here.

About Me

Hi I'm Joanne and live in Northampton and when I'm not looking after my husband and two beautiful children, am an avid crafter with a passion for all things Stampin' Up!

I must confess that I have never been a big rubber stamper - until I discovered Stampin' Up! that is. I love the fact that I can get such great results with co-ordinating stamps, inks, papers and punches - the possibilities are endless! Join me on my stamping journey as I share the things I love and be inspired to create amazing things yourself!

Follow Me

Monthly Newsletter

Box Builder

Click the button above to use Box Buster to create your custom box design using the Envelope Punch Board!

Kits Collection Now Available!

Stampin Cut and Emboss

The new Kits Collection from Stampin' Up! is now available!

Click here to see the current kits available and order yours online today.

I Design For


Stampin' Up Stuff

This is my personal blog and is not endorsed by Stampin’ Up! I hope you find it a plentiful source of ideas and personal inspiration but please don't copy my designs for contest submission or use for classes, publication or sale without express permission.