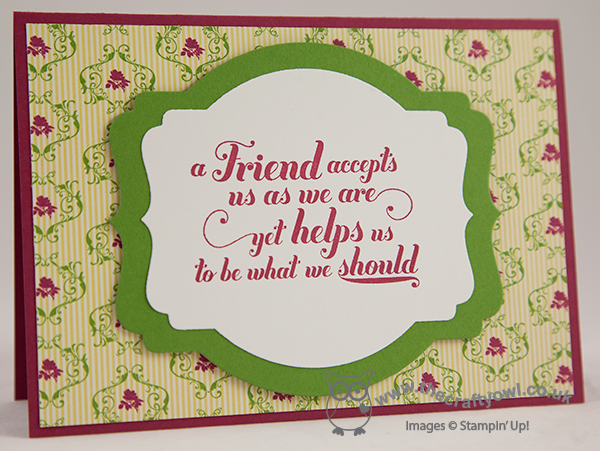
by Joanne James6. April 2014 19:00Good evening lovely blog readers! Today I'm sharing a card (well, actually two!) that I made a little while ago but that I didn't share with you at the time. I made this card using an old Freshly Made Sketches layout - here is my card:
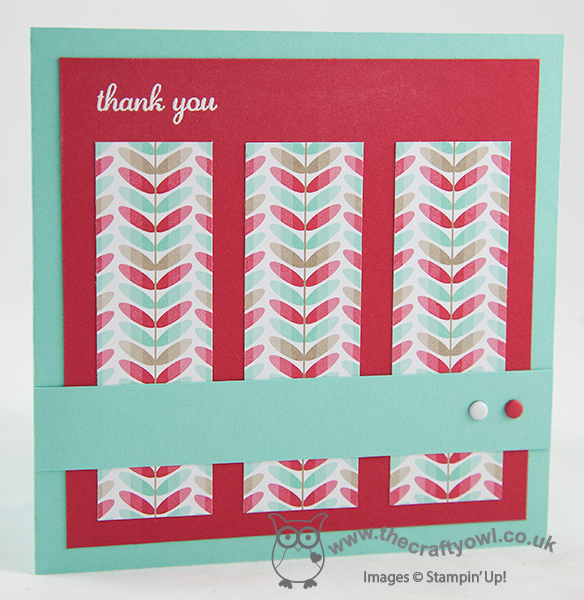
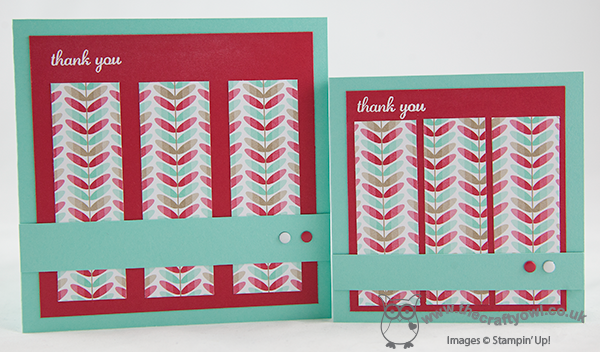
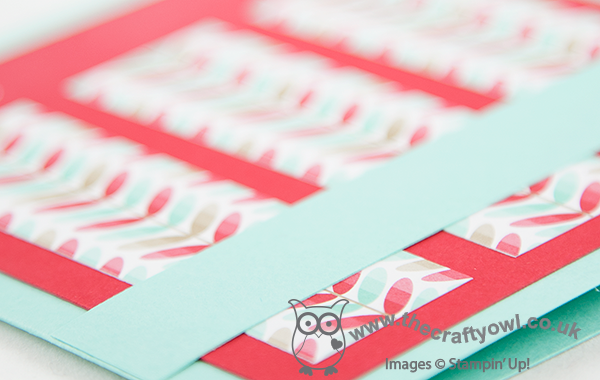
My card uses the Fresh Prints DSP stack - this paper stack is great value and perfect for cards and the pattern I've used on this card is one of my favourites: an Orla Kiely-inspired design I think and one that also appeared in last year's Sycamore Street Sale-A-Bration DSP pack, but this time updated with some fresh colours for the new season. I cut three panels, having centralised the pattern, and matted it on Real Red and a Pool Party base, with a Pool Party banner finished with two co-ordinating candy dots. The original sketch had only two dots and I wrestled with myself to not use three (I think things looks better in threes!) but I decided that the two dots balanced the sentiment on the top left-hand side of the card, so left alone! I stamped my sentiment in Versamark and heat-embossed with Whisper White embossing powder, because whilst I didn't want it to dominate my card, I didn't want it to get lost either. This was the card I was happy with, but I promised two cards today and thought I would show you the first one I made; it was slightly smaller in size but to the same layout, but instead of centralising the pattern on each individual strip, I simply cut a piece of paper equally into three. It gives quite a different effect - see what I mean:
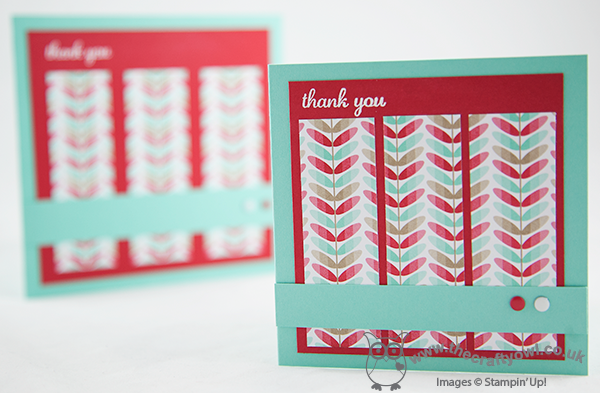
This cut really didn't work for me, as I felt such a clean card need the symmetry in the pattern - hence the second version. Here are both cards in focus side by side - which one do you prefer?
Who would have thought that such a simple card took so much thought? But for me, that's the difference between a good card and a great card! Lesson over for today; I'm off to listen to the next instalment of Harry Potter, our current bedtime reading book.
Back tomorrow with another project; until then, happy stampin'!
Stampin' Up! Supplies Used:
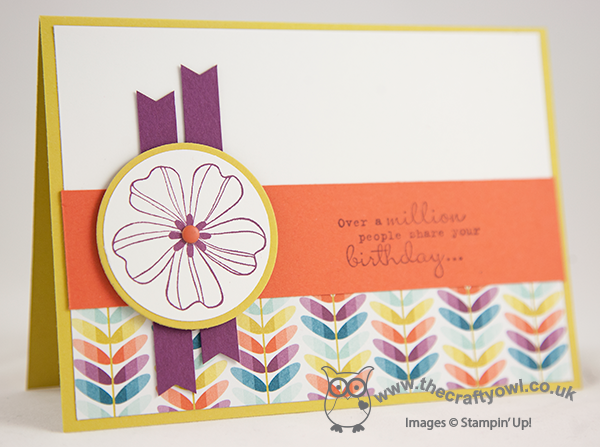
by Joanne James5. April 2014 20:27Another tulip card for you today - no apologies, I love this stamp! This card was inspired by the flecked pink tulips I received from my James juniors for Mother's Day last week. This card features this stamp used in another different way, this time to create an outlined background panel:
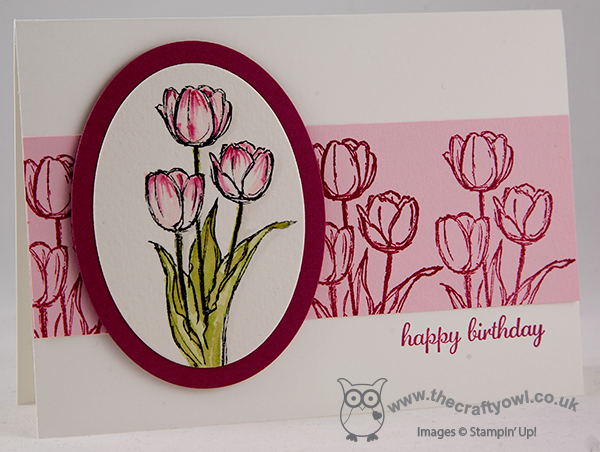
In splitting the tulips away from the sentiment on the original stamp, this makes it really easy to use the tulips for non-Easter cards, as I've done here. I used a Whisper White base, then stamped the tulips in Rose Red on a strip of Pink Pirouette cardstock. I then stamped the tulips again, this time in Black Stazon on watercolour paper and coloured with inks and my Aquapainter and cut out using my oval framelits and mounted on a second oval in Rose Red.
That's all for today; tomorrow's card may well have to be a 'get well soon' card as this afternoon my young son appears to have succumbed to the chicken pox - his THIRD dose in just 6 years!!! I didn't think this was even possible, but his itchy spots tell me otherwise. On the upside, at least it's the Easter holidays, so he should be over it by the time the new term starts :-)
Back tomorrow with another card; until then, happy stampin'!
Stampin' Up! Supplies Used:
bfde84b6-2625-4011-97c6-e19f66f05874|1|5.0|96d5b379-7e1d-4dac-a6ba-1e50db561b04
Tags: Blessed Easter, Express Yourself, Big Shot, Ovals Framelits, Shop online, Stamp-a-ma-jig, Stampin' Up, Stampin' Up Card, Stampin' Up Card ideas, Stampin' Up Supplies, Watercolouring
Cards | Stamping
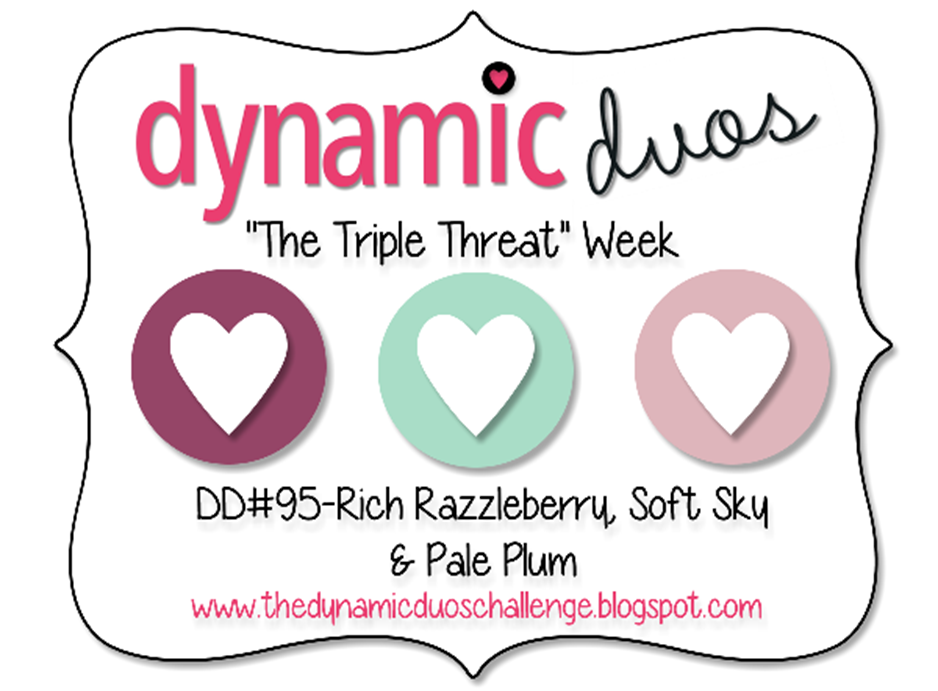
by Joanne James26. March 2014 21:28Another busy day today and my third night out in a row: today to a school concert, which was very entertaining with lots of singing and instrumentals. Now I'm back and today's card uses the colours over at Dynamic Duos this week, where it's actually 'Triple Threat' week and this week's sketch over at Retrosketches, which has an interesting decorative element:

And here is my card:
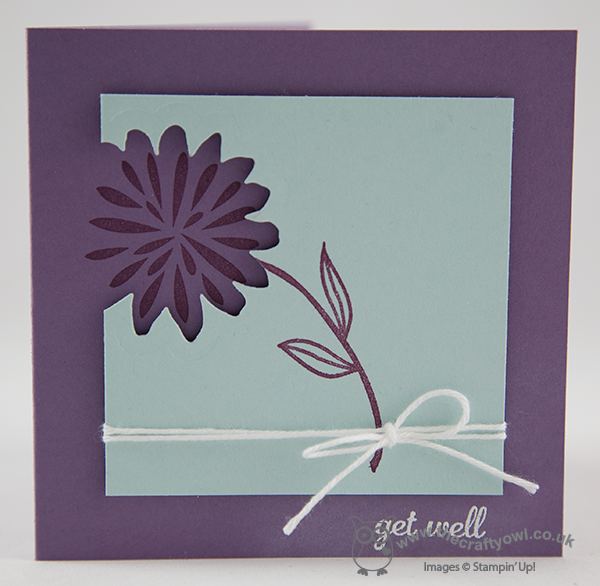
My card uses a single flower from the 'Simple Stems' stamp set and I printed the offset flower head on the base layer and the stem on a layer of Soft Sky, having cut out the area around the flower using the co-ordinating Secret Garden framelit. The Soft Sky layer was layered with dimensionals to give depth and allow a simple white baker's twine bow to be wrapped around the base.
As Pale Plum is a retired SU! colour, I substituted with Perfect Plum. I was a little concerned that it wouldn't have enough pink in it to work with the Rich Razzleberry, especially I had decided to experiment with stamping the Rich Razzleberry onto the contrasting Perfect Plum cardstock. I don't generally take two tones of the same colour and use them together in this way, but I quite like the effect - the Razzleberry 'warms' the Plum I think. I thought I would include a picture of my test card to show you how the effect differs depending on the colour ink you use:

The flowers are stamped clockwise from bottom left in Elegant Eggplant, Perfect Plum then Rich Razzleberry on Perfect Plum cardstock - it's interesting to see how different they each look, don't you think?
Anyway, back to my card! I finished it with a little 'get well' sentiment that I stamped in Versamark and heat embossed in white. This card will be sending get well wishes to one of my lovely customers who is having major surgery at the end of this week; if you're reading this Chris, I hope you're up and about again soon!
That's all from me today - I'm off to catch up on my beauty sleep! Back tomorrow with another project; until then, happy stampin'!
Stampin' Up! Supplies Used:
6ecb3bac-f56d-4451-8bd2-10848e8f6755|0|.0|96d5b379-7e1d-4dac-a6ba-1e50db561b04
Tags: Big Shot, Magnetic Platform, Stampin' Up Supplies, Stampin' Up Card ideas, Stampin' Up Card, Stampin' Up, Stamp-a-ma-jig, Shop online, Secret Garden Framelits, Simple Stems, Express Yourself
Cards | Stamping
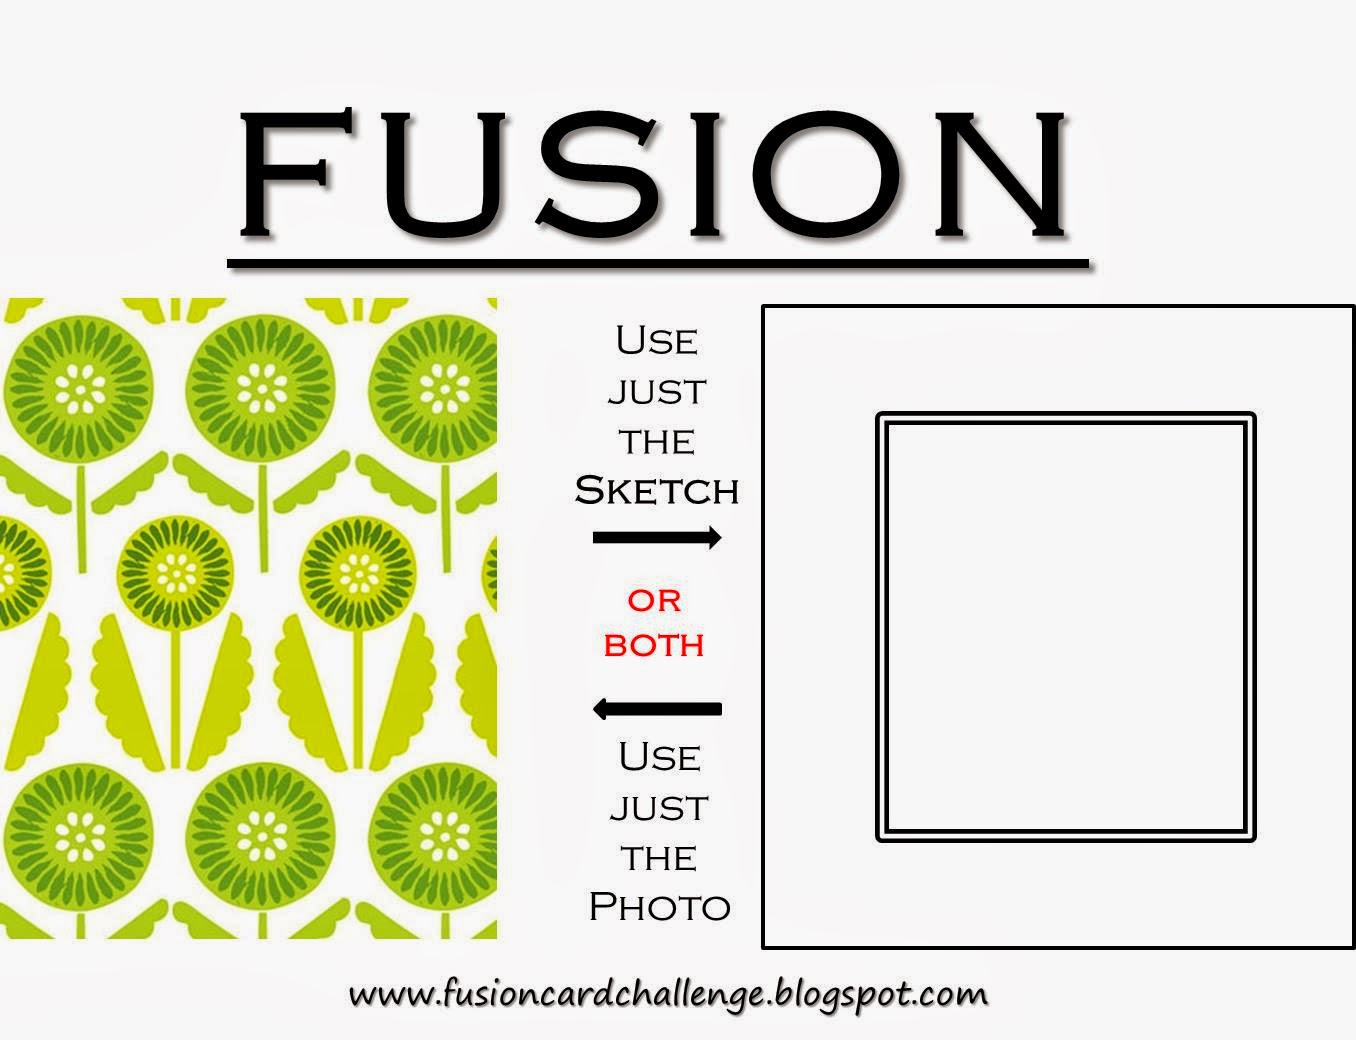
by Joanne James20. March 2014 21:27Good evening blog readers! Today I have a simple Spring flower card to share with you; simple in execution, yet I have been pondering its execution for almost a week. Why? Well, the challenge over at Less is More this week is to use masking or stencilling on your card. As I don't own much in the way of stencils and generally make my own templates if I want to mask or stencil something, I've been deliberating what to do. Then I saw the photo inspiration over at Fusion this week -
and I had a sudden flash of inspiration. Here is my card:
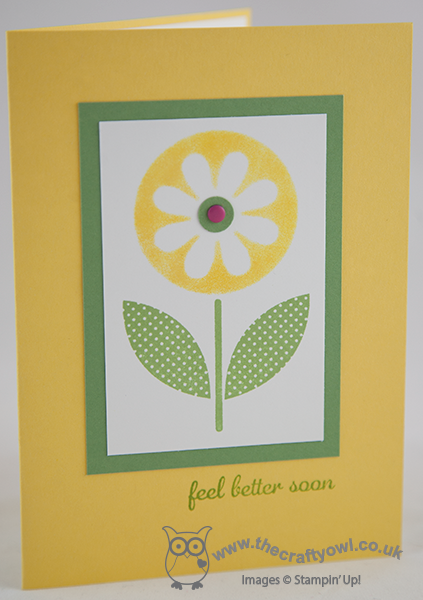
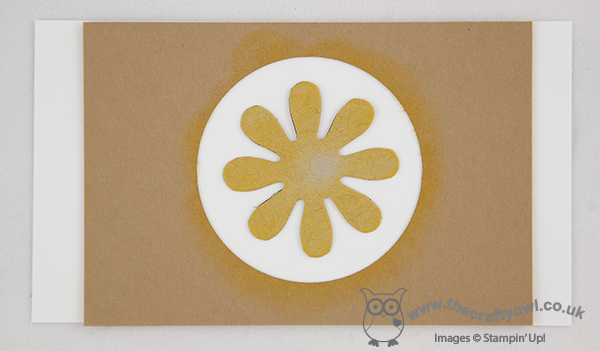
I kept with the yellows and greens of the inspiration photo and used Daffodil Delight and Wild Wasabi as I wanted my card to have a light, bright spring feel. I was tempted to stencil a repeating pattern, but decided instead to go with a single graphic flower instead for greater impact. I created the flowerhead by making my own stencil from a piece of card with a punched out circle and once in place on my white card, I positioned a flower cut with my Blossom Party Originals Die in the centre with some low-tack adhesive and sponged yellow ink onto the space in between - here's a photo of my makeshift mask/stencil which might make more sense:
For the stem I used a retired stamp from a set called 'Sweetheart'; this was the first ever stamp set I purchased so I feel I can't part with it for sentimental reasons and it was just perfect for this card. I finished with a simple sentiment and a bright pink candy dot layered on a small punched circle.
I'm also linking this card up with the lovely peeps over at The Paper Players this week, where Jaydee's challenge this week is to create something clean and simple with the theme of 'Spring'; I'm pretty sure today's card fits the bill.
Back tomorrow with another project; until then, happy stampin'!
Stampin' Up! Supplies Used:
by Joanne James12. February 2014 09:56So I didn't quite manage to squeeze in another 'make' for you yesterday, but I'm here bright and breezy (or should that be windswept, given the gales we've had here for the last day or so!) this morning with today's card. Given my recent dalliances with the colour black, I thought I would try something different using black cardstock and one of my most favourite stamps - yes, the Flowerfull Heart (still available to order until Friday if you'd like one - click on the link to my online shop below!) Here is my card:
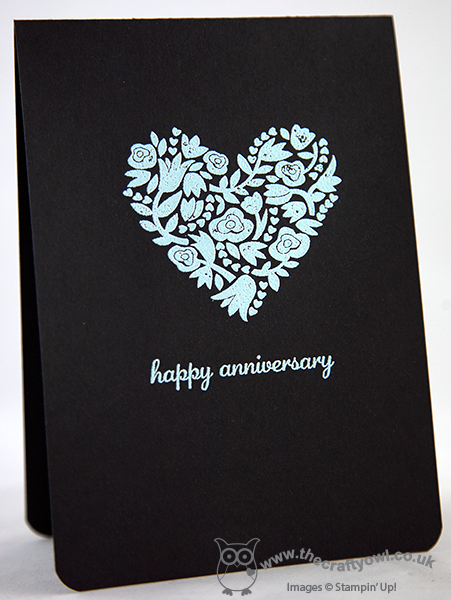
Now, I know you might be thinking "Anniversary card - on black??!" but hear me out! I wanted to use this stamp again with some heat embossing; I toyed with gold (well, it worked pretty well on this card I think) but eventually decided to use Pool Party embossing powder. My colour combination was inspired by one of the DSP patterns in the Sweet Sorbet pack that is available as one of the free Sale-A-Bration gifts currently when you spend £45 or more - the little blue Pool Party flowers with black centres. I would not necessarily have thought about using these colours together had it not been for this paper. A simple sentiment from the 'Express Yourself' hostess set (such a versatile set of greetings in a very usable font, it can be yours when you host a Stampin' Up! party - contact me to book yours) finishes this simple card.
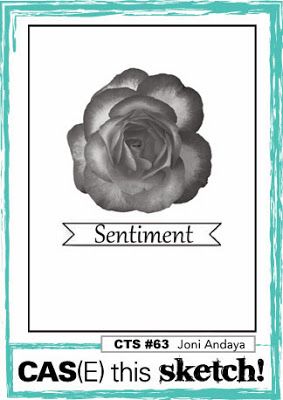
So what do you think - a colour combination that works or one to be avoided, especially on a romantic card? I'd love to know what you think. I'm also linking this card up with the 'One Layer Card - Anything Goes' challenge over at Less is More this week (currently the only card using black for it's 'white space' - should I be worried?!) and CAS(E) This Sketch as my card uses their sketch again:
Funny how you can use the same two starting points, yet end up with two cards that couldn't be more different. Back tomorrow with another project; until then, happy stampin'!
Stampin' Up! Supplies Used:
9fe4b513-b28f-441e-b5cc-fe0fd6c2169c|0|.0|96d5b379-7e1d-4dac-a6ba-1e50db561b04
Tags: Embossing, Flowerfull Heart, Host a Party, Express Yourself, one layer cards, Sale-a-bration 2014, Shop online, Stamp-a-ma-jig, Stampin' Up, Stampin' Up Card, Stampin' Up Card ideas, Stampin' Up Supplies, Anniversary, Weddings
Cards | Host a Party | Promotions | Sale-a-bration | Stamping
by Joanne James18. December 2013 22:07Well, what can I say - a seven day absence from my blog - unheard of!! I know this is a busy time of year and I've certainly no shortage of lovely things to share with you, but my real issue has been keeping up, both with the photography (lots of makes are leaving the house before being photographed!) and blog writing itself. The James juniors have finished school for the Christmas holidays already, and in addition to all of the usual pre-Christmas preparations, I have been having so much fun with them I've had little time for anything else this past week.
No festive project to share today - instead the alternative trio of cards made following the same layout used in my December Christmas card class (you can see the Christmas versions here) but with distinctly non-Christmas card designs. So here they are:
This one uses some of the Print Poetry paper stack that is currently available to buy on the clearance rack, whilst stocks last. The second one:
This one has quite a retro feel, with the colour scheme inspired by the retired Sycamore Street SAB paper - my customers love this paper, so are still looking for ideas and ways to use it. Lastly, the third card featuring a bow made with the Gift Bow Bigz Die:
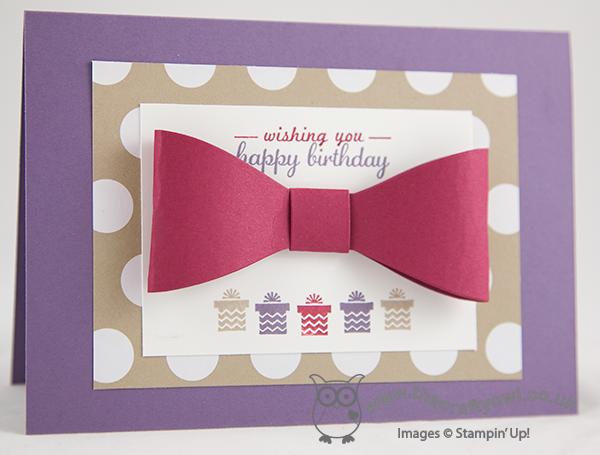
This card actually uses a couple of the things we used to make the Christmas card version - the Seasons of Style paper stack paper and the 'Wishing You' stamp set and proves that these things can be used for non-Christmas as well as Christmas cards if you use alternative colours.
I liked the way all three of these cards turned out and the fact that they gave me a few cards to add to my stash ready for the year ahead. This really is a quick post from me, but before I go I thought I'd share one festive picture of the masterpiece created by my super-creative children today - our very first gingerbread house, from scratch! We made the house yesterday and they built and decorated it today. I'm pleased to say it's all their own work - I for one, think it's rather impressive:
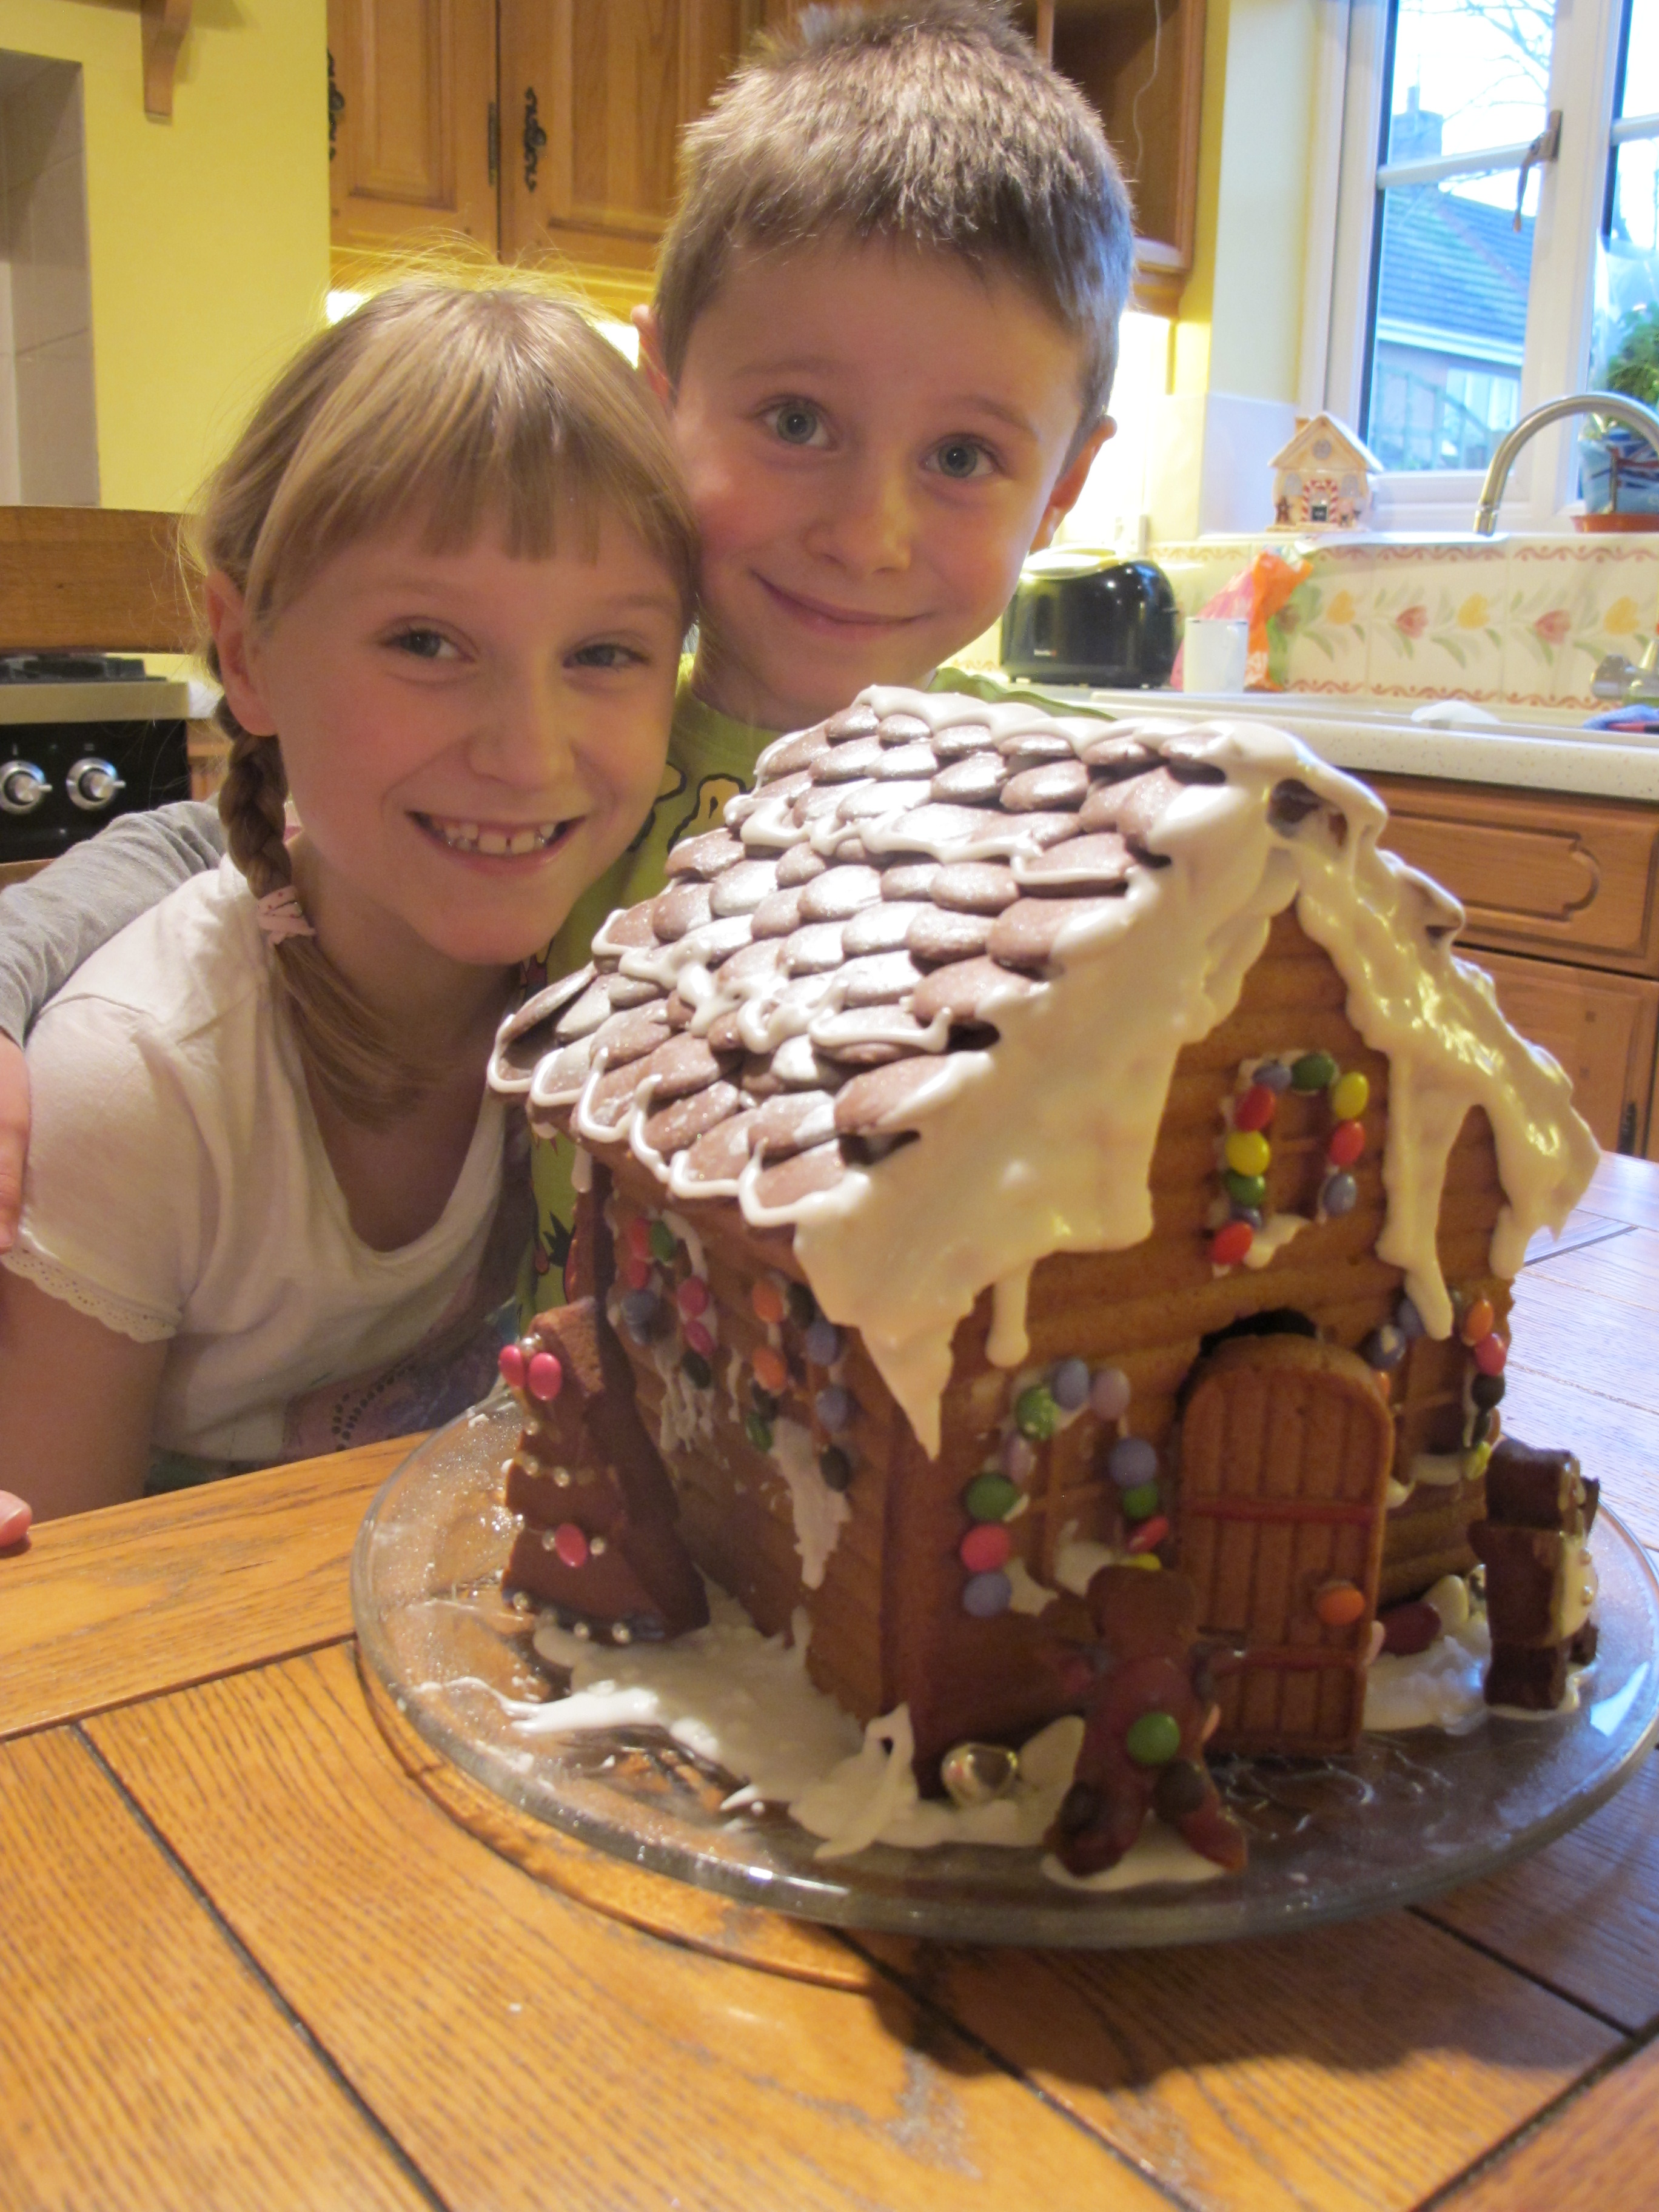
Complete with gingerbread boy and girl and Christmas tree in the garden and following a considerable 'snowfall', of course! Tomorrow I have a day of present wrapping in store, so with Christmas music and tape in hand will be a woman on a mission!
I will hopefully not leave it so long before my next post; until next time, happy stampin'!
Stampin' Up! Supplies Used:
0782b84f-9198-49ec-bf47-7345f1d2c2eb|0|.0|96d5b379-7e1d-4dac-a6ba-1e50db561b04
Tags: circle punch, Deco Labels Framelits, Gift Bow Bigz L Die, Flower Shop, Magnetic Platform, Wishing You, Stampin' Up, Stampin' Up Card, Stampin' Up Card ideas, Shop online, Season of Style, Print Poetry, Feel Goods, Express Yourself
Cards | Classes | Stamping
by Joanne James17. November 2013 19:43Another lovely day today, despite the miserable grey weather. I spent the morning at the swimming pool watching Rebecca train, followed by piano practice for both James Juniors, then lunch, more swaps for convention, a trip to the garden centre and then an hour or so in the garden planting some late winter baskets and pots and refilling our bird feeders - we are even more keen to look after our feathered friends this winter, as we have a new blue tit who seems to have made his home in our bird box and uses it every night to sleep in.
So, on to today's card! Yesterday was my nephew's birthday. He is now 11 years old (where did that time go?!) and another football-mad boy. Having just recently acquired a hexagon punch, I was keen to have a go at making a football as I've seen lots of cards like this on Pinterest. I was so pleased with the result I decided to make it into a shaped card using the largest of the circle framelits:
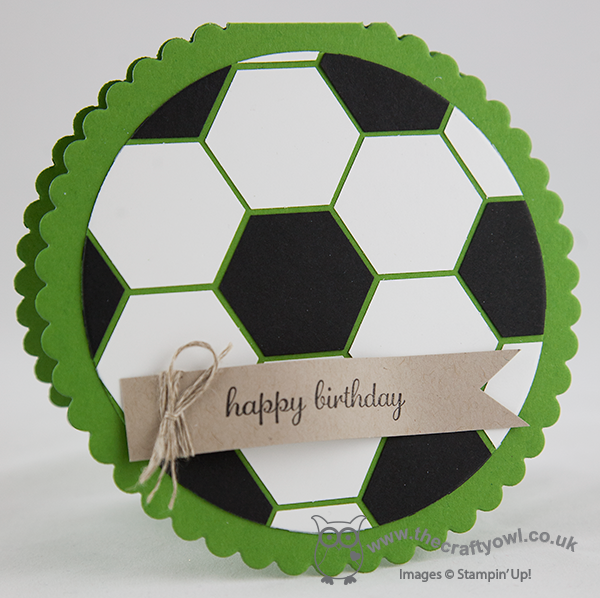
I simply punched the black and white hexagons and stuck them in a pattern onto Gumball Green card, then cut this out with a circle framelit and mounted it on the largest circle framelit, having cut this one by folding the card and cutting out just above the edge of the circle to create a hinge. A simply sentiment from the hostess set 'Express Yourself', some linen thread and done. Another simple yet effective card, with a definite masculine feel.
Back tomorrow with another project; until then, happy stampin'!
Stampin' Up! Supplies Used:
by Joanne James3. October 2013 21:36Today I'm sharing a card that I made for a friend of mine who had a very special day today. She is beginning a new chapter in her life and today marked a key milestone - the opening of her new beauty salon. I wanted to make her a card to wish her luck and encourage her look forward and not back. This is the card I made for her:
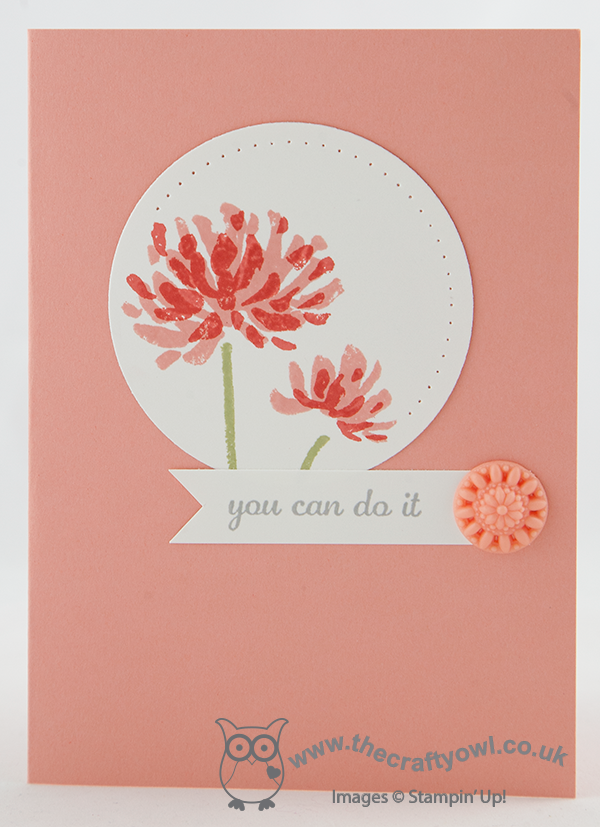
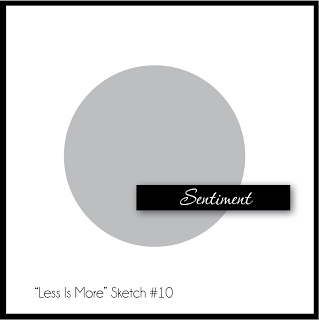
It's a simple card using the two-stepped stamping of the Too Kind stamp set in Crisp Cantaloupe and Calypso Coral, on a white background that I cut out with a Circle Framelit and part-pierced to add a little interest and draw the eye to the flagged sentiment. The flag is finished with one of the in-colour embellishments. I used the week 139 #10 sketch at Less is More as my inspiration for this card:
As for me, I hand-delivered this card to the recipient today as I was booked in to have a manicure at the same time - too good an opportunity to pass up I think! If you're local to Northampton, I would recommend you check out Pamper Me Beauty - you can link to their Facebook page here and find out more about the services on offer. My nails look lovely; I might have to shoot a video tutorial for you so that I can show them off - any preferences on what you would like to see?
Back tomorrow with another project; until then, happy stampin'!
Stampin' Up! Supplies Used:


