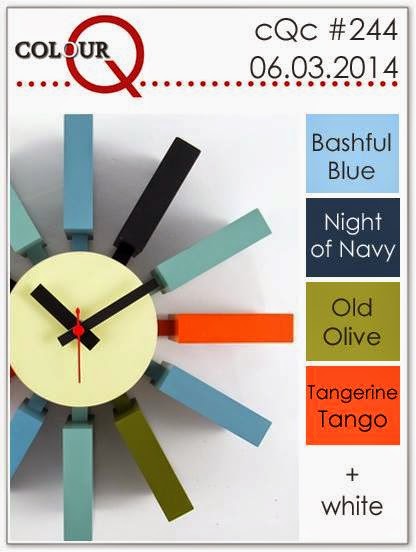
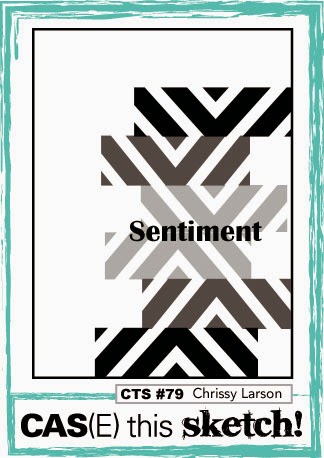
by Joanne James9. June 2014 23:10Today I'm sharing a card I made using this week's sketch over at CAS(E) This Sketch and the lovely colours at Colour Q:
My Dad had a knee replacement operation last week and so I wanted to send him a 'get well soon' card that would brighten his day - here is my card:
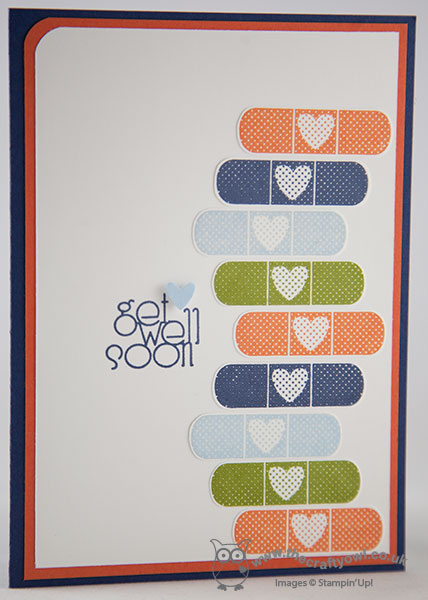
I used a base of Night of Navy along with a mat in Tangerine Tango and using the sticking plaster from an old 2013 Sale-A-Bration set, Patterned Occasions (minus the attached sentiment), stamped it in the challenge colours and cut them out and adhered them to my card following the sketch layout. I coupled them with a simple 'get well soon' sentiment from the ever-so-useful Delightful Dozen stamp set (due to retire at the end of this month) and added a tiny Bashful blue heart punched with my trusty owl punch to finish.
I love the look of the stuck-on sticky plasters, which works so well with the get well theme - I'm sure my Dad wishes his knee could have been fixed that easily!
Back tomorrow with another card; until then, happy stampin'!
Stampin' Up! Supplies Used:
36cb73d0-162d-4e36-a4a1-198996bceed2|0|.0|96d5b379-7e1d-4dac-a6ba-1e50db561b04
Tags: Delightful Dozen, masculine cards, Owl Punch, Sale-a-bration 2013, Shop online, Stamp-a-ma-jig, Stampin' Up, Stampin' Up Card, Stampin' Up Card ideas, Stampin' Up Supplies, corner punch, Patterned Occasions
Cards | Stamping
by Joanne James6. June 2014 09:00Today marks the 70th anniversary of the Normandy Landings in World War Two, with the start of the invasion on the 6th June known as D-Day. There are commemorations taking place both at home and abroad today to remember those Allied personnel who lost their lives on this day and to recognise the bravery, commitment and sacrifices of those service personnel who fought during the war to free Europe from Nazi occupation.
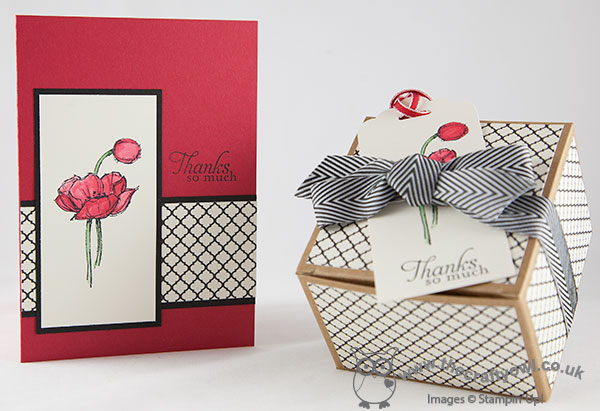
So it seemed a fitting day to share with you a recent commission. I was asked to create some cards and gift boxes as thank you gifts for some teachers who had led a school trip to the World War Two battlefields recently. A red poppy, the traditional form of remembrance, is the star of this card:
I chose a simple Real Red background and created a layered border using Modern Medley DSP. I stamped the poppy from the 'Simply Sketched' hostess set in Black stazon onto Very Vanilla, then coloured using Real Red ink and my aquapainter, with a touch of Garden Green for the stem. I added the sentiment directly to the card base, and honestly didn't feel this card needed anything else. I also made a co-ordinating gift box using one of the kraft gift boxes available in the annual catalogue:
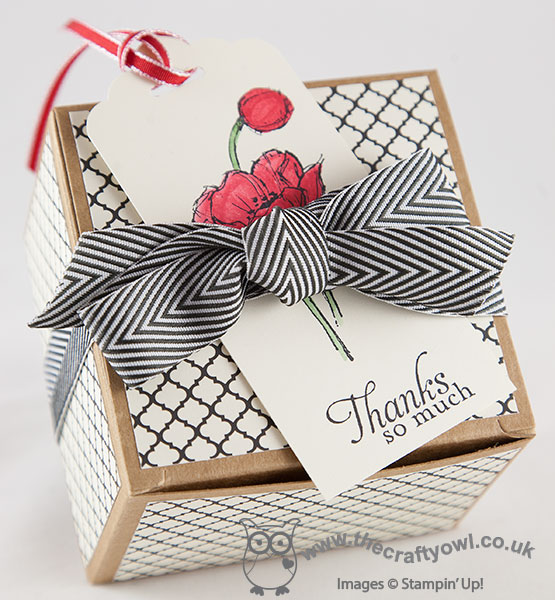
I covered in co-ordinating paper and made a tag with the same sentiment and poppy image on Very Vanilla and punched with my Scalloped Tag Topper punch, finishing with a 3/4" Chevron ribbon bow.
A lovely set to show appreciation and appropriate to share it on a day when we should all take time to remember the courage, bravery and sacrifice of our armed forces, of yesterday and today, who give of themselves in order that we may live relatively safe and secure lives. I for one, am thankful for that.
Back tomorrow with another project; until then, hapy stampin'!
Stampin' Up! Supplies Used:
72e562c8-d7a2-4069-b77a-e93e150acc7a|0|.0|96d5b379-7e1d-4dac-a6ba-1e50db561b04
Tags: boxes, Kraft Gift Boxes, Simply Sketched, Modern Medley, Scalloped Tag Topper Punch, Shop online, Stamp-a-ma-jig, Stampin' Up, Stampin' Up Card, Stampin' Up Card ideas, Stampin' Up Supplies
Boxes | Cards | Stamping
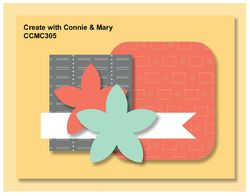
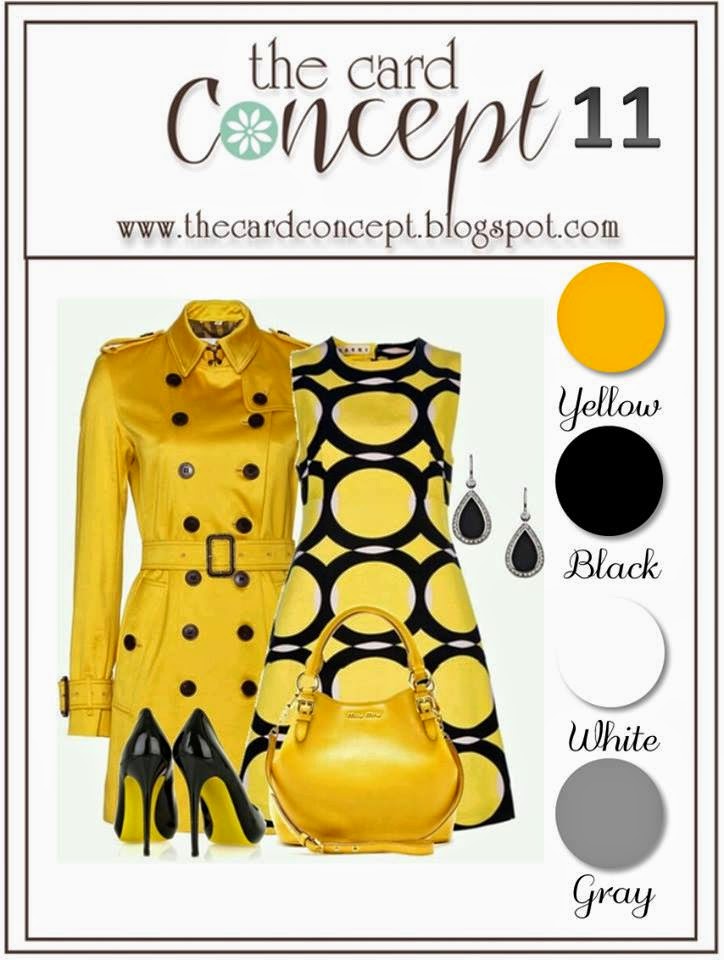
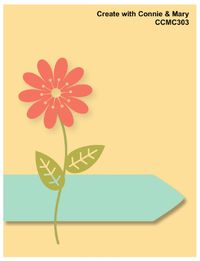
by Joanne James3. June 2014 21:42Today's card started out as my entry for this week's challenge over at Create with Connie and Mary; once I'd decided on my design, I also remembered the inspiration photo over at The Card Concept so used this as my colour scheme:
Here is my finished card:
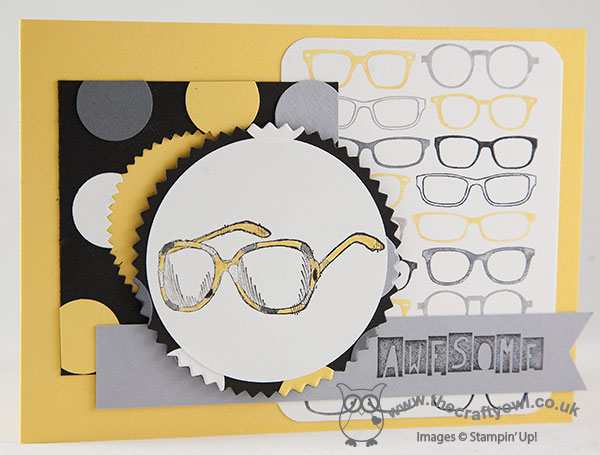
I decided to use the sunglasses (minus the sentiment) from the Spring catalogue hostess set 'To the Point' as the focal point for my card and stamped them onto a circle of Whisper White as I wanted to be able to create the cut out image on the layer behind. I created a patterned layer using punched 3/4" circles on a black square to echo the spot pattern on the sunglasses, and cut out the starburst shape and mat for the circle using my Starburst Framelits. I stamped the retired single stamp 'Spectacular' and my marker pens to create my own DSP background panel, using my stamp-a-ma-jig to enable easy alignment and pattern repeat, and rounded the corners with my Envelope Punch Board. Lastly, I stamped my sentiment onto a flag of Smoky Slate; the sentiment on the original stamp was too small to work here, so I substituted with 'Awesome' from the Cool kid stamp set in the current Spring catalogue (only available until the end of the month).
I had already made a card for the challenge over at The Card Concept, which is scheduled to post later in the week and couldn't be more different to this one, however having chosen my design I couldn't help but think that sunglasses were the only thing missing from the inspiration photo, so I decided to roll with it! My card definitely fits the 'clean and layered' style; the question is, does it really have specs appeal? I'd love to know what you think - feel free to leave me a comment below! I am also linking this card up over at SUO Challenges, where the theme is to create your own background DSP, as I've done here with my 'Spectacular' stamp.
That's all from me today; back tomorrow with another card and news of this week's Wednesday Weekly Deals; until then, happy stampin'!
Stampin' Up! Supplies Used:
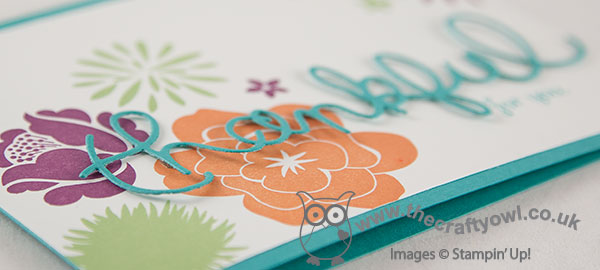
by Joanne James30. May 2014 12:00Yay - it's Friday again! Boy did that come around quick! This week has been half term and having James Juniors at home for the week seems to make the week fly by! Anyway, the weather is supposed to improve this weekend so that will be good. I have a busy, busy day today with retiring lists, preorders, class preparations and more besides, so let's get to it! Today I'm sharing a card that I made for this week's challenge over at 'Less is More' where it's recipe week and we're asked to include a die cut on our card. I've also combined with the vibrant colour palette over at Colour Q this week:
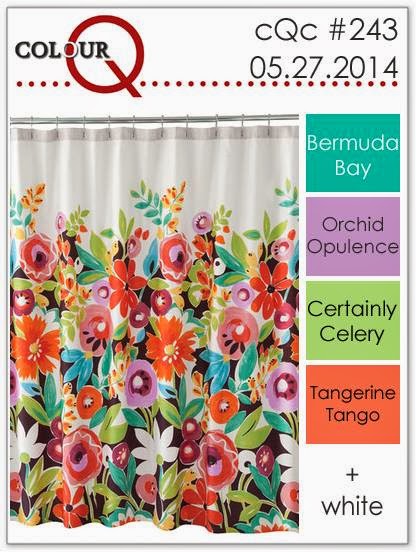
I just loved the bold flowers on that shower curtain in the inspiration photo! I had to substitute a couple of the colours, as they have retired and I don't have them; I used Rich Razzleberry and Wild Wasabi in place of Orchid Opulence and Certainly Celery, so my purple is not quite so electric but my card is just as colourful - take a look:

I actually used the same CAS(E) This Sketch layout, turned through 90 degrees, that I used for yesterday's butterfly card for today's background, although it looks totally different here. I used Simple Stems to stamp my flowers, along with the little flower from the Summer Silhouettes stamp set, then used Bermuda Bay for my card base, my die cut 'thankful' - the Expressions Thinlit Dies are currently available on the clearance rack, if you would like to pick up a set for the bargain price of £13.79, I love mine! - and stamped the 'for you' in Bermuda Bay using the Fabulous Phrases stamp set.
This is one of those cards that I finished and just love - the colours, layout, the diecut word, it's so me! Do you ever make a card and like it so much that you think you'll struggle to give it away? I think the recipient of this one will have to be someone special, so if it lands in your mailbox then you should consider yourself very lucky!!
Right - I'm off to peruse the retiring lists and write out my pre-order for goodies from the new catalogue too (and maybe do a little housework!). Back tomorrow with another card; until then, happy stampin'!
Stampin' Up! Supplies Used:
07beaf7b-d99f-4ad9-8388-f05a235941e8|0|.0|96d5b379-7e1d-4dac-a6ba-1e50db561b04
Tags: Simple Stems, Summer Silhouettes, Expressions Thinlits Dies, Fabulous Phrases, Shop online, Stamp-a-ma-jig, Stampin' Up, Stampin' Up Card, Stampin' Up Card ideas, Stampin' Up Supplies, Clearance Rack
Cards | Stamping
by Joanne James20. May 2014 21:20Good evening blog readers! Well, I really feel like I'm in catch-up mode this week, but I guess I shouldn't be too hard on myself - it is only Tuesday after all! Today I'm sharing a card I made for this week's sketch challenge over at Create with Connie and Mary. I kept the flower as per the sketch so I will also be linking up with The Paper Players, where this week's challenge from Ann is a clean and simple floral card and Less is More where the challenge theme is flowers:
Having played around with various floral sets, eventually I decided to dust off my 'Too Kind' set, as I haven't used it in a while and set about creating my card - here it is:

I chose an unconventional floral colour scheme, using blues and greys, but I think it works! I love the flowers in this stamp set - the two-step stamping really adds an extra dimension, which is perfect when you're trying to create a clean and simple card. A stamp-a-ma-jig makes light work of aligning the images though - this little tool is so useful! I decided to create a banner from the banner shape in the sketch and use it to highlight my sentiment which I heat embossed in pewter embossing powder, finished with a pewter button threaded with retired Pool Party baker's twine - here's a close-up:
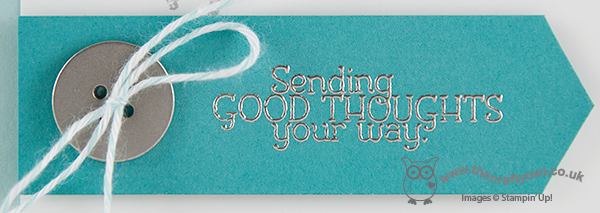
I also added Dazzling Diamonds to my flower petals to give a little sparkle and shimmer. A really clean and simple floral card; not where I started out at all, but I really like the end result.
Back tomorrow with another project; until then, happy stampin'!
Stampin' Up! Supplies Used:
by Joanne James16. May 2014 17:55I have had the busiest day today - last minute preparations for the Stampin' Up! UK Regional Training Event in Telford tomorrow coupled with lots of little jobs. Best part of my day though was getting to spend an hour in the sunshine watching Rebecca's team win their second rounders match of the week (go girls!) and I'm even managing to squeeze in a quick blog post, which I thought might be touch and go today!
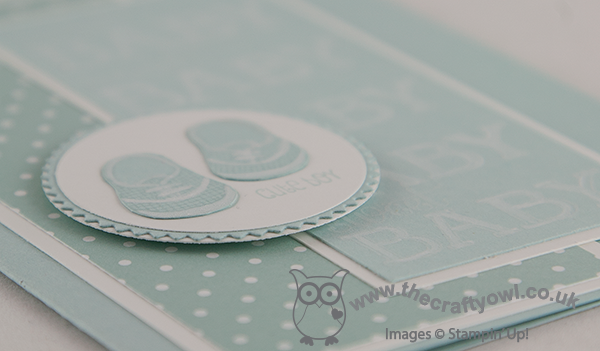
I have had a few baby cards to make lately, all of them girls, but I know someone who is due a baby boy anytime soon so thought I would get ahead for once and make my card ready. I decided to make a monochrome boy card to pair with the monochrome girl card I designed a couple of weeks ago for the Pals Paper Arts 200th anniversary challenge (you can see my original baby girl card here). Here is today's card:
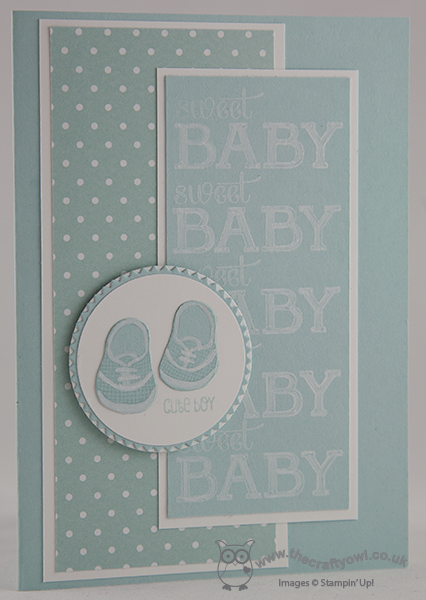
Using a Soft Sky base, I matted both of my cardstock layers on Whisper White and used a piece of Polka Dot DSP from the Subtles DSP stack for panel 2, whilst for panel 3 I stamped the 'sweet baby' stamp repeatedly in Whisper White onto Soft Sky cardstock - a stamp-a-ma-jig is essential for this - and coloured the word 'baby' with my chalk marker to give it a powdery look. Lastly, my focal point is the cute little boy shoes that I fussy cut and decorated with my chalk marker; to finish I layered this circle on a blue starburst mat and a further white circle.
Another pastel monochrome creation - not quite as fussy as the little girl one, but then in my experience boys never are!
Back tomorrow with another card and news of what's been happening at the regional event; until then, happy stampin'!
Stampin' Up! Supplies Used:
996af647-2d57-4ea6-ba5c-3ad558d82aae|0|.0|96d5b379-7e1d-4dac-a6ba-1e50db561b04
Tags: Baby cards, Baby We've Grown, Stampin' Up Supplies, Stampin' Up Card ideas, Stampin' Up Card, Starburst Framelits, Stampin' Up, Stamp-a-ma-jig, Shop online, Big Shot, Magnetic Platform
Cards | Stamping
by Joanne James14. May 2014 21:40I've had a busy couple of days preparing swaps and finishing my preparations for the Stampin' Up! event at Telford on Saturday and I've still got more to do! Today I'm sharing my card for this week's challenge over at Less is More, where Chrissie and the team are looking for one layer thank you cards. I decided to try something something a little different, using my retired but never-to-be parted with Expressions Thinlits. Here is my card:
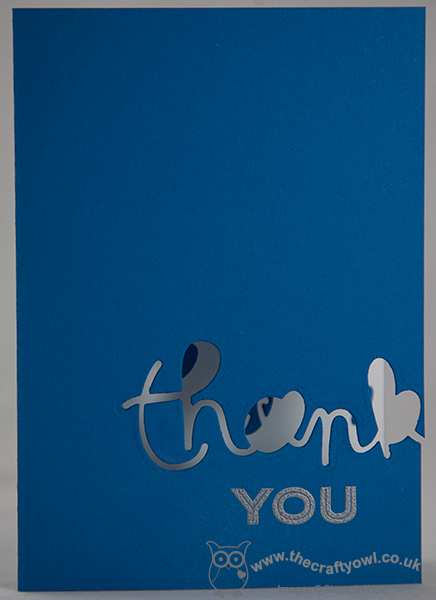
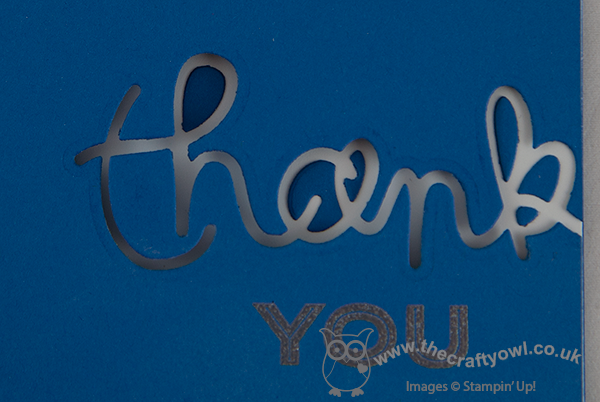
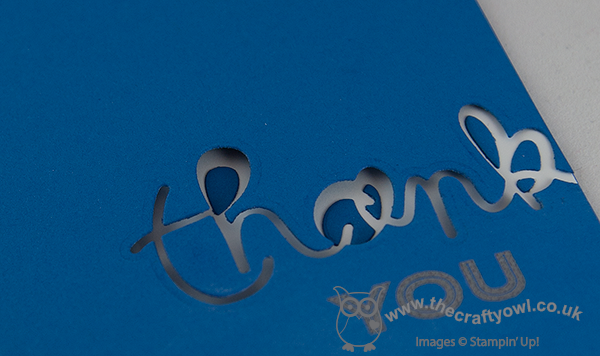
I decided to make a thank you card that would be suitable for a male, or at the very least gender neutral - so I went for a nice bright blue. Now I know the eagle-eyed amongst you are thinking - but the framelit says 'thankful', right? Well that's true - as I only wanted the 'thank' part, I positioned it over the edge of the card and cut it to the edge so that it looks as if the writing is going off the edge of the card. I adhered the cut-out pieces from the middle of the word to the inside of the card, to maintain the definition of the lettering - you can see it more clearly on the photo below:
To finish my sentiment, I inked up the 'you' from the 'thank you' sentiment in the 'Simply Celebrate' set and heat embossed it with silver embossing powder. A clean and simple thank you card that's just a little bit different! I'm also linking my card up to 'Addicted to CAS', where the current challenge is appropriately 'off the edge'. Right, I'm off to get my nails done!
Back tomorrow with another project; until then, happy stampin'!
Stampin' Up! Supplies Used:
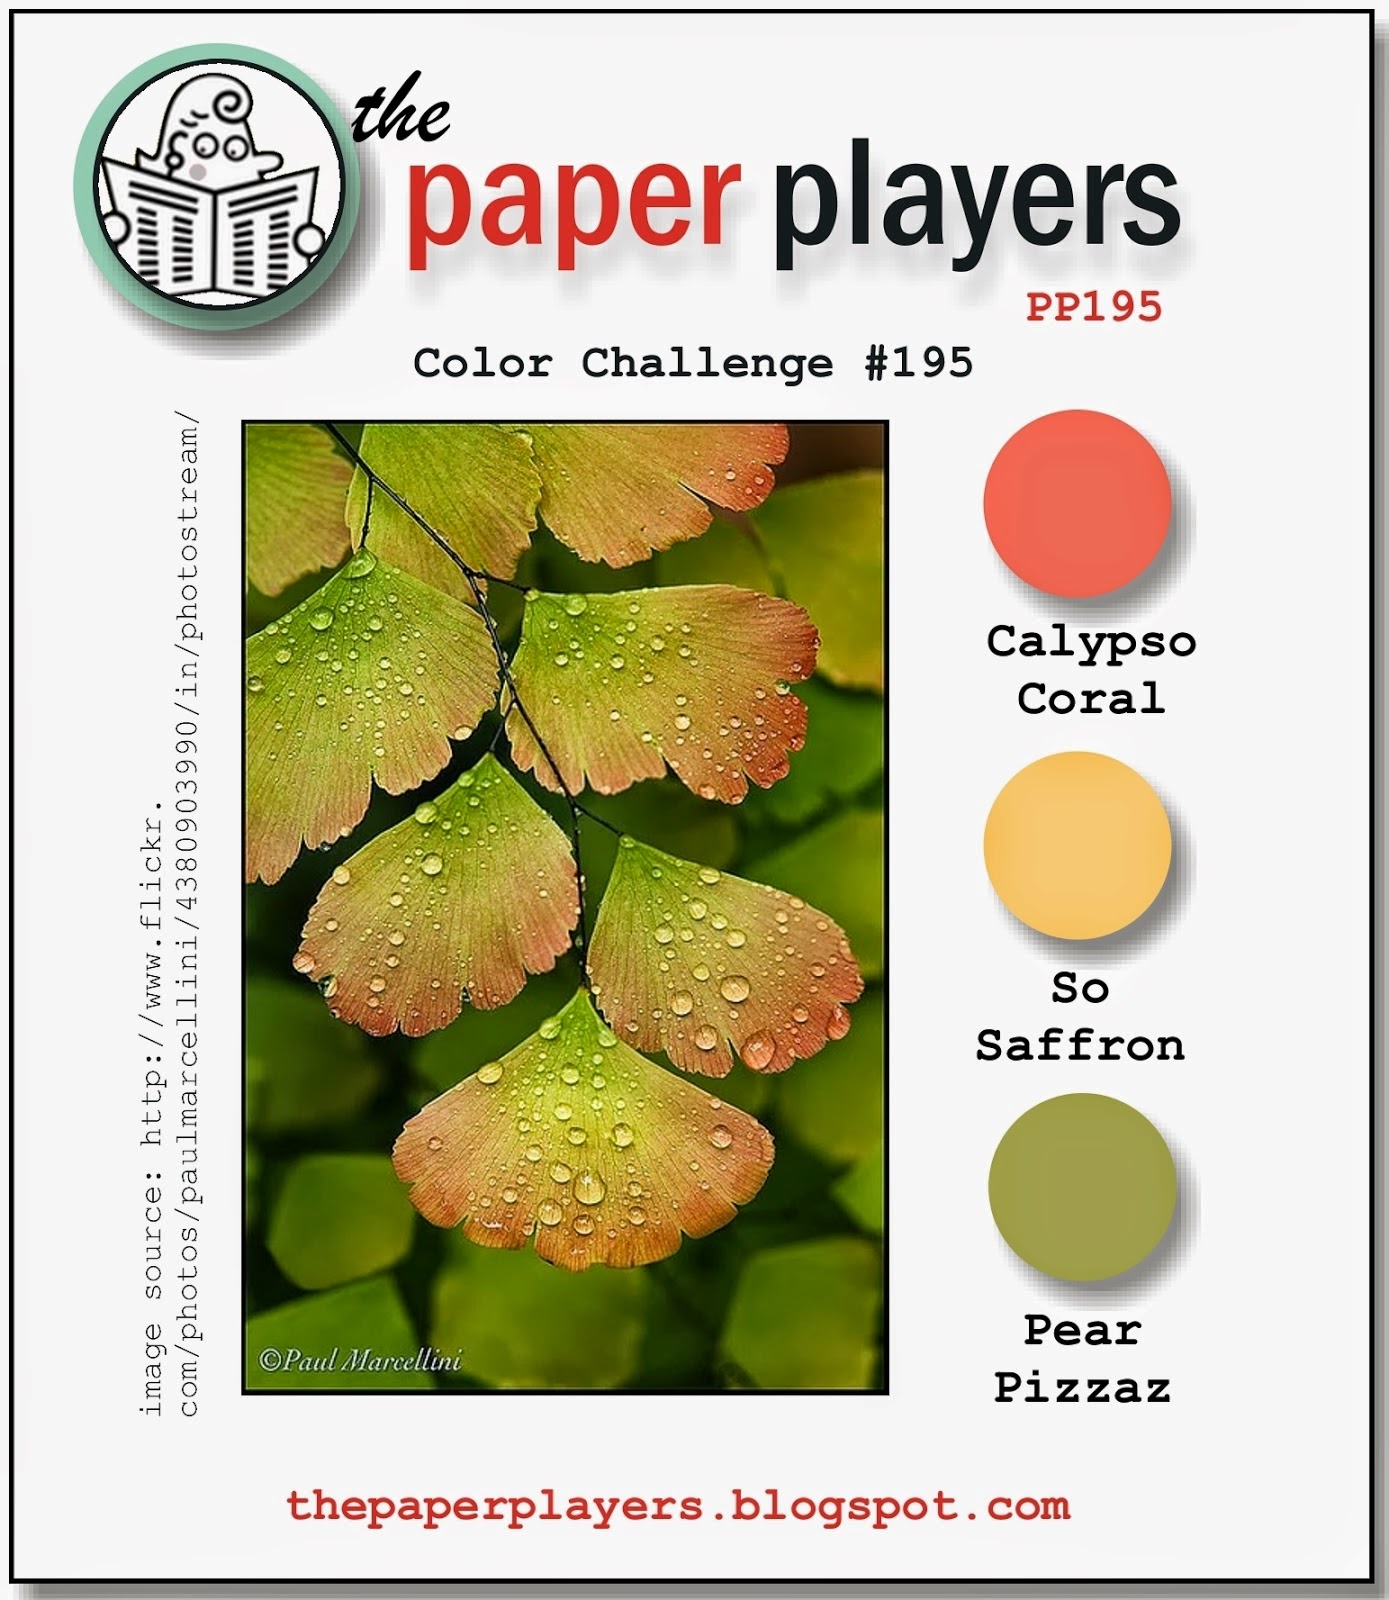
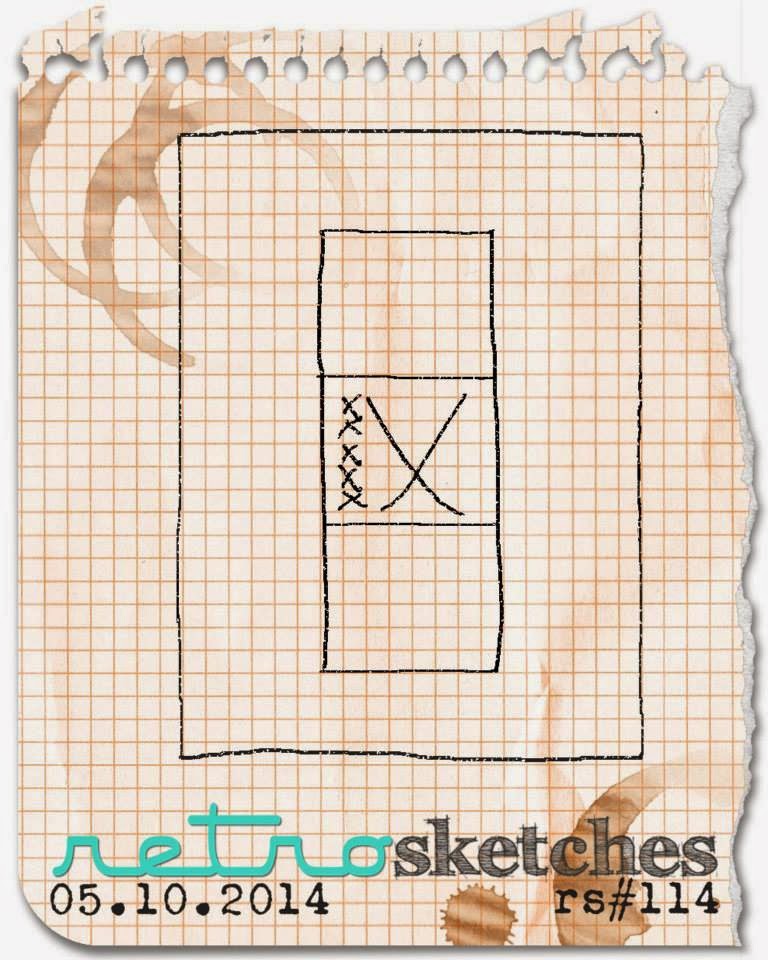
by Joanne James14. May 2014 11:00I'm having a love affair with my heat gun this week as this is my second card that features heat embossing and I've another cued up for tomorrow too! Today's card is my entry for this week's challenge over at The Paper Players where Sandy has chosen some lovely subtle spring colours to work with; I've also used this week's layout over at Retrosketches as the basis for my card:
I thought that The Paper Players colours were just asking to be used on a floral card - this is what I came up with:
I stamped the corner flower image twice in Versamark onto my vellum panel then heat embossed in white and coloured the reverse of the images with my So Saffron, Calypso Coral and Pear Pizzazz markers. I then adhered this to a panel of Calypso Coral and heat embossed my 'thank you' sentiment in white onto a panel of So Saffron and placed this across the middle on dimensionals.
This card came together quite quickly and I love the subtle effect of the colouring behind the vellum.
That's all from me today - I have to go and get on with my swaps in readiness for Stampin' Up!'s UK regional training event in Telford on Saturday, in order to be finished in time to go and watch Rebecca's first rounders match of the season later on this afternoon!
Back tomorrow with another card; until then, happy stampin'!
Stampin' Up! Supplies Used:
by Joanne James10. May 2014 20:55A quick post from me this evening as I sit with my feet up relaxing following today's all day workshop. We had a lovely time and everyone left with lots of completed projects and plenty of leftover bits and pieces to make lots more things at home. The following card, designed by Monica Gale, was one of my favourite projects:
The feature of the card is a Stippled Blossoms rose that is stamped partially off the tag; this is backed with a couple of strips of Fresh Prints DSP and then finished with a red grosgrain ribbon bow and a sentiment cut with the word window punch. A simple enough card but a great way to use the Stippled Blossoms stamps and great practice for getting to grips with your stamp-a-ma-jig. I'm on a mission to make sure all my ladies can use theirs and truly reap the benefits (much to their dismay at times, I'm sure!) of this amazing little plastic sheet and its accompanying t-piece. Thanks ladies for your patience!
My next monthly card class is on Monday 2nd June and will be featuring the 'Springtime Hello' stamp set. If you live in or around Northampton and would like to come along, please do get in touch for more details - experienced and non-experienced crafters welcome.
Back tomorrow hopefully with a special blog post for you; until then, happy stampin'!
Stampin' Up! Supplies Used:
5b70a00c-4938-4cf1-86fd-79b4b2a7a072|0|.0|96d5b379-7e1d-4dac-a6ba-1e50db561b04
Tags: Classes, Lots of Thanks, Shop online, Stippled Blossoms, Scalloped Tag Topper Punch, Fresh Prints DSP Stack, Stamp-a-ma-jig, Stampin' Up, Stampin' Up Card, Stampin' Up Card ideas, Stampin' Up Supplies
Cards | Classes | Stamping
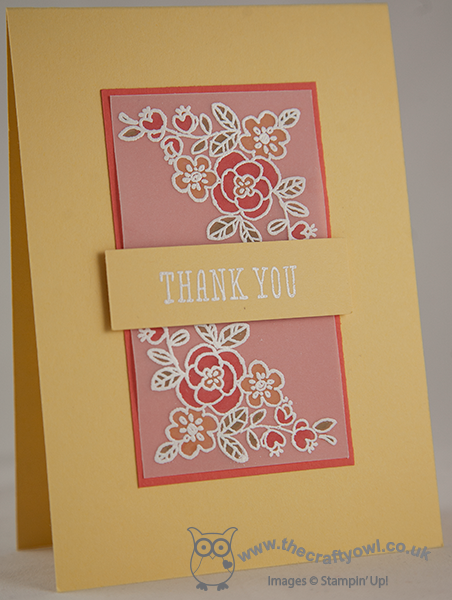
by Joanne James7. May 2014 22:08Good evening all! I had an unexpected uninterrupted day at home today and with the exception of a large basket of ironing, I've spent pretty much the whole day crafting - bliss! I had lots of partially finished projects on my desk and am glad to have been able to complete a fair few of these and cleared some space. I also had some new goodies arrive today and when I saw this week's Colour Me ...! challenge colours and photo inspiration, I just knew I was going to have to ink one of them up to complete a card for this challenge! I also used this week's sketch over at Retrosketches for my layout and tied it in with Jaydee's theme of 'Mother' over at The Paper Players this week:
I always think of Cherry Cobbler as a Christmas colour, so it's nice to use it for something that isn't seasonal. Here is my card:

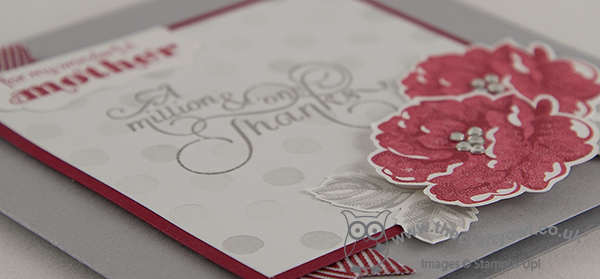
This card was the perfect excuse to ink up my new Stippled Blossoms stamp set. I've much admired this set for some time as I love the effect of the two-step stamping on the flowers, which look so typical of old English roses, but only recently purchased it. It's essential to use a stamp-a-ma-jig to get the images perfectly aligned - and there is no matching framelit, so the blossoms all need to be fussy cut by hand - but it is so worth it. I used my flowers to frame my central panel, a sheet of Watercolour Wonder DSP in White/Smoky Slate, onto which I heat-embossed the sentiment 'A Million and One Thanks' in Pewter. I matted this onto a square of Cherry Cobbler and used a Smoky Slate base. We've already celebrated Mothering Sunday here in the UK, but I decided to stay with this theme for my card. I thought this sentiment was quite appropriate; I know I don't thank my own Mother or Mother-in-law enough for everything they do for me and my family. I added a label (punched with the edge of the Decorative Label Punch) to incorporate 'to my delightful Mother' too and I finished off my card with a simple chevron ribbon trim and some rhinestones to add some sparkle.
Do check out the links to the challenges above for more design inspiration, especially Colour Me ...! where my long-distance Stampin' Up! buddy LeAnne Pugliese is the guest designer this month; you can check out her card on her Wee Inklings blog here.
Back tomorrow with another project (maybe even another video!); until then, happy stampin'!
Stampin' Up! Supplies Used:
862dbbcc-ef43-4e17-b01b-909f77482fcd|0|.0|96d5b379-7e1d-4dac-a6ba-1e50db561b04
Tags: Stippled Blossoms, Stampin' Up, Stampin' Up Card, Stampin' Up Card ideas, Stampin' Up Supplies, Stamp-a-ma-jig, Shop online, Delightful Dozen, Watercolour Wonder, Million & One, Decorative Label Punch
Cards | Stamping