To A Wild Rose Blessed Easter Wishes CCS 411

by Joanne James16. March 2021 12:00

It's Tuesday and time for a new challenge over at CAS Colours & Sketches. YoonYoung is hosting this month and today we have a colour challenge: 


For my card today I decided to go with some triple-step stamping and a sunny yellow rose for a cheery Easter card - take a look:


Here's the low-down on today's card:

To A Wild Rose - I'm not sure I've used this set on my blog before, but the 'To A Wild Rose' stamp set has some wonderful blousy blooms, that have great dimension just by layering colour - perfect for clean and simple cards. I used each of the challenge colours to create my layers, stamping off the third layer of both the leaves and the petals in order to get the depth of colour with only 3 inks.  

Bricks and Mortar - Over at Just Us Girls this week Bobby has asked us to embrace the trend of embossing folders. I decided to use a So Saffron card base so that I could use a white circle embossed with the Bricks and Mortar embossing folder to highlight my yellow rose. I'm sure there will be some wonderful and creative uses of embossing over in the JUGs gallery, but in an effort to keep things clean and simple I used a simple punched circle of texture on my card:


 Sometimes less is more I think!

Blessed Easter Wishes - I love the font of the large 'Blessed' stamp in the 'To A Wild Rose' stamp set, which works beautifully with the other friendship-themed sentiments included. I used a little creative licence and heat-embossed it in gold before I paired it with some other stamps from the super-versatile 'A Wish For Everything' stamp set to create my Easter greeting, which you can see in more detail below:


Do you ever combine stamp sets in this way? I love that with lots to choose from, the possibilities are endless! I also added a trio of sparkly enamel dots - I just couldn't help myself!

Here is the visual summary of the key products used on today's project for you to pin for easy reference:


You can see all of my 'How To' summaries on my 'How To - Tips and Techniques' Pinterest board in case you've missed any. 

As a reminder, for our colour challenges, you must use all of the stated challenge colours. You may also use neutral colours; however, the challenge colours should be the most noticeable ones featured on your card. We use Stampin' Up! color names for reference, but you are welcome to use any other companies' products as long as you match the challenge colours as closely as possible.

Enjoy your day; I have a date with the ironing pile but will be back later with a quick post about something very exciting that's happening tomorrow! I'll be back later! Until then, happy stampin'!


Stampin' Up! Supplies Used:

Table built using Product Table Builder by The Crafty Owl - Independent Stampin' Up! Demonstrator.

Hydrangea Hill Mothers Day Card PP532

by Joanne James14. March 2021 09:00

Today it's Sunday and time for this week's new challenge over at The Paper Players! It's my turn to host this week and I have a colour challenge for you to work with:
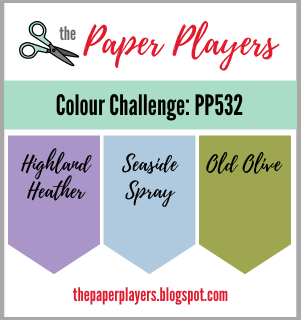
 

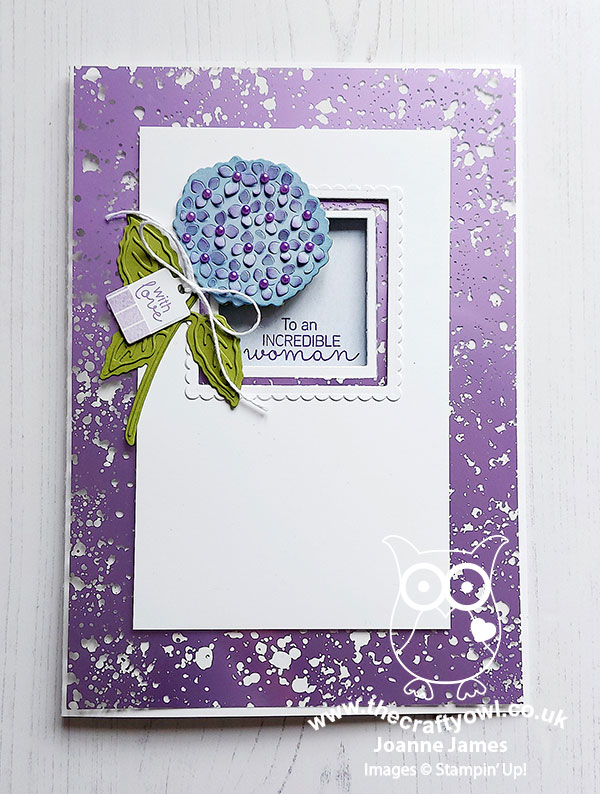
Today is Mothering Sunday or Mother's Day here in the UK and I chose my colour palette this week based on the products I wanted to use on the card that I was going to make for my Mum to celebrate this special day, specifically the Hydrangea Hill Mercury Glass Acetate which I was keen to incorporate into my card. I've lots of photos for you today and two versions of my card too, so get ready! Here's the first and original version of my card:
 

Here's the low-down on today's card:

Hydrangea Hill - My Mum is not particularly precious when it comes to flowers or gifts on Mother's Day, but she does appreciate a special card, so her card was the perfect opportunity to showcase the Hydrangea Hill Mercury Glass Acetate in Highland Heather, alongside other elements of the Hydrangea Hill Suite. I love the idea of these coloured foil acetates, but often find them trickier to use in practice. I think they make great frames or backgrounds though, so that's where I started with today's card. Measuring 21cm x 14.9cm (a sheet of folded A4) my card is larger than usual. I created an open window for my stamped sentiment (more on that below) and layered my frame with a scallop-edged border and a beautiful diecut hydrangea. Whilst the card above is my original card, and could actually be used for a special birthday too, I knew my Mum would want to see the words 'Happy Mother's Day' front and centre on her version - ever happy to oblige, I added an additional diecut sentiment in Highland Heather using the Word Wishes Dies to the front of my card:
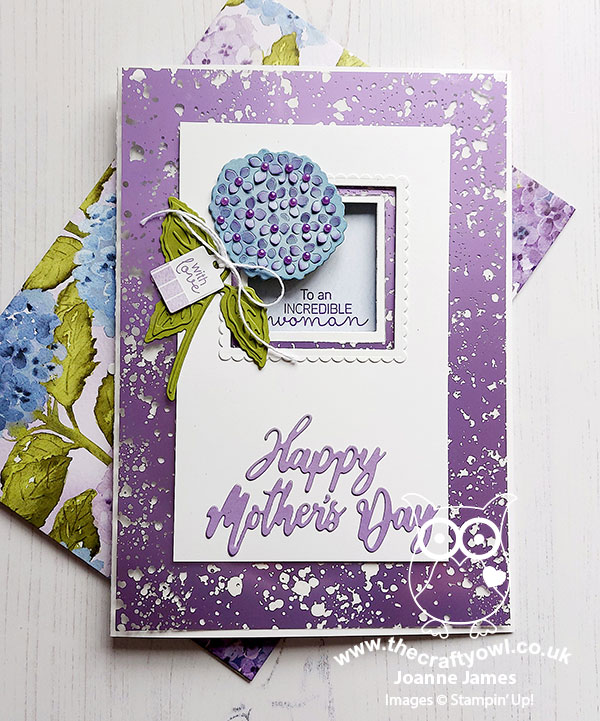
Layers, Layers - Despite its rather simple appearance, there are lots of layers to my card: the mercury glass acetate and framed sentiment window, along with the layered diecut elements to my flower, cut with the Hydrangea Dies. I also added a twine bow and tag to my floral stem using other elements in the set:
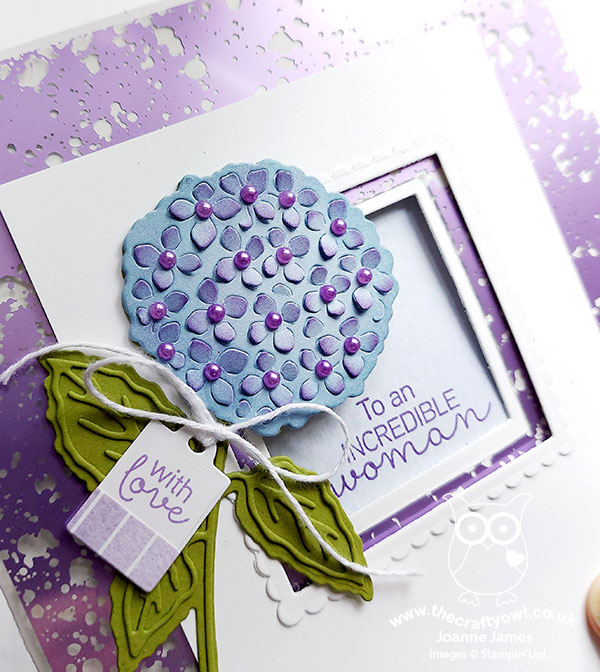
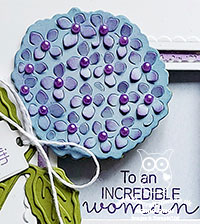
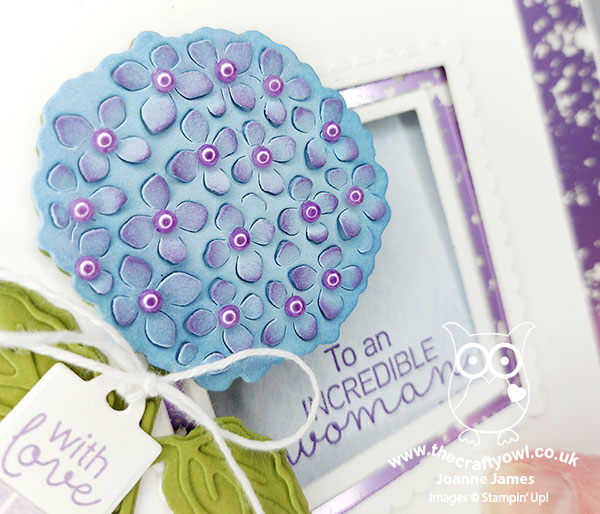
How beautiful is that hydrangea die? I cut it out of Balmy Blue and sponged the edges in the same colour to add depth, then lifted the petal elements and carefully sponged the tips of the petals with Highland Heather to create that two-tone look so often seen with this type of bloom. The suite has some beautiful coordinating pastel pearls, but they were too large for me to decorate the centre of my flowers. Instead, I used my dark Highland Heather Blends marker and coloured some small basic pearl jewels that were just the right size - aren't they so pretty?
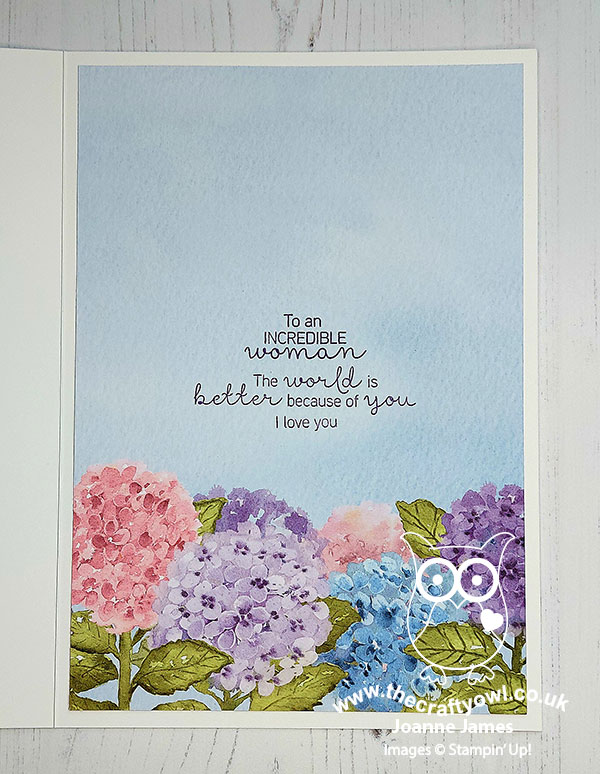
All About The Paper - I couldn't pass up the opportunity to use some of the beautiful Hydrangea Hill papers on my card today. The outside of my card only features the colours of my chosen palette, with a little of the Balmy Blue DSP visible through the window aperture, but the inside of my card also includes a little pink and some Gorgeous Grape on that hydrangea border paper; this paper is so perfect for additional hidden detail on the inside of the card, including my stamped message:
 

I also made a custom envelope from a whole sheet of 12" x 12" DSP, featuring the hydrangea flower heads and with a Highland Heather striped border on the flap:
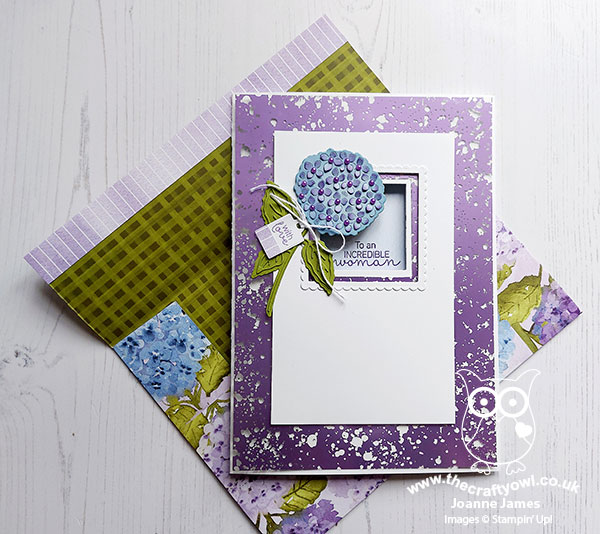
 

This paper is simply too good not to use! I added a simple stitched scalloped rectangle to the front of the envelope to address it:
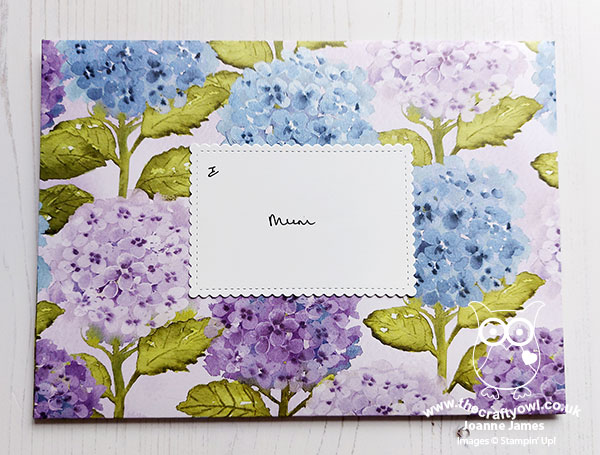
 

My card is going in the mail, so I packed it in a plain white envelope for mailing; I know my Mum will appreciate the extra pretty detail when she opens it though, so the double envelope is so worth it! I haven't seen my Mum in person for 15 months, due to ongoing restrictions in lockdowns and travel between Wales and England, however with the increasing rate of vaccination here in the UK, we shouldn't have too much longer to wait until we can all meet in safety once more.

Here is the visual summary of the key products used on today's project for you to pin for easy reference:
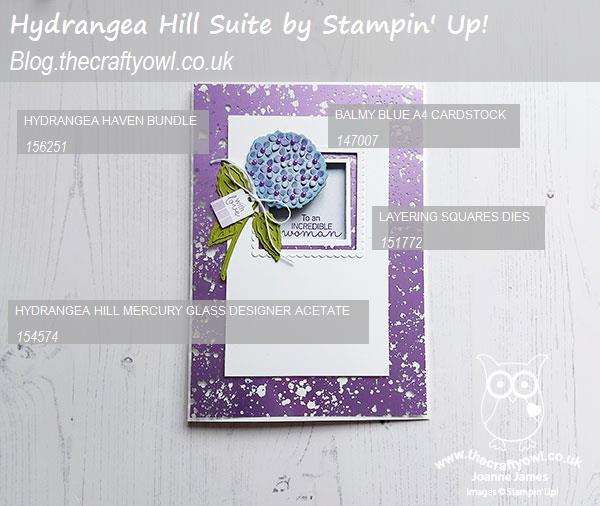
 

You can see all of my Product and 'How To' summaries on my 'How To - Tips and Techniques' Pinterest board in case you've missed any. 

Before you reach for your ink and papers, check out what our amazing team has created to inspire you this week:

Here's a quick recap of our challenge rules:
 
1.  Create a new paper project
2.  Upload your creation to your blog with a link back to us and provide a direct link to the post featuring your challenge submission.
3.  Please link your card to no more than four challenges, TOTAL.
4.  Have FUN!

You can see all of my 'How To' summaries on my 'How To - Tips and Techniques' Pinterest board in case you've missed any. 

I am looking forward to a special lunch cooked for me by my nearest and dearest, along with an afternoon bike ride if the rain holds. This is one of those days of the year that can mean many things to different people, so whether you are with your Mum or your offspring today, or whether you are missing your Mum because of Covid or other reasons, and for those who have perhaps lost a child or for whom motherhood is still to become a longed-for reality, I am thinking of you all and I hope you spend the day in a way that is meaningful to you.

I'll be back tomorrow with another project. Until then, happy stampin'!


Stampin' Up! Supplies Used: 

Table built using Product Table Builder by The Crafty Owl - Independent Stampin' Up! Demonstrator.

Woodland Wonder Concertina Birthday Card TTT104

by Joanne James11. March 2021 18:00

It's Thursday and time for a new challenge over at TicTacToe! It's the turn of Team X to host this week and I have the honour of being the featured designer this week. This is the fun board that we are playing along with: 


Lots of options for you to create with this one! I went down the first column with animal, stitching and birthday for a fun card with a difference today - take a look:


Here's the low-down on today's card:

Woodland Wonder - I don't have any really little people in my life, however I couldn't resist the Woodland Wonder stamp set! In addition to birthday cards, it's also great if you need to make a card from lots of people or even if you use elements of the set for a different purpose - that pink bunny could totally be going on an Easter egg hunt, right?! 

A Fun Fold - Whilst my card looks pretty standard at first glance, you may have noticed the fold across the centre - that's because it's a concertina fun fold. I loved the sample on page 53 of the January-June mini catalogue, so thought I'd have a go at making one myself. Once you slide the tulle ribbon bow off the cardfront, the card opens up to reveal the remainder of the bunny's friends:


I had a lot of fun stamping and colouring the various elements of this card, which folds up to a standard card size. The stamps are really easy to align; my one top tip for you is that you make sure you know where the front fold will sit on your back panel when closed, so that you don't have any elements that end up being partially visible when it's closed up, such as a cloud or part of an animal (ask me how I know!!)

Behind the concertina fold the card also opens up in the conventional way, for you to write a message. I couldn't resist adding another trunk full of cute critters waving their respective birthday wishes:

Isn't that just the cutest?! This is what the card looks like when it stands up in its concertina design:


It's In The Details - There are only two other main elements to my card besides my fun fold and stamped design: the lovely soft polka dot tulle ribbon that holds the card closed for mailing, and the stitched banner diecut I used for my happy birthday sentiment, that is from the Smooth Sailing Die set - such a useful little die:


I think this card could be adapted for lots of other uses too, such as welcome to the team, farewell and good luck cards and more besides!  

Here is the visual summary of the key products used on today's project for you to pin for easy reference:


You can see all of my Product and 'How To' summaries on my 'How To - Tips and Techniques' Pinterest board in case you've missed any. 

I'm also linking today's card up over at Just Us Girls where the theme is 'animals' and at SUO Challenges for a second entry in the 'things that fly' - today's card has birds, butterflies an owl - and at a stretch, a balloon too!

A tictactoe board offers so many creative possibilities - how does this week's board inspire you? Why not have a go? We would love to see you in the gallery and who knows - you might be selected for Designer's Choice and be eligible to be a guest designer on a future challenge. 

Enjoy your evening; I'll be back tomorrow with another project. Until then, happy stampin'!


Stampin' Up! Supplies Used: 

Table built using Product Table Builder by The Crafty Owl - Independent Stampin' Up! Demonstrator.

Life Can Get Kinda Prickly - And Busy!

by Joanne James11. March 2021 13:44

Thursday already??! The James Juniors are back at school and I should have more time, but the week is whizzing by! Today I'm squeezing in an extra post with a card for the current Fab Friday Challenge that I almost missed in the chaos of my week using Linda's fabulous Freshly Made Sketches layout this week:


That Fab Friday colour palette was perfect for my ongoing play time with the Flowering Cactus Product Medley, so I reached for more of those fun diecuts along with that fun 'prickly' border that I thought would be perfect for Linda's FMS sketch this week:


This is such a fun set with awesome papers - and you know how I love a good patterned paper! Check out the detail on those diecuts:


Today's card features probably my favourite sentiment in the Flowering Cactus stamp set - which finishes on the inside of my card with another stamped cactus just for fun:


Here is the visual summary of the key products used on today's project for you to pin for easy reference:


You can see all of my 'How To' summaries on my 'How To - Tips and Techniques' Pinterest board in case you've missed any. 

Life certainly can get prickly - and busy too! I will be back later to share more of my makes, but for now I'm racing to catch the peeps at Fab Friday! Until then, happy stampin'!


Stampin' Up! Supplies Used:

Table built using Product Table Builder by The Crafty Owl - Independent Stampin' Up! Demonstrator.

Pampered Pets CAS Sympathy Card CCS 410

by Joanne James9. March 2021 13:00

It's Tuesday and time for a new challenge over at CAS Colours & Sketches. This week's challenge is a sketch challenge and YoonYoung has asked that we create something with a crescent shape as the main feature on our card:


Feel free to flip or rotate the sketch when making your card.  

For my card today I was tempted to go with a spray of florals or even dig out a retired baby stamp that would be perfect for this card (in fact, if you'd like to check out this old post you will see two cards that I made for this very challenge using the exact set that I had in mind!), but in the end decided to go with something a little more obtuse that ended up ultra-CAS - take a look:


Here's the low-down on today's card:

I decided to go with the dog from 'Pampered Pets' for today's card - you can see the distinct curved shape of my pooch, right?!

I heat embossed my dog in white onto Basic Black cardstock for a change and used the Pets Dies to diecut out the shape with ease. The angle of the dog fitted around the sentiment perfectly and all I needed to do was add a red resin heart for a pop of colour on my otherwise monochromatic pet sympathy card. I actually started with a card that had a lot more going on (I actually turned that card into something else so will share another time) but for a variety of different reasons evolved beyond the sketch, so I decided to pare things right back and go ultra CAS. I debated with adding twine or even some sponging behind my pooch, but decided to go with the 'less is more' look after the positive comments I received on the one layer floral I created for last week's challenge. Besides, when it comes to the loss of a beloved pet, I'm not sure that any amount of frills or card details take away from the sense of loss that an owner feels. 

I am also linking today's card up over at Addicted to CAS where their codeword is 'Animal' and I'm hoping they will appreciate my CAS efforts. The simplicity of today's card rely does not reflect the thought and effort that went into it - I find that's often the way where 'clean and simple' is concerned!

Here is the visual summary of the key products used on today's project for you to pin for easy reference:


You can see all of my 'How To' summaries on my 'How To - Tips and Techniques' Pinterest board in case you've missed any. 

I am 'home alone' today for the first time in months as both James Juniors are now officially Covid-free and back at school. So I shall be playing the radio at full blast and making tea whenever I like, without fear of remonstration! Sometimes one must delight in the simple pleasures of life!! Enjoy your day and I'll be back tomorrow with another project. Until then, happy stampin'!


Stampin' Up! Supplies Used:

Table built using Product Table Builder by The Crafty Owl - Independent Stampin' Up! Demonstrator.

Flowering Cactus Product Medley #mojosketch554

by Joanne James7. March 2021 21:00

Today I'm sharing an extra card with you! I made it earlier in the week using the current Mojo Monday sketch for the challenge over at Hand Stamped Sentiments and had hoped to share yesterday, but simply ran out of time!


So I thought I'd grab a quick few minutes to share my make with you - take a look:


 Here's the low-down on today's card:

This card was my first outing with the Flowering Cactus Product Medley and it was perfect for that inspiration photo over at Hand Stamped Sentiments - cactus galore and pops of colour. I've not showcased a Product Medley on my blog before, so if it's a concept that's unfamiliar to you, let me explain! A Product Medley contains stamps, dies, papers and accessories that co-ordinating with each other perfectly and no instructions - leaving you free to create whatever you want. I'm not usually attracted to cactus stamps, but I particularly liked the dies and sentiments in this stamp set so thought I'd get one and have a play. I went big with the layers on this card, with lots of dimension:


I mostly used diecuts, paper and elements from the kit on this card, with the only stamping for my sentiment and on the inside of my card:


I really like the effect though and am pleased with my first attempt. Can't wait to make more with this box of prickly loveliness!

Here is the visual summary of the key products used on today's project for you to pin for easy reference:


You can see all of my 'How To' summaries on my 'How To - Tips and Techniques' Pinterest board in case you've missed any. 

Enjoy your evening and I'll be back soon with another project. Until then, happy stampin'!


Stampin' Up! Supplies Used:

Table built using Product Table Builder by The Crafty Owl - Independent Stampin' Up! Demonstrator.

Flowers For Every Season - Spring Butterfly Panel Card

by Joanne James7. March 2021 09:00

Today it's Sunday and time for this week's new challenge over at The Paper Players! It's the turn of the amazing Claire to host this week and she has a seasonal theme challenge for you to work with:


Whilst it has been a little chillier again here in the UK this week, there are still so many wonderful signs that spring is in the air. The daffodils are starting to open, the first lambs have been born on a neighbouring farm so today's card is full of spring colour - take a look:


Here's the low-down on today's card:

Flowers For Every Season - I decided that for today's card I wanted to see an injection of spring colour, so reached for the Flowers For Every Season designer paper pack. This pack contains some very bold, bright florals and the one I chose, with its tulips amongst other flowers, is just perfect for spring. I used the three panel layout over at Paper Craft Crew so that the pattern didn't become too overwhelming, and backed each one with a thin border of Just Jade and a fancy frame diecut with the Ornate Layers Dies in Whisper White.

Butterfly Beauty - I chose a sentiment that I thought reflects the optimism that comes with the spring season, and embellished it with a layered butterfly cut using the Butterfly Beauty dies (I snipped this one away from the larger die):


I also used another of the dies in the same set to create my horizontal pieces of greenery. 

Elongated Envelope - In order to comfortably accommodate my three panels, I made my card slightly longer than a standard card front (it measures 18cm instead of 14.9cm). The photo below shows the difference in sizes:


This meant I needed to create a custom envelope. Rather than start from scratch though, I thought I'd share with you a quick trick that you can use to convert a standard envelope to fit a larger card. All you need to do is glue the envelope closed, then slice off the end on the short side and add some some designer paper to create a new closure:

It's really straightforward: Take two strips of coordinating DSP, one measuring 4cm x 30.5cm (1 1/2" x 6") and one 4cm x 10.5cm and attach the longer one to the cut edge of the front of the envelope, with an even overhang top and bottom. Measure 18cm from the end of the envelope and score a line along your DSP, cut away the corners to create your flap then flip your envelope over to the reverse. Fold over the overhangs and glue those in place then align the shorter piece across the back of the envelope and glue to the base. Add tear and tape to the envelope flap and you're done. Here's a photo of the reverse of the envelope extension which hopefully makes some sense of my instructions above:


 I also added some Magenta Madness ribbon to cover my seam as my card will be hand delvered rather than posted - you can always leave this off if you need to be able to post your card.


What do you think? I hope you found the envelope instructions useful and you like my card full of spring colour and flowers. I'm also linking up today over at SUO Challenges, where the theme is 'things that fly' - I think my butterfly qualifies on that front!

Here is the visual summary of the key products used on today's project for you to pin for easy reference:


You can see all of my Product and 'How To' summaries on my 'How To - Tips and Techniques' Pinterest board in case you've missed any. 

Before you reach for your ink and papers, check out what our amazing team has created to inspire you this week:

Here's a quick recap of our challenge rules:
 
1.  Create a new paper project
2.  Upload your creation to your blog with a link back to us and provide a direct link to the post featuring your challenge submission.
3.  Please link your card to no more than four challenges, TOTAL.
4.  Have FUN!

You can see all of my 'How To' summaries on my 'How To - Tips and Techniques' Pinterest board in case you've missed any. 

Enjoy your day; I am hoping to spend some time in the garden today and will be making the most of my last day at home with the James Juniors before they head back to school next week on Monday and Tuesday respectively. I'll be back tomorrow with another project. Until then, happy stampin'!


Stampin' Up! Supplies Used: 

Table built using Product Table Builder by The Crafty Owl - Independent Stampin' Up! Demonstrator.

Grandad's Treasures of Life AYSI 245

by Joanne James5. March 2021 13:00

Today I'm sharing my design team card for our new challenge over at As you See It where it's time for a recipe challenge:


The often-dreaded masculine card! I decided to go with one of my current favourites from the January-June mini catalogue as I wanted to give this set another outing and create something a little different to my previous card with this set (you can see that card here if you missed it). Here's my card for today:


 Here's the low-down on today's card:

Treasures of Life - I decided to use the Grandad and Grandson image from the 'Treasures of Life' stamp set as the main feature of my masculine card today. This is such a beautiful set to celebrate the joys of being a grandparent. I stamped my image in Early Espresso and gave it a rough watercolou in earthy tones, picking out some of the details of the little boy in Night of Navy. I stamped my image on some retired Naturals White card for added texture and added another sentiment to the inside of my card from the set:


I left it otherwise fairly blank as I haven't yet decided what occasion I'm going to use this card for and I may add a birthday greeting too in due course.

All About Texture - I used lots of textural elements on today's card: a piece of Early Espresso embossed with the Tasteful Textile 3D embossing folder, a piece of the In Good Taste designer series paper. along with the texture added by the navy twine and my naturals white cardstock. I think the combination of elements along with the earthy brown tones give my card a homely, cosy feel. What do you think?


Tasteful Labels and an Old Faithful - The final element to complete this week's recipe challenge was to use a diecut: I used one of the Tasteful Labels dies for my sentiment, along with one of my old faithful Stitched Rectangle Dies to frame my watercoloured image.

Here is the visual summary of the key products used on today's project for you to pin for easy reference:


You can see all of my 'How To' summaries on my 'How To - Tips and Techniques' Pinterest board in case you've missed any. 

So how will you use this week's recipe?

Here's a summary of our challenge rules:

  • Create any card, scrapbooking page, 3D project or packaging project that fits the challenge.
  • Please include the challenge graphic and link back to the challenge in your blog post. Turn off word verification so we can leave you lots of lovely comments. Make sure you link the post not the whole blog to the Linky. Use #AYSIXXX when uploading to a public gallery.
  • If you’re unsure about ‘the rules’, check the details under the Challenge Guidelines tab on the As You See It Challenge homepage.
We look forward to seeing your creations in the AYSI gallery.

Enjoy your day and I'll be back tomorrow with another project. Until then, happy stampin'!


Stampin' Up! Supplies Used:

Table built using Product Table Builder by The Crafty Owl - Independent Stampin' Up! Demonstrator.

HB2U Hey Birthday Chicks Card

by Joanne James3. March 2021 22:16

Today was one of those days that did not go to plan - do you ever have days like that?! So I'm late squeezing in a quick post for this week's Inspired By Challenge and another entry for the birthday celebrations over at Time Out:


I used both the sketch layout and number inspiration over at Inspired By for my fun birthday card today - take a look:


Here's the low-down on today's card:

I created a custom sentiment using my Playful Alphabet Dies, flanked by some happy-go-lucky party chicks from the Hey Birthday Chicks bundle. I used some of the Ice Cream Corner designer paper for my background base and carried through the colours of the stripes for the other elements of my card:


Some quick stamping to the inside completes my card:


Here is the visual summary of the key products used on today's project for you to pin for easy reference:


You can see all of my 'How To' summaries on my 'How To - Tips and Techniques' Pinterest board in case you've missed any. 

Enjoy your evening and I'll be back tomorrow with another project. Until then, happy stampin'!


Stampin' Up! Supplies Used:

Table built using Product Table Builder by The Crafty Owl - Independent Stampin' Up! Demonstrator.

#SimpleStamping Art Gallery One Layer Floral Birthday Card CCS409

by Joanne James2. March 2021 13:00

It's Tuesday and time for a new challenge over at CAS Colours & Sketches. YoonYoung is hosting this month and our first challenge of March is a colour challenge: 


Feel free to flip or rotate the sketch when making your card. For my card today I thought I would take the opportunity to use these colours for an oh-so-simple CAS card and embrace this week's Less Is More ongoing celebrations too with a one layer floral - take a look:


Here's the low-down on today's card:

Today's card uses just 5 items: the Art Gallery stamp set, 3 ink pads and some Basic White thick cardstock - #SimpleStamping at its best. The Art Gallery stamp set is perfect for beginners and experienced crafters alike; the double-layered florals are very forgiving in terms of needing to be stamped accurately and the two-step stamping adds interest and the illusion of texture.  Having recently re-inked my Calypso Coral ink pad, it was stamping quite dark but you can see the contrast between it and the Terracotta Tile overlay more clearly below:


Whilst I was making this card, I also experimented with adding in some gold leaf; I stamped an identical card and added some gold leaf detail to the Terracotta Tile layer and I added a trio of gold gilded gems:


I discounted it as my main card today as it obscured too much of the Teracotta Tile colour, even though I tried to add a little more in with some stamens:


I thought I would share it with you as it shows a quick way to step up my original card. Here are both cards together:


Which one do you prefer? After much playing around, I think actaully 'less is more' and the most basic card is my favourite. 

Here is the visual summary of the key products used on today's project for you to pin for easy reference:


You can see all of my 'How To' summaries on my 'How To - Tips and Techniques' Pinterest board in case you've missed any. 

As a reminder, for our colour challenges, you must use all of the stated challenge colours. You may also use neutral colours; however, the challenge colours should be the most noticeable ones featured on your card. We use Stampin' Up! color names for reference, but you are welcome to use any other companies' products as long as you match the challenge colours as closely as possible.

Enjoy your day and I'll be back tomorrow with another project. Until then, happy stampin'!


Stampin' Up! Supplies Used:

Table built using Product Table Builder by The Crafty Owl - Independent Stampin' Up! Demonstrator.


Mini Catalogue

BROWSE THE CATALOGUE

The mini catalogue is now live! Read and download your copy here.

Shop Online

Access my online shop 24 x 7, 365 days of the year:

Current April hostess code:

VDKNV7BH

Shop Online

Join My Team

It's always a great time to join Stampin’ Up! New team members can get £130 worth of products for only £99 + free business supplies + free shipping + all the fun being a part of Stampin’ Up! Stampin' Up! has something for everyone: join my growing team and benefit from my support to enjoy Stampin' Up! however you choose.

If you're interested, call me for a chat to understand how I can help you realise your goals. Alternatively, if you have already decided to sign up and you just can't wait, please click here for the link to the online form where you can sign up and order your starter kit right away! 

Latest Kit!

Stampin Cut and Emboss

The Rock Legend Kit has all you need to make 8 cards with coordinating envelopes. Along with the new Panda Friends Kit, both are available from January 4th for just £14 each - get yours here!

2023-24 Annual Catalogue

BROWSE THE CATALOGUE

Click on the catalogue for a full list of current SU! supplies - if you would like to order any of the items featured, please drop me a line at [email protected] or give me a call on 07773 421446 - I'd be happy to help.

New Online Exclusives

There are new products available exclusively in the online store from 5 March - check them out here.

About Me

Hi I'm Joanne and live in Northampton and when I'm not looking after my husband and two beautiful children, am an avid crafter with a passion for all things Stampin' Up!

I must confess that I have never been a big rubber stamper - until I discovered Stampin' Up! that is. I love the fact that I can get such great results with co-ordinating stamps, inks, papers and punches - the possibilities are endless! Join me on my stamping journey as I share the things I love and be inspired to create amazing things yourself!

Follow Me

Monthly Newsletter

Box Builder

Click the button above to use Box Buster to create your custom box design using the Envelope Punch Board!

Kits Collection Now Available!

Stampin Cut and Emboss

The new Kits Collection from Stampin' Up! is now available!

Click here to see the current kits available and order yours online today.

I Design For


Stampin' Up Stuff

This is my personal blog and is not endorsed by Stampin’ Up! I hope you find it a plentiful source of ideas and personal inspiration but please don't copy my designs for contest submission or use for classes, publication or sale without express permission.