Flowers For Every Season - Spring Butterfly Panel Card

by Joanne James7. March 2021 09:00

Today it's Sunday and time for this week's new challenge over at The Paper Players! It's the turn of the amazing Claire to host this week and she has a seasonal theme challenge for you to work with:
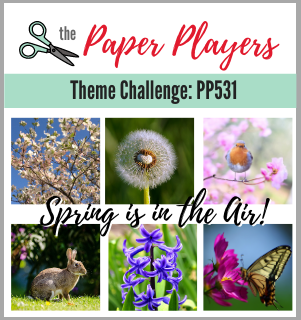
    

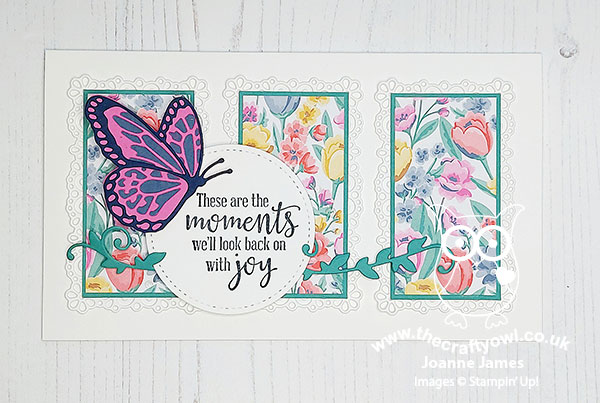
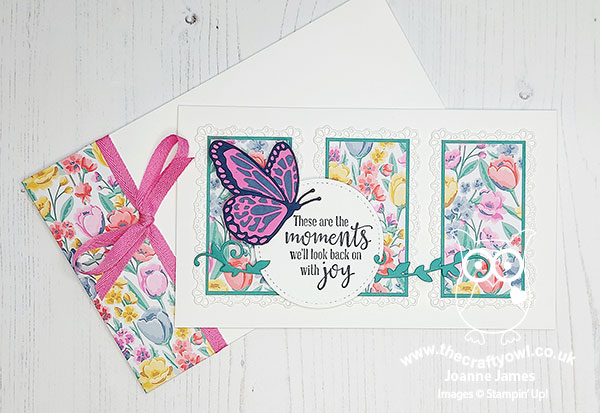
Whilst it has been a little chillier again here in the UK this week, there are still so many wonderful signs that spring is in the air. The daffodils are starting to open, the first lambs have been born on a neighbouring farm so today's card is full of spring colour - take a look:


Here's the low-down on today's card:

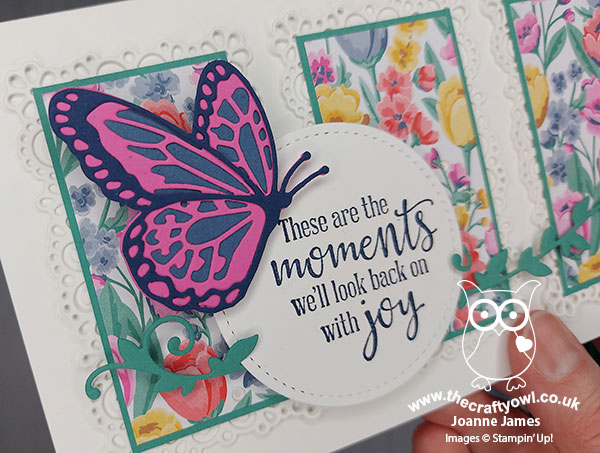
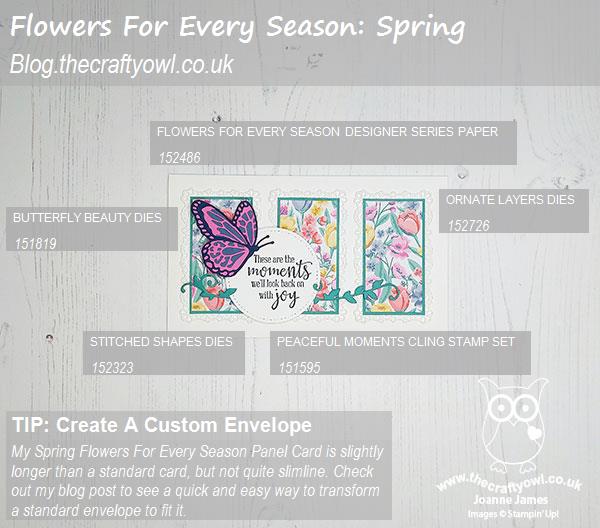
Flowers For Every Season - I decided that for today's card I wanted to see an injection of spring colour, so reached for the Flowers For Every Season designer paper pack. This pack contains some very bold, bright florals and the one I chose, with its tulips amongst other flowers, is just perfect for spring. I used the three panel layout over at Paper Craft Crew so that the pattern didn't become too overwhelming, and backed each one with a thin border of Just Jade and a fancy frame diecut with the Ornate Layers Dies in Whisper White.

Butterfly Beauty - I chose a sentiment that I thought reflects the optimism that comes with the spring season, and embellished it with a layered butterfly cut using the Butterfly Beauty dies (I snipped this one away from the larger die):


I also used another of the dies in the same set to create my horizontal pieces of greenery. 

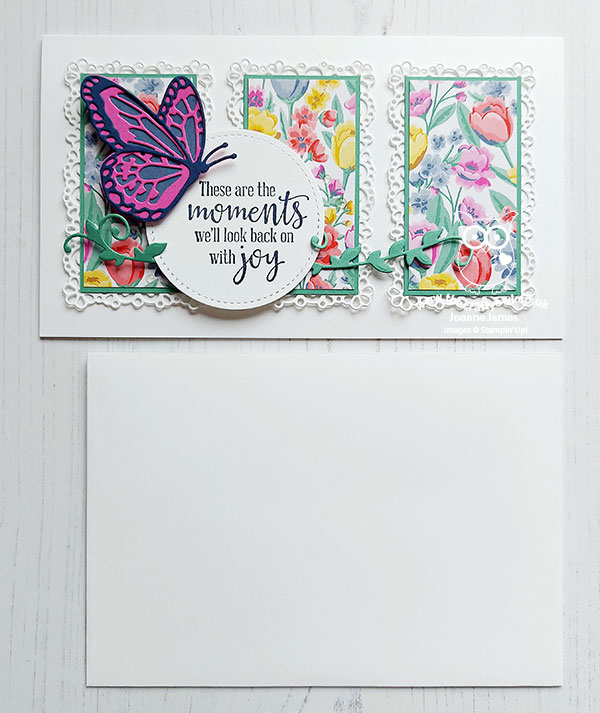
Elongated Envelope - In order to comfortably accommodate my three panels, I made my card slightly longer than a standard card front (it measures 18cm instead of 14.9cm). The photo below shows the difference in sizes:


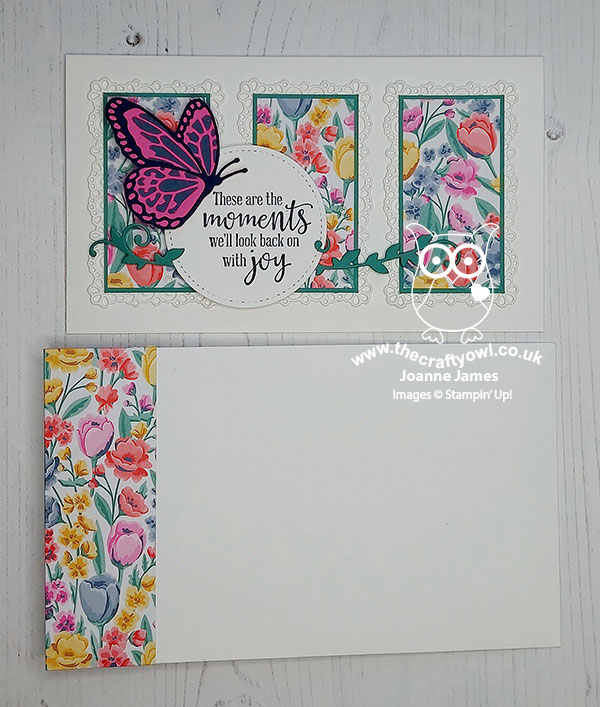
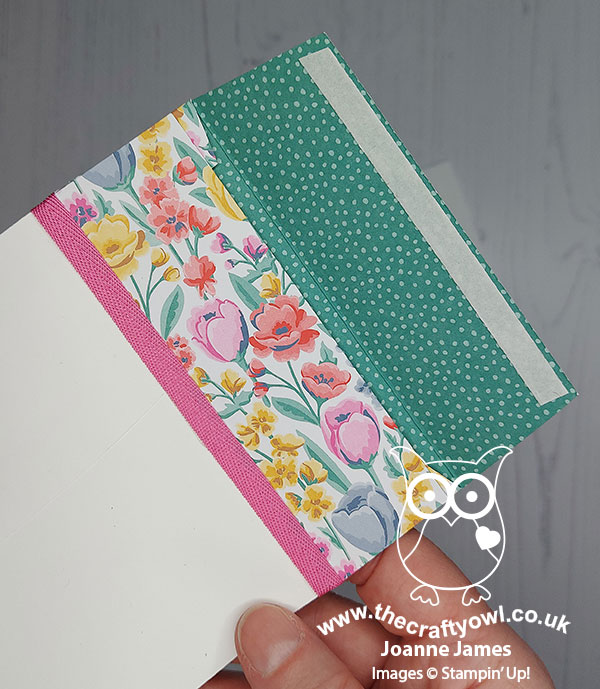
This meant I needed to create a custom envelope. Rather than start from scratch though, I thought I'd share with you a quick trick that you can use to convert a standard envelope to fit a larger card. All you need to do is glue the envelope closed, then slice off the end on the short side and add some some designer paper to create a new closure:

It's really straightforward: Take two strips of coordinating DSP, one measuring 4cm x 30.5cm (1 1/2" x 6") and one 4cm x 10.5cm and attach the longer one to the cut edge of the front of the envelope, with an even overhang top and bottom. Measure 18cm from the end of the envelope and score a line along your DSP, cut away the corners to create your flap then flip your envelope over to the reverse. Fold over the overhangs and glue those in place then align the shorter piece across the back of the envelope and glue to the base. Add tear and tape to the envelope flap and you're done. Here's a photo of the reverse of the envelope extension which hopefully makes some sense of my instructions above:


 I also added some Magenta Madness ribbon to cover my seam as my card will be hand delvered rather than posted - you can always leave this off if you need to be able to post your card.


What do you think? I hope you found the envelope instructions useful and you like my card full of spring colour and flowers. I'm also linking up today over at SUO Challenges, where the theme is 'things that fly' - I think my butterfly qualifies on that front!

Here is the visual summary of the key products used on today's project for you to pin for easy reference:


You can see all of my Product and 'How To' summaries on my 'How To - Tips and Techniques' Pinterest board in case you've missed any. 

Before you reach for your ink and papers, check out what our amazing team has created to inspire you this week:

Here's a quick recap of our challenge rules:
 
1.  Create a new paper project
2.  Upload your creation to your blog with a link back to us and provide a direct link to the post featuring your challenge submission.
3.  Please link your card to no more than four challenges, TOTAL.
4.  Have FUN!

You can see all of my 'How To' summaries on my 'How To - Tips and Techniques' Pinterest board in case you've missed any. 

Enjoy your day; I am hoping to spend some time in the garden today and will be making the most of my last day at home with the James Juniors before they head back to school next week on Monday and Tuesday respectively. I'll be back tomorrow with another project. Until then, happy stampin'!


Stampin' Up! Supplies Used: 

Table built using Product Table Builder by The Crafty Owl - Independent Stampin' Up! Demonstrator.

Butterfly Beauty Inlaid Foil Diecut Birthday Card

by Joanne James9. May 2019 20:30

Today I'm sharing a card for the current challenge over at Stamps Ink Paper where they are all about winged things this week:

After I made this card for our challenge over at The Paper Players on Sunday, the frugal crafter in me couldn't bear to throw away the rectangle of foil that I cut my butterflies for the pop-up out of, so I save it, along with the inset pieces, and diecut more black butterflies using the large die in the Butterfly Beauty Thinlits set and created a second card by piecing together my offcuts - take a look:


Once I'd pieced the whole thing together, I added some ribbon and sequins beneath my sentiment banner then decorated the inside of my card with the co-ordinating Beauty Abounds stamp set:


The paper-piecing here was something of a labour of love, but that Lovely Lipstick foil is just too pretty to allow any of it to go to waste!

Here is the visual summary of the key products used on today's project for you to pin for easy reference:


You can see all of my 'How To' summaries on my 'How To - Tips and Techniques' Pinterest board in case you've missed any. 

I'll be back tomorrow with another project. Until then, happy stampin'!


Stampin' Up! Supplies Used:

Table built using Product Table Builder by The Crafty Owl - Independent Stampin' Up! Demonstrator.

Beauty Abounds Butterfly Pop Up Birthday Card for PP440

by Joanne James5. May 2019 09:00

Today it's Sunday and time for this week's new challenge over at The Paper Players! It's the turn of the fabulous Jaydee to host this week and she has a fun theme challenge for you to work with:


Cards for friends are the best kind to make and I had a few different cards made that fitted this theme, but decided to share a special card that I made for one of my best friends who is celebrating a milestone birthday next month. This card is also perfect for the #SUOC222 celebratory theme over at SUO Challenges this week. My card is is bright, sparkly and features one of her favourite things - butterflies. First of all, here's the outside:


A selection of butterflies, loosely watercoloured in Melon Mambo and Lovely Lipstick and painted with Wink of Stella, along with the bokeh stamp from the Beauty Abounds stamp set, were flicked with ink and white shimmer paint, along with a liberal sprinkle of white metallic sequins form the basis for the background to my extra-large cardfront (it measure 15cm x 21cm) which provide a colourful background for my focal sentiment, which I accented with some layered diecut butterflies cut using pieces of the main large die in the Butterfly Beauty Thinlits set.

The Beauty Abounds stampset has such great sentiments for friendship cards; this one is completed on the inside of my card along with a fun pop-up surprise:


My simple pop-up includes the whole of the large butterfly thinlit, layered in black over Lovely Lipstick foil (ssaved from Sale-A-Bration). Difficult to photograph well, but it's really impressive in real life and I know my friend will love it! I added the second part of the sentiment; ours is indeed a friendship over many years, that started with the birth of our first babies but has grown in to something much more - it is not that one thing but a million little things that keep it going as the years go by.  I included some sparkly numbers (there comes a time when a milestone birthday is worth celebrating but does not necessarily need to be seen on the front of the card in my view!) along with a little more decoration and a birthday sentiment from the 'Beautiful Day' set that the watercoloured butterfly on the front also came from. 

Here is the visual summary of the key products used on today's project for you to pin for easy reference:
 

You can see all of my Product and 'How To' summaries on my 'How To - Tips and Techniques' Pinterest board in case you've missed any. 

Before you reach for your ink and papers, check out what our amazing team has created to inspire you this week:

Here's a quick recap of our challenge rules:
 
1.  Create a new paper project
2.  Upload your creation to your blog with a link back to us and provide a direct link to the post featuring your challenge submission.
3.  Please link your card to no more than four challenges, TOTAL.
4.  Have FUN!

You can see all of my 'How To' summaries on my 'How To - Tips and Techniques' Pinterest board in case you've missed any. 

Enjoy your day; we had a busy day yesterday with sport and a quick shopping trip for new school shoes for the youngest of the James Juniors who seems to be having a major growth spurt this year, (no blog post as I got too engrossed in a movie about Ted Bundy that I was watching last night and struggled to multi-process) so are looking forward to a slightly quieter one today, which will culminate with the final episode of the current season of 'Line of Duty' on TV tonight; any of my UK readers also looking forward to this 'who dunnit?' finale? We are also lucky to have a public holiday here in the UK this weekend, so will be making the most of the extra day tomorrow even though the weather is no great shakes - it's cold and showery and we even had hail yesterday! I'll be back then with another project. Until then, happy stampin'!
 

Stampin' Up! Supplies Used: 

Table built using Product Table Builder by The Crafty Owl - Independent Stampin' Up! Demonstrator.

Butterfly Beauties in Blue For Just Add Ink

by Joanne James30. April 2019 07:00

Today I'm sharing a card for this week's colour challenge over at Just Add Ink:


I've not managed to play along with this lovely group for a couple of weeks but when I saw this week's fabulous bright colour palette I couldn't resist! I decided to go for a bold design to really make the most of all that colour and used my Butterfly Beauty Thinlits Dies for the very first time - take a look:


Here's the low-down on today's card:

A Blended Background - I wanted something with lots of colour for my background but not too much detail so as to detract from the butterflies, so decided to use the two lightest colours and apply them using a sponge dauber in a circular motion until the colours were blended and covered the whole layer. I used Shimmery White cardstock for my base; I find this helps the colours blend better and I also love the subtle shimmer it adds to the card. 

Butterfly Beauties Indeed - I loved these butterflies the moment I saw them and I've had them for months, so I'm not sure why it's taken me so long to get them out of the packet as they really are gorgeous and the star of the show for sure on today's card. I used both of the large dies and layered them together, with a smaller layered butterfly to anchor my sentiment; the set rally is choc-full of butterflies in all shapes and sizes though - lots of creative possibilities. I'm so glad these are carrying over into the main catalogue as it will give me lots more opportunities to play with them. Just a quick reminder that whilst both the Beauty Abounds stamp set and the Butterfly Beauty Thinlits Dies are carrying over, the 10% bundle discount price will not, so if you want to take advantage of that you need to order before the new catalogue goes live on 4th June.

Friendship Abounds - The dies in the Beauty Abounds bundle are rather spectacular, but the stamp set is rather special too: alongside some generic sentiments, it has two great pairs of sentiments that are just perfect for that special friend in you life. The one I used on my card today finishes on the inside with '...out of a whole world of people' (I forgot to take a photo so you'll have to take my word for it!!) How lovely is that?

Here is the visual summary of the key products used on today's project for you to pin for easy reference:


You can see all of my 'How To' summaries on my 'How To - Tips and Techniques' Pinterest board in case you've missed any. 

Enjoy your day. I'm early posting for a change and mine is shaping up to be a busy one. and I'll be back tomorrow with another project. Until then, happy stampin'!


Stampin' Up! Supplies Used:

Table built using Product Table Builder by The Crafty Owl - Independent Stampin' Up! Demonstrator.

Mini Catalogue

BROWSE THE CATALOGUE

The mini catalogue is now live! Read and download your copy here.

Shop Online

Access my online shop 24 x 7, 365 days of the year:

Current March hostess code:

S9F2XJJW

Shop Online

Join My Team

It's always a great time to join Stampin’ Up! New team members can get £130 worth of products for only £99 + free business supplies + free shipping + all the fun being a part of Stampin’ Up! Stampin' Up! has something for everyone: join my growing team and benefit from my support to enjoy Stampin' Up! however you choose.

If you're interested, call me for a chat to understand how I can help you realise your goals. Alternatively, if you have already decided to sign up and you just can't wait, please click here for the link to the online form where you can sign up and order your starter kit right away! 

Latest Kit!

Stampin Cut and Emboss

The Rock Legend Kit has all you need to make 8 cards with coordinating envelopes. Along with the new Panda Friends Kit, both are available from January 4th for just £14 each - get yours here!

2023-24 Annual Catalogue

BROWSE THE CATALOGUE

Click on the catalogue for a full list of current SU! supplies - if you would like to order any of the items featured, please drop me a line at [email protected] or give me a call on 07773 421446 - I'd be happy to help.

New Online Exclusives

There will be new products available exclusively in the online store from 5 March - check them out here.

About Me

Hi I'm Joanne and live in Northampton and when I'm not looking after my husband and two beautiful children, am an avid crafter with a passion for all things Stampin' Up!

I must confess that I have never been a big rubber stamper - until I discovered Stampin' Up! that is. I love the fact that I can get such great results with co-ordinating stamps, inks, papers and punches - the possibilities are endless! Join me on my stamping journey as I share the things I love and be inspired to create amazing things yourself!

Follow Me

Monthly Newsletter

Box Builder

Click the button above to use Box Buster to create your custom box design using the Envelope Punch Board!

Kits Collection Now Available!

Stampin Cut and Emboss

The new Kits Collection from Stampin' Up! is now available!

Click here to see the current kits available and order yours online today.

I Design For


Stampin' Up Stuff

This is my personal blog and is not endorsed by Stampin’ Up! I hope you find it a plentiful source of ideas and personal inspiration but please don't copy my designs for contest submission or use for classes, publication or sale without express permission.