Nothing's Better Than Cookies Card FF103

by Joanne James18. February 2022 09:00

Happy Friday everyone! Today I have my card for the new challenge over at Festive Friday:


The challenge that we are celebrating this week is 'National Peanut Butter Lovers Day' which is on 24th January each year. Remember the fun thing is that at Festive Friday you do not need to actually celebrate the occasion; your goal is to simply use three or more items from the inspiration list on your project. This week I used baked goods, brown and enamel dots for my clean and simple cookie card today - check it out:


Here's the low-down on today's card:

Nothing's Better Than ... - I love the sentiment combinations in the 'Nothing's Better Than' stamp set - I mean, coffee, chocolate, cookies and cocktails!! I'm a tea drinker over coffee, but that would disrupt the 'c's, so I'm good with it! Today's card of course features cookies as my baked goods; the fun thing about the sentiments in this set is that they can be used inside and outside to make fun combinations - this is how I finished the inside of today's card:


... Cookies - I used a simple layered square for the sentiment on the front of my card, backed with a strip of (retired) pink plaid paper, and accented my sentiment with a couple of diecut cookies, complete with crumbs:


A trio of pink enamel dots complete today's card.

Here is the visual summary of the key products used on today's project for you to pin for easy reference:


You can see all of my 'How To' summaries on my 'How To - Tips and Techniques' Pinterest board in case you've missed any. 

How does our board inspire you? I can’t wait to see what YOU create! For more inspiration, be sure to visit the rest of the  Festive Friday Challenge Design team:

Ann Schach
Beth McCullough
Sharon Hashimoto Burkert
Melanie Hungerford
Helen Jennings
Stephanie Lanzalotto
Melva Peters
Jaydee
Diane Evans
Joanne James

Enjoy your day; it's the last day of half-term today however with the impending storm the James Juniors and I shall be battonning down the hatches and spending the day indoors! and I'll be back tomorrow with another project. Until then, happy stampin'!


Stampin' Up! Supplies Used:

Table built using Product Table Builder by The Crafty Owl - Independent Stampin' Up! Demonstrator.


Spirited Snowmen Love Never Melts

by Joanne James26. January 2022 20:56

Today I'm sharing a quick card that I made for a few current challenges:


I saw the badge over at Just Us Girls and that inspiration photo immediately reminded me of the retired stamp set 'Spirited Snowmen' so I dug it out and paired it with the Color Dare challenge colours for a sweet love-filled card:


Stamped, coloured and mounted using my Layered Squares dies, with some added clear Wink of Stella to make that heart shine:


No supplies list today as the stamp set is retired (I also used up some Tempting Turquoise card too!). I'm also linking up with TGIF Challenges and Global Design Project #GDP327 where both are asking for love-themed cards - it's clearly the season!!

Enjoy your evening and I'll be back tomorrow with another project. Until then, happy stampin'!

Hydrangea Hill Mothers Day Card PP532

by Joanne James14. March 2021 09:00

Today it's Sunday and time for this week's new challenge over at The Paper Players! It's my turn to host this week and I have a colour challenge for you to work with:
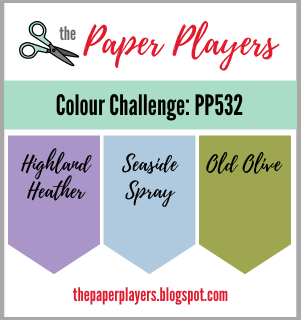
 

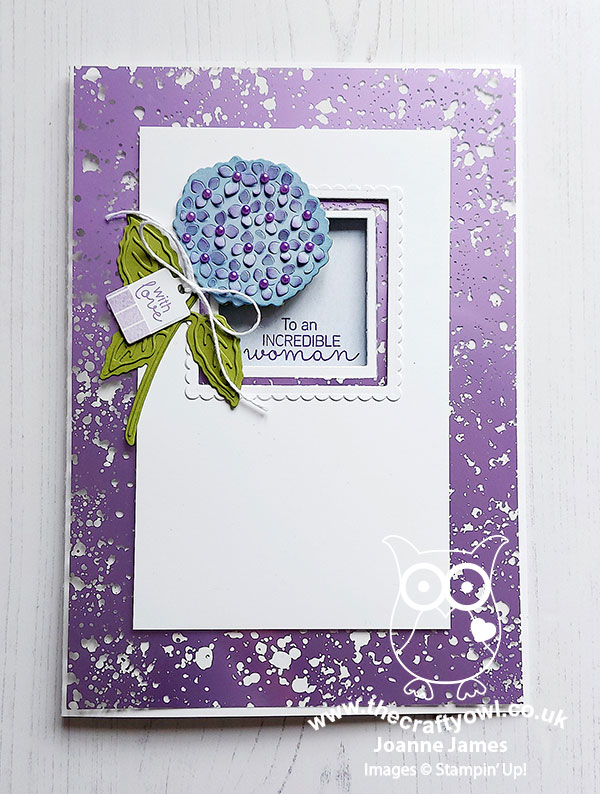
Today is Mothering Sunday or Mother's Day here in the UK and I chose my colour palette this week based on the products I wanted to use on the card that I was going to make for my Mum to celebrate this special day, specifically the Hydrangea Hill Mercury Glass Acetate which I was keen to incorporate into my card. I've lots of photos for you today and two versions of my card too, so get ready! Here's the first and original version of my card:
 

Here's the low-down on today's card:

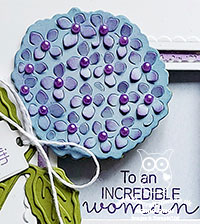
Hydrangea Hill - My Mum is not particularly precious when it comes to flowers or gifts on Mother's Day, but she does appreciate a special card, so her card was the perfect opportunity to showcase the Hydrangea Hill Mercury Glass Acetate in Highland Heather, alongside other elements of the Hydrangea Hill Suite. I love the idea of these coloured foil acetates, but often find them trickier to use in practice. I think they make great frames or backgrounds though, so that's where I started with today's card. Measuring 21cm x 14.9cm (a sheet of folded A4) my card is larger than usual. I created an open window for my stamped sentiment (more on that below) and layered my frame with a scallop-edged border and a beautiful diecut hydrangea. Whilst the card above is my original card, and could actually be used for a special birthday too, I knew my Mum would want to see the words 'Happy Mother's Day' front and centre on her version - ever happy to oblige, I added an additional diecut sentiment in Highland Heather using the Word Wishes Dies to the front of my card:
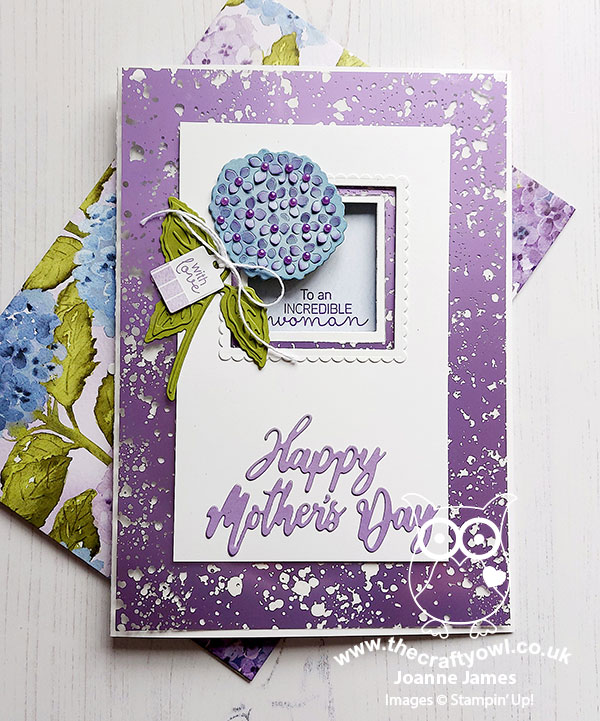
Layers, Layers - Despite its rather simple appearance, there are lots of layers to my card: the mercury glass acetate and framed sentiment window, along with the layered diecut elements to my flower, cut with the Hydrangea Dies. I also added a twine bow and tag to my floral stem using other elements in the set:
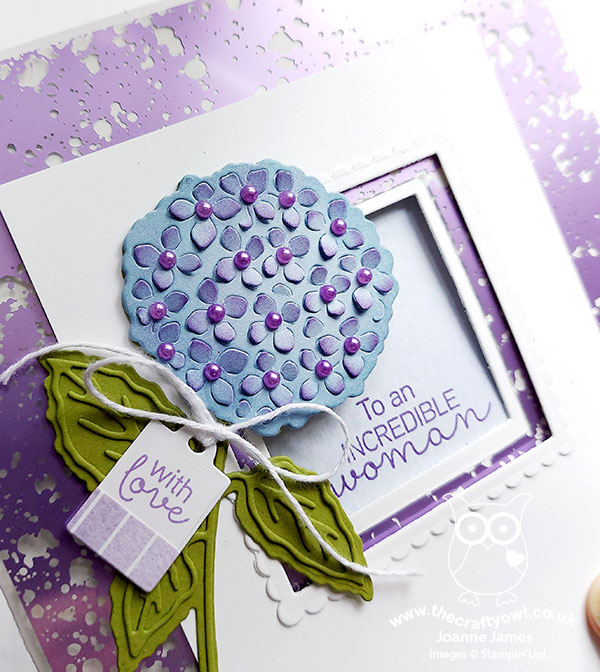
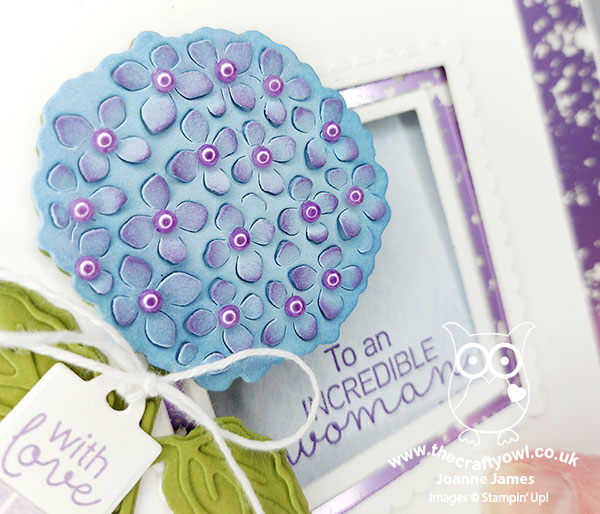
How beautiful is that hydrangea die? I cut it out of Balmy Blue and sponged the edges in the same colour to add depth, then lifted the petal elements and carefully sponged the tips of the petals with Highland Heather to create that two-tone look so often seen with this type of bloom. The suite has some beautiful coordinating pastel pearls, but they were too large for me to decorate the centre of my flowers. Instead, I used my dark Highland Heather Blends marker and coloured some small basic pearl jewels that were just the right size - aren't they so pretty?
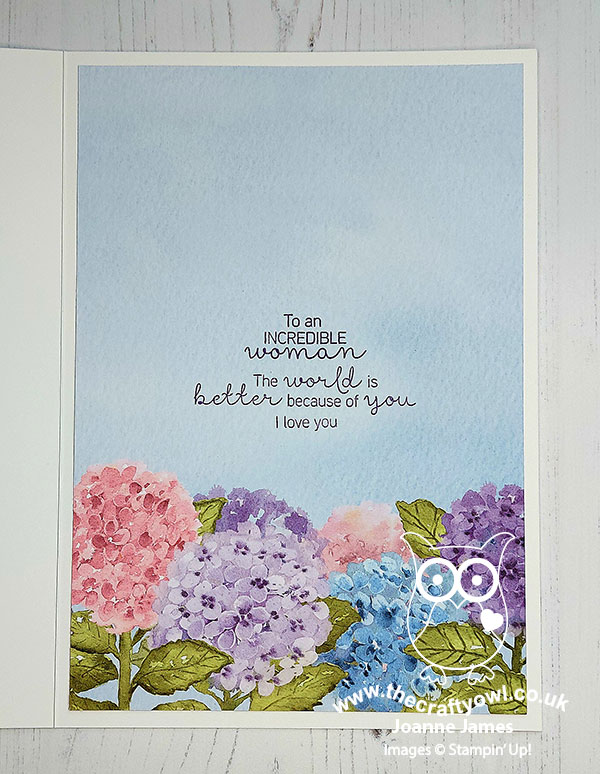
All About The Paper - I couldn't pass up the opportunity to use some of the beautiful Hydrangea Hill papers on my card today. The outside of my card only features the colours of my chosen palette, with a little of the Balmy Blue DSP visible through the window aperture, but the inside of my card also includes a little pink and some Gorgeous Grape on that hydrangea border paper; this paper is so perfect for additional hidden detail on the inside of the card, including my stamped message:
 

I also made a custom envelope from a whole sheet of 12" x 12" DSP, featuring the hydrangea flower heads and with a Highland Heather striped border on the flap:
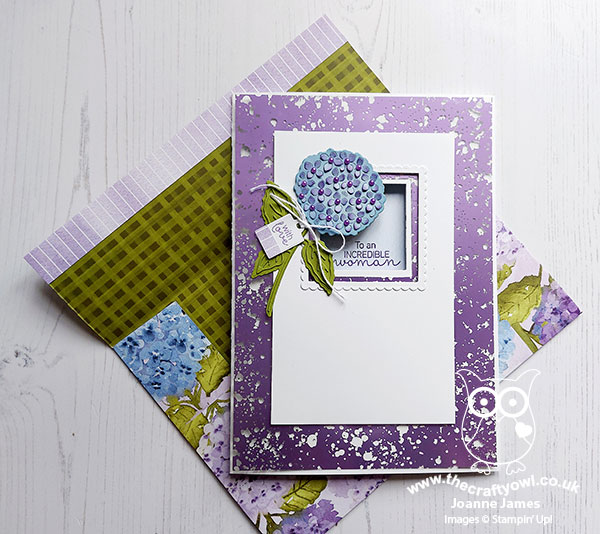
 

This paper is simply too good not to use! I added a simple stitched scalloped rectangle to the front of the envelope to address it:
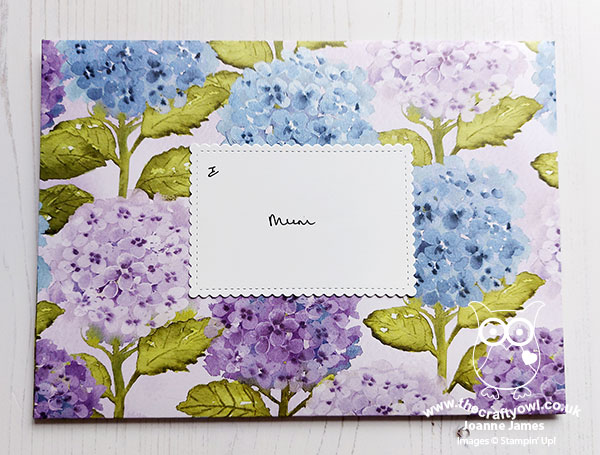
 

My card is going in the mail, so I packed it in a plain white envelope for mailing; I know my Mum will appreciate the extra pretty detail when she opens it though, so the double envelope is so worth it! I haven't seen my Mum in person for 15 months, due to ongoing restrictions in lockdowns and travel between Wales and England, however with the increasing rate of vaccination here in the UK, we shouldn't have too much longer to wait until we can all meet in safety once more.

Here is the visual summary of the key products used on today's project for you to pin for easy reference:
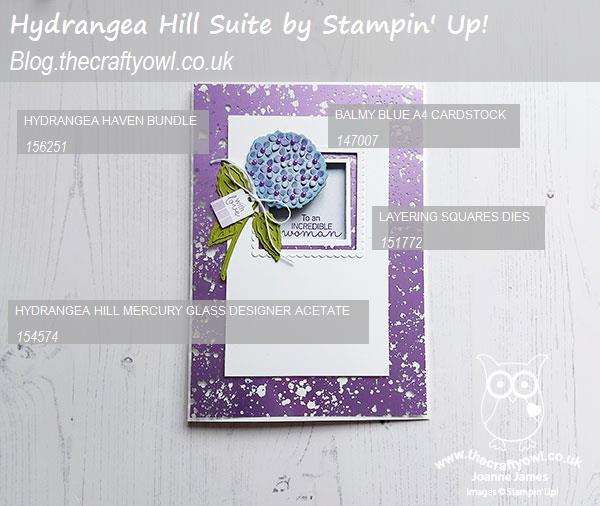
 

You can see all of my Product and 'How To' summaries on my 'How To - Tips and Techniques' Pinterest board in case you've missed any. 

Before you reach for your ink and papers, check out what our amazing team has created to inspire you this week:

Here's a quick recap of our challenge rules:
 
1.  Create a new paper project
2.  Upload your creation to your blog with a link back to us and provide a direct link to the post featuring your challenge submission.
3.  Please link your card to no more than four challenges, TOTAL.
4.  Have FUN!

You can see all of my 'How To' summaries on my 'How To - Tips and Techniques' Pinterest board in case you've missed any. 

I am looking forward to a special lunch cooked for me by my nearest and dearest, along with an afternoon bike ride if the rain holds. This is one of those days of the year that can mean many things to different people, so whether you are with your Mum or your offspring today, or whether you are missing your Mum because of Covid or other reasons, and for those who have perhaps lost a child or for whom motherhood is still to become a longed-for reality, I am thinking of you all and I hope you spend the day in a way that is meaningful to you.

I'll be back tomorrow with another project. Until then, happy stampin'!


Stampin' Up! Supplies Used: 

Table built using Product Table Builder by The Crafty Owl - Independent Stampin' Up! Demonstrator.

Love Hearts Wreath Builder Pastel Valentine PP527

by Joanne James7. February 2021 09:00

Today it's Sunday and time for this week's new challenge over at The Paper Players! It's the turn of the fabulous Anne Marie to host this week and she has a fun theme challenge for you to work with:


I'm not generally into pale colours but I was really drawn to the pastels over at the Color Throwdown challenge this week, and was also inspired by their photo of those old-time Love Hearts sweets to make another Valentine card and create some love hearts of my own - take a look:


Here's the low-down on today's card:

Today's card has no stamping at all! I decided to use a slimline card layout and create a layered square in each of the CTD challenge colours, using one each of a scallop-edged square, stitched square and a diecut heart from the Wreath Builder Die set. Each square is so simple, yet the detail of each of the diecut pieces is what makes this card so pretty:

A quartet of pastels that look good enough to eat! In additon to playing over at Color Throwdown, I'm also linking up over at Just Us Girls where their word this week is 'Valentine'. 

Here is the visual summary of the key products used on today's project for you to pin for easy reference:


You can see all of my Product and 'How To' summaries on my 'How To - Tips and Techniques' Pinterest board in case you've missed any. 

Before you reach for your ink and papers, check out what our amazing team has created to inspire you this week:

Here's a quick recap of our challenge rules:
 
1.  Create a new paper project
2.  Upload your creation to your blog with a link back to us and provide a direct link to the post featuring your challenge submission.
3.  Please link your card to no more than four challenges, TOTAL.
4.  Have FUN!

You can see all of my 'How To' summaries on my 'How To - Tips and Techniques' Pinterest board in case you've missed any. 

Enjoy your day; I've been decorating so am hoping to get a little more done today. Whilst the James Juniors are still hoping for snow, it's looking less and less likely. The arrival of the 'Beast From The East Mark Two' is threatening to push daytime temperatures below zero, so unless there's the opportunity to build a snowman, I'll be staying safely indoors! I'll be back tomorrow with another project using these colours. Until then, happy stampin'!


Stampin' Up! Supplies Used: 

Table built using Product Table Builder by The Crafty Owl - Independent Stampin' Up! Demonstrator.


Ornate Style Friendship Card PP486

by Joanne James12. April 2020 09:00

Happy Easter Sunday wishes everyone! As it's Sunday and time for this week's new challenge over at The Paper Players! It's the turn of the fabulous Jaydee to host this week and she has a beautiful colour challenge for us to work with:


I used Jacquie's sketch over at Freshly Made Sketches as the basis for my card today (I used a Layered Square Die instead of a diamond, turning it onto it's point) which showcases the main floral stamp from the Ornate Garden Suite pre-release - take a look:


Here's the low-down on today's card:

Ornate Style - The Ornate Style stamp set is one of two that feature in the Ornate Garden Suite that is on early pre-release from the new 2020-21 Stampin' Up! catalogue; you can read more about the whole suite in my earlier post here if you missed it. I used the main floral stamp in the Ornate Style stamp set as the focal point for my card. I heat embossed the image in silver onto Whisper White cardstock and coloured it with my Seaside Spray, So Saffron and Smoky Slate Blends. I added the single flower stem from the same set to the inside of my card:

I haven't added a sentiment yet; I might turn this into a birthday card, as I have lots of them coming up, but for the time being I've left it black until I've decided.

Something Blue - I used Seaside Spray as the main colour on my card today: for my base, a layer of in-colour DSP inside my aperture and a trio of faceted enamel dots. I've used this same colour combination before on these projects, where I used So Saffron as the main colour. Which one do you prefer? Feel free to leave me a comment below, I'd love to hear your thoughts.

Ornate Thanks - I finished my card with a heat embossed sentiment from another of the stamp sets in the Ornate Garden Suite, called Ornate Thanks. This is a great set with lots of sentiment combinations and I particularly like the style of the handwritten font.

Here is the visual summary of the key products used on today's project for you to pin for easy reference:


You can see all of my Product and 'How To' summaries on my 'How To - Tips and Techniques' Pinterest board in case you've missed any. 

Before you reach for your ink and papers, check out what our amazing team has created to inspire you this week:

Here's a quick recap of our challenge rules:
 
1.  Create a new paper project
2.  Upload your creation to your blog with a link back to us and provide a direct link to the post featuring your challenge submission.
3.  Please link your card to no more than four challenges, TOTAL.
4.  Have FUN!

You can see all of my 'How To' summaries on my 'How To - Tips and Techniques' Pinterest board in case you've missed any. 

Enjoy your day; we will of course be hunting for Easter eggs today and spending much of the afternoon consuming large quantities of chocolate whilst making the most of our own company - again! Safe safe everyone! I'll be back tomorrow with another project. Until then, happy stampin'!


Stampin' Up! Supplies Used: 

Table built using Product Table Builder by The Crafty Owl - Independent Stampin' Up! Demonstrator.

Beautiful Bouquet One Sheet Wonder

by Joanne James11. August 2017 20:00

Friday already - where did the week go?! I've been having fun with my not-so-little ones - and today my youngest James Junior turned 10 years old so now I have two children in double digits - I really don't know where the time goes! We have had a fun day of games, football, dinner out and a trip to the cinema so all in all a lovely end to the week. Following a few absent days, I thought it was time for a quick post to share more of my makes with the Beautiful Bouquet stamp set. I actually used the set to create a one sheet wonder, that I turned into eight cards that I then duplicated for my thank you cards to go out with my customer orders this month. Here's one of the cards in the set:


Here's the low-down on today's card:

Bright Colour Combo - I chose a bright colour combination of hot pink, orange and red with a contrasting touch of blue for my set of cards - the Marina Mist blue is definitely the wild card here, however I think it breaks up the other colours in a good way. Here's the colour combination if you'd like to save it for future use:


Step It Up - I could have simply added my one sheet wonder panels to my card bases, along with a sentiment stamped on a basic square or punched circle, to complete my cards in record time. I decided to step them up slightly with the aid of my Stitched Shape Framelits, Layered Squares and Circles Framelits and some additional stamped flowers that I then diecut with the co-ordinating Bouquet Bunch Framelits. Completion took a little more time for sure, however I think it was worth it - sometimes it's the details that count and really make the difference.

The Wonder Of One Sheet - A one sheet wonder is a fun way to create your own patterned paper and can be a quick solution if you want to create a bunch of cards. I made up my own cut template for this one, with a set of easy cuts to make the most out of my single sheet of A4 cardstock. Here's a shot showing all the cards I made just to give you a flavour off the set:


I used a variety of base and mat colours - the tiny flowers make Beautiful Bouquet a great set to use for a one sheet wonder. Why not give it a try with some of your favourite colour combinations?

Here is the visual summary of the key products used on today's project for you to pin for easy reference:


You can see all of my 'How To' summaries on my 'How To - Tips and Techniques' Pinterest board in case you've missed any. 

I'll be back on Sunday with another project. Until then, happy stampin'!


Stampin' Up! Supplies Used:

Table built using Product Table Builder by The Crafty Owl - Independent Stampin' Up! Demonstrator.

This Little Piggy ... Is So Cute!

by Joanne James28. May 2017 10:00

It's Sunday and time for this week's new challenge over at The Paper Players! The awesomely talented Laurie is the hostess this week and she has a sketch for us to work with:


I love a good sketch and this one was perfect for me to open a new stamp set that I won at Onstage in April but hadn't inked up yet - take a look:


Isn't that little piggy cute?! Here's the low-down on today's card:

This Little Piggy - This fun set of animated pigs in a variety of poses is set to be hugely popular if the 'oohs' and 'aahs' that accompanied Charlotte Harding's demonstration at Onstage are anything to go by. Who doesn't love a pig or know someone who does? The excitement in the room when this set was offered up as a prize patrol was palpable, but that was nothing compared to how I reacted when I won it - I think it's fair to say I gave a piggy squeal of delight! I've used the 'serious' pig on my card today, that can be paired with one of two sentiments. I stamped the image and sentiment separately on my card and completed the sentence inside my card, complete with kisses:


Isn't that sweet? A perfectly fun anniversary card for this week's challenge over at As You See It too - this card is perfect for my hubby!

Lots Of Layers - I took the opportunity to add some layers to my focal image with a mix of stitched shapes and layered squares. On this card I punched my sentiment out with the classic label punch, rather than stamp it directly onto the patterned paper layer as I did on the card below.

Paper Pick 'n' Mix - I'm taking the opportunity to use up my retiring papers so this card features some polka dots from the Brights stack as well as some Pop of Pink DSP for the horizontal band. I also created a second card using the Playful Palette DSP stack papers with an alternative sentiment pairing - take a look:


And here's the inside:


Here is the visual summary of the key products used on today's project for you to pin for easy reference:


Here's the details for my second card:


You can see all of my Product and 'How To' summaries on my 'How To - Tips and Techniques' Pinterest board in case you've missed any. 

Before you reach for your ink and papers, check out what our amazing team has created to inspire you this week:

The Paper Players Design Team
 
 
Here's a quick recap of our challenge rules:
 
1.  Create a new paper project
2.  Upload your creation to your blog with a link back to us and provide a direct link to the post featuring your challenge submission.
3.  Please link your card to no more than four challenges, TOTAL.
4.  Have FUN! 


I look forward to seeing what you create with our sketch this week. Do leave me a comment and let me know which of these little pigs you prefer and if they are on your wishlist too! Enjoy the rest of your weekend - we have a Bank Holiday on Monday so an extra long one, which is great. I am hoping for a continuation of this lovely weather and another BBQ, possibly followed by a bike ride. I'll be back tomorrow with another project; until then, happy stampin'!


Stampin' Up! Supplies Used:

Table built using Product Table Builder by The Crafty Owl - Independent Stampin' Up! Demonstrator.

Fall Treats With The Halloween Night Suite

by Joanne James18. September 2016 10:00

It's Sunday and time for a new challenge over at The Paper Players! It's the turn of the lovely Laurie to host this week and she has a great clean and simple theme for you to work with:

    ppa-318-sep15

I toyed with some time about my card this week: pumpkins, apples, acorns - what to choose? I browsed through my new goodies and when I happened across this pumpkin patterned DSP hidden away in the Halloween Night Specialty pack, I knew what I wanted to do. I also used this week's sketch over at Pals Paper Arts for my layout today. Here's what I came up with:


Here's the low-down on today's card:

Not Just for Halloween - Whilst many of the papers in the Halloween Night Specialty Designer Series Paper Pack are overtly Halloween-inspired, this pattern of watercoloured pumpkins can also be used on more general Fall projects, as can the spotted paper I used for my banner and the stripes and checked patterns in the pack. This paper became the starting point for my card.

Spooky Pumpkin Fun - My layered square was the perfect place for my sentiment from the 'Spooky Fun' stamp set, along with a popped up trio of pumpkins, coloured with my Pumpkin Pie ink and a blender pen and cut out with the co-ordinating Halloween Scenes Edgelits Dies.

Festive Fall Colours - The colour scheme for today's card comes straight from the Halloween Night DSP: the warm orange tones of Pumpkin Pie, contrasted with Basic Black, Whisper White and Smoky Slate. More Halloween than Fall granted, but by emphasising the warmth of the orange, I think it works. Feel free to save this colour combination if it's one you'd like to try:

Here is the visual summary of the key products used on today's project for you to pin for easy reference:


You can see all of my 'How To' summaries on my 'How To - Tips and Techniques' Pinterest board in case you've missed any. 

Before you reach for your ink and papers, check out what our amazing team has created to inspire you this week:

The Paper Players Design Team
 
 
Here's a quick recap of our challenge rules:
 
1.  Create a new paper project
2.  Upload your creation to your blog with a link back to us and provide a direct link to the post featuring your challenge submission.
3.  Please link your card to no more than four challenges, TOTAL.
4.  Have FUN! 


I look forward to seeing what you create with this week's CAS challenge. We have a day of sport and birthday parties today - we are most certainly back into the swing of things as far as the new school term is concerned!

Back tomorrow with another project; until then, happy stampin'!


Stampin' Up! Supplies Used:

Table built using Product Table Builder by The Crafty Owl - Independent Stampin' Up! Demonstrator.

Playful Palette Square Birthday Card

by Joanne James11. August 2016 08:05

Today it's time for a new challenge over at Create With Connie and Mary and this week we have a sketch for you:


For my card today I decided to stick with a square card and to make a big splash of colour with the Playful Palette Suite - take a look:


Here's the low-down on today's card:

Painter's Palette - I created a little easel as the focal point for today's card, with a fun sentiment and paint splatters from the Painter's Palette stamp set. I stamped the frame to the easel twice and cut out the inside of the second one with my Layered Squares Framelits so that I could create a raised frame with added dimension. I also added some tone-on-tone splatter to my card base to tie in with the 

Playful Palette - The papers in the Playful Palette DSP stack are full of bright colours and patterns. I chose a variety of paint-splattered papers for my background panels - all so clashing that they look oddly co-ordinated! 

Ribbon and Glimmer - I added some Peekaboo Peach and Flirty Flamingo ruched ribbons to my card, along with a strip of retired black glimmer paper that was lying in my scrap box. You could of course colour some silver glimmer with black ink if you don't have any black to hand.

A fun card that would work for a male or female - a great standby card for those last-minute birthdays!

Here is the visual summary of the key products used on today's project for you to pin for easy reference:


You can see all of my 'How To' summaries on my 'How To - Tips and Techniques' Pinterest board in case you've missed any. 

Do visit the other Design Team members to see what they did with this week's sketch; there's lots of inspiration over on their blogs too!

Enjoy your day - we are celebrating a birthday in the house today, with young Benjamin reaching the ripe old age of 9 (where did that time go?!) so we will be having a fun day. I'll be back tomorrow with another project; until then, happy stampin'!


Stampin' Up! Supplies Used:

Table built using Product Table Builder by The Crafty Owl - Independent Stampin' Up! Demonstrator.

Current Promotions

Stampin Cut and Emboss

Save up to 30% off on all your favourite kits from 1 to 31 October! 

Click here to see the current kits available and order yours online today.

Join My Team

It's always a great time to join Stampin’ Up! During October you can get even more in your starter kit! New team members can get £160 worth of products for only £99 + free business supplies + free shipping + all the fun being a part of Stampin’ Up! Stampin' Up! has something for everyone: join my growing team and benefit from my support to enjoy Stampin' Up! however you choose.

If you're interested, call me for a chat to understand how I can help you realise your goals. Alternatively, if you have already decided to sign up and you just can't wait, please click here for the link to the online form where you can sign up and order your starter kit right away! 

Shop Online

Access my online shop 24 x 7, 365 days of the year:

Current October hostess code:

4XPEYCB9

Shop Online

Scrapbooking

Stampin' Up! has introduced a new range of 12x12" scrapbooking product and kit - the full range is now available to purchase online. To download a copy of the new digital Scrapbooking Catalogue click here.

Mini Catalogue

BROWSE THE CATALOGUE

'Tis The Season - the new Stampin' Up! Mini Catalogue is here! For more details and to download your copy click here

2024-25 Annual Catalogue

BROWSE THE CATALOGUE

Click on the image to download your copy of the 2024-25 annual catalogue. For a full list of current SU! supplies, go to my online store. If you would like any help or advice, please drop me a line at joanne@thecraftyowl.co.uk or give me a call on 07773 421446 - I'd be happy to help.

Latest Kits!

Stampin Cut and Emboss

The Christmas Ornaments Kit and Card Keeper Kit are the latest kits in the online store - get yours here!

New Online Exclusives

There are new products available exclusively in the online store from 5 November - check them out here.

About Me

Hi I'm Joanne and live in Northampton and when I'm not looking after my husband and two beautiful children, am an avid crafter with a passion for all things Stampin' Up!

I must confess that I have never been a big rubber stamper - until I discovered Stampin' Up! that is. I love the fact that I can get such great results with co-ordinating stamps, inks, papers and punches - the possibilities are endless! Join me on my stamping journey as I share the things I love and be inspired to create amazing things yourself!

Follow Me

Monthly Newsletter

Box Builder

Click the button above to use Box Buster to create your custom box design using the Envelope Punch Board!

Kits Collection Now Available!

Stampin Cut and Emboss

The new Kits Collection from Stampin' Up! is now available!

Click here to see the current kits available and order yours online today.

I Design For


Stampin' Up Stuff

This is my personal blog and is not endorsed by Stampin’ Up! I hope you find it a plentiful source of ideas and personal inspiration but please don't copy my designs for contest submission or use for classes, publication or sale without express permission.